|
(Review first posted 1/22/2000) |
 |
|
2.3 megapixel CCD, 1792x1200 file size |
|
|
3x optical zoom lens | |
|
|
Internal and SmartMedia memory | |
|
|
External flash sync option | |
|
|
Protective LCD and lens covers |
EZ Print Link
Readers have requested free-formatted versions of our reviews (without the graphical
accouterments of our page design), to make printing easier. We are accommodating
this request with special copies of each review, formatted to allow the text
flow to be dictated by the browser window. Click here
for a print-optimized page. ![]()
Manufacturer Overview
Thus far, Ricoh has been one of the lesser-known players in digital photography,
although their cameras have consistently shown innovative features and excellent
price/performance value. With the RDC-5300, Ricoh has moved more strongly into
the higher-end 2 megapixel territory, updating their previous RDC-5000 through
a series of (mostly internal) improvements. Also, while selling prices obviously
change over time, the current (January, 2000) street price of the RDC-5300 seems
to position it at a very favorable price point relative to other 2 megapixel
cameras on the market, particularly when you consider the 3x optical zoom lens
in the bargain.![]()
Highlights
- 2.3 megapixel CCD delivering up to 1792 x 1200 pixel images.

- 1.8 inch TFT active matrix LCD monitor.
- 8 to 24mm 3x zoom lens (equivalent to 38 to 114mm on a 35mm camera).
- Aperture range of f/3.2-3.7 to f/15.0 -17.2.
- 2.5x Digital Telephoto feature.
- "Super Macro" shooting mode
- White balance with five modes (Auto, Daylight, Cloudy, Fluorescent, Tungsten).
- Shutter speed from one to 1/500 seconds.
- Exposure compensation from -2 to +2 in 0.5 EV increments.
- Built-in flash with four modes (Off, Auto, Forced, Slow Synchro).
- External flash sync.
- Black & white and sepia modes.
- Image capture in JPEG (EXIF Ver. 2.1) format.
- USB and standard serial cables.
![]()
Executive Overview
The RDC-5300 offers a compact body with a nice array of features. Its lightweight,
plastic body makes it convenient to carry and the automatic, protective lens
and LCD covers keep you from worrying about scratches and smudges when you tuck
it in your pocket. Add the accompanying soft carrying case and you're ready
to hit the road, trail or most anything else. We liked the provision of 8MB
of internal camera memory, perfect for those moments when you need just a few
more shots than will fit on your (optional) SmartMedia card.![]()
Overall, the camera is very capable, with a range of features surprising for
a product at its relatively low selling price. One of our few functional complaints
has to do with the optical viewfinder, the lower left-hand corner of which is
obscured in wide angle mode by the camera lens. This won't be much of an issue
when using the LCD monitor, but could get annoying when you're trying to save
power by using the optical viewfinder. The 1.8 inch TFT color LCD monitor displays
all the camera setting information on top of the image when in use. As we mentioned
earlier, the mechanically-operated protective cover helps avoid the always-present
smudges, and provides excellent protection when carrying the camera.![]()
The 8 to 24mm, 3x zoom lens (equivalent to a 38 to 114mm lens on a 35mm camera)
offers a focus range from approximately 1.6 inches (4.0cm) to infinity. Normal
macro photography allows you to get as close as 15.8 inches (40cm) to the subject,
while "Super Macro" mode gets you as close as 1.6 inches (4.0 cm),
but only in wide-angle mode. The five focusing options are: Manual, Auto, Super
Macro, 2.5m and Infinity. The manual focus option lets you cover the lens' normal
(non super-macro) range via the toggle control that normally operates the zoom
lens. The 2.5m and Infinity settings set focus at each distance for quick shooting
of nearby or far away subjects. (Eliminating the delay for the autofocus system
to operate.) A 2.5x digital zoom function expands the RDC-5300's zooming functions,
but as always with this feature, at the expense of image quality.![]()
Exposure control on the RDC-5300 is for the most part automatic, but you have
some influence over variables like flash mode, exposure compensation (EV), white
balance, etc. There are a couple of special modes to help you deal with unusual
situations. For example, the Slow Shutter mode utilizes slower shutter speeds
for night photography and backlit subjects, while time-lapse allows you to take
pictures at predetermined intervals for as long as the SmartMedia or internal
memory allows. Soft mode gives the entire image a soft focus and the Quick Shooting
mode lets you capture multiple images with one press of the shutter button at
approximately one frame per second (depending somewhat on the subject). There's
also a Text mode that more accurately captures printed data. The self-timer
counts down from 10 seconds, and an LED flashes for the first eight seconds
and then lights solid for the remaining two on the front of the camera. Additionally,
a monochrome exposure mode captures images in either black and white or sepia
tones.![]()
The built-in flash offers Off, Auto, Forced and Slow Synchro modes. The Off
setting simply means that the flash never fires while Auto lets the camera determine
when to use the flash. Forced means that the flash always fires, regardless
of lighting conditions and Slow Synchro is used for night scenes and backlit
subjects, using a slow shutter speed to allow more of the ambient light into
the picture. The usable flash range extends from about 1.6 inches to 10 feet
(4.0cm to 3.0m) in telephoto and from 1.6 inches to 11.3 feet (4.0cm to 3.4m)
in wide angle, although we don't recommend the flash for macro work, since it
can't provide even illumination that close. Interestingly, the RDC-5300 offers
a separate Red-Eye Reduction mode instead of the usual single flash setting,
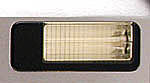
allowing all three active flash modes to utilize the feature. An external flash
sync on the side of the camera gives you the option of using a more powerful
flash, but you'll need to keep careful track of the tiny cap that protects the
socket. (We almost lost this cap a couple of times with our evaluation unit!)![]()
Exposure compensation lets you alter the exposure chosen by the camera by -2
to +2 EV in 0.5 EV increments. (An EV unit is equivalent to a one f-stop change,
for the old-timers out there like us.) An Auto Bracket shooting mode takes three
images in rapid succession, each with different EV settings so you just shoot
while the subject is available, and pick the best shot later. Five white balance
modes (Auto, Daylight, Cloudy, Fluorescent and Tungsten) let you work under
varying lighting conditions.![]()
The RDC-5300's playback options include a six image thumbnail display, playback
zoom and slide show functions. Deleting images requires you to switch modes
on the mode dial rather than just choosing a delete option from the settings
menu. An included NTSC (PAL for European models) output allows you to play back
images on a television set or record them to video tape.![]()
The included RS-232C serial, USB and Macintosh serial cables allow you to download
captured images to a PC or Macintosh (Windows 95, 98, NT 4.0 and Mac OS 7.6
and higher). We liked the extensive software offerings, which provide Internet
utilities, whimsical manipulation tools, storage and organization, mosaic creations,
printing options and correction tools (PhotoStudio, PhotoFantasy, PhotoBase,
PhotoMontage, PhotoPrinter and PhotoIsland.com).![]()
The RDC-5300 runs from four AA alkaline, NiCd or NiMH batteries. An AC adapter
is included with the camera and recommended for conserving batteries when playing
back images or downloading them. This camera is a bit higher than average on
power consumption with an estimated 60 minutes of recording time for AA NiMH
rechargeables. (No change here in our standard recommendation of buying a couple
of sets of high-capacity NiMH batteries and a good-quality charger.)![]()
In the end, the RDC-5300 makes a perfect companion for vacations and family
gatherings or other on-the-go applications. It appears to be rugged and durable,
built to withstand heavy use, and better-protected than most digicams against
dust, dirt, and scratches. The Time-Lapse, Soft focus, Slow Shutter and Monochrome
modes give you room to get creative without too much finessing of exposure settings.
Plus, the extra 8MB of internal memory gives you a little extra breathing room.
(You'll almost certainly want to budget to buy an extra SmartMedia memory card
though, as the internal memory gets filled up pretty fast.)![]()
Design
The RDC-5300 has a small, lightweight body that's highly pocketable. With the
protective LCD and lens covers that slide in and out of place, you won't worry
about scratching those delicate areas when tossing the camera into a coat pocket
or purse. The RDC-5300 weighs in at 12 ounces (350g) with dimensions of 5.17
x 2.71 x 2.13 inches (131.1 x 68.8 x 54.0mm).![]()
![]()
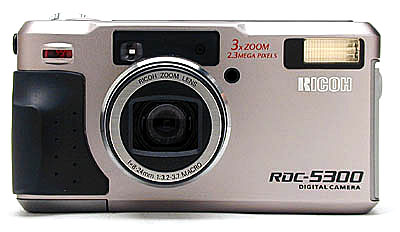
The front of the camera features the lens, built-in flash, viewfinder, flash
and remote control sensors and the self-timer LED. It's relatively smooth, with
the exception of the lens and hand grip that protrude slightly. As we previously
mentioned, the lens has a protective shutter that snaps open when the camera
is turned on, eliminating the nuisance of a separate lens cap.![]()

![]()
The back of the RDC-5300 holds the optical viewfinder, mode dial, power switch
and camera controls, in addition to the LCD monitor. The protective LCD cover
keeps it from gathering too many unnecessary smudges. There's also a small thumb
grip on the back right side, giving you a firm hold on the camera.![]()

![]()
On the top of the camera are the small status display panel, more controls and
the shutter button. The status display panel gives camera setting information
when the camera is running, useful for conserving power by keeping the LCD monitor
off.![]()
![]()
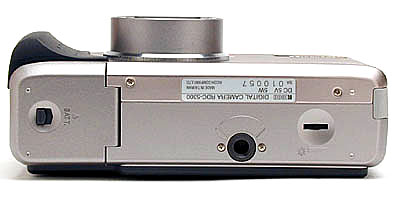
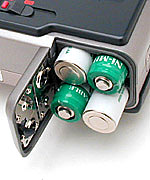
The threaded tripod mount and battery compartment live on the bottom of the
camera, the latter featuring a locking cover that snaps securely into place.
Interestingly, an LCD brightness control dial is also on the bottom of the camera,
a function more usually controlled through the setup menu. The battery compartment
cover is far enough from the tripod socket that you may (depending on the design
of your tripod head) be able to change batteries without unmounting the camera,
a feature we like.![]()
![]()
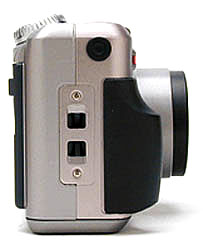
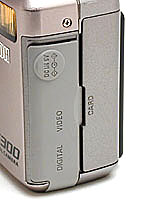
The shutter button side of the camera merely features the wrist strap eyelet
and the external flash sync, protected by a small plastic cap. Careful with
this cap, though, as it's not attached to the camera and can be easily lost.![]()
![]()
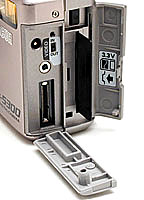
The SmartMedia and I/O jacks live on the opposite side of the camera. The jacks
are protected by a rubber flap that snaps in and out of place. Alternatively,
the SmartMedia slot is covered by a hinged plastic door, that clicks in. A red
LED inside the slot notifies you when the card is in use, warning you not to
remove it until the camera is done writing to it.![]()
Viewfinder
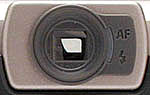
The RDC-5300 offers both a "real image" optical viewfinder and an
LCD monitor for composing images. The optical viewfinder mimics the zoom action
of the lens. However, when it is at the wide angle end, the top edge of the
lens is visible through the viewfinder. A red and green LED beside the optical
viewfinder clues you in to the status of the focus and the flash.![]()
The 1.8 inch TFT active matrix system LCD monitor (approximately 110,000 pixels)
turns on automatically when the camera is powered up (a setting which can be
disabled). Like the small status display panel on top of the camera, some settings
information is displayed in the LCD monitor. To see just the viewfinder image
without the information overlay, press the Enter button beneath the display.
To turn the LCD on or off altogether, press the Display button.![]()
The RDC-5300's viewfinder systems are a bit more accurate than average, with
the optical viewfinder showing 86.5 to 88.5 percent of the final image area
at wide angle and telephoto respectively. The LCD viewfinder ranges from 98.5
to 97.3 percent over the same focal length range. In digital telephoto mode,
the LCD screen displays "crop marks" on it, showing the portion of
the image that will be visible in the final file. We found this a bit less convenient
that the usual practice of enlarging the image on the viewfinder, although it
does provide more "context" to see what's going on just outside the
field of view. In our tests, the crop marks show just a bit more of the subject
that appears in the final image, resulting in an accuracy figure of about 110%.![]()
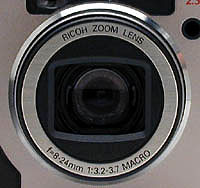
Optics
An 8 to 24mm, 3x zoom lens comes on the RDC-5300, the equivalent of a 38 to
114mm lens on a 35mm camera. Focus range extends from approximately 1.6 inches
(4.0cm) to infinity. Macro photography allows you to get as close as 15.8 inches
(40cm) to the subject at any focal length, while a Super Macro mode gets down
to the 1.6 inch (4 cm) minimum distance, but only with the lens set to its widest
angle position. Aperture range is from f/3.2-3.7 (wide angle to telephoto) to
f/15.0-17.2.![]()
In addition to autofocus, the RDC-5300 offers Manual, 2.5m, Infinity and Super
Macro options. Accessed via the settings menu in record mode, manual focus is
controlled by the up and down arrow buttons that normally operate the zoom mechanism.
As noted above, the Super Macro setting gets you in to a minimum shooting distance
of just 1.6 inches (4 cm), but in wide angle mode only. Macro performance is
very good though, with a minimum capture area of only 1.03 x 1.53 inches (26
x 39mm). The 2.5m and Infinity settings set focus at each distance for quick
focusing or far away subjects.![]()
The 2.5x digital zoom function goes into effect when you press the up arrow
button for two seconds after reaching the furthest end of the optical telephoto
range. Once the digital zoom is enabled, a frame appears on the LCD monitor,
showing the full scope of the digital zoom. Note that the digital zoom option
is only enabled when the LCD screen is active.![]()
Like many digicams we've tested, the RDC-5300 seems to "prefer" certain
lens focal lengths: Although the zoom mechanism traverses its range in a fairly
smooth fashion, it seems to want to stop moving only at a certain focal lengths,
splitting the zoom range into eight or nine discrete steps. This isn't a huge
issue, but it could be annoying if you were restricted as to camera position
and needed precise framing. (In normal shooting, most people won't need to frame
as precisely as we're talking about here and even then, could usually just move
in or out a little to adjust.)![]()
The RDC-5300's lens appears to be of fairly high optical quality, as it shows
virtually no chromatic aberration (we estimated this at roughly 0.25 pixels,
worst case), and no coma at all. It does have some geometric distortion though,
which we measured as 0.6% barrel distortion in wide angle mode, and 0.4% pincushion
at the telephoto end. The Super Macro mode appears to introduce more barrel
distortion, although we didn't measure it explicitly.![]()
Exposure
We experienced good overall exposure control on the RDC-5300. While you can't
control aperture or shutter speed directly on this camera, you do have a variety
of shooting modes available for special situations. The default automatic mode
gives you control over flash mode, exposure compensation (EV) and a few other
features. We were particularly pleased with the ability to save various camera
settings with the Keep Settings option. This feature allows you to save flash,
record mode, date imprint, card, focus, soft mode, exposure compensation (EV),
white balance, language, S mode and auto bracket settings. ISO on the RDC-5300
is rated at approximately 100, and the shutter speed can range from 1.0 to 1/500
of a second.![]()
These specifications should translate into a usable lighting range of roughly
2 to 32,000 foot-candles, or 22 to 350,000 lux. (EV 8 to 22 in our previous
parlance.) Our own low-light tests confirmed the lower end of this range, and
the upper end seems reasonable as well. The low-light performance is reasonably
good, but modest relative to the current (January 2000) top of the market. For
reference, a well-lit urban night scene under typical street lighting corresponds
to a light level of about 1 foot-candle. Thus, the RDC-5300 probably isn't well-suited
for available-light night photography.![]()
Flash
The built-in flash on the RDC-5300 offers four modes to choose from: Off, Auto,
Forced and Slow Synchro. The Off setting simply means that the flash never fires.
Auto means that the camera determines when to use the flash. Forced means that
the flash always fires, regardless of lighting conditions and Slow Synchro is
used for night scenes and backlit subjects (works well with a slow shutter speed).
All four flash modes are accessible by hitting the Flash button on top of the
camera until the desired icon appears on the status display panel. As far as
intensity goes, the flash works from approximately 1.6 inches to 10 feet (4.0cm
to 3.0m) in telephoto and from 1.6 inches to 11.3 feet (4.0cm to 3.4m) in wide
angle. Instead of the normal Red-Eye Reduction setting usually attached to a
single flash mode, the RDC-5300's Red-Eye setting is controlled via the settings
menu. This means it can be activated to work with all three active flash modes.
Our own flash range test supported Ricoh's rating of 11.3 feet, and in fact
the light falloff beyond that point was fairly gradual.![]()
Additionally, an external flash sync on the side of the camera allows you to
work with a more powerful flash, if desired. Using a sync cord instead of a
hot shoe means that you have to hold on to the flash, but it also means you
can place wherever it needs to be. (Third-party flash brackets are readily available
, and should work well.) In our limited testing with an external flash, the
RDC-5300 worked well, but the lack of direct control over aperture and shutter
speed means that you'll have to rely more on your flash to control the exposure
than the camera. This may necessitate a more-capable external flash (one that
can vary its output level more precisely) than typical low-end amateur flash
units.![]()
Exposure Compensation (EV adjustment)
Exposure compensation (EV setting) is adjustable on the RDC-5300 from -2 to
+2 EV in 0.5 EV increments. This setting is quickly changed through the record
settings menu. We dislike having to enter the menu system to make EV adjustments,
but the RDC-5300's user interface design offers a decent tradeoff: You must
initially enter EV-compensation mode via the menu system, but once there you
can adjust the exposure and capture multiple shots without returning to the
menu. Unfortunately though, the EV adjustments are made with the same toggle
control that normally operates the zoom lens, meaning you can't zoom at the
same time as you're making EV adjustments![]()
We liked the Auto Bracket shooting mode, which allows you to take three images
in fairly rapid succession (a little over a second between each), varying the
exposure by 0.5 EV between shots. (It takes shots at -0.5EV, 0, and +0.5EV.)
This is a great feature for finding the right setting as you can easily delete
the least favorable ones after the fact.(Handy to just need your subject to
smile and pose once, rather than constantly having to ask "Just one more.")![]()
White Balance
Five white balance modes give you the flexibility to handle different lighting
conditions. (Auto, Daylight, Cloudy, Fluorescent and Tungsten) Auto lets the
camera choose which white balance is best. Daylight balances the whites to match
sunny conditions. Cloudy balances to blue-tinged shady daylight conditions.
Fluorescent and Tungsten simply balance to those types of artificial light.
Ricoh notes that the Auto setting may have trouble balancing monochrome objects
and objects lit by multiple light sources. For these situations, play around
with the different settings to see which one looks best. Another important note
is that the flash is disabled in all white balance modes except for Auto (the
camera actually changes the flash setting to Off).![]()
Self-Timer
The RDC-5300 offers a self-timer function, controlled by a button on top of
the camera. After composing the picture and setting exposure and focus, press
the shutter button all the way to activate the timer. The camera will countdown
from 10 seconds, the self-timer LED flashing for the first eight seconds and
then lighting solid for the remaining two. Once the shutter is released, the
camera beeps. Additionally, Ricoh offers a remote control accessory to perform
this function.![]()
Quick Shooting Mode
The RDC-5300 allows you to take a series of frames continuously at approximately
one frame per second (we measured it at 1.2 seconds between shots in large/fine
mode, and 1.0 seconds in small/economy mode), depending on image information
and file size chosen. Images are initially stored in the camera's internal memory,
decreasing the interval of time between images. Once the series is complete
though, you'll have a fair wait (14 seconds in our tests) while the camera processes
and saves them all to memory. In maximum resolution and fine quality mode, the
camera could capture 3 images before having to write to the card, while in small/economy
mode, we could grab 29 successive images.![]()
Text Mode
Text mode allows you to record text clearly, the camera making the blacks in
the image as dark as possible. This feature would be very useful for copying
important family documents, etc.![]()
Monochrome Mode
For special effects, the RDC-5300 offers a Monochrome mode, accessible through
the record settings menu. Monochrome captures images in either sepia tones or
black and white, giving you some creative options.![]()
Interval (Time-Lapse) Mode
Through the record settings menu, the RDC-5300 can be set to take pictures automatically
at preset times. Intervals can be set from 30 seconds to three hours, in 30
second increments. The camera will continue to take pictures until the SmartMedia
card is full. Note that the auto power off function will kick in after 24 hours.
(Obviously, you'd need to use the AC adapter to power the camera over that long
an interval!)![]()
Soft Mode
The RDC-5300's Soft mode produces softer-looking images, as its name suggests.
So why would you want softer images? What is most likely happening in Soft mode
is that the camera is just not applying the post-capture image sharpening that
it normally does. This is useful if you want to apply custom sharpening of your
own, in an image-manipulation program. In our experience, we can almost always
"beat" the in-camera sharpening by using the unsharp masking function
in Photoshop(tm), and this proved to be the case with the RDC-5300 as well.
You clearly don't want to exert the effort to do this for every image, but it's
useful to be able to do it for important shots.![]()
S Mode (Actually ISO speed boost)
Ricoh doesn't explicitly call attention to the 5300's "S Mode" as
an ISO (light sensitivity) boost option, but it's obvious from their description
that this is what it does. They phrase their description in terms of shutter
speed, saying that S Mode allows you to use a faster shutter speed in low-light
conditions. They also warn that this will be at the cost of increased noise,
another characteristic of ISO-boost options. In our own tests, S mode does in
fact offer shutter speeds about 4x faster than the normal exposure mode, but
doesn't appear to significantly extend the camera's minimum usable light level.![]()
Shutter Lag / Cycle Times
When you press the shutter release on a camera, there's usually a delay before
the shutter actually fires. This time allows the autofocus and autoexposure
mechanisms time to do their work and can amount to a fairly long delay in some
situations. Since this number is almost never reported on, and can significantly
affect the picture taking experience, we now routinely measure it using an electronic
test setup accurate to 0.01 seconds. We also measure a camera's speed from shot
to shot, a parameter we refer to as cycle time.![]()
Overall, the RDC-5300 is somewhat slower than most cameras we've tested, with
a shutter lag in normal autofocus mode that varies from 1.4 to 1.7 seconds,
depending on distance to the subject. If we prefocused the lens by half-pressing
the shutter button prior to the actual exposure, or by using the manual focus
option, the lag time dropped to 0.36 seconds. This is much better, but still
slower than many other cameras. (Typical lag times for prefocused exposures
run 0.2 to 0.3 seconds.)![]()
We also found the camera a little slow from shot to shot, albeit not the slowest
we've seen: In high res/fine quality mode, and using normal autofocus, it took
7.7 seconds after the first shot to get the second one off. At low resolution
and "economy" quality, this time dropped to about 3.6 seconds. (If
you're concerned about faster cycle times, be sure to disable the "LCD
Confirmation" setting on the setup menu: We neglected this at first, meaning
that all our cycle time measurements were increased by the 3 seconds the "confirmation"
setting defaulted to!) Continuous capture mode did let us grab three high/fine
shots at roughly 1.2 second intervals though, or up to 29 shots at the 1.0 second
intervals in small/economy mode.![]()
The camera starts up reasonably quickly, capturing the first shot 5.8 seconds
after power-up, and shuts down completely (retracts its lens) in only 1.8 seconds.
It switches from record to playback mode in about 3 seconds, and from playback
back to record (captures the first image) in 2.4 seconds.![]()
Overall, speed isn't one of the RDC-5300's primary virtues, so it probably wouldn't
be your first choice for capturing fast-paced action.![]()
User Interface
The RDC-5300 offers a straightforward, no frills menu system, navigable via
the arrow keys (which we've also referred to as the zoom toggle) and Menu and
Enter buttons. Two handed operation is necessary when scrolling through menus,
as the keys are somewhat spread out. Overall, the controls and dials are well
marked and very responsive. Let's take a look at the controls individually.![]()

Top-Panel LCD Readout
To help save on battery power and speed operation, as well as to provide a ready
camera-status indication, the top-panel black & white LCD readout continuously
displays a number of camera settings. Using this readout and the top-panel controls,
you can set flash mode, image size and quality, self-timer operation, and select
internal or removable memory storage options. This display also shows the number
of shots that can be stored in memory at the current size/quality setting, and
flashes a battery-warning indicator when battery voltage is low.![]()

Shutter Button
Located on the top of the camera, this silver, circular button sets exposure
and focus when halfway pressed and fires the shutter when fully pressed.![]()
![]()
PIC Button
Located on top of the camera, below the status display panel. This button controls
image quality and resolution by switching between six modes. (1800F, 1800N,
1800E, 900F, 900N, 900E: Fine/Normal/Economy, in two different image resolutions
of 1792 x 1200 and 900 x 600)![]()
![]()
Self-Timer Button
Located on top of the camera, just to the left of the PIC button, this button
puts the camera into Self-Timer mode. The self-timer counts down from 10 seconds
once the shutter button is fully pressed. The self-timer setting only applies
to the next picture to be taken: Once the shutter trips, the mode is disabled.
(This prevents you from missing a subsequent shot by leaving the timer on when
you actually want the camera to fire immediately.)![]()
![]()
Flash Button
Located on top of the camera, to the left of the Self-Timer button, this button
cycles through the four flash modes (Off, Auto, Forced and Slow Synchro).![]()
![]()
Card/In Button
Located on the top of the camera, to the left of the Flash button, this button
tells the camera to store images either on the (optional, removable) SmartMedia
card or in the camera's internal memory.![]()
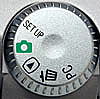
Mode Dial
Located on the top right of the back of the camera, this silver dial features
a notched exterior. The mode dial offers the following camera modes:
- Setup: allows you to make changes to camera settings.
- Record: allows you to capture images and record to SmartMedia or
internal memory.
- Playback: allows you to scroll through captured images.
- Delete: allows you to delete unwanted images.
- PC: allows you to connect the camera to a computer and download images.
![]()
Zoom Rocker Button / Arrow Keys
Located directly beneath the mode dial, this two-way rocker button is marked
with up and down arrows. These buttons are used for multiple functions in the
RDC-5300's user interface:
- In normal capture mode, these buttons control the optical zoom.
- In setup menus, they maneuver through menu options.
- In manual-focus mode, they control the lens focus setting.
- In exposure-compensation mode, they adjust the exposure compensation setting.
![]()
![]()
Power Slide Switch
Located on the very bottom of the back of the camera, this switch turns the
camera on, as well as retracts the protective cover from the LCD. It also triggers
the lens cover to open and the lens to rack out for operation. A tiny red button
in the center of the switch prevents the switch from sliding open on its own.
(We rather liked the simple, purely mechanical operation of this cover, and
the thoughtfulness of including it to shield the LCD screen when the camera
isn't being used.![]()
![]()
Enter Button
Located beneath the LCD monitor, this silver button is marked with the word
'Enter.'
- In the Setup, Record and Playback menus, this button confirms menu selections.
- In Record and Playback modes, this button toggles the information overlay
on the LCD screen.
![]()
![]()
Menu Button
Located beneath the LCD monitor and to the left of the Enter button, this silver
button is marked with the word 'Menu.' In Record and Playback modes, this button
calls up the settings menus.![]()
![]()
Display Button
Located beneath the LCD monitor and to the left of the Menu button, this button
is marked with the word 'Display' in red letters.
- In Record mode, turns the LCD monitor on and off.
- In Playback mode, activates the Multi Image Playback feature, which displays six recorded images on the screen at a time.
![]()

Brightness Adjustment Dial
Located on the very bottom of the camera, this dial controls the LCD brightness.![]()
Camera Modes and Menus
![]()
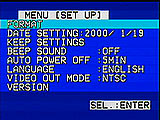
![]() Setup Mode
Setup Mode
Accessed by turning the mode dial to the Setup position, this mode allows you
to change the camera's settings. Entering this mode immediately pulls up the
settings menu with the following options:
- Format: formats the SmartMedia card or internal memory.
- Date Setting: sets the camera date and time.
- Keep Setting: allows you to save various exposure settings such as
white balance, flash, etc.
- Beep Sound: turns the camera beep on and off.
- Auto Power Off: enables the auto power off mode as well as sets the
amount of time before the camera goes to sleep.
- Language: sets the language to Japanese, English, German or French.
- Video Out Mode: sets video format at NTSC or PAL.
- Version: checks the version of the camera firmware.

- LCD Confirmation: sets the amount of time for LCD confirmation of
each image when shot.
- LCD Setting: sets whether or not the LCD monitor is enabled or disabled
when the camera turns on.
- Initialize Setting: resets all camera settings except password and
date/time.
- Password: turns password protection on and off.
- Sequential File Numbering: turns sequential file numbering on and
off.
- Display Power: sets whether or not the Display button controls camera
power.
![]() Record Mode
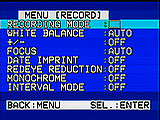
Record Mode
Accessed by turning the mode dial to the Record position (marked by a small
green camera symbol). This mode allows you to capture images and alter various
exposure settings like flash, exposure compensation, white balance, etc. Pressing
the Menu button in this mode brings up the following options:
- Recording Mode: selects between Still, Text and Continuous Shooting
modes.
- White Balance: selects between Auto, Daylight, Cloudy, Fluorescent
and Tungsten white balance settings.
- Exposure Compensation (-/+): sets the exposure compensation from
-2 to +2 in 0.5 EV increments. Puts the camera into EV-adjustment mode. Exit
the mode by pressing the Enter button, which locks-in the exposure adjustment
you've selected. If you like, you may shoot pictures and make further adjustments
without leaving EV-adjustment mode, but you can't operate the zoom lens, since
the zoom toggle is used to control the EV setting. The zoom toggle returns
to normal operation as soon as you lock-in an exposure setting.
- Focus: selects between Auto, Manual, Super Macro, 2.5m and Infinity
focusing options. In manual focus mode, the zoom toggle controls focus distance.
Normal zoom operation is restored only by re-entering the setup menu and disabling
Manual focus mode.
- Date Imprint: turns the date imprint function on and off.
- Red-Eye Reduction: turns on the Red-Eye Reduction mode, which works
with the Auto, Forced and Slow Synchro flash modes.
- Monochrome: turns on the monochrome feature and selects between black
and white and sepia tone shooting modes.
- Interval Mode: accesses the time-lapse photography mode and allows
you to set time intervals.
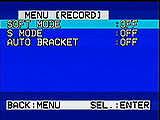
- Soft Mode: activates the soft focus mode, disabling in-camera sharpening.
- S Mode: activates "Sensitive" mode, boosting CCD sensitivity,
allowing shorter shutter speeds under dim lighting.
- Auto Bracket: turns on Auto Bracketing, which shoots three exposures
at different EV values determined by the user.
![]() Playback Mode
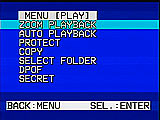
Playback Mode
Accessed by turning the mode dial to the playback symbol, this mode allows you
to scroll through recorded images. Pressing the Menu button in this mode brings
up the following options:
- Zoom Playback: accesses the zoom playback function which allows you
to magnify captured images.
- Auto Playback: plays back all images on the SmartMedia card, one
at a time. The "slide show" cycles continuously until stopped by
pressing the Enter, Menu, or Shutter buttons.
- Protect: allows you to write protect individual images. Write protected
images won't be erased by an "Erase All" operation (see Delete Mode
below), but will be lost if the memory is formatted via the Setup menu.
- Copy: allows you to copy images between the camera's internal memory
and the SmartMedia card. You can copy either all images or selected ones.
The direction of transfer is set by the Card/In button on the camera's top
panel.
- Select Folder: selects which folder to play back.
- DPOF: sets up printing options for specific images.
- Secret: prevents specific files from being displayed on the playback
screen.
![]() Delete Mode
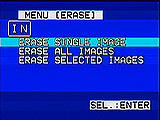
Delete Mode
Accessed by turning the mode dial to the trash can symbol, this mode allows
you to delete individual or all images on the SmartMedia or the camera's internal
memory. Entering the mode immediately pulls up the delete menu with these options:
- Erase Single Frame
- Erase All Images
- Erase Selected Images
![]() PC Mode
PC Mode
Accessed by turning the mode dial to the PC position, this mode allows you to
connect the camera to a computer and download captured images.![]()
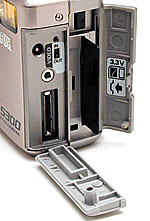 Image Storage
and Interface
Image Storage
and Interface
The RDC-5300 utilizes SmartMedia for image storage as well as the camera's own
internal memory (8MB), depending on how the camera is set. The Card/In button
on top of the camera allows you to quickly switch between storage locations.
SmartMedia cards are available in 2MB, 4MB, 8MB, 16MB, 32MB and 64MB sizes.
Be sure to only use the 3.3v variety, as the early 5v versions won't work and
could damage the camera. (Don't worry about memory voltage unless you've found
an old card in a drawer someplace: All currently-sold SmartMedia cards are the
3.3 volt variety, even though some are labeled simply "3v".![]()
The camera is equipped with 8 MB of internal (non-removable) memory, and doesn't
ship with a SmartMedia card of any sort. Given the high resolution the RDC-5300
is capable of, we don't feel the 8 MB of internal storage is adequate for any
extended use, so you should probably plan on buying an extra memory card when
you get the camera. On the other hand, if the camera's large/normal mode provides
adequate image quality, the 20 shots the internal memory can hold is a reasonably
useful number. We also like the availability of the internal memory as a kind
of "reserve tank" for those times when your SmartMedia card is full
and there's just a few more shots you really need to capture.![]()
When the Sequential File Numbering option is turned on, the RDC-5300 assigns
file names R001 0001 to R999 9999 to captured images. When the function is turned
off (via the Setup menu in Setup mode), the file names RIMG0001 to RIMG9999
are used. Once RIMG9999 is reached, 'File Number Over' is displayed on the status
display panel and a new SmartMedia card should be inserted.![]()
You can write protect an entire SmartMedia card by placing a write protection
sticker over the designated area on the card. This prevents accidental erasure
or overwriting of images. Write protection stickers can only be used once and
must be clean to be effective. You can write protect individual images on the
card through the Playback settings menu. This also protects images from accidental
erasure or overwriting, except in the case of formatting the card.![]()
Formatting a SmartMedia card erases all the previous information on the card
and is controlled through the Playback settings menu. Ricoh recommends formatting
any SmartMedia card that has been used on any other device, to make it compliant
with the RDC-5300.![]()
The RDC-5300 gives you six image quality and resolution combinations to choose
from, with pixel sizes at 1792 x 1200 and 896 x 600 and compression levels at
Fine, Normal and Economy. Following is the image capacity and compression ratios
for an 8MB SmartMedia card:![]()
| Resolution/Quality vs Image Capacity |
|
|
||
|
|
Compression |
|
Compression |
|
| Fine Quality |
|
|
|
|
| Normal Quality |
|
|
|
|
| Economy Quality |
|
|
|
|
![]()
As with other cameras with USB host connections, the RDC-5300 is very quick
transferring files to the computer. (We timed the USB connection, but not the
RS-232 one: Most computers built within the last few years have USB ports, making
the RS-232 capability largely superfluous.) When the camera is plugged into
a Windows '98 machine, it takes the computer about 8 seconds to recognize it
and display it in Windows Explorer. Timing a typical download, 6.65 megabytes
of image data was transferred in 47 seconds, a transfer rate of about 142 Kbytes/second.
This is about typical of camera-PC transfers via USB, but a good factor of five
or more slower than standalone card readers can achieve. We also timed the RDC-5300
copying files between its internal memory and a SmartMedia card, and found that
it was about 30% slower.![]()
Our test unit was a production model, but the software package we received with
it was obviously still beta-stage: The "camera utility" was missing
a file it needed to install, and the host data transfer would only recognize
data on a SmartMedia card, not in the internal memory(!) Obviously, this latter
is a bug, as there'd be no way to download images from the internal memory if
the host connection didn't work. We mention it because we observed it, but can't
imagine Ricoh would let it persist in the production software.![]()
Video Out
US and Japanese versions of the RDC-5300 come with an NTSC video cable for connecting
to a television set and viewing captured images. European models come with a
PAL cable and the camera can be set to either mode. This is a nice feature when
you're traveling between countries, just be sure to purchase the appropriate
accessory cable.![]()
 Power
Power
The RDC-5300 runs on four AA alkaline, NiCd or NiMH batteries. An AC adapter
also comes with the camera, good when reviewing images or downloading to a computer.
Ricoh estimates that with standard AA alkaline batteries, the RDC-5300 will
record for approximately 60 minutes, although they don't say whether this is
with the LCD on or off. Based on our own power-consumption measurements, we'd
have to say it's with the display off, especially given the miserable performance
of alkaline cells under the high current drains imposed by digicams. In our
own tests, we found the '5300 to be a bit power-hungry (although far from the
worst we've seen in this respect), and we'd estimate its operating time with
a good set of NiMH rechargeables as around an hour with the display on, 90-120
minutes with it off. The table below summarizes our power measurements:![]()
Here's how the RDC-5300's actual power consumption measured up:![]()
|
|
|
| Capture Mode, w/LCD |
|
| Capture Mode, no LCD |
|
| Half-pressed shutter w/LCD |
|
| Half-pressed w/o LCD |
|
| Memory Write (transient) |
|
| Flash Recharge (transient) |
|
| Image Playback |
|
![]()
Included Software
The RDC-5300 comes prepared for downloading with a standard RS-232C serial cable,
USB cable and a standard Macintosh cable (AppleTalk). Although the model we
tested didn't come with the actual software, an entertaining CD accompanied
it with a QuickTime movie explaining the major camera features and software
packages.![]()
Ricoh offers six software packages (all from ArcSoft) with the RDC-5300, giving
you a multitude of capabilities. PhotoStudio allows you to download images and
perform minor manipulations and corrections. PhotoFantasy extends those manipulation
capabilities by allowing you to really use your imagination (you can put your
face on Mt. Rushmore or on a magazine cover). PhotoBase is a package that organizes
all your photos and includes email and HTML functions for Internet projects.
PhotoMontage is an impressive feature, allowing you to create giant images made
of thousands of micro images. PhotoPrinter sets up printing options and PhotoIsland.com
lets you post your images in a virtual album on the Internet. All software is
compatible with Windows 95, 98 and NT 4.0 and Macintosh OS 7.6 and up.![]()
Test Results
Test Results coming soon!![]()
Conclusion
With its sturdy design and good physical protection when shut down, the RDC-5300
offers convenient pocketability with carefree operation. Exposure modes like
Time-Lapse, Soft focus, Slow Shutter and Monochrome expand your creative options
without requiring a technical degree. The 8MB of internal memory is enough to
get you started, and makes a handy "reserve tank" for extended trips.
While the camera isn't at the top of any performance category (although it does
have an excellent macro capability), it provides 2-megapixel resolution, good
color rendition, and a solid feature set at an attractive price. A good choice
for people needing two megapixels of resolution (and a true optical zoom lens!)
on a budget.
Do you have a RDC-5300 camera? If you'll post an album of your samples on one of the photo-sharing services and email us at [email protected], we'll list the album here for others to see!
For More Info:
View the data sheet for the RDC-5300![]()
View the test images from the RDC-5300![]()

Follow Imaging Resource: