Ricoh RDC-6000Ricoh's inexpensive 2 megapixel digicam doubles as a USB webcam. (With optional software.)<<Optics :(Previous) | (Next): Shutter Lag & Cycle Time Tests>> Page 6:Exposure & FlashReview First Posted: 1/9/2001 |
Exposure
Exposure control is relatively straightforward on the RDC-6000, as the LCD menu system drives the majority of the exposure functions. The flash mode, self-timer, digital telephoto, ISO, and image quality settings are all accessed through external controls. Most exposure functions are automatically controlled, although the camera does offer an Aperture Priority mode which allows you to select the desired lens aperture setting, from f/2.8 to f/13, while the camera selects the best corresponding shutter speed (which ranges from 1/500 to 1/4 second in still Record mode). Program mode chooses both shutter speed and aperture, but you can change the camera's settings by adjusting Exposure Compensation, ISO, and Flash mode. You also have full control over Recording mode, White Balance, and PIC (image quality and compression) settings.
Exposure compensation is adjusted through the Record settings menu, allowing you to choose from -2 to +2 EV (exposure value) in 0.25 EV steps. Also controlled through the Record menu, the RDC-6000's white balance system offers seven modes: Auto, Daylight, Overcast, Tungsten, Fluorescent, User Define, and W/B Calibration. The first five settings basically match the white balance to an existing light source, however, the User Define and W/B Calibration modes work a little differently. The User Define mode allows you to manually correct the white balance by adjusting the amount of red, blue, and green in the image, using the Cancel and Enter buttons as right and left arrow keys to adjust the levels. Once you've adjusted the white balance, a Save option enables you to keep the adjustment as a preset to call up again later. This is a very interesting option, unlike any we've seen before on other cameras we've tested. The only drawback to it is that the LCD screen gives only a very approximate indication of the color of the final image. Still, with some trial and error, the User Define white balance option could be useful in special lighting conditions. More conventionally, the W/B Calibration mode chooses the white balance based on a white card or paper held in front of the camera lens. The flash is disabled when shooting in the Daylight, Tungsten, Overcast, Fluorescent, User Define, and W/B Calibration modes, and according to the user manual, Auto White Balance may be inaccurate when shooting images with low white values. (That is, images with no pure white areas in them.)
The RDC-6000 also gives you control over the CCD light sensitivity, with ISO 100, 200, or 400 equivalents available through the settings menu. The Self-Timer button on top of the camera activates the camera's Self-Timer mode, which provides a 10-second countdown between a full press of the shutter button and the actual firing of the shutter. During the countdown, the self-timer LED on the front of the camera flashes for the first eight seconds, then lights steadily for the remaining two. Self-timer mode is automatically deactivated after the shutter fires. Ricoh offers an accessory remote control unit, which we did not receive for testing. It works with the camera's Self-Timer mode, as well as with the standard Record and Playback functions. An image confirmation screen appears on the LCD monitor immediately after an image is captured, merely displayimg the image as it is being recorded. There is no option to cancel display of the recorded image, but the display time can be set anywhere from zero to three seconds through the Set menu, which is accessed through the camera's Mode dial.
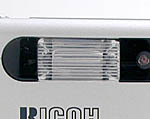 Flash
FlashThe RDC-6000 features a built-in flash with five operating modes, four of which are controlled by the Flash button on top of the camera: Off, Auto, Forced, and Slow Synchro. Off is the default setting, which the camera reverts to each time it is powered off (unless the default is changed through the Set menu). The Auto setting places the camera in control of when to fire the flash, based on the current ambient light conditions. In Forced mode, the camera fires the flash with each exposure, regardless of the existing light level. In Slow Synchro mode, the camera combines the flash with a slow shutter speed to allow more ambient light into the image (thereby avoiding a harsh flash exposure with a dark background). Ricoh notes that when using the flash to illuminate a backlit subject, the subject must be framed in the center of the image or the camera will not recognize the backlighting. The RDC-6000 also features a Red-Eye Reduction mode, which is turned on through the Record menu. (A puzzling set-up, since you would expect this function to be accessed through the Flash button as well.) Red-Eye Reduction applies to all flash modes except for Off. Once Red-Eye Reduction is activated, the camera fires a small pre-flash before the full flash, to avoid red-eye effect. Ricoh estimates that the RDC-6000's flash is effective from 1.0 to 9.9 feet (0.3 to 3.0m).
Text Mode
Activated through the Recording Mode selection of the Record menu (indicated by a small green box with the letter "A" inside, above the Menu button), Text mode sets the camera to record clear images of text. By altering the contrast, black-and-white values are intensified. The built-in flash is unavailable in Text mode.
Quick Shooting Mode
Also controlled through the Recording Mode selection of the Record menu (and indicated by a series of overlapping green boxes), Quick Shooting mode captures a series of consecutive images at approximately one frame per second for as long as the shutter button is held down. Actual cycle times and the total number of consecutive frames vary, depending on the amount of image information to be recorded and SmartMedia space available. The camera saves each image to its own internal buffer memory before saving the entire series to the memory card. As with Text mode, the flash is unavailable. Focus, exposure compensation, and white balance are all locked with the first shot in the series. If the file numbering has reached 9999, the Quick Shooting mode will not work. You can either format the SmartMedia card or insert a new card.
Movie Mode
The RDC-6000 also offers a Movie mode for capturing moving images. The movie camera symbol on the mode dial designates Movie mode, and the amount of available recording time is automatically displayed on the LCD monitor when the Movie mode is activated. Shutter speed remains under automatic control, with shutter speed range od 1/2,000 to 1/30 second. Exposure compensation, focus, and white balance are all automatically controlled as well, and the flash is unavailable. Movies can be recorded at 320 x 240- or 160 x 120-pixel image sizes, with Fine and Normal quality settings available.
Monochrome Mode
The Monochrome menu option records images in black-and-white or sepia monotones. Black-and-white mode works exactly as it indicates, converting the color image to black and white. Sepia mode is also monotone, but records the blacks in warm shades of brown, reminiscent of old photographs.
Interval (Time Lapse) Shooting
Also through the Record menu, you can set the camera to an Interval Mode option to record images at set time periods (time-lapse photography). Time intervals can be set in 30 second increments from 30 seconds to 180 minutes, and the camera will continue to record one image at each set interval until the mode is canceled, the memory card runs out of room, or the battery discharges. The word "Interval" is displayed on the LCD monitor throughout the recording time, and an initial press of the shutter button kicks off the Interval series.
Auto Bracketing
The RDC-6000 features an Auto Bracket mode, which captures three images at different exposure compensation levels. Once activated, the Auto Bracket feature exposes the image at the camera's set exposure, then takes another exposure at -0.5 EV and one at +0.5 EV. A tripod is recommended when using the Auto Bracket feature to prevent camera shake, and the flash is automatically disabled.
Video Capture
Ricoh bills the RDC-6000 as a "dual mode" camera, as it can be used as a USB-connected digital video camera as well as a conventional digital still camera. Unfortunately, doing so requires that you find and download additional software beyond what comes packaged with the camera. Mac users will need a copy of CU-SEE-ME, while Windows users will need a copy of Microsoft NetMeeting. (We didn't experiment with this capability in our testing, so have no comment on its effectiveness.)
Reader Comments! --> Visit our discussion forum for the Ricoh RDC-6000!

Follow Imaging Resource: