Ricoh RDC-7A 3 megapixel "Image Capturing Device" for mobile professionals with some unusual capabilities!<<Shutter Lag & Cycle Time Tests :(Previous) | (Next): Camera Modes & Menus>> Page 8:Operation & User InterfaceReview First Posted: 8/2/2000 |
Operation and User Interface
At first glance, the RDC-7's user interface left us wondering how to control it, as there were only 4 buttons in evidence on the outside of the unit. As it turns out, a full control panel is hidden by the flip-up LCD screen, and there are plenty of buttons to make controlling the RDC-7 a simple matter. A quick read of the manual should clear up any questions users might have, as the camera operation is very straightforward. The majority of the camera settings are controlled through the LCD based menu system, but you can change the flash mode, activate the self-timer, enter the macro mode, and change the picture quality, white balance and exposure compensation without entering the menu system. Navigation of the LCD menu is quite uncomplicated as well, featuring a scrollable list of options and clear directions on changing settings. The camera is set up to be held either vertically or horizontally, with two shutter buttons and two zoom control levers. One handed operation is possible (and comfortable) in the vertical position, but a little awkward when shooting horizontally. Overall, we found the RDC-7 to be an easy camera to understand and operate. Following is our standard list of controls and functions.

Primary Shutter Button: Located on the top panel of the camera, this flat, silver button sets exposure and focus when halfway pressed, and fires the shutter when fully pressed. It also serves as the stop and start of recording for sound and movie files. In Playback mode, when the "Copy All Files" option is selected, the shutter button acts as the start button and initiates the copying process once pushed.
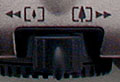
Secondary Shutter Button: Sitting next to the lens on the front of the camera, this button also sets focus and exposure when halfway pressed and fires the shutter when fully pressed. This secondary shutter button is for use when holding the camera in a vertical position.
Pic Button: Positioned to the left of the primary shutter button, this button cycles through nine image quality and size settings (640 x 480, 1024 x 768 and 2048 x 1536 sizes and Fine, Normal and Economy quality settings). Note that the uncompressed formats and the "PRO" modes are accessed via the LCD menu system, rather than by the Pic button.
Self-Timer Button: Directly to the left of the Pic button, this button activates the Self-Timer mode. It can also cancel the mode and the self-timer countdown.
Card / IN Button: Just below the Self-Timer button, this control determines where images are saved by alternating between the (optional) SmartMedia card and the eight megabyte internal memory.
Flash Button: To the right of the Card / IN button, this button cycles through four flash modes:
- Off: Completely deactivates the flash.

- Auto: Lets the camera judge when to fire the flash, depending on the existing light levels.
- Forced: Sets the flash to fire with every exposure.
- Slow-Synchro: Times the flash with a slow shutter, to allow more ambient light into an image.
Primary Zoom Lever: Situated directly over the mode dial, this lever rocks back and forth to control the optical zoom.
![]()
Display Button: Located in the far right corner of the Operation Panel (beneath the LCD monitor), this button turns the LCD information display on and off.
![]()
LCD Light Button: Directly to the left of the Display button, this button turns the LCD backlight on and off.
![]()
Erase Button: Sitting to the left of the LCD Light button, this button (marked with an orange trash can) calls up the Erase menu, with the following options (each with an option to cancel):
- Erase Single Image: Deletes the currently displayed image.
- Erase All Images: Removes all images from either the SmartMedia card or internal memory.
- Erase Selected Images: Allows you to select specific images to be erased.
![]()
Macro Button: Positioned beneath the Display button, this button (marked with a green flower symbol) activates the macro mode, which changes the focal range to 0.4 to 9.4 inches (1 to 24 cm).
![]()
White Balance / Right Arrow Button: Located to the left of the Macro button, this control serves two functions. In standard record mode, pressing it calls up the white balance menu, featuring Auto, Daylight, Overcast, Tungsten and Fluorescent white balance settings. In any settings menu, it serves as the right arrow for making changes in menu options. In Playback mode, it scrolls through images in the thumbnail display, and controls the volume when playing back sound files.
![]()
+/- / Left Arrow Button: As with the White Balance button, this button serves dual functions, and sits to the left of the White Balance button. In standard record mode, this button accesses the range of exposure compensation settings (from -2 to +2 in 1/2 EV increments). In any settings menu, it serves as the left arrow for making changes to menu selections. In Playback mode, it scrolls through images in the thumbnail display, and controls the volume when playing back sound files.
![]()
Enter Button: Residing below the Macro button, this button confirms menu selections.
![]()
Cancel Button: Situated to the left of the Enter button, this button cancels menu selections.

Menu Button: Located to the left of the Cancel button, this button calls up the settings menu for each mode. It also dismisses the menu screen.

Up and Down Arrow Buttons: Positioned on the far left side of the Operation Panel, these buttons navigate through menu options in each of the settings menus. In Playback mode, the buttons scroll through captured images and play back sound and movie files. When shooting in manual focus mode, the up and down arrows adjust the focus.
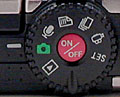
Mode Dial: Located on the back side of the camera, this notched dial sets the camera's operating mode:
 Setup: Places the camera into Setup mode, for changing various camera settings (marked by the word "Set").
 Motion Picture: Sets up the camera for recording moving images with sound (white movie camera symbol).
 Continuous Shooting: Allows the camera to capture multiple images in rapid succession, with one press of the shutter button (white multi-shot symbol).
 Text: Allows you to capture black/white images of text, such as meeting notes or white boards, with smaller file sizes than in standard shooting mode (white text symbol).
 Sound: Sets the camera to record audio files only (white microphone symbol).
 Still: Adjusts the camera for shooting single, still images (green camera symbol).
 Playback: Puts the camera in Playback mode, for reviewing captured images, recorded sounds, and movies (white playback symbol).

On/Off Button: Encircled by the mode dial, this red button turns the camera on and off.
Secondary Zoom Lever: Nestled underneath the mode dial on the bottom of the camera, this secondary zoom lever controls the optical zoom and is convenient when holding the camera vertically.
![]()
Dioptric Adjustment Dial: This small dial is located beneath the optical viewfinder and adjusts the viewfinder's focus to accommodate eyeglass wearers.

Follow Imaging Resource: