The Imaging Resource
Quick Review
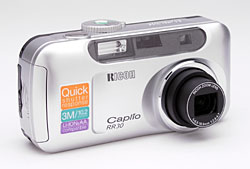
Ricoh Caplio RR30 Digital Camera
 |
Camera QuickLook | |
| Review Date | 07/01/03 | |
|
User Level |
|
|
|
Product Uses |
|
|
|
Digicam Design |
|
|
|
Picture Quality |
Fair, 3.2-megapixel CCD | |
|
Print Sizes |
Up to 8x10s | |
|
Availability |
now | |
| Suggested Retail
Price (At Introduction) |
|
|
|
||||||||||
Though Ricoh's past contributions to digital imaging are not widely touted, this primarily business-based communications company has done a lot over the years to expand the boundaries of digital capture. Consistently delivering ground breaking new technology and innovative digital features with its imaging products, Ricoh has significantly influenced the course of consumer-based digicam design and functionality. In 1996, Ricoh introduced the RDC-1, the first "multimedia" camera to combine still image digital capture with video and audio recording. Since then, subsequent models have incorporated updated "QVGA" QuickTime movies with sound, memo recording, time-lapse photography, and webcam broadcast capabilities. Ricoh's objective? To bridge the gap between the corporate business environment and digital imaging communications.
Ricoh's latest digicam product actually takes them back to a device with more purely "camera" functions, with none of the exotic communication or PDA capabilities of some of their recent devices. Rather, the Caplio RR30 is a straightforward 3.2-megapixel camera with a lot of features for the price. Most noteworthy though, is the remarkably(!) short shutter lag it sports, head and shoulders above most competing models. Read on for all the details.
Camera Overview
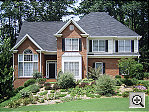
With a thin, elongated, yet compact body style, Ricoh's Caplio RR30 digital
camera is readily portable. With its all-plastic body, the RR30 is lightweight
with small enough dimensions for nestling in larger shirt pockets and most purses.
A wrist strap keeps it securely attached to your wrist when shooting (necessary
given the lack of a handgrip). The compact design includes a shutter-like, built-in
lens cover which conveniently slides open whenever the camera is powered on,
allowing the 3x zoom lens to telescope outward about a half-inch from the body.
The camera's 3.2-megapixel CCD produces ample resolution for prints to 8x10
inches, as well as lower resolution images better suited for e-mail transmission
among family and friends. Exposure control is completely automatic, though six
preset "scene" modes and a host of creative exposure options are available,
making the RR30 an good choice for novice consumers who want to take great pictures
without hassling over complicated exposure decisions.
The RR30 is equipped with a 3x, 5.5-16.5mm lens, equivalent to a 35-105mm lens on a 35mm camera. Normal focus ranges from approximately 11.7 inches (30 centimeters) to infinity, with a Macro range from 0.4 to 24 inches (1 to 60 centimeters). A manual focus option is available through the Record menu, as are Infinity and Snapshot fixed focus modes. In addition to the 3x optical zoom, the RR30 also features a maximum of 3.4x digital zoom. Keep in mind, however, that because digital zoom is simply enlarging the central portion of the CCD, image quality typically decreases (usually in the form of softer details or increased artifacts). For composing images, the RR30 offers a real-image optical viewfinder with a comfortably high eyepoint for eyeglass wearers, as well as a 1.6-inch, color LCD monitor. The LCD display includes an informative data readout, detailing various camera settings, and includes a central autofocus crosshair. For aligning difficult subjects, the LCD also features a grid display, which divides the image area into thirds horizontally and vertically. Pressing the Display button on the camera's back panel controls the LCD's information and image displays.
Exposure remains under automatic control on the RR30, although the camera does report the selected aperture and shutter speed settings whenever the Shutter button is halfway pressed. An On/Off button on top of the camera does what you'd expect, and is surrounded by a Mode dial that selects between Playback, Record, Scene, Movie, and Setup exposure modes. Record mode puts the camera in control of aperture and shutter speed, but allows you to set other variables such as ISO, White Balance, etc. Scene mode offers six preset "scenes," which optimize the camera for specific shooting situations. Available scenes are Portrait, Sports, Landscape, Nightscape, Text Mode, and High Sensitivity. Portrait mode employs a larger aperture for a more shallow depth of field, capturing a sharply-focused subject in front of a slightly-blurred background. Sports mode uses fast shutter speeds to freeze fast-moving action, and Landscape mode uses a small aperture to capture both the foreground and background in sharp focus. Nightscape mode is best for shooting night scenes and portraits, as the camera uses a slower shutter speed (meaning you'll likely need a tripod to prevent any blurring). Text mode captures black and white subjects, such as printed documents, clearly. Text mode features a Density setting for controlling the background shading, and saves images as uncompressed TIFF files. Finally, High Sensitivity mode boosts the ISO setting for dim lighting, and brightens the LCD display (by slowing the LCD's refresh rate), making it easier to frame dimly-lit subjects.
By default, the RR30 uses a Multi metering mode, which takes exposure readings from throughout the frame to calculate the best overall exposure. Through the Record menu, you can also opt for Center and Spot metering modes, for more precise exposure readings. An Exposure Compensation adjustment increases or decreases exposure from -2 to +2 exposure equivalents (EV) in one-third-step increments, with a live display of what the resulting exposure may look like. If you find it difficult to determine the best exposure setting, the RR30's Auto Exposure Bracketing mode takes a series of three images at different exposures, so you can choose the best overall image. Although you can't adjust the shutter speed in normal usage, the RR30's Time Exposure mode lets you select from a range of longer exposure times (from one to eight seconds), when shooting in dark conditions. White Balance options on the RR30 include an Auto setting, as well as Daylight, Overcast, Tungsten, Fluorescent, and One-Push (manual) settings. The camera's sensitivity can be set to Auto (variable as the camera sees fit, starting at an ISO 125 in bright conditions), or to 200, 400, or 800 ISO equivalents. A Sharpness adjustment is also available, for controlling the in-camera sharpening, and a Self-Timer mode offers a two or 10-second countdown before capturing the image. The RR30's built-in flash operates in Forced, Suppressed, Auto, Red-Eye Reduction, and Slow-Synchro modes, and is effective to approximately 7.6 feet (4.5 meters).
The RR30 also features an Interval shooting mode, which takes a series of images at preset, fixed intervals from 30 seconds to three hours. The camera will capture images for as long as the memory card has available space, or the camera has power. Three Continuous Shooting modes act like a motor drive on a 35mm camera. The basic Continuous Shooting mode captures a series of images, for as long as the Shutter button is held down. The number of images in the series depends on the amount of available memory card space, and frame rates will vary with resolution and compression settings. "SCont" mode captures 16 consecutive frames in about two seconds. The 16 images are grouped together as one large image, arrayed in a four-by-four pattern. Finally, "MCont" mode "memorizes" the scene while the Shutter button is held down. Once released, the camera records the last two seconds, or 16 frames. Image display is the same as in "SCont" mode. The RR30's Movie exposure mode captures either 320 x 240-, or 160 x 112-pixel resolution moving images (without sound). Maximum recording times vary with the resolution and available memory card space, with a maximum of 30 seconds for the large resolution and 120 seconds for the smaller setting.
The RR30 stores images either on SD/MMC memory cards, or in its internal memory. The camera does not come with a memory card, so you'll want to purchase a large capacity SD or MMC card right away, as the camera's internal memory won't hold too many files. The RR30 uses two AA batteries for power, either alkaline, NiMH, or lithium. A set of two alkaline AAs is included in the box with the camera, but I strongly recommend purchasing a couple of sets of high-capacity NiMH batteries and a good charger, and keeping a spare set of batteries charged at all times. The RR30 has no external power jack, so I wasn't able to conduct my normal power-consumption tests. With only two AA cells for power though, you'll want to make sure that you have high-capacity rechargeable NiMH cells for the best run times. Click here to read my "battery shootout" page to see which batteries currently on the market are best, or here for my review of the Maha C-204F charger, my longtime favorite. The RR30 features a Video Out jack, for connecting to a television set, and a USB jack for downloading images to a computer. A software CD is loaded with the Caplio software and USB drivers, for downloading and organizing images, as well as a full copy of the instruction manual. Additionally, the RR30 comes packaged in a plain brown cardboard box, which is more easily recycled.
Basic Features
- 3.2-megapixel CCD.
- Real-image optical viewfinder.
- 1.6-inch color LCD monitor with backlight.
- 3x zoom lens, equivalent to 35-105mm on a 35mm camera.
- Maximum aperture of f/2.6 - f/4.7, depending on lens zoom position.
- As much as 3.4x digital zoom.
- Automatic exposure control.
- Shutter speeds from 1/2,000 to eight seconds.
- Built-in flash with five modes.
- Images stored to internal memory or SD/MMC memory cards (not included).
- USB computer interface and supplied cable.
- Power supplied by two AA batteries or optional AC adapter.
- Caplio image software and USB drivers included for both Windows and Mac platforms.
Special Features
- Amazingly fast shutter response!
- Movie mode without sound.
- Portrait, Sports, Landscape, Nightscape, Text, and High Sensitivity preset modes.
- 10- and two-second Self-Timer modes for delayed shutter release.
- Macro (close-up) lens setting.
- White balance (color) adjustment with six modes, including a manual adjustment.
- Interval, Auto Exposure Bracketing, and three Continuous Shooting modes.
- Multi, Center, and Spot metering modes.
- Sensitivity setting with three ISO equivalents (200, 400, 800) and an Auto setting (equivalent to ISO 125).
- Two (optional) fixed focus settings and a manual focus adjustment.
- Sharpening adjustment.
- DPOF (Digital Print Order Format) compatibility.
- Video cable for connection to a television set.
Recommendation
The Caplio RR30 is small, compact, and light weight, with an easy-to-follow interface that should set novices at ease. It offers the convenience of point-and-shoot simplicity, but also features creative options for capturing images in challenging situations (low light, fast action, etc.). The 3.2-megapixel CCD delivers high quality images, appropriate for any use from printing to distributing via e-mail, and its compact design makes it a good candidate for travel. It has more features than are commonly found on a low-end digicam, but its biggest claim to fame is its blazing shutter response. - I found its image quality to be sub-par relative to its competitors. If you need really low shutter lag, this camera is the fastest consumer model I've found, but you'll have to accept some tradeoffs in image quality.
Design
With its thin, elongated body size and compact design, the RR30 is small enough
to travel just about anywhere. The two-toned, black and silver body is free
from any extreme protrusions except for the lens, which telescopes outward when
powered on. Measuring 4.48 x 2.14 x 1.28 inches (114 x 54.5 x 32.5 millimeters)
makes it just small enough to fit into a shirt pocket or small purse. The all-plastic,
yet rugged, body keeps the RR30 light weight as well, at just 7.5 ounces (212.5
grams) with batteries and memory card.

The RR30's front panel features the lens, protected by a shutter-like, retractable lens cover that opens quickly when the camera is turned on. The lens then telescopes out from the camera body about half an inch into its operating position. Also on the front panel are the flash, AF sensor window, and optical viewfinder window. A very slight indention on the right side provides a small fingergrip when holding the camera, but is small enough that you'll probably want to keep the wrist strap securely in place while shooting. Also visible from the front is the very edge of the battery compartment door.
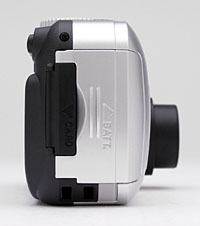
On the right side of the camera (as viewed from the rear) are the battery and memory card compartments. A sliding plastic door protects the battery compartment, and remains hinged when opened. In the center of the two hinges for the battery compartment door is a tiny, plastic door covering the memory card slot. (I found that the battery door had an annoying tendency to pop open when I was closing the memory card compartment. Not a huge issue, but an annoyance nonetheless.) Just below the battery compartment is the eyelet for attaching the wrist strap, adjacent to a small plastic flap that slides out of the way for the AC adapter cord.

The opposite side of the camera features only the USB and Video Out connector terminals, beneath a flexible plastic flap.
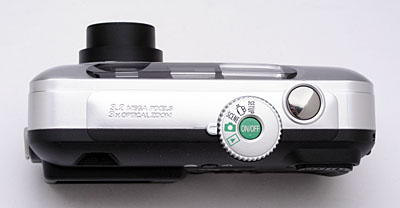
The RR30's top panel features the Shutter and Power buttons, as well as the Mode dial.

The remaining few camera controls are on the rear panel, along with the optical viewfinder eyepiece and LCD monitor. Two LED lamps below the optical viewfinder report camera status, indicating when focus is set or the flash is charging. The Zoom rocker button dominates the top right corner of the back panel, while the rest of the control buttons are arranged alongside the LCD monitor. These include the Erase/Self-Timer button, Menu button, Four-Way Arrow pad, OK button, and Display button. Just below the Zoom rocker button is a raised thumbgrip, which promotes a firmer hold on the camera when shooting.
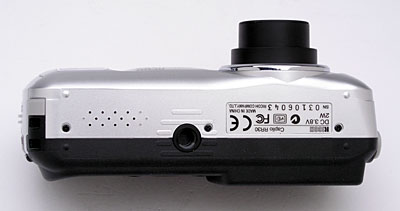
The RR30 has a flat bottom panel, which holds the plastic tripod socket and a small speaker grille (for playing camera sounds).
Camera Operation
The RR30's user interface is very straightforward, with only a few external controls and a very concise LCD menu system. The Mode dial on top of the camera quickly sets the operating mode, and options like flash, macro, and the Self-Timer have external controls. The LCD menu features three main screens in Record mode, and is quick to navigate. The arrow keys of the Four Way Arrow pad scroll through the selections, and the OK button in the center of the pad confirms any changes. The menu system is so simple and intuitive I think even novice users will be able to become completely familiar with it in an hour or so. (The one thing I found awkward was that I had to hit the OK button for everything. - I'm used to just hitting the right-arrow a second time to make the selection on many cameras, but on the RR30, this just bumped me onto the next menu page.)
Record Mode Display
 The
RR30 has three record-mode displays, shown at right. Pressing the Display button
cycles between the three displays and a mode with the LCD turned off entirely.
The main information display shows the center autofocus area along with currently-selected
options for image size/quality, macro and flash mode, white balance, zoom position,
etc, as well as the number of images of the current size and quality that can
be stored in the remaining space on the memory card. When the Shutter button
is halfway pressed, the camera reports the selected aperture and shutter speed
settings. The RR30 also offers a plain image display, and a grid display for
aligning shots.
The
RR30 has three record-mode displays, shown at right. Pressing the Display button
cycles between the three displays and a mode with the LCD turned off entirely.
The main information display shows the center autofocus area along with currently-selected
options for image size/quality, macro and flash mode, white balance, zoom position,
etc, as well as the number of images of the current size and quality that can
be stored in the remaining space on the memory card. When the Shutter button
is halfway pressed, the camera reports the selected aperture and shutter speed
settings. The RR30 also offers a plain image display, and a grid display for
aligning shots.
Playback Mode Display
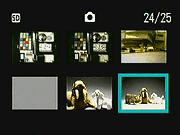 In
Playback mode, you can use the RR30's zoom control to enlarge an image, with
a maximum enlargement of 3.4x. Zooming out from a full-frame view brings up
a thumbnail display of the images on the card, letting you move quickly between
them by via the arrow keys on the camera's back panel. The screen shot at right
shows the progression of playback displays, beginning with the thumbnail index
view and ending with a zoomed view at the maximum 3.4x magnification.
In
Playback mode, you can use the RR30's zoom control to enlarge an image, with
a maximum enlargement of 3.4x. Zooming out from a full-frame view brings up
a thumbnail display of the images on the card, letting you move quickly between
them by via the arrow keys on the camera's back panel. The screen shot at right
shows the progression of playback displays, beginning with the thumbnail index
view and ending with a zoomed view at the maximum 3.4x magnification.
External Controls

Shutter Button: Located on the far right of the top panel, this button
sets focus and exposure when halfway pressed, and fires the shutter when fully
pressed.

Mode Dial: Surrounding the Power button on the top panel, this notched
dial offers the following settings:
- Playback: Replays captured still images and movie files, with options for image management and printing.
- Record: Places the camera in Record mode, with a range of exposure options available.
- Scene: Lets the user select from six preset shooting modes, including Portrait, Sports, Landscape, Nightscape, Text, and High Sensitivity.
- Movie: Records moving images without sound, for a maximum of 30 seconds at 320 x 240 pixels or 120 seconds at 160 x 120 pixels.
- Setup: Displays the Setup menu, for changing camera settings.
Power Button: Placed in the center of the Mode dial on the camera's top panel, this button turns the camera on and off.
![]()
Zoom Rocker Button: Located in the top right corner of the back panel,
this rocker switch controls the optical and digital zoom in any record mode.
In Playback mode, this button controls the digital enlargement of captured images and accesses the index display mode. (The "T" side zooms in, the "W" side zooms out. Zooming out from the normal-sized single image view brings up an index display of tiny "thumbnail" images.)
![]()
Erase / Self-Timer Button: To the left of the Zoom rocker button,
this button accesses the two- and 10-second Self-Timer modes in Record mode.
In Playback mode, this button displays the Erase menu, which lets you delete the displayed image or all images on the memory card or internal memory (whichever is selected).

Menu Button: Beneath the Erase / Self-Timer button, this button displays
or dismisses the settings menu in any Record mode or in Playback mode.
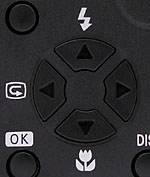
Four Way Arrow Pad: Just to the right of the center of the LCD monitor,
this control pad features four arrow keys, which navigate through any settings
menu.
In Record mode, the up arrow controls flash mode, cycling through Auto, Forced, Suppressed, Red-Eye Reduction, and Slow-Synchro modes. The down arrow activates the camera's Macro shooting mode, while the left arrow controls the Quick Review mode. (The right arrow has no additional function.)
In Playback mode, the left and right keys scroll through captured images on the memory card. When an image has been enlarged, all four arrow keys move around within the enlarged view.

OK Button: Next to the lower right corner of the LCD monitor, this
button confirms menu selections.

Display Button: Directly to the right of the OK button, this button controls
the LCD monitor's display mode. In both Record and Playback modes, the button
cycles through the image and information displays, and turns the LCD monitor
on and off. In Record mode, this button also accesses an alignment grid display.
Camera Modes and Menus
Record Mode: In this mode, the camera captures standard still images, controlling aperture and shutter speed. Pressing the Menu button displays the Record settings menu, with options varying depending on the exposure mode selected:
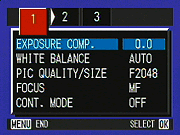 Menu
1:
Menu
1:
- Exposure Compensation: Increases or decreases exposure from -2 to +2 exposure equivalents (EV) in one-third-step increments. A live display appears, showing what the exposure may look like at each setting.
- White Balance: Adjusts the color balance depending on the light source. Options are Auto, Daylight, Overcast, Tungsten, Fluorescent, or One Push (manual setting).
- Picture Quality / Size: Sets the image resolution and compression. Options are: F2048 (2,048 x 1,536 pixels), N2048 (2,048 x 1,536 pixels), F1280 (1,280 x 960 pixels), N1280 (1,280 x 960 pixels), and N640 (640 x 480 pixels).
- Focus: Sets the camera's focus mode to Auto or Manual, or to Snapshot or Infinity fixed settings.
- Continuous Mode: Selects the continuous shooting mode. Options
are Cont, SCont, and MCont, or Off. (SCont captures 16 sub-images, stored
in a single high-res frame. MCont does the same, but "memorizes"
the scene, then records the last 2 seconds of action in the 16 sub-images,
after you lift your finger from the shutter button.)
 Menu
2:
Menu
2:
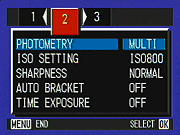
- Photometry: Sets the camera's metering system to 256-segment Multi, Center, or Spot modes.
- ISO Setting: Controls the camera's sensitivity setting. Options are Auto (equivalent to ISO 125), or 200, 400, and 800 ISO equivalents.
- Sharpness: Designates the amount of in-camera sharpening applied to the image. Choices are Sharp, Normal, or Soft.
- Auto Bracket: Turns the camera's Auto Exposure Bracketing mode on or off.
- Time Exposure: Accesses longer shutter times of 1,
2, 4, or 8 seconds. The Off setting returns to the normal automatic exposure
control.
 Menu
3:
Menu
3:
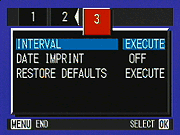
- Interval: Activates and sets the interval for Interval shooting mode. Shot intervals range from 30 seconds to three hours.
- Date Imprint: Designates whether the date and time are imprinted on images as they are recorded.
- Restore Defaults: Resets the Record menu to its default
settings.
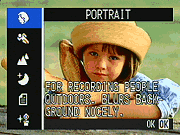 Scene
Mode: A Scene menu appears upon entering this mode, requiring the user
to select either Portrait, Sports, Landscape, Nightscape, Text, or High Sensitivity
scene modes. Menu options are similar to those above, but vary depending on the
scene selected.
Scene
Mode: A Scene menu appears upon entering this mode, requiring the user
to select either Portrait, Sports, Landscape, Nightscape, Text, or High Sensitivity
scene modes. Menu options are similar to those above, but vary depending on the
scene selected.
 Movie
Mode: This mode lets you record moving images (without sound). The
following menu options are available:
Movie
Mode: This mode lets you record moving images (without sound). The
following menu options are available:
- Movie Size: Sets the resolution to 640 x 480 pixels (maximum recording time of 30 second per clip) or 160 x 120 pixels (maximum of 120 seconds).
- White Balance: Adjusts the color balance of the image in response to the lighting. Options are Auto, Daylight, Overcast, Tungsten, Fluorescent, or One Push (manual setting).
- Focus: Controls the focus mode, with options of Auto or
Manual focus, or Snapshot or Infinity fixed settings.
 Playback
Mode: This mode lets you review captured images on the memory card, erase
them, protect them, set them up for printing, etc. Pressing the Menu button
displays the following options:
Playback
Mode: This mode lets you review captured images on the memory card, erase
them, protect them, set them up for printing, etc. Pressing the Menu button
displays the following options:
- Slide Show: Plays back all images on the memory card or internal memory as a slide show.
- Protect: Write-protects the current image, or all images, or removes protection.
- Print: Marks the current image or all images for printing on a DPOF device, or removes the print mark.
- Copy To Card: Copies files from the internal memory to a memory card
 Setup
Mode: The following menu automatically displays when entering this mode:
Setup
Mode: The following menu automatically displays when entering this mode:
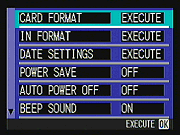
- Card Format: Formats the SD or MMC memory card.
- IN Format: Formats the camera's internal memory.
- Date Settings: Sets the camera's date and time, with an option to set the display format.
- Power Save: Turns the camera's Power Save function on or off.
- Auto Power Off: Designates the period of inactivity before the camera shuts itself off. Choices are one, five, or 30 minutes, or Off.
- Beep Sound: Turns the camera's beep sounds on or off.
- Sequential Numbering: Turns on Sequential Numbering, which continues file numbering from card to card, or turns it off. If off, numbering restarts with each new card.
- LCD Confirm: Activates the LCD confirmation screen which appears immediately after image capture, with available review times of one, two, or three seconds. Also turns this function off.
- LCD Brightness: Adjusts the brightness of the LCD display.
- Language: Sets the camera's menu language to English, French, German, Chinese, or Japanese.
- Video Out: Sets the Video Out signal to NTSC or PAL.
In the Box
The RR30 ships with the following items:
- Wrist strap.
- USB cable.
- Video cable.
- Two AA alkaline batteries.
- Software CD.
- Quick Start guide and registration card.
- Large capacity SD or MMC memory card.
- Rechargeable AA batteries and charger.
- AC adapter.
- Small camera case.
About Batteries
Time for my standard battery tirade. I've gotten so many emails about power
issues for digicams, that I'm now inserting this standard notice in the reviews
of all AA-powered cameras on our site. Don't even *think* about using alkaline
AA batteries in a digicam! Despite their being packed in the box with
many cameras, they simply don't have the juice to handle typical digicam demands.
Get a couple of extra sets of high-capacity NiMH AA cells, and always keep
one set charged and ready to go while the other is in the camera. Click here
to read my "battery shootout" page to see which batteries currently
on the market are best, or here
for my review of the Maha C-204F charger, my longtime favorite. There's nothing
more frustrating than running out of battery power in the middle of an outing.
Spend the money on good-quality batteries and you'll be glad you did.
Recommended Software: Rescue your images!
Just as important as an extra memory card is a tool to rescue your images
when one of your cards fails at some point in the future. I get a lot of email
from readers who've lost photos due to a corrupted memory card. Memory card
corruption can happen with any card type and any camera manufacturer, nobody's
immune. A surprising number of "lost" images can be recovered with
an inexpensive, easy to use piece of software though. Given the amount of
email I've gotten on the topic, I now include this paragraph in all my digicam
reviews. The program you need is called PhotoRescue, by DataRescue SA. Read
our review of it if you'd like, but download the program now,
so you'll have it. It doesn't cost a penny until you need it, and even then
it's only $29, with a money back guarantee. So download PhotoRescue for
Windows or PhotoRescue for
Mac while you're thinking of it. (While you're at it, download the
PDF manual and quickstart
guide as well.) Stash the file in a safe place and it'll be there when you
need it. Trust me, needing this is not a matter of if, but when...
PhotoRescue is about the best and easiest tool for recovering digital
photos I've seen. (Disclosure: IR gets a small commission from sales of
the product, but I'd highly recommend the program even if we didn't.)
OK, now back to our regularly scheduled review...
Sample Pictures
See my test images and detailed analysis
here. The thumbnails below show a subset of my test images. Click
on a thumbnail to see the full-size photo.

|

|

|
| |
|
|
|
|
|
|
| |
|
|
|
|
|
|
| |
|
|


Specifications
See the specifications sheet here.
Picky Details
Information on shooting speed, battery life, etc. can be found here.
- Ricoh Caplio RR30 user reviews on PriceGrabber.com
- Ricoh Caplio RR30 user reviews on PC PhotoREVIEW
Test Results
In keeping with my standard test policy, the comments given here summarize only my key findings. For a full commentary on each of the test images, see the Caplio RR30's "pictures" page.
As with all Imaging Resource product tests, I encourage you to let your own eyes be the judge of how well the camera performed. Explore the images on the pictures page, to see how RR30's images compare to other cameras you may be considering.
- Color: Color appeared to be the RR30's weakest point,
as its hue accuracy didn't seem to be as accurate as much of its competition.
Skin tones in particular were susceptible to whatever color cast was present
in the original lighting, although the camera did a workmanlike job with
the very difficult household incandescent lighting of my Indoor Portrait
test, when using its Incandescent and Manual settings. On the Davebox target,
the large color blocks were slightly off in hue, but were reasonably bright.
- Exposure: The RR30 had a few exposure problems, although
the worst of them seemed to be cured by a firmware upgrade that came out
after I received my test unit. - I didn't have time to reshoot all my tests
with the upgraded firmware, but the severe underexposure problems on high-contrast
subjects that I encountered with the original firmware seemed to be pretty
well fixed by the upgrade. (And the firmware update was very easy to apply
as an end-user, provided that you have a Windows computer available to connect
the camera to.) On a positive note, Flash exposures all came out pretty
well, with much less exposure compensation than my flash test shots typically
required.
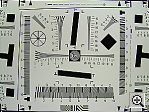
- Resolution/Sharpness: The RR30 turned in about an average
performance for its 3.2-megapixel class on the "laboratory" resolution
test chart. It started showing artifacts in the test patterns at resolutions
as low as 600 lines per picture height, in both horizontal and vertical
directions. I found "strong detail" out to at least 1,000 lines.
"Extinction" of the target patterns occurred at about 1,100 lines.
- Closeups: The RR30 did a really excellent job in the
macro category, capturing a very tiny minimum area of only 0.79 x 0.59 inches
(20 x 15 millimeters). Resolution was very high, with excellent detail in
the fibers of the dollar bill. Corner softness was a bit stronger in this
shot, possibly due to the very close shooting range. Because of the close
shooting distance, the camera's flash had trouble throttling down for the
macro area, and produced an uneven exposure. - Plan on using external lighting
for any macro shots you might do.
- Night Shots: In its normal exposure mode, the RR30 can
shoot down to the light level of typical city night scenes (1 foot-candle,
11 lux) pretty well. Using its time exposure option though, it can shoot
down to the darkest levels of my test (1/16 foot-candle, 0.63 lux), fully
sixteen times darker. The RR30 has no dark-frame noise subtraction system
though, so "hot pixel" noise was pretty evident for any exposure
of a second or longer. I had a hard time telling what level the autofocus
would reliably work to though: It sometimes indicated it was focused when
it actually wasn't, and other times seemed to think it wasn't focused when
it actually was. Overall, it seemed to work OK down to 1 foot-candle, although
its performance beyond that point was rather variable. All in all, a decent
low-light performer, at least on a par with competing digicam models.
- Viewfinder Accuracy: The RR30's optical viewfinder is
quite tight, showing approximately 77 percent frame accuracy at wide angle,
and approximately 86 percent at telephoto. The LCD monitor proved much more
accurate, showing about 98 percent frame accuracy at both zoom settings.
Given that I like LCD monitors to be as close to 100 percent accuracy as
possible, the RR30's LCD monitor does an excellent job here, but the optical
viewfinder could really stand some improvement. (I particularly don't like
to see a viewfinder change its frame coverage as the lens zooms,
as that makes it very hard to know how much to compensate for it.)
- Optical Distortion: Optical distortion on the RR30 was
slightly high at the wide-angle end, where I measured an approximate 0.9
percent barrel distortion. The telephoto end fared only slightly better,
as I measured a 0.4 percent barrel distortion. (Typical values for digicams
with 3x zoom lenses that I've tested are 0.8 and 0.2 percent, respectively.)
Chromatic aberration was fairly low, showing only faint coloration around
the target lines in the corners of the image. (This distortion is visible
as a very slight colored fringe around the objects at the edges of the field
of view on the resolution target.) There was a little coma on the res target
shot, producing blurriness in the extreme corners. The only other signs
of distortion I noticed were some corner softness in several shots, and
some coma in the sky portions of the outdoor house shot.
- Shutter Response: I haven't been including this parameter in my
standard test summaries, but am thinking I should, as it's so critical to
most consumers' use and enjoyment of a digicam, and so woefully lacking
in most. This is the area where the RR30 really shines, as its shutter lag
is way better than any other consumer-level, autofocus-equipped
camera I've tested to date. Full autofocus shutter lag runs only 0.19 to
0.22 seconds. (!) Cycle time is only average, at 2.7 seconds for the first
two large/fine images, and upwards of 15 seconds to clear the buffer memory
after that. - But if you have quick-moving, wiggly subjects, the RR30 is
the fastest thing out there to capture them!
- Battery Life: The RR30 doesn'thave an external power
jack, so I couldn't conduct my normal exacting power measurements on it.
Simply running it from a high-capacity set of rechargeable AA cells though,
it lasted nearly two hours, a very good performance for a camera powered
by only two AA batteries. - I still strongly recommend that you pick up
a couple of sets of high-capacity NiMH batteries and a good-quality charger
though. - Don't even think about running a digicam on alkaline batteries,
except in an emergency. (Click here
to read my "battery shootout" page to see which batteries currently
on the market are best, or here
for my review of the Maha C-204F charger, my longtime favorite.)
| Free Photo Lessons | |
|

Small, compact, and light weight, the Caplio RR30 is a portable option for
novice users, with a wider-than-usual range of features. Though exposure is
automatically controlled, the option for longer shutter times and the available
preset scene modes should handle a wide range of shooting conditions. The
RR30's real claim to fame is its amazingly fast shutter response - The delay
between pressing the shutter button and the camera's taking the picture is significantly
faster than other cameras I've tested. Image quality is its weak point though:
Competing three megapixel models have much better color and tone. (If you really
need the fastest possible shutter response though, the RR30 is the quickest
I've seen.)

Follow Imaging Resource: