Fuji FinePix S1 ProA 3.5 megapixel "SuperCCD" gives superb color and amazing low-light capability in an under-$4,000 SLR digicam!<<Optics :(Previous) | (Next): Shutter Lag & Cycle Time Tests>> Page 6:Exposure & FlashReview First Posted: 8/1/2000 |
Exposure
The S1 gives you a lot of exposure control, with the benefit of a full automatic mode as well as several "Vari Program" presets when you want to take it easy. The camera's exposure mode is controlled by the mode dial on the top of the camera body, which features Full Auto, Programmed Auto, Shutter Priority, Aperture Priority, Manual, Portrait, Landscape, Macro, Sports and Night Scene modes. The Full Auto exposure mode does exactly as it sounds and puts the camera in charge of all the exposure decisions, with the exception of whether or not to use the flash. The Programmed exposure mode works similarly in that the camera judges the appropriate exposure for the situation. However, the user can opt to select from a variety of exposure equivalents as well as adjust the exposure compensation. Aperture Priority and Shutter Priority are also relatively self-explanatory, each allowing the user to control either the aperture (which depends on the lens in use) or the shutter speed (from 30 to 1/2,000 seconds) while the camera selects the most appropriate corresponding value. As you might expect, the Manual exposure mode gives the user total control over the both aperture and shutter speed.
Exposure compensation on the S1 can be adjusted from -3.0 to +3.0 EV (an unusually wide range) in 1/3 EV increments by pressing the +/- button on the camera's back panel. This adjustment is only available with the Programmed, Shutter Priority, Aperture Priority and Manual exposure modes. (Wait a minute, you say, what does "exposure compensation" mean if you're in manual exposure mode? You're controlling all the exposure parameters, so what's to compensate? It turns out that the S1 gives you an exposure readout when in manual mode, showing whether the camera thinks you're exposing correctly or not. The exposure compensation setting in manual mode affects this exposure-feedback display, biasing it to indicate "correct" exposure when the exposure is actually high or low by the amount that you've dialed-in. Slick!)
An Auto-Exposure Lock function button allows you to lock in the camera's exposure settings for a certain area of your subject (as you would use the shutter button to lock focus). You simply point the camera at the part of the subject you want metered, hold down the AE-Lock button and then recompose the shot. Holding down the AE Lock button also sets the camera's metering mode to center-weighted, as opposed to multi-pattern (which we'll discuss in more detail a little later). This decoupling of exposure and focus lock is potentially a very handy feature that consumer-level digicams generally lack. The Self-Timer button on top of the camera activates the self-timer mode, which counts down from two or 10 seconds after the shutter button is pressed before firing the shutter. The AF Assist light on the front of the camera blinks during the countdown.
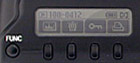 Many
of the S1's exposure options are controlled through the series of function buttons
on the camera's back panel, just beneath the small LCD display and above the
larger LCD monitor. We found this to be one of the easiest camera interfaces
we've yet encountered, for setting common camera operating parameters. We really
liked the way the functions were immediately available, without having to delve
deep into layers of menu structure to find the feature we were looking for.
The function buttons are "soft buttons", whose behavior are set by
the contents of the LCD display above them. The Function button on the back
panel controls which function menu is displayed in the LCD. The first press
of the main Function button displays the basic exposure function menu, featuring
white balance, ISO, image quality and size settings.
Many
of the S1's exposure options are controlled through the series of function buttons
on the camera's back panel, just beneath the small LCD display and above the
larger LCD monitor. We found this to be one of the easiest camera interfaces
we've yet encountered, for setting common camera operating parameters. We really
liked the way the functions were immediately available, without having to delve
deep into layers of menu structure to find the feature we were looking for.
The function buttons are "soft buttons", whose behavior are set by
the contents of the LCD display above them. The Function button on the back
panel controls which function menu is displayed in the LCD. The first press
of the main Function button displays the basic exposure function menu, featuring
white balance, ISO, image quality and size settings.
The second press of the Function button displays the next menu, which adjusts color, tone, sharpness and accesses the multiple exposure feature. White balance on the S1 offers eight modes, including Auto, Sunny, Shade, Fluorescent 1, Fluorescent 2, Fluorescent 3, Incandescent and Custom (which is the manual setting). The Custom setting adjusts the white balance to a preset value selected by the user. To balance the color for a new light source, the Custom setting must be changed through the Record settings menu. We'd prefer to change the setting just by selecting the Custom white balance option, instead of having to access the LCD menu, but it's nice that the camera remembers the setting for you, without forcing you to choose a new setting every time you enter Custom white balance mode. The camera's ISO sensitivity can be set to 320, 400, 800 or 1600 equivalents. Again, it would have been nice to include a lower ISO option, for those situations where you want to use a larger lens opening in fairly bright conditions. (The S1's maximum shutter speed is 1/2000, which won't let you use the widest apertures with bright sunlight and light-colored subjects.) We liked the degree of picture control that the second function menu provided over picture characteristics like color, tone, and sharpness (including a black & white option). The tone and color saturation variations were nicely balanced to give a useful range of control. (That is, the "high" color option wasn't overly garish, and the "org" (original) setting gave nicely understated colors that weren't too flat.)
Flash
 The
S1 offers both a built-in, pop-up flash and a hot shoe for connecting an external
flash unit when more flash power is needed. (The external flash option seems
to be able to work with a majority of Nikon dedicated flash units (unlike the
D1, which requires a special model of the SB-28), but it isn't clear how well
they'd work in TTL (through the lens) metering mode, given the different reflectance
of the CCD than the conventional films that the N60 body's flash sensor is calibrated
for. The built-in flash works in six operating modes: Auto, On, Off, Anti Red-Eye,
Slow Synchronization with Anti Redeye and Slow Synchronization. All of the flash
modes are controlled by the Flash button on top of the camera, and each is pretty
self-explanatory. The Auto setting lets the camera judge when to use the flash,
while the On setting fires the flash with every exposure and the Off setting
disables the flash entirely (you can also close the flash compartment to disable
the flash). Anti Redeye (equivalent to Redeye Reduction mode on other digicams)
fires a small pre-flash before firing the full flash, to avoid the pesky Redeye
Effect. Slow Synchronization works with a slower shutter speed to illuminate
the subject and also allow more ambient light into the image. Finally, Slow
Synchronization with Anti Redeye just combines the two modes for night portraits.
The top mounted hot shoe should accommodate most Nikon Speedlights, as well
as other off-brand flash units. Check the manual for more specific information.
The
S1 offers both a built-in, pop-up flash and a hot shoe for connecting an external
flash unit when more flash power is needed. (The external flash option seems
to be able to work with a majority of Nikon dedicated flash units (unlike the
D1, which requires a special model of the SB-28), but it isn't clear how well
they'd work in TTL (through the lens) metering mode, given the different reflectance
of the CCD than the conventional films that the N60 body's flash sensor is calibrated
for. The built-in flash works in six operating modes: Auto, On, Off, Anti Red-Eye,
Slow Synchronization with Anti Redeye and Slow Synchronization. All of the flash
modes are controlled by the Flash button on top of the camera, and each is pretty
self-explanatory. The Auto setting lets the camera judge when to use the flash,
while the On setting fires the flash with every exposure and the Off setting
disables the flash entirely (you can also close the flash compartment to disable
the flash). Anti Redeye (equivalent to Redeye Reduction mode on other digicams)
fires a small pre-flash before firing the full flash, to avoid the pesky Redeye
Effect. Slow Synchronization works with a slower shutter speed to illuminate
the subject and also allow more ambient light into the image. Finally, Slow
Synchronization with Anti Redeye just combines the two modes for night portraits.
The top mounted hot shoe should accommodate most Nikon Speedlights, as well
as other off-brand flash units. Check the manual for more specific information.
Effective Flash Range (from S1 Manual):
| ISO |
|
|
| Guide Number |
|
|
| f-stop (aperture) |
|
|
|
|
(7.2 - 33.8 ft.) |
(8.2 - 37.7 ft.) |
|
|
(5.9 - 28.5 ft.) |
(6.6 - 31.8 ft.) |
|
|
(4.3 - 20.7 ft.) |
(4.9 - 22.3 ft.) |
|
|
(2.6 - 14.1 ft.) |
(3.3 - 15.7 ft.) |
|
|
(2.6 - 10.5 ft.) |
(3.3 - 11.8 ft.) |
One thing that caught us a little by surprise is that the S1's internal flash doesn't throttle down too well for close-in subjects. Perhaps due to the higher sensitivity of the sensor in the S1, the flash really needs to work with a lens stopped down to a fair degree, if your subject is closer than 6 feet or so (a couple of meters). Thus, our first round of the "indoor portrait" shots were drastically overexposed, because we were shooting with the lens wide open. Stopping down to f/8, the results were much better. The table above shows working range for the onboard flash at various aperture settings, for ISO settings of 320 and 400.
We were anticipating problems with flash exposure in the S1 though, that really didn't seem to materialize once we got the aperture settings right. Some professional SLRs have shown very poor flash exposure control due to the difference in reflectivity between the CCD sensor and conventional photo film that the SLR body was designed to cope with. Many SLRs offering TTL (through the lens) flash metering rely on the light reflected from the film surface to gauge the flash exposure while the shutter is open. Because CCD sensors have very different reflectance characteristics than photo film, these cameras tend to overexpose flash pictures by 1 to 1.5 f-stops. We were therefore surprised when we discovered that the S1's flash actually did a pretty good job of getting the exposure right, as long as we were within the acceptable working distance. Our results were somewhat variable though, and we didn't do a great deal of flash shooting in the short time we had the S1 to work with. It did seem to slightly overexpose, but in most cases only by a half-stop or so. On the other hand, there were isolated instances where the overexposure was fairly drastic. Unfortunately, we weren't able to nail down just what the circumstances were that resulted in normal or overexposure.
Metering
The S1 offers three separate metering modes, which are automatically selected depending on the exposure mode. The 6-zone multi-pattern metering divides the image into six zones, which are then measured and analyzed to determine the best exposure for the full image. In 3D 6-zone multi-pattern metering, the camera takes the same information from the six zones and also judges information on the maximum brightness, the differences in brightness and the distance from the subject to the lens. Finally, the S1 also employs a center-weighted metering system, which averages values from a broad area in the center of the image to determine the exposure. The only deficiency we noted in this metering system is that you cannot manually select which system you'd like to use. (This is doubtless a result of the "consumer" heritage of the S1's N60 body.) The only way around this is to use the AE Lock function, which automatically sets the metering to center-weighted. All exposure modes except for Manual use the two multi-pattern metering systems, but unfortunately, the camera does not report whether it's using standard multi-pattern or 3D multi-pattern.
Multiple Exposure Mode
Through the second Function menu in Record mode, you can turn the Multiple Exposure mode on. What this does is allow you to make multiple exposures of one frame. It's just like exposing the same frame of 35mm film without advancing the film, either to brighten the exposure or to create the effect of a multiple exposure. This was a surprise to find on a digital camera, and we suspect that any serious work of this sort would be better done in the computer, rather than in the camera itself. It did have a huge advantage over similar modes in film-based cameras, in that you could immediately see the results of your multi-exposure on the LCD screen, rather than waiting for the film to come back from developing. Overall, an entertaining option, but one we don't think will find a lot of application.
Preview Mode
Through the Record settings menu, you can enable a Preview mode which provides a powerful tool for checking your exposure. When set to Auto Record, the image is previewed but automatically recorded. However, under the Manual Record setting, the image is still previewed, but must be confirmed before saving to memory. Once in Preview mode, the function menu (smaller rear LCD display) allows you to save or delete the image, as well as display a histogram or check the color. The histogram function button actually toggles between the Master histogram (showing the distribution of brightness values in the image) and the individual histograms for the red, green, and blue channels. This gives you a good idea of the distribution of tonal values across the image and whether it's under or over exposed. In Preview Mode, the Color function displays two reference bars, one of gray tones and the other of the standard color range, which help you evaluate the color and tonal values of your image for proper exposure.
Vari-Program Modes
The S1 features five special exposure modes, called Vari-Program modes, which are also controlled by the mode dial. These are again reflections of the underlying N60 body's consumer heritage, as they're intended to help relatively unsophisticated users get the best pictures out of the camera under a variety of conditions, without needing to know a lot about f-stops, exposure compensation, or other more-advanced subjects. In a professional device, they have less use, but we suspect that a lot of S1 owners will end up using these regardless.
Portrait Mode
The first of these is Portrait mode, which decreases the depth of field by using a larger aperture setting. This blurs the background slightly and makes the subject the prominent focus.
Landscape Mode
Using nearly the opposite settings of Portrait mode, Landscape mode increases the depth of field with a smaller aperture setting, causing subjects both near and far to be in sharp focus. Because the smaller aperture setting may necessitate a slower shutter speed, we recommend keeping a tripod handy to prevent any camera movement.
Macro Mode
As with Portrait mode, Macro mode uses a larger aperture setting to softly blur the background and place more emphasis on the subject. Remember that the actual macro focus range will vary with the lens being used.
Sports Mode (Continuous Shooting)
Sports mode biases the exposure system to use a faster shutter speed to freeze fast moving action. The focusing mode switches to continuous AF, so that the camera is continually adjusting the focus as the subject moves within the frame. Holding down the shutter button allows you to capture up to five continuous shots at approximately 1.5 frames per second. (Note that Sports Mode is the only mode that enables continuous shooting.) The actual number of consecutive shots and the cycle time will vary depending on the image size and amount of information to be recorded. When shooting continuously, the camera temporarily saves images to a small buffer memory before saving them to the memory card. An aspect of Sports mode that we didn't like was that it seemed to disable many of the camera's features, such as the white balance controls.
Night Scene Mode
The final special exposure mode is Night Scene, which employs a slower shutter speed to allow more ambient light into the image. A tripod is definitely recommended in this mode to avoid any blurring from camera movement. This mode also works well for night portraits, when using the Slow Synchronization and Slow Synchronization with Anti Redeye flash modes.
Reader Comments! --> Visit our discussion forum for the Fuji FinePix S1 Pro!

Follow Imaging Resource: