Canon PowerShot S20Canon packs 3 megapixels and a 2x optical zoom into their "smallest digicam" body!<<Operation & User Interface :(Previous) | (Next): Image Storage & Interface>> Page 9:Camera Modes & MenusReview First Posted: 4/4/2000 |
Camera Modes and Menus
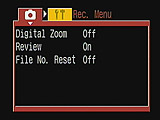
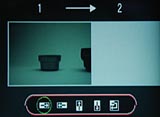 Stitch Assist Mode: Accessed by turning the mode dial to the red stitch assist symbol, this mode allows you to take multi-frame shots for panorama images to be assembled later with the included PhotoStitch software. When the mode dial is set to stitch assist mode, the LCD automatically turns on, and displays one of five different viewfinder setups, letting you stitch images from right to left, left to right, up to down, down to up, or in a 2x2 array. These displays show both the previous image, and the one currently being shot, as an aid to aligning the camera properly. One such display is shown above right. Pressing the Menu button in this mode pulls up the following options under the Record Menu:
- Resolution: selects between L (2048 x 1536), M (1024 x 768) and S (640 x 480).

- Compression: selects between Super Fine, Fine and Normal.
- Review: turns image review on and off.
- File Number Reset: turns the file number reset function on and off.
Scrolling to the top of the Record menu screen and over to the right accesses the Camera Setup Menu with the following options:![]()
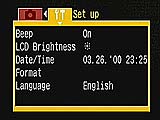
- Beep: turns the camera beep sound on and off.
- LCD Brightness: adjusts the brightness of the LCD display.
- Date/Time: sets the camera date and time.
- Format: formats the CompactFlash card.
- Language: selects between English, German, French, Spanish and Japanese.
Image Mode: Accessed by turning the mode dial to the word 'Image' in red letters, this mode allows you to select from the following preset exposure settings:![]()
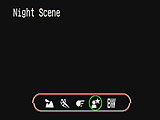
- Landscape: for recording broad expanses of scenery.
- Fast Shutter: for fast moving objects like sports, etc.
- Slow Shutter: for recording moving objects to achieve a blurred effect, like white water rapids.
- Night Scene: for night subjects.
- Black & White: records monochrome images.
Pressing the Menu button in this mode gives the following options under the Record Menu:![]()
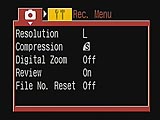
- Resolution: selects between L (2048 x 1536), M (1024 x 768) and S (640 x 480).
- Compression: selects between Super Fine, Fine and Normal.
- Digital Zoom: turns the digital telephoto function on and off.
- Review: turns image review on and off.
- File Number Reset: turns the file numbering reset on and off.
While in the Record Menu, scrolling up to the top of the screen and over to the right pulls up the Camera Setup Menu, with the same options as delineated under the Stitch-Assist capture mode.![]()
Manual Mode: Accessed by turning the mode dial to the red camera symbol denoted with an ‘m,' Manual capture mode gives you some control over exposure compensation (EV) and white balance in addition to a few other settings. Pressing the Menu button in this mode pulls up the Record and Camera Setup Menus with the following options:![]()
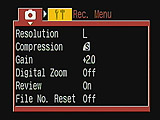
- Resolution: selects between L (2048 x 1536), M (1024 x 768) and S (640 x 480).
- Compression: selects between Super Fine, Fine and Normal.
- Gain: selects between zero (ISO 100), +1 (ISO 200) and +2 (ISO 400).
- Digital Zoom: turns the digital telephoto function on and off.
- Review: turns the image review function on and off.
- File Number Reset: turns the file number reset function on and off.
- Contrast: sets the image contrast.
- Sharpness: sets the image sharpness.
Scrolling up and over to the Camera Setup Menu gives the same options as stated earlier.![]()
Automatic Mode: Accessed by turning the mode dial to the lone red camera symbol, this setting gives the camera complete control over exposure with the exception of flash, self-timer and macro. Pressing the Menu button in this mode pulls up the Record and Camera Setup Menus with these options:![]()
- Digital Zoom: turns the digital telephoto function on and off.
- Review: turns the image review function on and off.
- File Number Reset: turns the file number reset function on and off.
Scrolling up and over to the Camera Setup Menu pulls up the same setup menu.![]()
Playback Mode: Accessed by turning the mode dial to the blue playback symbol, this mode allows you to review, write protect and erase captured images. Pressing the Menu button brings up the Play and Camera Settings Menus with these options:![]()
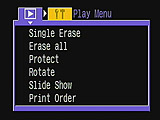
- Single Erase: erases a selected image.
- Erase All: erases all images on the card.
- Protect: write protects individual images.
- Rotate: rotates a selected image 90, 270 and zero degrees clockwise.
- Slide Show: activates the slide show playback of all images.
- Print Order: selects individual images for printing (DPOF compliant).
Scrolling up and over to the Camera Setting Menu pulls up the same options as in the other modes.![]()
PC Mode: Accessed by turning the mode dial to the black data transfer symbol, this mode allows you to connect the camera to your computer and download images.![]()

Follow Imaging Resource: