Fuji FinePix S20 ProFuji's latest electronic SLR offers a high dynamic range Super CCD (6.7 million photosensors in a 3.4 megapixel array) that interpolates to 6.0 megapixels, plus an external flash sync connection!<<Optics :(Previous) | (Next): Exposure & Flash>> Page 6:Fuji's "SR" Sensor TechnologyReview First Posted: 04/27/2004 |
Fuji's "SR" Sensor Technology
![]() An
important part of the story of the S20 Pro is the Fuji "SR" sensor
technology it's built around. First announced in early 2003, this technology
is an attempt to address the poor tonal characteristics of digital sensors.
Photographers who have worked with both film and digital technology have long
been aware of the poor job digital does when it comes to exposure latitude and
the preservation of highlight detail, areas where film still reigns supreme.
Fuji's SR technology seeks to address this problem by trading off resolution
for improved tonal range, dedicating half the sensors in the imager solely to
the recording of highlight data.
An
important part of the story of the S20 Pro is the Fuji "SR" sensor
technology it's built around. First announced in early 2003, this technology
is an attempt to address the poor tonal characteristics of digital sensors.
Photographers who have worked with both film and digital technology have long
been aware of the poor job digital does when it comes to exposure latitude and
the preservation of highlight detail, areas where film still reigns supreme.
Fuji's SR technology seeks to address this problem by trading off resolution
for improved tonal range, dedicating half the sensors in the imager solely to
the recording of highlight data.
Fuji's unique approach deserves attention and accolade, as it's a meaningful attempt to step off the megapixel roller coaster and take a hard look at how best to use ongoing advances in sensor technology in the service of real photography. The following is largely excerpted from my original news story on the technology, written when it was first announced, but has been updated to reflect current experience, and includes some examples from real-world cameras to illustrate the points.
At the root of the dynamic-range problem is that CCDs are essentially linear devices, with a hard limit on the range of illumination they can accurately respond to. Once a CCD's charge wells are full, it stops responding to incremental exposure. If the subject gets any brighter, there's no change in the amount of charge stored by the CCD.
This is very different than the way film responds to increasing exposure. Even slide film (which digital sensors are often compared to) offers some differential response to increasing illumination beyond that required to fully expose the film.
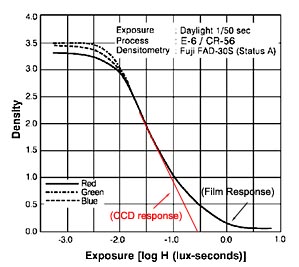
The illustration above shows how typical transparency (slide) film responds to light. (This and all other illustrations here are courtesy of Fujifilm. Modifications made to them are copyright Imaging Resource, and may not be reproduced without the permission of IR.) This is the so-called "DlogE" curve for Fuji's own Sensia 100. The vertical axis shows the density (opacity) of the film, while the horizontal axis shows the exposure level. As you'd expect for slide film, the density is the lowest when the exposure is the highest. Graphs of this sort are referred to as the "Characteristic Curves" of the film involved.
What's interesting about characteristic curves of film emulsions is the way they "tail off" at both high and low exposures. Looking at the highlight (righthand) end of the curve, you can see that it flattens out quite a bit as you get to high exposure levels. This means that the film begins responding more gradually to changes in exposure, and as a result can manage to show at least some detail at much higher light levels than it would otherwise.
By comparison, CCDs are "linear" throughout their range, with the result that they respond very predictably and proportionately up to a certain light level, but stop responding altogether at levels higher than that point. I've drawn-in an example of what a CCD's response would look like in red on the chart above.
This limitation of CCDs is well-known, but there are things camera designers can do to minimize it. This is why I came up with the horribly-lit "outdoor portrait" shot in my standard test suite, to evaluate how well cameras handle light overloads in strong highlights. Almost anything you might do to improve a CCD's tolerance for overexposure will have undesirable effects in other areas of its performance, however, so there's not much you can do with conventional CCD technology to match film's tonal response without arriving at a cure that's worse than the problem.
Now comes Fuji though, with a very clever approach to the problem. Rather than try to engineer a single CCD sensor element to match the broad dynamic range of film, they've instead added a second, low sensitivity sensor to each pixel of the CCD array. The resulting cells look something like the illustrations below.
| Standard ("HR") SuperCCD pixel layout. | Dual-Element "SR" SuperCCD pixel structure. |
While it sounds counterproductive to add reduced-sensitivity sensors to the CCD array, it turns out to be just what's needed to mimic the exceptional dynamic range of film. (Fuji's press release for SR technology pointed out that this is actually exactly how film emulsions work, using a combination of high- and low-sensitivity layers to respond to varying levels of exposure.) The low-sensitivity sensor is designed to have a light sensitivity only a quarter that of the main element. This means that it can tolerate light overloads 400% higher than can the main sensor element, without saturating (ceasing to respond). Fuji calls the new, lower-sensitivity sensor elements the "R" pixels, and the larger, more sensitive elements the "S" pixels.
With a little clever post-processing, the camera can combine the output signals from the two sensor elements, to mimic the long "tail" on film's DlogE characteristic curve. The illustration below shows how this works.
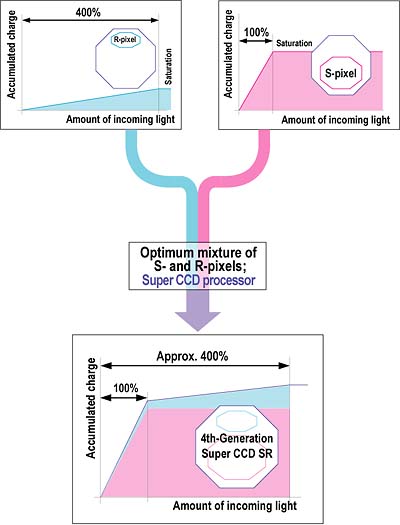
In this schematic depiction of the technique, the resulting curve doesn't look much like a conventional DlogE curve, but the effect is much the same. The sensor can continue to provide a proportional response even in the face of as much as a 400% light overload. The result is that cameras using the new "SR" SuperCCD sensor approach can potentially do a much better job of holding highlight detail under high-contrast lighting conditions.
The photos below (provided by Fuji) illustrate how this could work, but it's important to note that these are a mockup only. In actual practice, the impact of SR technology appears to be much less dramatic.
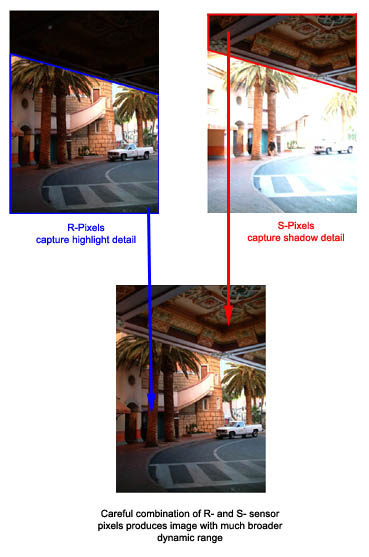
In the shot above, notice how the detail in the overhanging roof is preserved by the "S" pixels, while detail in the brighter portions of the image are recorded by the "R" pixels. (Once again, please do note that this is a mockup, not actual images from an SR sensor, at least as far as I know.)
When the SR technology was first announced, I hailed it as a huge breakthrough, in terms of extending the ability of digital cameras to deal with adverse lighting conditions. More than most digicam innovations, it holds the potential to really impact the picture-taking of the average consumer. - Just think of how many washed-out, pasty faces you've seen in flash shots, or how often you've tried to take shots in full sun (like my "Outdoor Portrait" torture test) with unappealing results. As we shall see below, the actual impact has been less dramatic, but is still very encouraging.
Fuji's development of the SR SuperCCD technology is a bold move for another reason as well: While the industry as a whole has been engaged in a race to cram ever-more pixels onto each chip, the further we go in that direction, the less perceptible the benefit is for the average consumer. The move from 4 to 5 or even 8 megapixels has made relatively little difference in the picture quality enjoyed by the average consumer. While it's true that an 8-megapixel camera lets you crop your shots more than you can manage with a 3-megapixel one, this is a moot point for the average consumer, who rarely manipulates their images. For pros and other advanced users though, the ability to crop and greatly extended dynamic range are both important, so the market impact of tradeoffs made there could be trickier to call.
With the SR technology, Fuji is breaking away from the blind pursuit of ever-higher pixel counts, and instead trading off some of that resolution to provide better quality photos with more tonal information in them. Thus, I suspect that even some "enthusiast" shooters would happily trade away some resolution if it meant being able to hold onto more critical subject detail in highlight areas. (In fact, the "enthusiast" crowd may very well become the most enthusiastic adopters of Fuji's SR technology.) The key obviously will be how much resolution has to be traded, in exchange for how much gain in dynamic range. - And the extent to which the bulk of users will want to accept that tradeoff.
Fuji introduced the first camera using their SR technology to the US market toward the end of 2003, in the form of the consumer-oriented FinePix F700. At the time, I questioned this move, feeling that advanced users would be more likely to appreciate the capabilities of the SR technology than would consumers.
Now though, Fuji has finally brought the SR technology to the enthusiast market with the S20 Pro. At the same time however, many users and reviewers have been claiming that the SR technology conveys no advantage in terms of dynamic range. In light of this, I thought it appropriate to take a closer look at the particular strengths and weaknesses of the SR approach.
Highlight Detail - The "SR" Advantage?
The primary benefit of the SR technology should be in extended dynamic range through the preservation of highlight detail. As noted above, this is an area in which most reviewers and many users have challenged Fuji's claims, seeing little or no improvement in highlight detail in image that they've looked at. As it turns out, this is the result of a misperception of how Fuji's SR implementation works, rather than an inherent failing in the technology itself.
The trick with any scheme to extend dynamic range is how to do so without making an ugly, flat-looking image in the process. Think about it: Anyone can shoot a picture that preserves highlight detail, all you have to do cut the exposure in half -- or to a quarter, if that's not enough. Assuming that the highlight brightness was less than 4x the peak brightness elsewhere in the scene, cutting the exposure by two stops (in other words, to 1/4 of the original) would preserve all the highlight detail. The only problem is that you'll end up with a drastically underexposed-looking image, with all the non-highlight detail pushed far down to the shadow end of the tone curve.
What the above example illustrates is that, while it's fine to blithely talk about dynamic range, when it comes time to view the final images, there's only so much "dynamic range" to go around in your final output (print, CRT display, etc) as well. So the real issue is not just a simple one of "dynamic range," but one that involves that plus what's called "tonal compression." In order to end up with a good-looking image that shows detail in both highlights and shadows, you need to selectively compress the tonal range of the original image. This is exactly what the "tail" on the DlogE curve of film does, and what Fuji is attempting to do with their "R" pixels.
The trick comes in deciding just when to compress an image's tonal range, and by how much. It turns out that the way Fuji cameras with SR sensors do this is by looking at how much of an image is occupied by overexposed highlights. If it's a relatively small percentage, the camera ignores the data from the R pixels, and doesn't compress the tonal scale at all. - This makes sense, because you'll generally be content to let a specular highlight here or there blow out, rather than flattening the contrast across your entire image just for the sake of preserving detail in a few small areas. On the other hand, if there's a large area with overexposed highlight detail, the camera compresses the tonal scale a fair bit, and relies the R-pixel data quite heavily, to maintain what's likely to be important subject detail. In between these two extremes, the camera's processor will use more or less R-pixel data, depending on how much image area is occupied by strong highlights.
As it turns out, this is the reason why many users and reviewers haven't seen any effect from the SR technology in their images: Almost invariably, when someone shows a sample image in which the SR technology didn't have any appreciable effect on dynamic range, it'll be an image in which the overblown highlights occupy a fairly small percent of the total image area. - And note that they need to be overexposed highlights to trigger use of the R-pixels. A normally-exposed sky with lots of cloud detail in the highlights won't normally trigger the SR technology, as long as the highlights in the clouds aren't saturating the sensor's "S" pixels.
It turns out that the deliberately awful lighting and harsh highlights of my standard "Outdoor Portrait" shot makes it just the sort of subject that will trigger the SR technology to take effect, hence my own conclusion that SR technology does indeed do more or less what it's intended to.
To show the difference between the SR technology and a conventional CCD, I've cropped portions of the Outdoor Portrait shot captured with the S20Pro and the Olympus C-8080, and shown the results side by side below.
Note that these two images were shot within a few minutes of each other, so the lighting is essentially identical between the two of them. The folds of Marti's shirt are positioned slightly differently in the two images, so specific areas of the image may not correlate exactly between the two shots. You can definitely see areas with the same shading though, and I've highlighted a region in each shot that not only has the same lighting, but that shows an excellent example of white-on-white detail as well, in the seam of the shirt. Note too, that I selected sample images that were exposed the same by both cameras, as evidenced by the brightness level of the wall behind Marti. - Comparing the same area in both images, the average brightness matched to within two luminance units (eg., 197 for the S20Pro vs 195 for the C-8080). This tells us that any differences we might see in the highlight detail are not caused by differences in the overall exposure level.
In the comparison images below, I first show the crops exactly as they came from the camera, and then after an extreme "levels" adjustment in Adobe Photoshop(tm). (The shadow slider was pushed up to a level of 150.) The purpose of this adjustment is to bring the extreme highlight detail down into a range that's easy to see on a typical CRT, which are generally pretty awful for accurately showing subtle highlight detail, even on calibrated screens. Click on either image to see a full-sized view (1:1 as it came from the camera).
|
Side by side crops from the Olympus C-8080 (left)
and Fuji S20 Pro (right) Unaltered, exactly as they came from the camera. |

 |
Side by side crops from the Olympus C-8080 (left)
and Fuji S20 Pro (right) Shadow slider boosted +150 units in Photoshop
"levels" control, to display hidden highlight detail. |
The result is clear, but perhaps needs a little further interpretation to clarify what we're seeing. There's no question that the S20 Pro maintains detail even in the strongest highlights, clearly illustrated by the way that it preserved detail in the seam of Marti's blouse outlined above, and in the subtly shaded areas on either side of it. It also keeps more of the subtle shading in the ripples of the blouse elsewhere. Looking at the 8080 image though, it might be tempting to conclude that it has more detail, as wrinkles and texture in the shirt are much more obvious in some areas. When you look at the strongest highlight areas though, it's clear that the 8080 image blows out to pure white, while the S20's maintains smooth gradations.
So why are the wrinkles of the fabric more obvious on the 8080's shot? Part of the reason is that the images were shot a few minutes apart, so some of the same elements just aren't present in the S20's image. The greater reason though, has to do with how the two cameras have "allocated" their tonal range. Because the 8080 has allowed the strongest highlights to blow out, it has more tonal range (and hence more contrast) available to render the detail in the wrinkles. The S20 on the other hand, in order to preserve a smooth rendering of the very strong highlight detail, has to roll off the contrast in the brightest areas of the image. This is exactly what film does, with the "S" shape of its density vs exposure curve. Another way of looking at it is that there's no free lunch. You have only so much output tonal range to go around. If you allocate a chunk of it to holding onto the strongest highlights, you're going to have to accept lower contrast in other parts of the tone curve. Likewise, if you use up your tonal range with detail that's a stop or two down from the maximum highlight value, you won't have any left with which to show detail in the strongest highlights.
Bottom line, the S20 Pro with its SR sensor clearly preserves more highlight detail than do cameras with conventional CCD sensors. The catch is that people may or may not see it in their particular images, depending on how much area overexposed highlights occupy. - And there's another (very large) category of images, in which people may hope for a better rendering of highlight detail (as in skyscapes), but which the SR technology will have no impact on whatsoever.
Fortunately, for those advanced amateurs and pros interested in directly controlling the S/R balance in their images, the latest version of Fuji's RAW Converter application lets you do just that. A slider labeled "Dynamic Range" offers a control range from 100% to 400%, corresponding to the amount of R-pixel data that's used. At 100% dynamic range, none of the R-pixel data is used, at 400%, the full range of R-pixel data is incorporated. - The percentage number is the amount that the maximum recorded highlight exposure is extended beyond the capabilities of the S-pixel sensors alone.
Extending the promise of SR technology: A modest proposal.
It seems to me that Fuji has an opportunity here to really capitalize on their SR technology and use it deliver a much greater level of creative control to advanced photographers. While the Dynamic Range slider in their RAW Converter application does allow pretty fine-grained control over the mixture of S- and R-pixel data, it is still limited in that the mixture is applied globally, across the entire image. In practice though, advanced amateur and pro photographers often want to treat highlight and shadow detail differently in different parts of an image. - This is the idea behind the graduated neutral density filters that photographers have used for years with film cameras to capture stunning dawn/dusk photos, balancing the exposure between the much brighter sky and the darker landscape beneath it. In the digital age, there are numerous tools designed to selectively merge data from two images with radically different exposures, to achieve the same effect. (See Fred Miranda's excellent DRI Pro utility for an example of one of these. - It does a superb job of combining image data from over- and under-exposed shots to result in stunning final images.) Even absent automated tools, many photographers routinely use this approach with density masks in Photoshop, manually "painting" portions of a low-exposure image into a high-exposure one to obtain results unobtainable in a single shot.
So here's my proposal: Why doesn't Fuji just provide a tool to directly support this workflow? All they'd need to do would be to add a (minor) feature to their RAW Converter software that would let users extract the S- and R-pixel data separately, as two separate images. Users could then merge the two images however they'd like, using tools like Fred Miranda's DRI Pro, or manipulate the two images in Photoshop or other imaging software. This should involve only a relatively minor tweak to the RAW-conversion software, but would convey huge benefits to advanced users. In my mind, this minor change would make the S20 Pro into an absolutely unique photographic tool, greatly increasing its appeal to advanced amateurs and professionals alike.
Resolution - How many megapixels?
The flip side of the SR technology's dynamic range extension of course,
is that it achieving it by trading away some resolution, packing two sensors
into each pixel site of its array. While the unique honeycomb structure of Fuji's
SuperCCD architecture helps a little in improving the apparent resolution, there's
no question that the approach should yield visual resolution more closely akin
to that of a 3 megapixel CCD than a 6 megapixel one.
This is exactly where Fuji has been caught on the horns of a dilemma. On the one hand, they want to call attention to the fact that the S20 Pro does in fact have 6 million photosites at work, so they'd like to use the 6-megapixel designation in talking about the camera. And the JCIA standard definition for "megapixel" in fact specifies that it should include "all photo sites contributing to the final image" (or words very much to that effect). By that definition, the S20 Pro does indeed have a "six megapixel sensor". The only problem with this is that the conventional use of "megapixel" has a very direct correlation with resolution. - And in the S20 Pro, the pixels are grouped in pairs, such that the pixels of each pair don't separately contribute to spatial resolution, but rather are only evaluated as pairs. (Both pixels of each pair are positioned under the same "microlens" on the array's surface, so they both "see" the same optical information.) Thus, while the S20 Pro can legitimately be described as having 6 million pixels according to the JCIA standard, it only provides spatial resolution roughly equal to that offered by conventional CCD arrays with 3.1 megapixels.
Personally, I think Fuji should find some way of talking about their cameras' resolution that maintains the commonly accepted understanding of what a megapixel means (as having a fairly direct correlation with the number of discrete sensors that contribute to luminance resolution), and use some other parlance to highlight the dynamic range benefits. ("Superpixels," perhaps? For instance, "3.1 million superpixels, with a total of 6.2 megapixels of sensor data available for processing.")
Terminology aside, let's take a look at some examples from a 3-megapixel camera, the S20 Pro, and a 6-megapixel product. Bottom line, it's how the images look that determines what people think about cameras' resolution capabilities.
The examples below are somewhat handicapped because I didn't have a three-megapixel camera available with a lens on it the equal of that on the S20 Pro. Surveying the 30 or so cameras that were stacked around the studio, and comparing their test images, I settled on the Nikon Coolpix 3700 as being the 3-megapixel model at hand with the best-performing lens. (It's actually pretty good.) For the 6-megapixel exemplar, I chose the Canon Digital Rebel, with a 50mm f/1.8 lens attached. In the interest of fairness, and to remove the impact of different image-sharpening processing in the cameras themselves, I shot the images with the internal sharpening adjustment on each camera set to the lowest value available (that is, either "low" or "soft"), and then experimented in Photoshop to find the optimum sharpening settings for each of the cameras involved. (To extract the best results a camera is capable of, you need to tailor the radius and amount of unsharp masking applied, to match the camera's inherent blur radius.) The crops below are taken from the images that I hand-sharpened in Photoshop, but also I've included links to the original images so interested readers can apply their own sharpening as desired.
In order to match the scale of the 3-megapixel image to the two 6-megapixel ones, I resampled it (after sharpening) to match the width of the S20 Pro's image. - Again, if you'd like to quibble about the order of sharpening vs resizing, you're welcome to experiment with the original images provided, to see how much of a difference it makes.
The subject I chose for this test is a large pine tree across the driveway from the office/studio. While not the most visually compelling subject, it does show an excellent range of fine detail in its foliate. The pine tree's rough, scaly bark and the leaves on deciduous trees around it show a different sort of detail, defined by contrast edges and texture, as compared to the fine lines of the pine needles.
The three shots were captured at as close to the same exposure as each camera's compensation adjustment would allow. The S20 Pro and Digital Rebel lenses were both set to f/5.6, which should be about in the "sweet spot" of their respective aperture ranges. The Coolpix 3700 didn't permit any control over its aperture setting, but it happily ended up at f/4.3, which should roughly correspond to the optimum aperture range of its shorter focal length lens. All cameras were shot using their Auto white balance setting. (Yes, their color really did vary that much, and in fact, none of them really did a good job (IMHO) of accurately reproducing the sky color that day. - In actuality, it was about midway between that shown in the Rebel and S20 Pro's shots.)
So, enough preamble, how'd they do? See for yourself:
| Resolution comparison: 3 megapixels vs (3.1+3.1) vs 6 |
||
| Nikon Coolpix 3700 | Fuji S20 Pro | Canon Digital Rebel |
 |
 |
 |
| Original Image Unsharp Masked ("Normal" camera sharpness for comparison) Resized |
Original Image Unsharp Masked ("Normal" camera sharpness for comparison) |
Original Image Unsharp Masked ("Normal" camera sharpness for comparison) |
 |
 |
 |
| This portion of the image shows very fine, spiky detail in the pine needles. The S20 Pro clearly has some advantage here relative to the 3-megapixel Coolpix, but doesn't approach the resolution of the 6-megapixel Digital Rebel. | ||
 |
 |
 |
| In the detail of the bark, the S20 Pro's advantage over the 3 megapixel camera is even more pronounced, but the Rebel still wins easily. | ||
From the above, it does appear that the S20 Pro has an advantage over a conventional 3-megapixel camera, but it's equally clear that it doesn't approach the resolution of a true 6-megapixel model like the Digital Rebel. (The Coolpix 3700 clearly wouldn't have a lens that would approach that of the S20 Pro or the one used on the Digital Rebel, but the magnitude of the resolution differences between it and the S20 Pro is just as clearly more than could be accounted for by the lens alone, hence my conclusion that there is an inherent advantage in the SuperCCD sensor layout.)
Reader Comments! --> Visit our discussion forum for the Fuji FinePix S20 Pro!

Follow Imaging Resource: