Fuji FinePix S3 ProFuji updates their digital SLR with a 12.34-megapixel Super CCD SR II, for amazing tonal range.<<Optics :(Previous) | (Next): Shutter Lag & Cycle Time Tests>> Page 6:Exposure & FlashReview First Posted: 9/7/2005 |
Exposure
| Free Photo Lessons | |
|
As noted, shutter times in Manual or Shutter Priority modes extend from 30 to 1/4,000 seconds. In Manual mode, CSM option 6 can be used to enable bulb exposure operation, in which the camera's shutter remains open as long as the shutter button is depressed.
While the S3 permits very long shutter speeds, I was surprised to find that it doesn't appear to incorporate a "dark frame subtraction" noise-reduction system, as found in most D-SLRs and high-end consumer digital cameras. I say this because the camera begins recording the captured image to the memory card the moment the shutter closes. That said, there's evidently some sort of noise reduction processing going on in the SuperCCD sensor, because even very long exposures are amazingly "clean," with virtually no "hot pixels." (I was quite impressed by the S3's low light capabilities.)
Fujifilm's previous S2 model had a disappointing limitation in its metering system, in that it had problems accurately metering exposures longer than two to three seconds. In a very dark room, where a 30 second manually-set exposure at ISO 200 produced a slightly underexposed image, the camera's AE system routinely selected an exposure time of only three seconds in Programmed mode. Happily, the S3 seems to have overcome this limitation, in that its autoexposure system had no trouble metering exposures as long as 30 seconds, the camera's maximum timed exposure duration.
Exposure compensation on the S3 can be adjusted from -3.0 to +3.0 EV (a wider than average range) in 1/2 EV increments by pressing the +/- button on the camera's top panel and rotating the Main Command dial. This adjustment is only available with the Programmed, Shutter Priority, Aperture Priority and Manual exposure modes. Wait a minute, you say, what does "exposure compensation" mean if you're in manual exposure mode? You're controlling all the exposure parameters, so what's to compensate? It turns out that the S3 gives you an analog exposure readout in the viewfinder when in manual mode, showing whether the camera thinks you're exposing correctly or not. The exposure compensation setting in manual mode affects this exposure-feedback display, biasing it to indicate "correct" exposure when the exposure is actually high or low by the amount that you've dialed-in.
For the most part, I really liked the controls on the S3, but one area that I really felt needed improvement was the step size on the exposure compensation adjustment. The S3 has a 1/2 EV unit step size on its exposure compensation control, and there doesn't appear to be any option for switching to the 1/3 EV steps used by most other digital cameras. The 1/2 EV adjustment step is apparently a holdover from the N80 film body, and frankly is too large for exacting work with a digital camera. Film (even transparency film) has a wider exposure latitude than do the sensors on digital cameras. Exposure adjustments of 1/2 EV are thus fine for film work, but can make it difficult to set exposure precisely enough on a digital camera. I'd say if there was a single firmware enhancement I'd like to see Fuji make to the S3, it would be an option for 1/3 EV exposure compensation increments.
ISO sensitivity on the S3 Pro ranges from 100 to 1,600, in steps of 100, 160, 200, 400, 800, and 1600. The user manual cautions about image noise at ISO settings higher than 400, but I thought the images were generally surprisingly clean. Looking at the numbers quantitatively and comparing between the S3 and other cameras currently on the market, the S3's absolute noise levels are lower than most, and the S3 doesn't trade away as much subtle subject detail as some do to achieve its low noise levels. (See the noise graph and further discussion in the Test Results section at the end of this review.)
As mentioned earlier, an Auto-Exposure Lock function button lets you lock the camera's exposure settings for a certain area of your subject (instead of using a half-press of the Shutter button to lock both exposure and focus). You simply point the camera at the part of the subject you want metered, hold down the AE-L/AF-L button and then recompose the shot. For the best/most predictable results, you should set the camera's metering mode to center-weighted or spot when using the AE lock function. (I'll discuss these metering modes in more detail in just a bit.) This decoupling of exposure and focus lock is a handy feature offered by most pro SLRs, but generally lacking in consumer-level digital cameras. By default, the AE-L/AF-L button locks both exposure and focus. CSM menu 9 offers a range of options relating to the AE-L/AF-L button. In addition to the default dual AE/AF lock, you can set it instead to lock just exposure, just focus, or to "latch" the exposure lock when it's pressed. When the AE button is set to latch exposure, you don't have to hold the button down to maintain the exposure setting: Press it once, and the exposure will remain locked until you either trip the shutter, or press the AE-L/AF-L button again. Finally, a fifth option lets you decouple the autofocus system from the Shutter button. The "AF Operation" setting forces the camera's autofocus system to only operate when the AE-L/AF-L button is pressed.
Independent of the AE-L/AF-L button's functioning, you can separately control whether exposure locks when you half-press the Shutter button. CSM menu screen 5 lets you disable the shutter-based AE lock. When this function is disabled, the camera will continue to adjust its exposure settings regardless of whether the Shutter button is half-pressed or not. (The focus will still lock unless it also is decoupled by CSM option 9 as just described, but the exposure will be allowed to change.) With the function enabled, the exposure settings will be set whenever you half-press the Shutter button, and will remain the same until the shutter is fired or the button released. NOTE that the S3's Shutter button AE lock is disabled by default. (Most digital cameras lock exposure when the shutter is half-pressed, so you need to be aware of this when you first start shooting with the S3.)
The Self-Timer button on top of the camera activates the self-timer mode, which counts down from two, five, 10, or 20 seconds after the Shutter button is pressed before firing the shutter. The AF Assist light on the front of the camera blinks during the countdown.
Fujifilm's SuperCCD "SR" Technology
Fujifilm's basic "SuperCCD" technology was first announced back in the fall of 1999, and has been featured in a variety of their digital camera models since then. The basic SuperCCD structure uses diagonally-arrayed hexagonal cells, with the pixel data interpolated 1.4x into the standard rectangular image array. The net result is final images with twice as many pixels as were in the original sensor array, but that have slightly better vertical and horizontal resolution than that of conventional CCDs. Besides the slight but noticeable increase in resolution, Fuji also claims greater light sensitivity, improved signal/noise ratio, and lower power consumption for the technology.
In early 2004, Fujifilm announced a totally new development in the field of CCD sensors, their "SR" sensor technology. An effort to mimic the very broad dynamic range of film, SuperCCD SR chips combine two light-sensitive pixels at each array site. One sensor has normal sensitivity, but the other is only 1/4 as sensitive to light. By cleverly combining the signals from both sensors, Fuji can achieve dynamic range four times as great as that of conventional CCD designs. "SR" technology was first introduced to the market in the consumer-oriented Finepix F700. Now, the technology's true potential becomes more apparent, with its implementation in the S3 Pro.
Here's a little background on how Fujifilm's SR sensor technology works, excerpted from our news coverage of the original announcement:
The root of the dynamic range problem with conventional CCDs is that they're essentially linear devices, with a hard limit on the range of illumination they can accurately respond to. Once a CCD's charge wells are full, it stops responding to incremental exposure. If the subject gets any brighter, there's no change in the amount of charge stored by the CCD.
This is very different than the way film responds to increasing exposure. Even slide film (which digital sensors are often compared to) offers some differential response to increasing illumination beyond that required to fully expose the film.
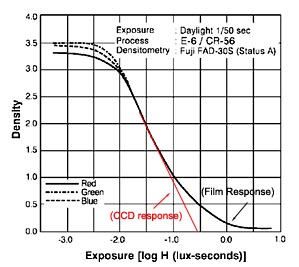
The illustration above shows how typical transparency (slide) film responds to light. (This and all other illustrations here are courtesy of Fujifilm. Modifications made to them are copyright Imaging Resource, and may not be reproduced without the permission of IR.) This is the so-called "DlogE" curve for Fuji's own Sensia 100. The vertical axis shows the density (opacity) of the film, while the horizontal axis shows the exposure level. As you'd expect for slide film, the density is the lowest when the exposure is the highest. Graphs of this sort are referred to as the "Characteristic Curves" of the film involved.
What's interesting about characteristic curves of film emulsions is the way they "tail off" at both high and low exposures. Looking at the highlight (righthand) end of the curve, you can see that it flattens out quite a bit as you get to high exposure levels. This means that the film begins responding more gradually to changes in exposure, and as a result can manage to continue to show at least some response at much higher light levels than it would otherwise.
By comparison, CCDs are "linear" throughout their range, with the result that they respond very predictably up to a certain light level, but then stop responding altogether at levels higher than that point. I've drawn-in an example of what a CCD's response would look like in red on the chart above.
This limitation of CCDs is well-known, but there are things camera designers can do to minimize it. This is why we have that horribly-lit "sunlit portrait" shot in our standard test suite, to evaluate how well cameras handle light overloads in strong highlights. Almost anything you might do to improve a CCD's tolerance for overexposure will have undesirable effects in other areas of its performance, however, so there's no way with conventional CCD technology to match film's tonal response without arriving at a cure that's worse than the problem.
Now comes Fuji though, with a very clever approach to the problem. Rather than try to engineer a single CCD sensor to match the broad dynamic range of film, they've instead added a second, low sensitivity sensor to each pixel of the CCD array. The resulting cells look something like the illustrations below.
| Standard ("HR") SuperCCD pixel layout. | Dual-Element "SR" SuperCCD pixel structure. |
While it sounds counterproductive to add a reduced-sensitivity sensor to the CCD array, it turns out to be just what's needed to mimic the exceptional dynamic range of film. (Fuji's original press release pointed out that this is actually exactly how film emulsions work, using a combination of high- and low-sensitivity layers to respond to varying levels of exposure.) The low-sensitivity sensor is designed to have a light sensitivity only a quarter that of the main element. This means that it can tolerate light overloads 400% higher than can the main sensor element, without saturating (ceasing to respond). Fuji calls the new, lower-sensitivity sensor elements the "R" pixels, and the larger, more sensitive elements the "S" pixels.
With a little clever post-processing, the camera can combine the output signals from the two sensor elements, to mimic the long "tail" on film's DlogE characteristic curve. The illustration below shows how this works.
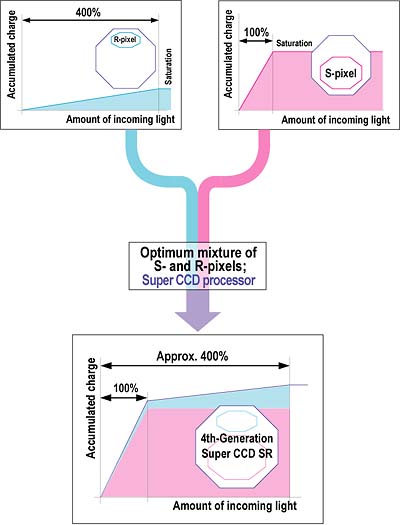
In this schematic depiction of the technique, the resulting curve doesn't look much like a conventional DlogE curve, but the effect is much the same. The sensor can continue to provide a proportional response even in the face of as much as a 400% light overload. The result is that cameras using the new "SR" SuperCCD sensor approach should do a much better job of holding highlight detail under high-contrast lighting conditions. The photos below show what this might look like in an actual image. (Note though, that these images are mockups, and do not represent the actual output from a SR-design SuperCCD. They do serve to convey the general idea though.)
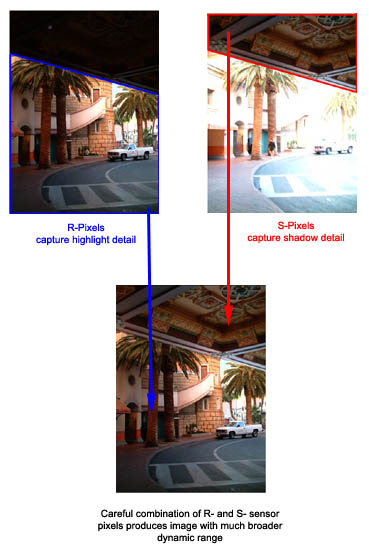
In the shot above, notice how the detail in the overhanging roof is preserved by the "S" pixels, while detail in the brighter portions of the image are recorded by the "R" pixels.
With the SR technology, Fuji has broken away from the blind pursuit of ever-higher pixel counts, and instead trading off some of that resolution to provide better quality photos with more tonal information in them. Early results from the consumer-oriented F700 camera were mixed, part of the problem being that people (including many reviewers) didn't really understand how the SR technology was being applied, and so didn't know how to properly interpret what they were seeing.
With the S3 Pro though, the SR technology comes to its logical market, and the results are absolutely stellar. Based on our detailed tests here, it's hard to imagine any wedding photographer who wouldn't immediately want an S3 Pro for their work: Its handling of difficult highlights under tough lighting conditions simply puts to shame any other camera we've ever tested. - And wedding photographers aren't the only ones who have to deal with difficult highlights either. The S3 Pro could make life considerably easier for studio photographers as well, greatly easing the task of lighting difficult subjects to reduce contrast. With its incredible dynamic range, excellent results can be obtained even with fairly contrasty lighting.
The Function Buttons

Many of the S3's exposure options are controlled through the series of function buttons on the camera's back panel, just beneath the small LCD display and above the larger LCD monitor. This is the same arrangement as appeared on the earlier S2 and S1 models, and I've found it to be one of the best camera interfaces I've yet encountered for setting common camera operating parameters. I really like the way the functions are immediately available, without having to delve into layers of menu structure to find the feature I'm looking for. The function buttons are "soft buttons," whose behavior is set by the contents of the LCD display above them. The FUNC button just to the left of the row of soft buttons controls which function menu is displayed in the LCD. The first press of the FUNC button displays the basic exposure function menu, featuring white balance, image quality and size, and Film Simulation settings. The second press of the Function button displays the next menu, which adjusts dynamic range, color, tone, and sharpness. A third screen offers the AF area option and also lets you lock the function buttons so you won't inadvertently change a setting if you happen to bump the button panel while carrying the camera. There's also a reset option to reset all the settings to their defaults.
White Balance Options
The S3 Pro offers a wider than average range of white balance settings. Options include Auto, two separate Custom ("manual") settings, Sunny, Shade, three Fluorescent settings (Daylight, Warm White, Cool White), and Incandescent. The Incandescent option seems to be adjusted for 3,200K studio lights (as you'd expect on a pro-oriented camera), so it doesn't fully compensate for the very warm cast of typical household incandescent bulbs. The Custom settings adjust the white balance to match specific lighting, based on a reference white card. To balance the color for a new light source, each Custom setting must be changed through the Record settings menu. I'd prefer to change the setting just by selecting the Custom white balance option, instead of having to access the LCD menu, but it's nice that the camera remembers the setting for you, without forcing you to choose a new setting every time you enter Custom white balance mode.
Tone, Color, and Sharpness Options
The S3's tone and color saturation variations are nicely balanced to give a useful range of control. (That is, the "high" color option isn't overly garish, and the "org" (original) setting gives nicely understated colors that aren't too flat. Options for tone (contrast) are STD (standard), HARD (high contrast), or ORG (original - a lower contrast setting). Color options are STD (standard), HIGH (high contrast), ORG (original - a slightly lower saturation), and B/W (black and white). Sharpness options are STD (standard), HARD (higher in-camera sharpening) and OFF (no in-camera sharpening). As with color and tone, the sharpness options seem to cover a good range of variation.
Dynamic Range and Film Simulation
The S3 Pro's Super CCD SR II's dual-pixel configuration was intended to mimic the dual grain configuration of color negative film. What this essentially means is that the S3's CCD is composed of 6.17 million large "S" pixels and 6.17 million small "R" pixels, arrayed in a pattern to mimic the silver-halide grains in film. According to Fuji, this new design broadens the camera's dynamic range by 4x. Thus, built into the S3 is a Dynamic Range adjustment tool, which lets you specify how broad you'd like the range to be, depending on the subject and lighting conditions. Accessed through the Function menu, the Dynamic Range option offers Auto, Wide 1, and Wide 2 settings. The Auto setting varies the range between 100 and 400 percent, depending on the scene. In theory, this mode should automatically suppress any flaring highlights or dark areas in high contrast situations. The Wide 1 option sets the dynamic range to 230 percent, while Wide 2 fixes the setting at 400 percent. Thus, you can leave it up to the camera, or select a smaller or wider dynamic range, depending on the scene at hand. I can immediately see this feature being of interest to wedding photographers (among whom the previous S2 Pro was a big hit), looking to preserve detail in those white wedding dresses.
In order to take advantage of the S3's Dynamic Range setting in the Function menu, the main Dynamic Range option under the Setup menu must be set to Wide. If set to Standard, the dynamic range is fixed at 100 percent (like the previous S2), and the setting is unavailable in the Function menu.
The S3's unique CCD also enables a Film Simulation mode, which enhances tone and color in an effort to simulate the look of color film. Also accessed through the Function menu, the Film Simulation option offers Standard, F1 (Studio Portrait), and F2 (Fujichrome) choices. The Studio Portrait setting enhances skin tones, while the Fujichrome setting boosts saturation for more impressive scenery. This is the first time such a tool has been offered on a digital SLR, and I've no doubt that wedding and portrait photographers alike will be more than a little interested in playing around with it.
Flash
The S3 Pro offers both a built-in, pop-up flash and a hot shoe for connecting an external flash unit when more flash power is needed. The built-in flash has seven operating modes: Auto, On, Off, Anti Red-Eye, Slow Synchronization with Anti Redeye, Slow Synchronization, and Rear-Curtain Sync. All of the flash modes are controlled by the Flash button at the top of the camera's rear panel, and each is pretty self-explanatory. The Auto setting lets the camera judge when to use the flash, while the On setting fires the flash with every exposure and the Off setting disables the flash entirely (you can also close the flash compartment to disable the flash). Anti Redeye (equivalent to Redeye Reduction mode on other digital cameras) fires a small pre-flash before firing the full flash, to avoid the annoying Redeye Effect. Slow Synchronization works with a slower shutter speed to illuminate the subject and also allow more ambient light into the image. Likewise, Slow Synchronization with Anti Redeye just combines the two modes for night portraits. Finally, Rear-Curtain Sync fires the flash at the end of long exposures, so any "motion trails" will appear behind moving subjects, rather than seeming to proceed in front of them.
Effective Flash Range (from S3 Manual):
| ISO | |
|
| Guide Number (feet) | |
|
| f-stop (aperture) | |
|
| |
(3.3 - 13.8 ft.) |
(6.6 - 27.9 ft.) |
| |
(2.3 - 9.8 ft.) |
(4.6 - 19.7 ft.) |
| |
(2.0 - 6.9 ft.) |
(3.3 - 13.8 ft.) |
| |
(2.0 - 4.9 ft.) |
(2.3 - 9.8 ft.) |
| |
(2.0-3.6 ft.) |
(2.0 - 6.9 ft.) |
As noted, the S3 also has an external flash hot shoe, just behind the pop-up flash compartment. The hot shoe accommodates Nikon accessory strobes, as well as a wide range of third party flashes. The range of flash sync modes remains available for compatible flash units. Different Nikon speedlights offer different features when used on the S3 with different lenses. Rather than try to reproduce the large table from the S3's manual here, I'll just note that the S3 doesn't seem to need the special "DX" flash types required by Nikon's own digital SLRs. Chances therefore are good that whatever Nikon speedlight you happen to already own should work on the S3 much as it does on your film-based SLRs.
3D Matrix Flash Metering?
A key feature of Nikon's SLRs (both film and digital) is their "3D Matrix Flash Metering," a uniquely capable system of metering flash exposures that handles difficult subjects with remarkable ease. Given that the S3 Pro is based on a Nikon body, I was curious as to whether that meant that it would also incorporate Nikon's advanced flash exposure algorithms. Unfortunately, a little side by side experimentation with the S3 Pro and my Nikon D70 seems to suggest that this is not the case. Setting up some deliberately difficult subjects (a dark computer screen, surrounded by lighter objects, various light objects against darker backgrounds), the S3 Pro's flash metering system was fairly easy to "trick" into over- or underexposing the images. By contrast, the D70 delivered very accurate flash exposures in almost every instance.
Metering
The S3 offers three separate metering modes, selected via a small ring surrounding the AE-L/AF-L button on the camera's rear panel. The 10-segment multi-pattern metering divides the image into 10 zones, which are then measured and analyzed to determine the best exposure for the full image. Alternatively, the S3's center-weighted metering system averages values from a broad area in the center of the image to determine the exposure. Finally, the Spot Metering option determines the exposure by metering a roughly 4mm diameter area in the viewfinder (approximately two percent of the image area). The spot metering area shifts to follow the selected focus area. (When the camera is in closest-subject priority dynamic autofocus mode though, the spot metering area always remains in the center of the shot.)
Multiple Exposure Mode
You can enable multiple exposures on the S3, through the Release Mode switch on the left side of its top panel. This lets you make multiple exposures on one frame. It's just like exposing the same frame of 35mm film without advancing the film, either to brighten the exposure or to create the effect of a multiple exposure. This is a little surprising to find on a digital camera (although it was also present on the S1 and S2), and I suspect that any serious work of this sort would be better done in the computer, rather than in the camera itself. It does have a huge advantage over similar modes in film-based cameras, in that you can immediately see the results of your multi-exposure on the LCD screen, rather than waiting for the film to come back from developing. Overall, an entertaining option, but one I don't think will find a lot of application.
Preview Mode
Through the Record settings menu, you can enable a Preview mode which provides a powerful tool for checking your exposure. When set to On, the image is previewed two seconds and then automatically recorded. However, under the Preview setting, the image is still previewed and automatically recorded, but the Function keys now offer a few options. Once in Preview mode, the function menu (smaller rear LCD display) allows you to save or delete the image, as well as display a histogram or the brightness warning. The histogram function button actually toggles between the Master histogram (showing the distribution of brightness values in the image) and the individual histograms for the red, green, and blue channels. This gives you a good idea of the distribution of tonal values across the image and whether it's under or over exposed. In Preview mode, the Standard Chart option (fourth Function key) cycles between the brightness warning (which flashes any overexposed areas) and a Color chart. The Color chart displays two reference bars, one of gray tones and the other of the standard color range, which help you evaluate the color and tonal values of your image for proper exposure.
Reader Comments! --> Visit our discussion forum for the Fuji FinePix S3 Pro!

Follow Imaging Resource: