Minolta Dimage S404Dimage technology and optics in a compact, stylish four megapixel design<<Shutter Lag & Cycle Time Tests :(Previous) | (Next): Camera Modes & Menus>> Page 8:Operation & User InterfaceReview First Posted: 1/30/2002 |
Operation and User Interface
Though the combination of record modes, drive modes, and exposure modes may seem complicated at first, the S404's user interface is pretty straightforward once you get the hang of it. I liked the fact that most exposure options are controlled externally (that is, without resorting to the LCD menu system), via the Mode dial, Drive Mode button, and Subject Program button. You can also control the flash and Exposure Compensation externally, as well as the shutter speed and aperture when in Manual mode. The availability of the QuickView button makes checking just-captured images a snap, without having to change camera modes. Special exposure features are all adjustable through the LCD menu system, which is extensive but uncomplicated. Menu screens are set up as subject tabs, and are quickly navigated via the Four Way Arrow pad. The top status display panel is a definite plus, as it reports a lot of camera settings, enabling you to operate the camera with the LCD monitor disabled. (This saves a great deal of battery power.) You'll spend some time flipping through the instruction manual to understand the camera settings, but I don't think it'll take most users too long to get up and running.
Control Enumeration
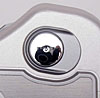
Shutter Button: Located on top of the camera, this chrome button sets focus and exposure when halfway pressed. When fully pressed, this button fires the shutter.

Subject Program Button: Nestled next to the status display panel in a small recess, this button controls the Scene modes of the camera. Pressing it repeatedly cycles through the following modes:
 Macro: Adjusts the focus range for smaller, close-up subjects.
 Portrait: Uses a larger aperture setting to produce sharply-focused subjects in front of slightly blurred backgrounds.
 Landscape: Employs a smaller aperture for a greater depth of field, keeping both foreground and background in focus.
 Night: Uses a slower shutter speed for darker exposure settings, allowing more ambient light into the image. Also combines the flash with longer shutter times for well-exposed night portraits.
 Text: Increases the image contrast and boosts exposure compensation for capturing black text over a white background.
- Text with Macro: Combines the two modes, capturing clear text at a closer range.
- No Scene Selection: Returns the camera to the normal operating mode.
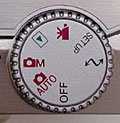
Mode Dial: This notched dial rests on top of the camera, on the right side. Turning the dial selects the camera's operating mode, with the following options available:
 Off: Turns the camera off.
 Auto: Puts the camera into Auto record mode, in which the camera makes all of the exposure decisions, including shutter speed and aperture.
 Manual: Provides more control over the exposure, with available exposure modes of Program AE, Aperture Priority, and Manual.
 Playback: Reviews captured images and movies on the memory card. Also allows users to delete images, set them up for printing, copy them, or enlarge them.
 Movie: Records short movies with sound, for as long as the memory card has available space.
 Setup: Activates the Setup menu, which instantly appears on the LCD monitor upon entering the mode.
 PC: Allows the camera to connect to a computer and download images.

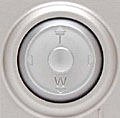
Flash Mode / Playback Zoom Button: The first button in a series on the angled portion of the top panel, this button controls the flash mode in any record mode (except for Movie), cycling between Auto, Fill, Flash Cancel, Auto Red-Eye Reduction, and Fill Red-Eye Reduction.
In Playback mode, this button controls the playback zoom feature, which magnifies the image as much as 3.5x. Pressing the button repeatedly cycles through 2x, 2.5x, 3.5x, and normal image displays.

Drive Mode Button: Directly to the right of the Flash Mode / Playback Zoom button, this button controls the camera's drive mode, cycling through the following:
- Self-Timer / Remote Control Mode: Provides a 10-second delay between the time the Shutter button is pressed and the shutter actually opens. This mode also allows the camera to work with the optional remote control accessory.
- Continuous Shooting Mode: Allows the camera to capture a rapid succession of images for as long as the Shutter button is held down, or as long as the memory card has available space. (As noted earlier, continuous shooting mode will capture up to 6 shots very rapidly (less than a second between each) until the buffer memory fills. After that, shot to shot cycle times stretch to 5 seconds or so.)
- Auto Exposure Bracketing Mode: Sets up the camera so pressing and holding the shutter button takes three sequential images at different exposure settings. - The exposure difference between the shots is set via an LCD menu option.
- Single Shot Mode: Returns the camera to the normal, one-shot recording mode.

Exposure Compensation Button: Directly to the left of the Mode dial, this button activates the Exposure Compensation feature in any record mode (except Manual exposure mode). In Manual exposure mode, pressing this button toggles the function of the Four Way Arrow Pad (see below) between setting shutter time or aperture.
Four Way Arrow Pad: The dominant control on the camera's back panel, this button features four arrows (one pointing in each cardinal direction). In any settings menu, these arrows navigate through menu options and screens. Pressing the center of the button confirms menu selections.
In any record mode, the up and down arrows control the optical and digital zoom. When manual focus is activated, the up and down arrows can control either the focus or the zoom. Pressing the center of the pad alternates between the optical zoom and manual focus options. In Manual and Aperture Priority exposure modes, the right and left buttons control exposure settings. Pressing and holding the center of the pad activates the AF Area Selection screen, allowing you to choose the autofocus area using the arrow keys.
In Playback mode, the right and left arrows scroll through captured images. Pressing the up arrow switches to a histogram display that also shows several exposure parameters for the image being viewed. Pressing the down arrow returns to normal playback display. When an image has been enlarged in playback mode, the four arrows let you scroll around the enlarged image.
![]()
Menu Button: Just beneath the Four Way Arrow pad, the Menu button activates the settings menu in any camera mode. Pressing this button also dismisses the menu screen.
![]()
Quick View / Erase Button: Below the Menu button, this button activates the Quick View image review mode when pressed in any record mode.
In Playback mode, this button activates the Erase menu, allowing you to erase the currently displayed image or selected images from the memory card.
![]()
Display Button: Adjacent to the lower right corner of the LCD monitor, this button controls the image and information display in any record mode as well as in Playback mode. In Record mode, pressing the button once removes the information display, while a second press shuts off the LCD monitor entirely. A third press activates the LCD monitor with the information display.
In Playback mode, this button also turns the information display on and off. This button also activates the nine-image index display.

Card Slot Release Latch: Situated in the top right corner of the back panel, just beside the CompactFlash compartment door, this latch releases and opens the compartment door.
Battery Latch: Hidden on the bottom panel of the camera, in the center of the battery compartment door, this latch locks and unlocks the battery compartment door.

Follow Imaging Resource: