The Imaging Resource
Quick Review
Contax TVS Digital Camera
 |
Camera QuickLook | |
Review
Date |
07/16/03 | |
|
User Level |
|
|
|
Product Uses |
|
|
|
Digicam Design |
|
|
|
Picture Quality |
High, 5.0-megapixel CCD | |
|
Print Sizes |
Sharp 8x10s and larger | |
|
Availability |
Now | |
| Suggested Retail
Price |
|
|
| ||||||||||
In the world of film cameras, Contax made a name for itself with the T-series, a compact, portable line of cameras sporting Carl Zeiss optics. With the introduction of the TVS, Contax brings the best of its T-series film cameras into the digital age, along with a great deal of digital flexibility. The same great Carl Zeiss Vario-Sonnar T* optics and titanium body grace the TVS, as well as a generous 5.0-megapixel CCD. The TVS features automatic exposure control, with partial manual control, and a wide range of exposure options. Read on for more details.
Camera Overview
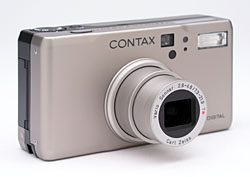
Featuring a sleek, smooth titanium body, the Contax TVS digital camera looks a lot like its film counterparts, the Contax "T" series of cameras. The titanium body panels are lightweight, yet durable, contributing to the camera's overall design aesthetic of understated elegance. The TVS even sports what Contax deems "gem quality sapphire" components, such as the scratch-resistant shutter button and sapphire glass viewfinder cover. At about the same size as the T-series film cameras, the TVS probably won't fit into most shirt pockets, but the camera is suitable for larger coat pockets and purses, and does come with an elegant leather case. Still, the camera is quite portable, and the front panel remains nearly flat whenever the lens is retracted. A 3x Zeiss lens captures sharp images, and the 5.0-megapixel CCD results in good image quality (suitable for printing to 11x14 inches, or 8x10 inches with significant cropping).
The 3x Carl Zeiss Vario-Sonnar T* lens has a zoom range from 7.3 to 21.9 millimeters, equivalent to a 35-105mm lens on a 35mm camera. Contax has made a marketing point of the Zeiss lens coating technology employed in the TVS, and I have to say that it does appear to have a noticeable effect: Pictures from the TVS seem to be less prone to flare in bright, contrasty lighting than those from other cameras I've tested. Normal focus ranges from approximately 1.97 feet (0.6 meters) to infinity, with a Macro setting that focuses from 5.9 inches to 1.97 feet (0.15 to 0.6 meters) with the lens at the full wide angle position. The TVS also offers a manual focus option, with preset distances of 0.6, 0.7, 0.8, 1.0, 1.5, 2.0, and 5.0 meters. Two AF area modes are also available, Spot and Wide, with the Wide setting judging focus from a large area in the center of the frame, Spot taking its cues from a very small spot in the exact center. An AF Lock button on top of the camera locks focus, and can be set to lock exposure as well. Maximum aperture ranges from f/2.8 to f/4.8, depending on the zoom position, while minimum aperture is f/6.7, regardless of focal length. In addition to the camera's 3x optical zoom, the TVS also features as much as 4x digital zoom. Be sure to keep in mind that digital zoom often compromises image quality, because the camera is simply enlarging the central portion of the CCD (typically resulting in higher image noise and less detail). For composing shots, the TVS offers a real-image optical viewfinder as well as a 1.6-inch, color LCD monitor. The optical viewfinder also features a diopter adjustment, and also has an unusually high eyepoint, both features that will be appreciated by anyone wearing eyeglasses. An information display on the LCD monitor reports a variety of camera settings, including aperture and shutter speed (when the Shutter button is halfway pressed). In my tests, the optical viewfinder showed about average accuracy (still to low, IMHO), at roughly 85% frame coverage. The LCD viewfinder was almost 100% accurate.
When it comes to exposure, the TVS offers Program AE and Aperture Priority main exposure modes. Both modes are accessed via the Mode dial on the camera's top panel, which also offers Movie, Playback, and Setup options. In standard Program AE mode, the camera selects both shutter speed and aperture settings, while you maintain control over all other features. Aperture Priority mode lets you adjust the lens aperture (from f/2.8 to f/6.7), while the camera selects the best corresponding shutter speed. Shutter speeds on the TVS range from 1/2,000 to eight seconds, although the maximum exposure time in Program AE and Aperture Priority modes is one second. Exposure times of 1, 2, 4, and 8 seconds are available through the Long Time setting of the LCD menu system. Instead of having a main menu button, the TVS divides its exposure features among three LCD menu systems. The +-/WB/ISO, C.Menu, and D.Menu buttons on the rear panel access different menu settings. This actually saves a little time, once you get used to which settings are on which menu, because you don't have to sift through a long series of menu screens every time. Overall, it's an efficient system.
By default, the TVS employs a Multi-Area Evaluation metering system, which determines the exposure from readings taken throughout the frame. Center-Weighted and Spot metering options are also available for times when you want to restrict the exposure evaluation to a more specific area. The camera's Exposure Compensation adjustment increases or decreases the overall exposure from -2 to +2 exposure equivalents (EV), in either 1/2 or 1/3-step increments (step size is set through the Set-Up C.Menu). When you're uncertain of the best exposure, the camera's Auto Exposure Bracketing mode takes a series of three images at different exposure settings. One image is captured at the normal meter reading, one overexposed slightly, and then one underexposed. You can set the degree to which each image differs through the C.Menu in record mode, as well as the order in which exposures are taken. White Balance options on the TVS include an Auto setting, as well as Sunlight, Incandescent Lighting, Cloudy, Fluorescent Lighting, and Preset (the manual setting). Just as with the exposure, you can bracket the white balance in three steps via the White Balance Bracketing function, although the step size for White Balance Bracketing isn't adjustable. Light sensitivity is also adjustable, with ISO equivalents of 80 through 400, plus an Auto setting. The TVS also features Black-and-White and Sepia color modes, as well as Chroma and Sharpness adjustments. The built-in flash operates in five modes (Auto, Red-Eye Reduction Auto, Off, Fill-In, and Night Portrait settings), and has an intensity adjustment.
In Movie exposure mode, the camera captures either 320 x 240-, or 160 x 120-pixel resolution moving images with sound for a maximum of 30 seconds per clip. (Actual recording times will vary, depending on the amount of available space on the memory card.) Continuous Shooting mode captures a rapid burst of images while the Shutter button is held down. After the first three frames in the sequence are captured at slightly over two frames per second, the frame rate will vary depending on the resolution and image quality setting. A Self-Timer mode provides a 10- or two-second delay between the time the Shutter button is pressed and the time that the camera actually takes the picture, giving you time to run around and get into the picture. The TVS comes with a remote control for triggering the shutter at a distance, and the "0s" setting under the Self-Timer mode configures the camera to work with the remote control unit.
The TVS stores images on SD/MMC memory cards, and comes with a 16MB SD card. I strongly recommend purchasing a larger capacity card though, so you don't miss any shots. Still image resolutions include 2,560 x 1,920; 1,600 x 1,200; 1,280 x 960; and 640 x 480 pixels, with JPEG compression settings of Fine and Normal. A single lithium battery pack comes with the camera, as well as the necessary AC adapter / charger. Even though the TVS has excellent battery life, I recommend picking up an additional battery pack and keeping it charged, since it doesn't run on AA batteries, and there's therefore no option for disposable spare batteries. The TVS features a Video Out jack, for connecting to a television set, and a USB jack for downloading images to a computer. A software CD is loaded with Pixela Image Mixer software and USB drivers, for downloading and organizing images. One other note worth mentioning is that the TVS comes packaged in non-coated cardboard, which is more easily recyclable. Kudos to Contax and its parent company Kyocera for promoting more responsible packaging!
Contax sells two versions of the TVS Digital, one in a champagne-colored case (seen in my product photos below), for $899 list, and the other in a black case for $999. (I'm told that the manufacturing process by which the titanium case is blackened is quite expensive, partially accounting for the higher price of the black version.) Even $899 is a very high price for a five-megapixel camera with fairly average capabilities though, so I'm not sanguine about the TVS' prospects in the marketplace.
Basic Features
- 5.0-megapixel CCD delivering image resolutions as large as 2,560 x 1,920 pixels.
- Real-image optical viewfinder.
- 1.6-inch color LCD monitor with backlight.
- Carl Zeiss Vario-Sonnar T*, 3x zoom lens, equivalent to 35-105mm on a 35mm camera.
- Maximum aperture of f/2.8 - f/4.8, depending on lens zoom position.
- As much as 4x digital zoom.
- Program AE, Aperture Priority, and Long Time exposure modes.
- Shutter speeds from 1/2,000 to eight seconds.
- Built-in flash with five modes.
- SD or MMC memory storage, 16MB SD card included.
- USB interface and supplied cable.
- Power supplied by one lithium battery pack or AC adapter.
- Pixela Image Mixer software and USB drivers included for both Windows and Mac platforms.
Special Features
- Better than average lens coating for reduced flare.
- Movie mode with sound.
- 10-second Self-Timer for delayed shutter release.
- Continuous Shooting and Auto Exposure Bracketing modes.
- Macro (close-up) lens setting.
- Manual and Auto focus modes, with Wide and Spot AF area settings.
- White balance (color) adjustment with five modes, including a manual setting.
- Black-and-White and Sepia modes.
- Multi-Area Evaluation, Center-Weighted, and Spot metering modes.
- Adjustable sensitivity with ISO equivalents from 80 to 400, plus an Auto setting.
- Image sharpness and chroma adjustments.
- DPOF (Digital Print Order Format) compatibility.
- Video cable for connection to a television set.
- Remote control included.
Recommendation
With its fairly thin, compact size, the Contax TVS digital camera is portable and fashionable. Its titanium body is lightweight and very durable, and it should fit into larger coat pockets and purses fairly readily. Basically a digital translation of the already popular T-series of Contax film cameras, the TVS offers a 3x Zeiss lens, 5.0-megapixel CCD, and a wealth of features for flexible control. Partial manual exposure control gives novices a direction for learning, while satisfying the needs of more experienced digital photographers.
Design
Making its debut as the digital version of the popular Contax T-series of film cameras, the TVS looks a lot like its film-based cousins. Titanium body panels are not only attractive, but offer strength and durability without compromising weight. Measuring 4.41 x 2.36 x 1.31 inches (112 x 60 x 33 millimeters), the TVS is a bit too big for most shirt pockets, although the camera should find a home in larger coat pockets and purses. When the lens is retracted, the front panel is practically smooth and pocket-friendly. With battery and memory card, the TVS weighs only 9.2 ounces (262 grams) with the battery and memory card. The TVS comes with a small protective case for travel, as well as a thin wrist strap.

The front of the TVS features the lens, optical viewfinder window, flash, remote control sensor, light sensor, and self-timer LED lamp. A shutter-like lens cover protects the lens when retracted, and automatically opens when the camera is powered on. In shooting mode, the lens extends about one inch from the camera body. The front panel is quite smooth, without any grip for your hand as it wraps around the camera. Thus, I'd keep the wrist strap securely in place when shooting.
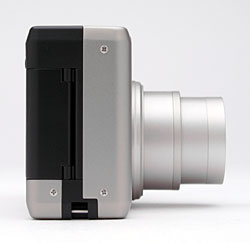
The right side of the camera, as viewed from the rear, features the SD/MMC memory card compartment. A sliding switch on the rear panel opens the compartment door. At the bottom of the right side is the eyelet for attaching the wrist strap.
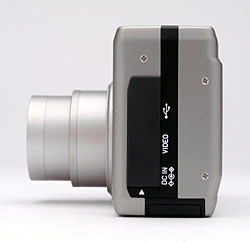
The opposite side of the camera features the connector jacks, tucked beneath a flexible plastic flap, tethered to the camera at its top. Beneath the flap are the DC In, Video, and USB connector terminals. At the very bottom of the panel, the edge of the battery compartment door is visible.
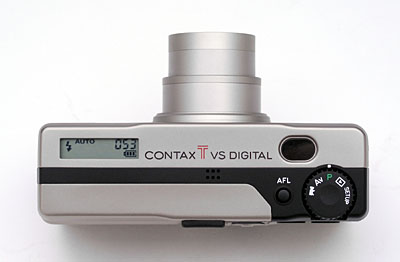
The TVS' top panel is nice and flat, featuring the Shutter and AF Lock buttons, Mode dial, and a small status display panel. The sapphire(?!) Shutter button is smooth and unobtrusive, level with the camera surface. The small status display panel reports a variety of camera information on its black and white LCD, such as flash mode, drive setting, the number of available images, etc. It also reports battery status during charging. Hidden in the black detail strip is a tiny microphone grille.
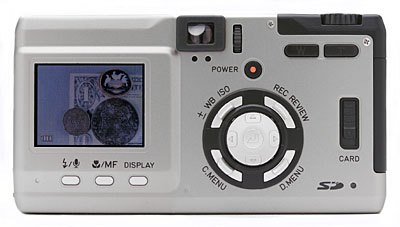
The remaining camera controls are on the back panel, along with the optical viewfinder eyepiece and LCD monitor. Two LED lamps below the optical viewfinder report camera status, indicating when focus is set or the flash is charging, and a diopter adjustment dial adjusts the viewfinder for eyeglass wearers. (As noted earlier, the TVS is very comfortable for eyeglass wearers, thanks to the combination of an unusually high eyepoint and the diopter adjustment dial.) Lining the bottom of the LCD monitor are the Flash / Audio, Focus Mode, and Display buttons. A large Multi-Controller is just off-center on the rear panel, encircled by four additional menu buttons. Just above the Multi-Controller is the Power button, with the Zoom buttons in the top right corner. A sliding latch along the right side releases the memory compartment door.
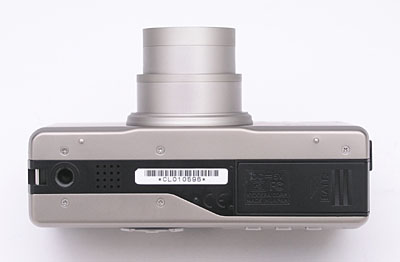
The TVS has a flat bottom panel, with the battery compartment on one side, and the plastic threaded tripod mount on the other side. The location of the tripod mount may result in slight tilting when the camera is screwed down, but a quick adjustment on the tripod head would easily correct this. One good thing about the tripod mount placement is that it's far enough from the battery compartment to allow quick changes while the camera is mounted. Also visible on the bottom panel is the underside of the wrist strap eyelet, as well as the camera's speaker (on the other side of the tripod mount).
Camera Operation
With its variety of menu buttons, the TVS' user interface may seem a little daunting at first. However, once you get used to which functions are on the C and D menus, operation is a snap, especially since the limited menu displays cut down on the amount of time you spend sifting through options. The status display panel on top of the camera helps you work without the LCD monitor, as you can quickly check flash and focus settings, as well as the number of available images. Additionally, the Mode dial lets you quickly change shooting modes as well as access Setup and Playback modes. Right out of the box, it might take about an hour to get familiar with the camera. However, once you get the menus figured out, camera operation is quite efficient.
Record-Mode Display
 In
record mode, the LCD monitor displays the subject with a modest array of overlaid
information, indicating flash, white balance, ISO setting, the current size/quality
setting, and number of images that can be stored on the remaining memory card
space at the current size/quality. Pressing the Display button beneath
the LCD once turns on a live histogram display that's overlaid above the central
portion of the viewfinder image. Pressing the Display button a third time dismisses
most of the information overlay, and pressing it a fourth time turns the LCD
off altogether. When you half-press the shutter button, the shutter speed and
aperture the camera will use is displayed at the top of the LCD screen. The
screenshot above right cycles through the range of record-mode display screens..
In
record mode, the LCD monitor displays the subject with a modest array of overlaid
information, indicating flash, white balance, ISO setting, the current size/quality
setting, and number of images that can be stored on the remaining memory card
space at the current size/quality. Pressing the Display button beneath
the LCD once turns on a live histogram display that's overlaid above the central
portion of the viewfinder image. Pressing the Display button a third time dismisses
most of the information overlay, and pressing it a fourth time turns the LCD
off altogether. When you half-press the shutter button, the shutter speed and
aperture the camera will use is displayed at the top of the LCD screen. The
screenshot above right cycles through the range of record-mode display screens..
Playback-Mode Display
 In
playback mode, the TVS by default displays ony the image and a battery-condition
indicator. Pressing the Display button adds a histogram overlay, while pressing
the up or down button on the multi-controller pad overlays exposure information,
including shutter speed, aperture, exposure compensation, capture date and time,
and image size/quality info.When viewing the image by itself (no histogram or
information overlay), pressing the T zoom control button zooms you into the
image 2x or 4x, while pressing the W button zooms you back out. While the TVS
can also display a thumbnail index of the images on the memory card, you must
enter the D.Menu to do so. The screenshot above right shows all the available
playback-mode display screens.
In
playback mode, the TVS by default displays ony the image and a battery-condition
indicator. Pressing the Display button adds a histogram overlay, while pressing
the up or down button on the multi-controller pad overlays exposure information,
including shutter speed, aperture, exposure compensation, capture date and time,
and image size/quality info.When viewing the image by itself (no histogram or
information overlay), pressing the T zoom control button zooms you into the
image 2x or 4x, while pressing the W button zooms you back out. While the TVS
can also display a thumbnail index of the images on the memory card, you must
enter the D.Menu to do so. The screenshot above right shows all the available
playback-mode display screens.
External Controls

Shutter Button: Located on the far right of the top panel, this shiny,
black button sets focus and exposure when halfway pressed, and fires the shutter
when fully pressed.
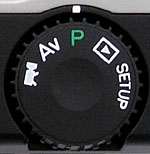
Mode Dial: Behind the Shutter button on the camera's top panel, this notched
dial accesses the following camera modes:
- Movie: Records moving images with or without sound, for as long as 30 seconds per movie clip.
- Aperture Priority: Sets up the camera for capturing still images, with user control over the lens aperture. (The camera selects the best corresponding shutter speed.) The user also has control over all other exposure variables.
- Program AE: Also for recording still images, this mode keeps the camera in control over aperture and shutter speed, while you control everything else.
- Playback: Replays captured still images and movie files, with options for image management and printing.
- Set-Up: Displays the Set-Up menu, for changing camera settings.

AF Lock Button: To the left of the Mode dial, this button locks
the focus independently of exposure, until the Shutter button is fully pressed.
It can also be set to lock exposure independently of focus.
![]()
Diopter Adjustment Dial: Located on the right side of the optical
viewfinder eyepiece, this dial adjusts the viewfinder display to accommodate
eyeglass wearers from +1.0 to -3.0 D (diopter) units.
![]()
Power Button: Diagonally below the Diopter Adjustment dial to the right,
this button turns the camera on and off. A small fluorescent red dot makes
it easy to spot.
![]()
Zoom Buttons: In the upper right corner of the rear panel, these buttons
control optical and digital zoom in Record mode. In Playback mode, they control
the digital enlargement of captured images (up to 4x).
![]()
Card Release Switch: Lining the right side of the rear panel,
this sliding switch releases the memory card compartment door.
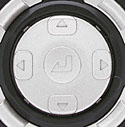
Multi-Controller: Just off-center on the camera's rear panel, this four-way
multi-controller button has an arrow in each direction. In any settings menu,
these arrow keys navigate through menu options. In Aperture Priority mode,
the left and right buttons control the aperture setting. The center of the
pad (marked by a "Return" icon) serves as the "OK" button,
and confirms menu selections. In Playback mode, the right and left arrow keys
navigate through captured images on the memory card.

 +-
/ WB / ISO Button: Curving around the upper left corner of the Multi-Controller,
this button displays the following menu options in any record mode:
+-
/ WB / ISO Button: Curving around the upper left corner of the Multi-Controller,
this button displays the following menu options in any record mode:
-
Exposure Compensation (+/-): Adjusts the overall exposure from +2 to -2 exposure equivalents (EV) in 1/3 or 1/2-step increments. (Step size is adjusted through the Set-Up C.Menu.)
- White Balance: Sets white balance to Auto, Sunlight, Incandescent, Cloudy, Fluorescent, or Preset (manual setting).
- ISO: Controls the camera's sensitivity. Options are Auto, or 80, 100, 125, 160, 200, 250, 320, and 400 ISO equivalents.

Record Review Button: Above the top right corner of the Multi-Controller,
this button calls up an instant review of the most recently captured image
in record mode. A second press of the button asks you if you want to erase
the displayed image. Pressing it a third time dismisses the image and returns
the LCD to normal viewfinder operation.

 C.Menu
Button: Below the lower left corner of the Multi-Controller, this button
accesses the following menu options:
C.Menu
Button: Below the lower left corner of the Multi-Controller, this button
accesses the following menu options:
-
Self-Timer / Remote: Accesses the two and 10-second self-timer modes. The "0s" setting is intended for use with the remote control unit.
- AF Area: Sets the AF area to Spot or Wide.
- Metering Mode: Programs the camera's exposure metering to Multi-Area Evaluation, Center-Weighted, or Spot modes.
- ABC (Auto Bracketing Control): Activates the camera's Auto Exposure Bracketing option, with step-sizes of 1.0, 0.5, and 0.3. The "0.0" setting disables bracketing.
- Drive: Puts the camera into Single or Continuous Shooting modes.
- Long Time: Accesses a range of longer shutter times, from one to eight seconds, or turns the function off.
- Flash Intensity: Adjusts flash power to "+" or "-" 1 EV settings.

 D.Menu
Button: Just below the lower right corner of the Multi-Controller, this
button calls up the following options in Record mode:
D.Menu
Button: Just below the lower right corner of the Multi-Controller, this
button calls up the following options in Record mode:
-
Color: Sets the color mode to Color, Black-and-White, or Sepia.
- Image Size: Offers resolutions of 2,560 x 1,920; 1,600 x 1,200; 1,280 x 960; and 640 x 480 pixels.
- Image Quality: Sets JPEG compression to Fine or Normal.
- WB BKT: Turns on the White Balance Bracketing option, which takes three images at different white balance values.
- Sharpness: Adjusts the in-camera sharpening from -1 to +3 arbitrary units.
- Chroma: Controls color intensity, with "+" or "-" adjustments.
 In
Playback mode, this button accesses the Playback menu:
In
Playback mode, this button accesses the Playback menu:
-
Multi: Displays a nine-image thumbnail index of all images on the memory card.
- Audio Recording: Records a 30-second audio clip to accompany a still image.
- Protect: Write-protects the current image, protecting it from accidental deletion (except through card formatting). This option also removes protection if it was already enabled.
- Erase: Deletes the currently-displayed image.
- Erase All: Deletes all images on the memory card, except for protected files.
- Resize: Resizes the current image to a lower resolution (320 x 240 or 160 x 120).
- Rotate: Rotates the image in 90-degree increments clockwise.
- Auto Play: Enables an automatic slide show of all images on the memory card. You can set the frame interval and starting frame.
- Print: Activates the DPOF printing menu, with options to set the number of prints or setup an index print.

Flash Mode / Audio Button: The leftmost button in a series beneath
the LCD monitor, this button controls flash mode in Aperture Priority and
Program AE modes. Pressing the button cycles through the Auto, Red-Eye Reduction
Auto, Flash Off, Fill-In Flash, and Night Portrait flash modes. In Playback
mode, this button shortcuts to the Audio Recording menu option, which lets
you record a 30-second audio clip to accompany a still image.

Focus Mode Button: To the right of the Flash Mode / Audio button,
this button controls the camera's focus mode. Options are Macro, Manual Focus,
and Auto Focus.

Display Button: Beneath the lower right corner of the LCD monitor,
this button controls the LCD display. In any record mode, one press activates
a live histogram display, a second press disables the histogram, and a third
press disables the display entirely. In Playback mode, this button simply
enables and disables the histogram display.
Camera Modes and Menus
(Normally, this section is where you'd find the record and playback menus, but I put them in the section above, so they'd be more closely associated with the buttons that access them.)
Movie Mode: The first position on the Mode dial, this mode records short .AVI movie clips with sound, for a maximum of 30 seconds. (Actual recording times will vary, depending on the amount of memory card space.) A limited number of exposure options are available in this mode.
Aperture Priority Mode: This mode for capturing still images lets you maintain control over the lens aperture. In return, the camera selects the most appropriate shutter speed for a good exposure. You have control over all other exposure options, too.
Program AE Mode: The other still image recording mode on the Mode dial, this mode puts the camera in charge of aperture and shutter speed, while you control all other options.
Playback Mode: This mode lets you review captured images on the memory card, erase them, protect them, and set them up for printing, among other options discussed above.
Set-Up Mode: The following Set-Up menu automatically displays when entering this mode:
 Set-Up
C (press the C.Menu button to display options):
Set-Up
C (press the C.Menu button to display options):
- Default Flash: Selects which flash mode is the default. Options are Auto, Red-Eye Reduction Auto, Flash Off, Fill-In Flash, and Night Portrait Flash.
- ABC: Specifies the sequence of exposures in Auto Exposure Bracketing mode. Choices are either 0/+/- or +/0/-.
- AFL Hold Time: Sets how long the focus is locked after pressing the AF Lock button. Options are either for one frame only or until the camera is turned off.
- AFL Function: Designates whether the AF Lock button locks only focus, or focus and exposure.
- Exp Comp Time: Specifies how long the Exposure Compensation setting remains valid. Options are until the camera is switched off, or until the setting is canceled through the menu.
- Exp Comp Step: Sets the exposure compensation step size to 0.3 or 0.5.
- MF Hold Time: Designates whether the manual focus setting is held until manually canceled, or until the camera is powered off.
 Set-Up
D (press the D.Menu button to display options):
Set-Up
D (press the D.Menu button to display options):
- Bright Control: Adjusts the brightness of the LCD monitor display.
- Date: Sets the camera's clock and calendar.
- Insert Date: Inserts the date as an overlay on recorded images. Options are No Date and With Date.
- Format: Formats the SD/MMC memory card, which erases all files (even protected ones).
- Power Save: Specifies how long the camera must be inactive before it shuts itself off. Choices are No Power Off, or 1, 3, or 6 minutes.
- Digital Zoom: Turns the digital zoom option on or off.
- Beep: Sets the camera's beep sounds. Options are Off, or volume levels from +1 through +3.
- Shutter Volume: Controls the volume of the shutter noise, with options of Off, or +1, +2, or +3 volume settings.
- Color Select: Chooses the color of highlighted menu items. Color choices are Blue, Purple, Red, and Yellow.
- Start Screen: Lets you select what screen appears when the camera is powered on. The default is a Contax screen, or you can choose a recorded image. You can also cancel the startup screen.
- Auto Playback: Turns on or off an instant image review. Review times are two and four seconds.
- Language: Sets the menu language to Japanese, English, French,
German, or Spanish.
In the Box
The Contax TVS ships with the following items:
- Remote control.
- 16MB SD memory card.
- Rechargeable battery pack.
- AC adapter / battery charger.
- USB cable.
- Video cable.
- Wrist strap.
- Camera case.
- Software CD.
- Instruction manual and registration information.
- (Much) larger capacity SD or MMC card. - 64 MB minimum.
- Additional battery pack.
Recommended Software: Rescue your images!
Just as important as an extra memory card is a tool to rescue your images when
one of your cards fails at some point in the future. I get a lot of email from
readers who've lost photos due to a corrupted memory card. Memory card corruption
can happen with any card type and any camera manufacturer, nobody's immune.
A surprising number of "lost" images can be recovered with an inexpensive,
easy to use piece of software though. Given the amount of email I've gotten
on the topic, I now include this paragraph in all my digicam reviews. The program
you need is called PhotoRescue, by DataRescue SA. Read our review of it if you'd like, but download the program now,
so you'll have it. It doesn't cost a penny until you need it, and even then
it's only $29, with a money back guarantee. So download PhotoRescue for
Windows or PhotoRescue for
Mac while you're thinking of it. (While you're at it, download the PDF
manual and quickstart
guide as well.) Stash the file in a safe place and it'll be there when you need
it. Trust me, needing this is not a matter of if, but when... PhotoRescue
is about the best and easiest tool for recovering digital photos I've seen.
(Disclosure: IR gets a small commission from sales of the product, but I'd highly
recommend the program even if we didn't.) OK, now back to our regularly
scheduled review...
Sample Pictures
See our sample pictures and detailed
analysis here.
The thumbnails below show a subset of our test images. Click on a thumbnail
to see the full-size photo.

|

|

|
| |
|
|
|
|
|
|
| |
|
|
|
|
|
|
| |
|
|


Specifications
See the specifications sheet here.
- Contax TVS user reviews on PriceGrabber.com
- Contax TVS user reviews on PC PhotoREVIEW
Picky Details
Information on shooting speed, battery life, etc. can be found here.
Test Results
In keeping with my standard test policy, the comments given here
summarize only my key findings. For a full commentary
on each of the test images, see the TVS Digital's "pictures" page.
As with all Imaging Resource product tests, I encourage you to let your own eyes be the judge of how well the camera performed. Explore the images on the pictures page, to see how TVS Digital's images compare to other cameras you may be considering.
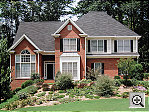
Overall, the TVS delivered good-looking photos, nice and sharp from corner to corner, thanks to its Zeiss lens. Color was generally accurate, and dynamic range was good. All in all, a very workmanlike performance with better than average lens quality. Here's how it did in the various categories I routinely evaluate:
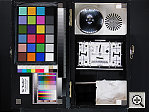
Color: Overall, the TVS produced good, nearly accurate color in most cases. I often chose the Auto and Daylight settings, though both had a tendency to produce slight reddish casts. The Manual white balance did a great job with the difficult incandescent lighting of the Indoor Portrait (without flash), and produced the best results on the Musicians test target. Color saturation and accuracy were quite good overall, though saturation was slightly high on the Davebox target. Skin tones were pretty good, though a bit pinkish, and the difficult blue flowers of the bouquet also looked good most of the time.
- Exposure: Exposure was often just a bit bright, with slightly high contrast, both indoors and out. The high-key Outdoor Portrait test had high contrast with limited highlight detail, although the TVS managed to hold onto shadow detail quite well. Though slightly dark at times, midtone detail was actually pretty good. Given the TVS' price, I would have liked to have seen a contrast-adjustment option to help with high-contrast subjects, but the TVS' overall tonality was similar to many other digicams I've tested.
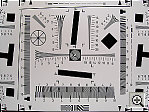
- Resolution/Sharpness: The TVS performed very well on the "laboratory" resolution test chart. It started showing artifacts in the test patterns at resolutions as low as 1,000 lines per picture height, in both horizontal and vertical directions. I found "strong detail" out to at least 1,200 lines, although you could perhaps argue for as high as 1,250 lines. "Extinction" of the target patterns didn't occur until about 1,450 lines. The Zeiss lens on the TVS did a very good job holding sharpness even into the corners of the image.
- Closeups: The TVS did a bit better than average in the macro category, capturing a minimum area of 3.12 x 2.34 inches (79 x 59 millimeters) at its closest shooting distance (7.0 centimeters). Resolution was very high, with strong detail in the dollar bill. The coins and brooch were slightly soft due to the reduced depth of field at such a close shooting range. There was much more softness in the corners in this shot, extending the length of both sides of the frame. (This is a very typical failing of digicam lenses in macro mode, caused by the optical phenomena of curvature of field.) The TVS' flash throttled down fairly well for more distant macro shots, but isn't really usable at closest approach.
- Night Shots: The TVS did a good job here, and produced clear, bright, usable images down to the 1/16 foot-candle (0.67 lux) limit of my low-light test, at both the 200 and 400 ISO settings. At ISO 100, images were bright as low as 1/8 foot-candle (1.3 lux), and at ISO 80, images were bright as low as 1/4 foot-candle (2.7 lux). Color was slightly warm with the Auto white balance, but still pretty good overall. Noise was low at the lesser ISO settings, but increased to a moderately high level at ISO 400. The grain pattern was brighter and more visible at ISO 400, with very visible "hot pixels" as well. (Here again, given the price point of the TVS, I'd have expected to see some sort of noise-reduction system available for long exposures.
- Viewfinder Accuracy: The TVS' optical viewfinder was only a little tight, showing approximately 86 percent frame accuracy at wide angle, and approximately 84 percent at telephoto. (About average among cameras I've tested, but still too tight, IMHO.) The LCD monitor proved much more accurate, showing nearly 100 percent at both wide angle and telephoto settings. Given that I like LCD monitors to be as close to 100 percent accuracy as possible, the TVS' LCD monitor did an excellent job here.
- Optical Distortion: Optical distortion on the TVS is about average at the wide-angle end, where I measured approximately 0.8 percent barrel distortion. (This is about average among cameras I've tested, but I'd really like to see much less geometric distortion in digicam images than that.) The telephoto end fared much better, as I didn't find so much as a single pixel of pincushion or barrel distortion. Chromatic aberration is low, showing only slight coloration on either side of the target lines. (This distortion is visible as a very slight colored fringe around the objects at the edges of the field of view on the resolution target.) As noted earlier, images from the TVS were generally noticeably sharper in the corners than those from many competing models.
- Battery Life: Powered by a relatively beefy LiIon battery, the TVS showed very good battery life, with a worst-case run time of about two hours in capture mode with the LCD on. While this is better than most competing models, I still recommend that you purchase a second battery along with the camera, for extended outings.
| Free Photo Lessons | |
|

Overall, I think I'd be more favorably disposed toward the TVS if it carried
a lot lower price tag. It's a capable enough camera, takes generally good-looking
photos, and has a beautiful case and excellent lens. - But at $899 for the "cheap"
version, it's just too expensive relative to other excellent models on the market.
Don't get me wrong: If you're a die-hard Contax fan, and particularly if you
were fond of the film-based T-series Contax models, the TVS wouldn't be a bad
camera to own. Apart from such considerations though, I think the TVS is just
too expensive for the general market. Still though, I take it as an encouraging
sign that Contax got so many aspects of digicam operation right, with relatively
little experience in the field. - Perhaps future models will be priced a bit
more competitively...

Follow Imaging Resource: