The Imaging Resource
Quick Review
Kodak EasyShare V550 Digital Camera
 |
Kodak V550 Camera QuickLook | |
| Review Date |
|
|
| User Level |
|
|
| Product Uses |
|
|
| digital camera Design |
|
|
| Picture Quality |
Very Good, 5.0-megapixel CCD | |
| Print Sizes |
11x17s or 8x10s with heavy cropping | |
| Availability |
Now | |
| Suggested Retail Price |
|
|
Introduction - Kodak V550
|
|||||||||
Kodak's EasyShare Software is a big part of the EasyShare story. Especially in its latest implementation, it walks you through every step of uploading, enhancing, and emailing your photos, and has about the most graphically intuitive interface of any consumer imaging software I've seen. It automatically sizes the images for printing or emailing, stores copies, applies simple effects, and allows you to make image corrections, such as color, brightness, and contrast adjustments. The entire line of EasyShare cameras are among the easiest and most goof-proof digital cameras out there, and the V550 and Kodak's latest Picture Software carry on that tradition admirably.
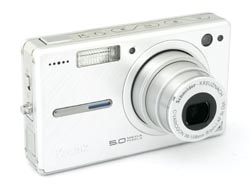
In more than a slight departure from the handful of well-known Kodak EasyShare digital camera designs, this newest member of the pack is ultra-thin and fashion-forward. Featuring a brushed-metal front panel and minimalist design aesthetic, the Kodak EasyShare V550 will likely turn a few heads. Part of what Kodak calls the "Pocket Series," the V550's innovative design includes a set of flat control buttons on the top panel, which are actually part of the panel itself. (I'll describe them further in the Design section.) Accompanying the Kodak EasyShare V550 is a round, and likewise very thin, Photo Frame dock that escapes the boxier designs of previous EasyShare docks. The Photo Frame dock turns the camera into a picture frame when attached, displaying captured images either as a slide show or individually. (The dock also provides the same battery charging and image downloading functions as the standard EasyShare camera docks.) The Kodak V550 boasts a 5.0-megapixel CCD and very large, 2.5-inch LCD monitor, with a very user-friendly point-and-shoot format. Measuring a mere 3.7 x 2.2 x 0.9 inches (94 x 56 x 22 millimeters), and weighing only 5.71 ounces (162 grams) with the card and battery, the V550 is quite at home in a shirt pocket or tiny purse, excellent for travel.
Built into the Kodak EasyShare V550 is an all-glass, 3x Schneider-Kreuznach C-Variogon zoom lens, equivalent to a 36-108mm zoom on a 35mm camera. (That's a moderate wide angle to a good telephoto, a fairly typical range among point-and-shoot digital cameras.) The camera's autofocus mechanism uses a multi-zone system to "find" the primary subject closest to the lens. The AF area is highlighted in the LCD display with a set of brackets. You can change the AF area to read only the center of the frame through the Record menu. Additionally, you can choose between Continuous and Single AF modes. The Kodak V550 has a maximum aperture ranging from f/2.8 to f/4.8, depending on the zoom position. Focus ranges from 24 inches (60 centimeters) to infinity in normal mode, with a Macro mode ranging from 2 to 28 inches (5 to 70 centimeters). (The minimum Macro focus distance depends on the zoom setting.) A Landscape focus mode fixes focus at infinity, for distant subjects and scenery. In addition to the 3x optical zoom, the Kodak V550 also offers as much as 4x digital zoom, which effectively increases the camera's zoom range to a total of 12x. Keep in mind though, that digital zoom decreases the overall image quality, since it just stretches the center pixels of the CCD image. For composing images, the V550 offers both a real-image optical viewfinder as well as a generous and bright 2.5-inch color LCD monitor.
The Kodak V550 offers Auto, Portrait, and SCN (Scene) exposure modes, with the SCN setting offering no less than 17 preset shooting modes. Auto mode is best for general photography, leaving all of the exposure decisions up to the camera. Portrait mode sets up the camera for capturing good-looking portraits, using larger lens apertures to decrease the depth of field. Thus, you get a sharply focused subject in front of a pleasantly-blurred background. The 17 preset shooting modes are accessible by pressing the SCN button on top of the camera, and include Sport, Landscape, Closeup, Night Portrait, Night Landscape, Snow, Beach, Text, Fireworks, Flower, Manner/Museum, Self-Portrait (for pointing the camera back at you), Party, Children, Backlight, Panning, Candlelight, Sunset, and Custom. The available scenes appear at the bottom of the LCD display upon entering the mode, and the Multi-Controller selects the scene. The Custom option lets you save a bank of exposure settings, for recall later. Though the camera doesn't offer any manual exposure control, you can access a Long Exposure mode through the Record menu, for exposures as long as eight seconds.
The Kodak EasyShare V550 employs a Multi-Pattern metering system, which bases the exposure on several light readings taken throughout the frame. Also available are Center-Weighted and Center-Spot modes. You can increase or decrease the overall exposure from -2 to +2 exposure equivalents (EV) in one-third-step increments. White balance options include Auto, Daylight, Tungsten, Fluorescent, and Open Shade settings, which take advantage of Kodak's proprietary Color Science technology to achieve an accurate color balance under most lighting. An ISO setting offers equivalent settings of 80, 100, 200, 400, and 800 (with the 800 setting only available at the 1.8-megapixel resolution). An Auto setting is also available, and ranges from 80 to 160. The Kodak V550 also offers a range of color settings (High, Natural, and Low color), as well as Black and White and Sepia modes. You can also adjust the in-camera sharpening. The built-in flash is effective from 2.0 to 7.9 feet (0.6 to 2.4 meters) depending on the setting of the zoom lens, and features Auto, Fill, Red-Eye Reduction, and Off operating modes. Whether you use the Red-Eye Reduction pre-flash or not, the camera automatically corrects Red-Eye (very useful for all of those wedding reception and party shots where Red-Eye seems to prevail). A 10-second Self-Timer mode provides a delay between the time the Shutter button is pressed and when the shutter actually opens, so you can get into your own shots. The Kodak V550 also provides an optional histogram display, which reports the tonal distribution of the image, so that you can graphically see any areas of over- or underexposure.
In addition to its still photography modes, the Kodak EasyShare V550 also offers a Movie recording mode for capturing moving images with sound. Recording stops and starts with a brief, full press of the Shutter button, but if you hold the button down for more than a second or two, the camera will automatically stop recording when you let it back up again. As you record, the duration of the movie appears in a running counter on the LCD monitor. Maximum movie lengths can be set through the Record menu. (The 32 megabytes of internal memory will let you record movies up to two minutes and two seconds in length at the lowest quality setting.) Movies can be recorded at 320 x 240 or 640 x 480 pixels, at 30 frames-per-second. Also available is a Motion Image Stabilization mode, which reduces the amount of blurring from slight camera movement. (A tripod is still recommended for the most steady shots, however.) A Burst photography mode lets you capture as many as five frames in rapid succession (approximately three frames per second) while you hold down the Shutter button. The five-frame maximum number applies regardless of resolution, but may be hindered depending on how much available space is on the memory card or internal memory. An interesting feature on the Kodak V550 is the camera's Blur Warning setting. If enabled, the camera reports via a series of color-coded shaking hand icons whether an image will be sharp enough for a 4x6-inch print. For example, green indicates an acceptable sharpness level, while a red icon indicates that the image is too soft.
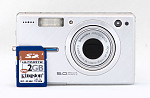
The V550 is compatible with Kodak's EasyShare camera and printer docks, which offer hassle-free image downloading and printing. You simply put the camera into the dock and press a button to connect the camera and initiate image downloading. Included with the Kodak V550 is the EasyShare Photo Frame Dock 2, which, when connected to the camera, essentially turns the camera's LCD monitor into a picture frame. The dock also allows you to transfer images to a computer, and serves as an AC adapter and in-camera battery charger. Built into the V550 is 32 megabytes of internal memory, but the camera also features an SD/MMC memory card slot so you can expand the camera's memory capacity. I highly recommend picking up at least a 128 megabyte card right away, given the camera's 2,576 x 1,932-pixel maximum resolution size, though cards are available as large as 512 megabytes. For power, the V550 uses a Kodak EasyShare Li-Ion battery pack, or the optional AC adapter. Since the camera does not accommodate AA-type batteries, I highly recommend picking up a spare battery pack and keeping it on-hand and freshly charged. Also packaged with the Kodak V550 are USB and AV cables, as well as a software CD loaded with the EasyShare software for downloading and managing images.
Basic Features
- 5.0-megapixel CCD delivering images as large as 2,576 x 1,932 pixels.
- Real-image optical viewfinder.
- 2.5-inch color LCD monitor.
- 3x, all-glass Schneider-Kreuznach 36-108mm (35mm equivalent) lens.
- 4x digital zoom.
- Auto and Portrait exposure modes, plus 18 preset Scene modes.
- White Balance with five settings.
- Maximum aperture of f/2.8 to f/4.8, depending on lens zoom position.
- Shutter speeds from 1/1,400 to eight seconds, depending on exposure mode.
- Built-in flash with four modes.
- 32MB internal memory.
- SD/MMC card storage (optional, card not included).
- Power supplied by one Kodak EasyShare Li-Ion pack (included), or optional AC adapter.
- Compatible with optional Kodak EasyShare camera and printer docks.
- Kodak EasyShare Photo Frame Dock 2 included.
- Kodak EasyShare software included for both Windows and Mac platforms.
Special Features
- Movie mode (with sound).
- Motion Image Stabilization mode.
- Burst photography mode.
- Custom exposure mode for saving frequently-used settings.
- Long Exposure mode for shutter speeds up to eight seconds.
- Black and White, Sepia, and three color modes.
- Automatic Red-Eye correction.
- Adjustable ISO from 80 to 800, with an Auto setting.
- 10-second Self-Timer for delayed shutter release.
- Image sharpness adjustment.
- Optional histogram display.
- Three AF area modes, plus Single and Continuous AF modes.
- Macro (close-up) lens setting.
- DPOF (Digital Print Order Format) compatibility.
- PictBridge support.
- USB cable for connection to a computer (driver software included).
Recommendation
Like the rest of Kodak's EasyShare line, the V550 boasts a simple-to-understand user interface that keeps the fun in point-and-shoot digital photography. The Kodak V550's unique, stylish design should please most fashionistas, and its tiny size is perfect for anyone on the go. Featuring a full complement of preset exposure modes, an Auto setting, and the flexibility of a long-exposure mode, the V550 is perfect for point-and-shoot enthusiasts who don't want to worry over exposure decisions. With the range of preset shooting modes, the V550 produces good exposure in almost any situation. Like Kodak's other EasyShare cameras, when combined with the included camera dock, the V550 ranks among the easiest to use digital cameras I've seen.
 The V550 is an eyeopener in the Kodak EasyShare lineup. Its stylish brushed-metal panels, low-profile controls, and very thin size rank the V550 among the more fashionable digital cameras in the marketplace. Included with the V550 is Kodak's newest generation EasyShare Photo Frame Dock 2, with a round, thin design equally as stylish. Measuring only 3.7 x 2.2 x 0.9 inches (94 x 56 x 22 millimeters), and weighing only 5.71 ounces (162 grams) without the card or battery, the V550 is at home in shirt pockets and small purses, and comes with a teensy wrist strap to save it from damage should its lip out of your hands.
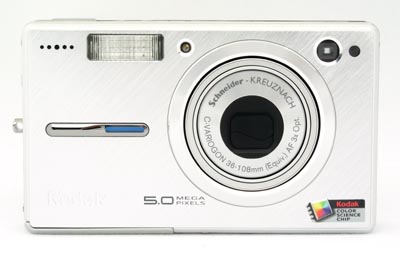
The telescoping lens takes up the right side of the camera's front panel, and withdraws completely flush with the front panel so that there are no protrusions to hang on pockets. The lens extends outward a full inch when the camera is powered on. A shutterlike lens cover automatically slides out of the way as well, and eliminates the need for a removable lens cap. Also on the front panel are the optical viewfinder window, flash, self-timer/AF assist/video lamp, light sensor, and tiny microphone. A thin, horizontal ridge is the only fingergrip provided, and isn't more than a design accent.

On the right side of the camera (as viewed from the rear) are the Auto/Favorites switch, a shiny, silver eyelet for attaching the wrist strap, and the AV Out / USB shared connector jack. The jack is beneath a flexible, plastic flap that folds out of the way to reveal the terminal.
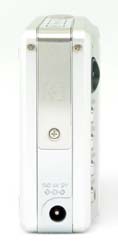
The opposite side of the camera features only the DC In terminal, which remains uncovered for easy access.
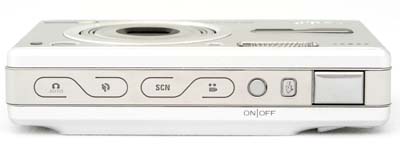
The Kodak V550's top panel is flat with low-profile controls. The Shutter, Power, and Flash buttons protrude just barely above the surface. Flush with the panel, and actually incorporated into the panel itself, are four mode buttons (Auto, Portrait, SCN, and Movie), highlighted by laser cuts that reveal cool blue LEDs beneath. Lightly pressing the icon for each button activates the mode. I really liked the minimalist design here, as it prevents accidentally changing the camera mode while carrying the camera, and the design is visually pleasing as well, to the point of being quite cool. Larger hands and fingers may find the tiny control buttons a bit tedious, but I still love the appearance and feel of the camera and its controls.
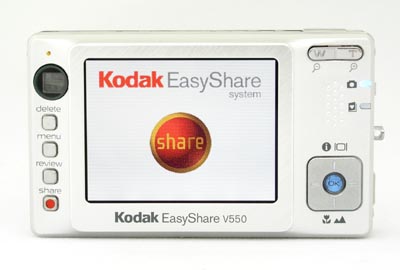
The rest of the camera controls are on the rear panel, along with the optical viewfinder and 2.5-inch LCD monitor. An indented thumb rest with a series of raised bumps on the right side cups your thumb as you hold the camera. Above the thumb rest is the Zoom rocker button, controlling optical and digital zoom. Directly below that are two LEDs, indicating the position of the Auto/Favorites switch on the side panel. In the lower right corner is the multi-controller, with an OK button at its center. This square-shaped button actuates up, down, left, or right, and navigates menu options. The up and down controls also adjust the monitor display and focus modes, respectively. Lining up on the left side of the LCD monitor are the Delete, Menu, Review and Share buttons. The optical viewfinder eyepiece is quite small in the top left corner, but has a fairly high eyepoint to accommodate eyeglass wearers (I could see the full frame even with my eye a good distance from the camera). Above the viewfinder is a tiny LED lamp that lights to indicate camera focus or flash status.
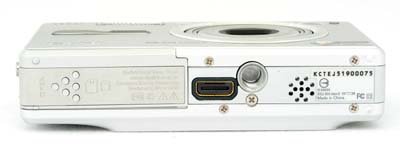
On the bottom panel of the Kodak V550 are the tripod mount, dock jack, and battery / memory card compartment. The metal, threaded tripod mount is just off-center and too close to the battery / memory card compartment for quick battery changes while working with a tripod. The battery / memory card compartment features a locking, hinged door, which slides forward to open. Inside, the battery pack and SD card slots line up side-by-side, and a small ejection lever locks the battery in place or releases it. (The SD card is ejected by pressing it down quickly, which pops it out slightly.) The dock connection jack connects the camera directly to the EasyShare dock for quick image downloading.
True to its EasyShare name, the Kodak V550 has a very user-friendly interface with limited control options that keeps camera operation simple. The camera's automatic systems do an excellent job of capturing good-looking photos, with a well-rounded range of preset shooting modes to handle a wide range of scenes. The LCD menu system is short and simple to navigate, and the plain-English descriptions of menu items are a welcome change from the too-common cryptic icons on so many other cameras. The flat mode buttons across the top panel let you change camera modes quickly, and once again, plain-English descriptions flashed along the top of the LCD screen make operation straightforward for even rank beginners. Given the simple interface and limited controls, you should be able to snap images right away, with hardly a glance at the manual. Though for more advanced functions, it shouldn't take more than a half an hour or so to get the gist of things.
Record-Mode Display
 Depending on the exposure mode, the Kodak V550's LCD display shows the center autofocus area along with currently-selected options for image size/quality, macro and flash mode, exposure compensation, the number of images of the current size and quality that can be stored in the remaining space on the memory card. Pressing the Display button once in a record mode cancels the information display, while a second press brings back the information display with a small histogram. A third press cancels the display entirely.
Playback-Mode Display
 In Playback mode, you can use the Kodak EasyShare V550's Zoom lever to zoom in or out on an image, with a maximum enlargement of 8x. A thumbnail display of the images on the card is also available, through the camera's Playback menu (or you can press the down arrow). The Display button offers a more detailed information display, reporting the set exposure variables for the current image. The normal Playback display reports the image number, and any shared settings information. As in Record mode, the Display button also enables a small histogram, for checking the overall exposure of the image. The display can also be canceled entirely.
External Controls

Shutter Button: Located on the far right of the camera's top panel, this button sets focus and exposure when halfway pressed, and fires the shutter when fully pressed. In Playback mode, pressing this button returns the camera to the selected Record mode.
![]()
Flash Button: To the left of the Shutter button, this button cycles through the Auto, Fill, Red-Eye Reduction, and Off flash modes.
![]()
Power Button: Just left of the Flash button, this button turns the camera on and off.
![]()
Movie Mode Button: This is the first in a series of mode buttons on the camera's top panel, each of which is part of the panel itself. Pressing this button enters Movie mode, for recording short video clips with sound.
![]()
SCN Mode Button: To the left of the Movie Mode button, this button enters SCN mode and displays the SCN menu. Options in this mode are Sport, Landscape, Closeup, Night Portrait, Night Landscape, Snow, Beach, Text, Fireworks, Flower, Manner/Museum, Self-Portrait (for pointing the camera back at you), Party, Children, Backlight, Panning, Candlelight, Sunset, and Custom preset shooting modes.
![]()
Portrait Mode Button: Directly left of the SCN Mode button, this button enables Portrait mode, which sets up the camera for capturing good-looking portraits.
![]()
Auto Mode Button: The final button in the series, this button enables the standard Auto exposure mode.
![]()
Zoom Rocker Button: In the top right corner of the camera's rear panel, this two-way rocker button controls the optical and digital zoom in any record mode. In Playback mode, the lever controls the amount of digital enlargement applied to captured images, to a maximum of 8x.
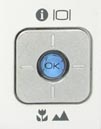
Multi-Controller and OK Button: Located in the lower-right corner of the rear panel, this square-shaped four-way rocker button with central OK button navigates through menu screens and options. When the center OK button is pressed, it confirms menu selections. Outside of the menu system, the right and left buttons adjust the exposure compensation. The up button controls the LCD display, while the down button cycles between Normal AF, Macro, and Landscape focus modes.
In Playback mode, the controller scrolls through captured images, when moved left and right. Pressing the button down activates the index display mode.
![]()
Delete: The first in a vertical series of buttons lining the left side of the LCD monitor, this button calls up the Delete menu in Review mode. You can delete individual images or all images on the card. There's also an option to cancel.
![]()
Menu Button: Below the Delete button, this button displays the settings menu in Playback or Record modes.
![]()
Review Button: Beneath the Menu button, this button activates Playback mode when pressed in any record mode. Once in Playback mode, pressing the button again, or the Shutter button, returns to the Record display.
![]()
Share Button: The final button in the series on the left of the LCD monitor, this button lets you tag images for printing, emailing, or as a favorite image. (A heart icon appears on "favorite" images.) Pressing this button in Review mode automatically enables Playback mode, and displays the Share menu with the following options:
- Print: Designates the number of copies of the current image to be printed.
- E-Mail: E-mails a low-resolution copy of the image to a recipient, based on a saved address book.
- Favorite: Marks the current image as a "favorite."
- Print All: Prints one copy of each image on the memory card or internal memory.
- Cancel Prints: Cancels a print order.
Auto/Favorites Switch: On the right side of the camera, this sliding switch moves between Auto and Favorites modes. The Auto setting enables the camera's shooting and image review modes, while the Favorites position lets you view images tagged as "Favorites" in a type of digital photo album.
Camera Modes and Menus
Auto Mode: Accessed by pushing the Auto/Favorites switch to the Auto position (camera icon), this mode enables the camera's photo capture and review functions. The mode buttons on top of the camera control the exposure mode, with options of Auto, Portrait, Scene, and Movie, while the Review button on the rear panel enables image and movie playback.
Favorites Mode: An album icon with a heart on its cover indicates this mode on the Auto/Favorites switch. In this mode, any images that have been designated as "favorites" are displayed. You can opt to view images in a slide show or index format, or view exposure information for individual images. You can also access the camera's Setup menu.
Record Menu: The following menu items appear whenever the Menu button is pressed in any Record mode. However, not all menu options are available in all modes.
 Self-Timer: Activates the 10-second Self-Timer, or disables it.
- Burst: Enables or disables the camera's Burst photography mode, for capturing a rapid series of images.
- Picture Size: Sets the resolution for still images. Choices are 5.0 MP (2,576 x 1,932 pixels), 4.4 MP 3:2 Ratio (2,576 x 1,716 pixels), 4.0 MP (2,304 x 1,728 pixels), 3.1 MP (2,048 x 1,536 pixels), or 1.8 MP (1,552 x 1,164 pixels).
- Video Size: Sets the pixel resolution for Movie mode. Choices are 320 x 240 or 640 x 480 pixels.
- White Balance: Sets the color balance to Auto, Daylight, Tungsten, or Fluorescent, Open Shade settings.
- ISO Speed: Sets the sensitivity to Auto (ISOs 80 to 160), or to 80, 100, 200, 400, or 800 equivalent settings. (ISO 800 is only available at the 1.8 MP resolution.)
- Color Mode: Allows you to record images in High, Natural, or Low Color, or in Black and White or Sepia tones.
- Sharpness: Controls the in-camera sharpening, with options of High, Normal, or Low.
- Exposure Metering: Designates the camera's metering mode as Multi-Pattern, Center-Weighted, or Center-Spot.
 AF Control: Sets the autofocus to Continuous or Single modes.
- Focus Zone: Controls where the camera's AF system determines focus from. Choices are Multi-Zone and Center-Zone.
- Long Time Exposure: Accesses longer exposure times, from 0.5 to eight seconds.
- Set Album (Still): The Kodak V550 lets you set up albums through its interface software on a computer. If albums have been set up and downloaded to the camera, you can associate images with an album as they are recorded.
- Image Storage: Dictates where images are stored, either in the 32MB internal memory or SD card. If Auto is selected, the camera automatically stores images to a memory card if one is present.
- Reset to Default: (Scene Custom mode only.) Resets all camera settings to their defaults.
- Video Length: (Movie mode only.) Sets the default video length to Continuous, or to 5, 15, or 30 seconds.
- Motion Image Stabilization: (Movie mode only.) Turns the image stabilization function on or off for movies.
- Setup Menu: Displays the following Setup options:
 Return: Returns to the previous menu display.
- Camera Sounds: Designates the camera's operating sounds. Choices are Theme and Individual. Theme applies the same sound effect to all operating sounds, while Individual lets you assign a specific sound to each function. Loaded themes are Default, Animal, Fun, Music, Scifi.
- Sound Volume: Sets the volume to Low, Medium, or High, or turns sound off.
- LCD Brightness: Sets the period of inactivity before the LCD dims. Choices are 10, 20, or 30 seconds, or Continuous.
- Auto Power Off: Specifies the period of inactivity before the camera shuts itself off. Choices are 1, 3, 5, or 10 minutes.
- Date & Time: Sets the camera's internal clock and calendar.
- Video Out: Specifies PAL or NTSC as the Video Out signal.
- Photo Frame: Sets the Photo Frame Dock 2 settings for image display. Options are Interval (between slide show frames), Loop, Transition (between slide show frames), Image Source (Album, Internal or Favorites), and Run Time.
- Orientation Sensor: Controls the camera's orientation sensor, which detects when the camera is held vertically. Vertical-format images captured when the Orientation Sensor is enabled are rotated to their correct orientation on-screen when they're played back.)
- Red-Eye Pre-Flash: If activated, this function fires the Red-Eye pre-flash before the full flash. If off, no pre-flash occurs. In either mode, the camera automatically corrects Red-Eye.
- Date Stamp: Turns the date stamp function on or off, which records the date over the image. You can choose from a selection of date formats as well.
- Video Date Display: Like the Date Stamp option above, imprints the date and time on video files, with a choice of display formats.
- Video Print: Automatically creates a still image that includes nine frames taken from each video recorded and displays them in a matrix. Turns option on or off.
- Blur Warning: Turns on the camera's blur warning, or disables it. If on, the camera displays the shaking hand icon during quickview, with a range of colors to indicate the level of blur. For example, a green hand indicates that the picture is sharp enough for a good 4x6-inch print. Yellow shows that the image may be sharp enough for 4x6-inch prints, or that sharpness hasn't been determined. (In other words, check the image on a computer before printing.) A red icon means that the picture is not sharp enough for a 4x6-inch print. White indicates that the camera is still assessing the image file.
- Language: Sets the menu language to one of nine languages.
- Format: Formats the SD memory card or internal memory.
- About: Displays the camera's firmware information.
Playback Menu:
 Album: Adds images to an image album, created on a computer with the camera's interface software.
- Crop: Lets you crop an image and save it as a separate image file.
- Slide Show: Enables a slide show of captured images, with user-adjustable intervals between images.
- Multi-Up: Enables a index display of images on the memory card or stored in the internal memory.
- Copy: Copies files from the internal memory to the SD card, or the reverse.
- Protect: Write-protects the displayed image, preventing it from being accidentally erased or manipulated (except via memory or card formatting). Also removes protection.
- Image Storage: Selects between the internal memory or the SD card for image storage.
- Setup Menu: Displays the same settings as under the Record menu.
In the Box
In the box are the following items:
- Kodak EasyShare V550 digital camera.
- Kodak EasyShare Photo Frame Dock 2 adapter
- Kodak Li-Ion battery pack.
- USB cable.
- A/V cable.
- Wrist strap.
- Small carry case.
- EasyShare dock and Photo Frame dock inserts.
- Software CD-ROM.
- Operating manual and registration card.
- Large capacity SD/MMC memory card. (These days, 128 - 512 MB is a good tradeoff between cost and capacity.)
- Additional battery pack.
- Battery charger.
- AC adapter.
- Kodak EasyShare Printer Dock.
See the specifications sheet here.
Test Results
We ran the Kodak EasyShare V550 through our usual battery of tests, and have summarized our findings here. To see the full set of our test images, with explanations of what to look for in them, see the Kodak V550 Sample Pictures page. For a complete listing of all our test and "gallery" shots, go to the Thumbnails page.
A collection of more random, pictorial images can be found in the Kodak EasyShare V550 Photo Gallery.
Not sure which camera to buy? Let your eyes be the ultimate judge! Visit our Comparometer(tm) to compare images from the Kodak V550 with those from other cameras you may be considering. The proof is in the pictures, so let your own eyes decide which you like best!
Lens
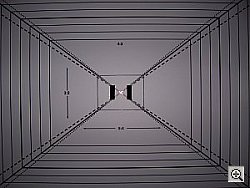
Zoom
A typical 3x optical zoom range, with good performance.
 |
 |
 |
| 36mm |
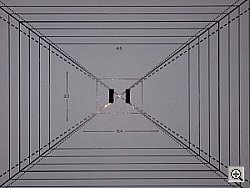
108mm |
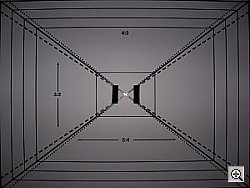
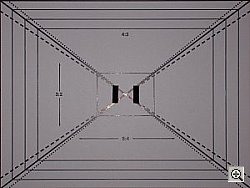
4x Digital Zoom |
The Kodak V550 zooms over the equivalent of a 36-108mm range, fairly typical for its class. Though a little soft at wide angle, with some noticeable coma distortion in the trees, the V550's lens still performs quite well. The 4x digital zoom takes it out to 12x total with the loss of quality that digital zoom creates.
Macro
A small macro area with good detail and high resolution. Flash exposes fairly well, but flash illumination is uneven up close.
 |
 |
| Standard Macro | Macro with Flash |
The Kodak V550's macro setting performs well, capturing a small minimum area of 2.17 x 1.62 inches (55 x 41 millimeters). Detail is strong and resolution high, with only a moderate amount of softening in the corners from the lens. (Most cameras have some softening in the corners in macro mode.) The flash throttles down pretty well, but its light doesn't reach the lower left corner of the frame. (Plan on using external lighting for your closest macro shots with the V550.)
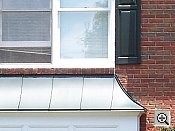
Distortion
Moderate barrel distortion, though low pincushion.
This is the tendency for the lens to bend straight lines outward (like a barrel--usually at wide angle) or inward (like a pincushion--usually at telephoto). The Kodak EasyShare V550's 0.8% barrel distortion at wide angle is average among the cameras I've tested, although I personally feel that this level is too high. At the telephoto end, the V550's 0.03% pincushion is very low.
| Barrel distortion at 36mm is 0.8% |
| Pincushion at 108mm is 0.03% |
Chromatic aberration
Moderately high, small effect on images at edges.
 |
 |
| Wide: moderate, top left @ 200% | Wide: fairly bright, top right @ 200% |
 |
 |
| Tele: quite low, top left @200% | Tele: quite low, top right @200% |
Chromatic aberration is rather high at wide angle, showing about 6-7 pixels of moderately bright coloration on either side of the target lines, but decreases to very low levels at telephoto focal lengths. (This distortion is visible as a very slight colored fringe around the objects at the edges of the field of view on the resolution target.)
Corner Sharpness
Some softening in the left and right corners of the frame, strongest effect in the lower right corner.
 |
 |
| Slightly soft in the upper left corner. | Much softer in lower right corner. |
The Kodak V550 produced soft corners in a few shots, though the lower right corner seemed to have the most visible effect.
Sensor
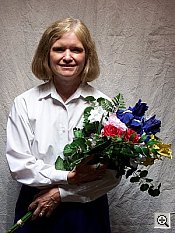
Exposure and White Balance
Indoors, incandescent lighting
Moderate warm cast with both Auto and Incandescent white balance settings. Less exposure compensation required than usual.
 |
 |
| Auto White Balance +0.3EV | Incandescent WB +0.3EV |
Color balance indoors under incandescent lighting was just a bit warm and reddish in Auto white balance mode, and the Incandescent setting resulted in a more yellow color balance that looked more pleasing overall. The Kodak V550 only required a +0.3 EV exposure compensation boost to get a good exposure, much less than average for this shot. Overall color is a bit dark and yellow here, making the blue flowers very dark and purplish. (A very common outcome for this shot.) Our test lighting for this shot is a mixture of 60 and 100 watt household incandescent bulb, a pretty yellow light source, but a very common one in typical home settings here in the US.
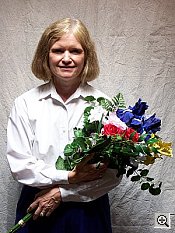
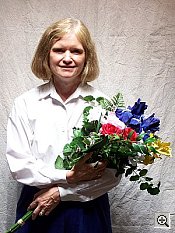
Outdoors, daylight
Good color balance, very bright colors. Better than average exposure accuracy.
 |
 |
| Auto White Balance, Auto Exposure | Auto White Balance, Auto Exposure |
Outdoor shots generally showed accurate exposure with slightly blown out highlights. Shadow detail also tended to fall apart, but nothing that would raise an alarm for a consumer digicam. Exposure accuracy overall was better than average, the camera requiring less exposure compensation than we're accustomed to seeing with consumer digicams.
See full set of test images with explanations
See thumbnails of all test and gallery images
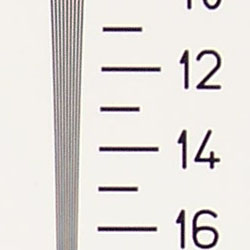
Resolution
High resolution, 1,250 lines of strong detail.
Our laboratory resolution chart revealed sharp, distinct line patterns down to about 1,250 lines per picture height, with extinction at around 1,600. (The camera did produce slight color artifacts at lower line frequencies though, visible in the full-sized res target shots.) Use these numbers to compare with other cameras of similar resolution, or use them to see just what higher resolution can mean in terms of potential detail. Beware that while you might be able to make out what looks like distinct lines at numbers higher than those we've mentioned here, the camera is just doing its best to continue interpreting the lines. If you zoom in and follow them from the wider portions, you'll see the lines converge and reappear several times, so the lines you see at 1,500 and higher are really only artifacts generated by the camera's imaging system.
 |
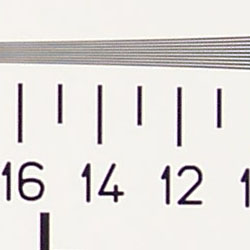 |
| Strong detail to 1,250 lines horizontal | Strong detail to 1,250 lines vertical |
See full set of test images with explanations
See thumbnails of all test and gallery images
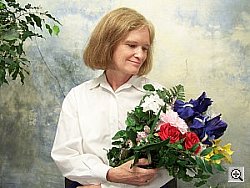
Sharpness & Detail
Fairly sharp images, with some blurring of detail from noise suppression.
 |
 |
| Pretty good definition of high-contrast elements. | Subtle detail: Hair Noise suppression tends to blur detail in areas of subtle contrast, as in the darker parts of Marti's hair here. |
The Kodak V550's images are reasonably sharp, without any strong over-sharpening or edge enhancement on the camera's part. (Edge enhancement creates the illusion of sharpness by enhancing colors and tones right at the edge of a rapid transition in color or tone.)
Noise-suppression systems in digital cameras tend to flatten-out detail in areas of subtle contrast. The effects can often be seen in shots of human hair, where the individual strands are lost and an almost "watercolor" look appears. The crop at far right shows this, with darker areas of Marti's hair showing only limited detail, even though individual strands are quite visible against her cheek in the uncropped image. (The level of detail loss shown here isn't all that obvious on prints 8x10 inches or smaller though.)
ISO & Noise Performance
Moderate noise at the normal sensitivity settings, very high noise that blurs detail at the higher settings.
 |
 |
 |
| ISO 80 | ISO 100 | ISO 200 |
 |
 |
|
| ISO 400 | ISO 800 |
The Kodak V550's lower ISO settings produced moderate noise, with only slightly blurred detail in the dark areas. As the ISO setting increases, so does the noise level and the amount of blurring that results, and its images at ISO 400 are quite soft indeed. At ISO 800, noise is high, though not as bad as it could be. ISO 800 is available only at 1.8 megapixel resolution, because the camera combines several sensor pixels for every output pixel reduce noise levels. When printed, ISO 200 photos looked OK at 8x10 inches; ISO 400 ones were marginal even at 5x7 inches, but looked fine at 4x6.
Extremes: Sunlit and low light tests
High resolution with good overall detail, though high contrast and limited shadow detail. Pretty good low-light performance, capable of capturing bright images under average city street lighting and slightly darker conditions.
 |
 |
 |
| Normal | +0.3EV | +0.7EV |
Sunlight:
Because digital cameras are more like slide film than negative film (in that they tend to have a more limited tonal range), we test them in the harshest situations to see how they handle scenes with bright highlights and dark shadows, as well as what kind of sensitivity they have in low light. The shot above is designed to mimic the very harsh, contrasty effect of direct noonday sunlight, a very tough challenge for most digital cameras. (You can read details of this test here.)
The Kodak V550 had a little trouble with the deliberately harsh lighting in the test above, producing very high contrast with washed-out highlights and deep shadows. Noise suppression is visible in both shadows and highlights as well, contributing to the loss of detail, made more severe in these areas. Exposure at least did not wash out the highlights when exposure compensation was set to zero adjustment, but the +0.3EV image shows better skin tones. (In "real life" though, be sure to use fill flash in situations like the one shown above; it's better to shoot in the shade when possible.)
Low light:
Our low light testing revealed some limitations in the lens and sensor's ability to gather and process light, but the Kodak EasyShare V550's performance in this area will be more than adequate for most consumers, provided they know to switch to "Night Landscape" mode for after-dark photography. Shutter speeds in the normal exposure modes are restricted to 1/2 second and shorter, limiting usage to normal indoor illumination levels, or outdoor shots at dusk or earlier, even with the ISO set to higher values. The Night Landscape mode forces the ISO setting to 80 for minimum image noise, but permits shutter times as long as 8 seconds. The net result in Night Portrait mode was that our test images were bright as low as 1/4 foot-candle, which is about 1/4 as bright as average city street lighting at night. Color balance was slightly warm from the Auto white balance setting. The camera's autofocus system worked unusually well, able to focus on the subject down to the darkest light levels we test at, even with its AF-assist light turned off. Do keep in mind though, that the very long shutter times associated with Night Landscape mode absolutely demand the use of a tripod or other camera support to get sharp photos. (A useful trick is to just prop the camera on a convenient surface, and use its self-timer to release the shutter. This avoids any jiggling from your finger pressing the shutter button, and can work quite well when you don't have a tripod handy.)
| 1 fc 11 lux |
1/2 fc 5.5 lux |
1/4 fc 2.7 lux |
1/8 fc 1.3 lux |
1/16 fc 0.67 lux |
|
| ISO 80 |
3.2 sec f2.8 |
6 sec f2.8 |
8 sec f2.8 |
8 sec f2.8 |
8 sec f2.8 |
Color
Saturation & Hue Accuracy
Slightly oversaturated color (especially reds and blues), very typical of consumer digital cameras. Generally good hue accuracy.
 |
| In the diagram above, the squares show the original color, and the circles show the color that the camera captured. More saturated colors are located towards the periphery of the graph. Hue changes as you travel around the center. Thus, hue-accurate, highly saturated colors appear as lines radiating from the center. |
The other important part of color rendition is hue accuracy. Hue is "what color" the color is. Here, the Kodak V550 did quite well. Like most digicams, it shifts cyan colors toward blue, to produce better-looking sky colors, but the rest of the hues were quite accurate.
 |
 |
 |
Our random "Gallery" shots showed very pleasing color across a wide variety of subjects. (See our Kodak EasyShare V550 Photo Gallery for more shots taken with the camera.)
Viewfinder
Coverage
Optical viewfinder tight and skewed to the upper right. Very good accuracy from the LCD monitor.
 |
 |
| 36mm eq., optical viewfinder | 108mm eq., optical viewfinder |
 |
 |
| 36mm eq., LCD monitor | 108mm eq., LCD monitor |
The V550's optical viewfinder was quite tight, showing only about 80% frame accuracy at both wide angle and telephoto lens settings. However, the LCD monitor showed close to about 100 percent frame accuracy, though my standard measurement lines were just out of frame in the final shot.
Flash
Coverage and Range
The V550's small flash has a limited range, produces a slight blue cast in combination with typical incandescent room lighting. Our standard shots required more exposure compensation than average.
|
|
| 36mm equivalent | 108mm equivalent |
 |
 |
| Normal Flash +1.3EV | Night Portrait Mode |
Flash coverage was rather uneven at wide angle but very good at telephoto. In the Indoor test, the flash on the V550 underexposed our subject at its default setting, requiring a +1.3 EV exposure compensation adjustment to get reasonably bright results. Even here, the exposure is a little dim, with a strong pink cast. The camera's Night Portrait mode produced slightly brighter and more even results, though with a stronger pinkish-orange cast from the room lighting; no EV adjustment was required, fortunate since the EV adjustment is disabled in this mode.
Even at eight feet, our closest test range, the flash did not quite illuminate the DaveBox target adequately. This agrees with Kodak's own spec of 7.9 feet for flash range, a bit on the short side, although not uncommon for a compact camera model.
| 8 ft | 9 ft | 10 ft | 11 ft | 12 ft | 13 ft | 14 ft |
1/125 sec f4.8 ISO 80 |
1/125 sec f4.8 ISO 80 |
1/125 sec f4.8 ISO 80 |
1/125 sec f4.8 ISO 80 |
1/125 sec f4.8 ISO 80 |
1/125 sec f4.8 ISO 80 |
1/125 sec f4.8 ISO 80 |
Output Quality
Print Quality
Good print quality, great color, very usable 11x14 inch prints. ISO 400 images are very soft at 8x10, acceptable at 5x7, great at 4x6.
Testing hundreds of digital cameras, we've found that you can only tell just so much about a camera's image quality by viewing its images on-screen. Ultimately, there's no substitute for printing a lot of images and examining them closely. For this reason, we now routinely print sample images from the cameras we test on our Canon i9900 studio printer, and on the Canon iP5000 here in the office. (See the Canon i9900 review for details on that model.)
With the Kodak EasyShare V550, we found that it had enough resolution to make very crisp 8x10 inch prints. At 11x14, its prints were a bit softer looking, but more than adequate for wall or table display. At high ISO, image noise levels are held in check, but at the cost of rather soft-looking images. ISO 200 photos look OK printed at 8x10 inches, but ISO 400 ones are marginal even at 5x7 inches, but look fine at 4x6. Color-wise, the Kodak V550's images looked really great when printed on the i9900, with bright, vibrant color. Users who prefer more subdued, technically accurate color saturation levels may find the V550's images a little too bright, but most consumers will probably find the V550's bright, snappy images very appealing.
Timing and Performance
Kodak V550 Timing
Good to average speed for a consumer camera.
| Startup/Shutdown: | |
| Power On to first shot | 2.2 seconds |
| Shutter response (Lag Time): | |
| Full Autofocus Wide |
0.31 second |
| Full Autofocus Tele |
0.95 second |
| Prefocused |
0.086 second |
| Cycle time (shot to shot) | |
| Normal large/fine JPEG | 1.94 seconds |
| Flash recycling | 5 seconds |
| Continuous mode | 0.31 second 3.19 frames/second (3 large/fine frames) |
| Download speed | |
| Windows Computer, USB 2.0 | 539 KBytes/sec |
The V550's performance ranges from quite fast to just average, depending on what you're trying to do. It starts up fairly quickly, and has a very fast shutter response when the lens is set to its wide angle position. At the telephoto end of the lens' range though, the lag time of 0.95 second is on the slow side of average. On the other hand though, if you "prefocus" the camera by half-pressing and holding down the shutter button before the final exposure, it's blazingly fast, with a shutter delay of only 0.086 second, among the fastest on the market. Shot to shot cycle times are average, at about 1.9 seconds for large/fine JPEGs, and it can capture up to six shots this quickly before it has to slow down and wait for the memory card to catch up. Continuous-mode speed is quite good, at a bit over three frames/second, for up to three shots in succession. The flash takes about five seconds to recharge after a full-power shot, about average for this class of camera. Connected to a computer, download speeds are fast enough that you probably won't feel a need for a separate card reader, but nonetheless aren't as fast as many cameras currently on the market. Bottom line, while not a first choice for sports or other fast-paced action, the V550 is responsive enough (particular at wide angle lens settings) to handle most family photo opportunities.
Battery and Storage Capacity
Battery
Short battery life with the LCD on, very good when LCD is switched off.
| |
|
| Still-image capture mode LCD on |
58 minutes |
| Still-image capture mode LCD off |
384 minutes |
| Image playback LCD on |
106 minutes |
The Kodak EasyShare V550 uses a custom rechargeable 3.7V, 720 mAh LiIon battery for power. The table above shows maximum run times based on our power measurements and the rated performance of its battery. Given the short run time with the LCD enabled, you should definitely consider purchasing a second battery to pack along on extended outings.
Storage
No card is included with the Kodak EasyShare V550, although it accepts SD/MMC cards; 28.5MB RAM is built into the camera.
| 28.5MB Internal Memory |
Fine | |
| 2,567 x 1,932 | Images | 17 |
| File Size | 1.6MB | |
| 2,304 x 1,728 | Images | 21 |
| File Size | 1.3MB | |
| 2,048 x 1,536 | Images | 26 |
| File Size | 1.1MB | |
| |
Images | 43 |
| File Size | 659K | |
I strongly recommend buying at least a 128MB card, preferably a 256MB one, to give yourself extra space for extended outings.
| Pro: | Con: |
|---|---|
|
|
| Free Photo Lessons | |
|

Related Reviews

Follow Imaging Resource: