The Imaging Resource
Quick Review
Konica Minolta DiMAGE X1 Digital Camera
 |
Camera QuickLook | |
| Review Date | 11/17/2005 | |
|
User Level |
|
|
|
Product Uses |
|
|
|
Digicam Design |
|
|
|
Picture Quality |
Excellent, 8.0-megapixel CCD | |
|
Print Sizes |
Good prints to 16x20 inches or 11x17 with some cropping | |
|
Availability |
Now | |
| Suggested Retail
Price (At introduction) |
|
|
Introduction
|
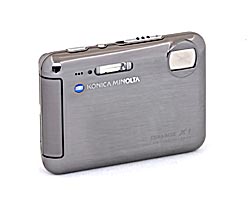
This year, the latest model continuing the heritage of the "X" line is the Konica Minolta DiMAGE X1. While a little bigger than, and visually quite dramatically different to its recent X-series predecessors, the X1 will still feel familiar to anybody who's used those cameras - and its new Anti Shake feature is a very welcome addition. The high resolution of eight megapixels offers good detail and sharpness, but unfortunately comes at a cost, as the maximum ISO sensitivity is just 200. The body design may be very stylish looking, but is perhaps somewhat less practical, being a magnet for fingerprints and smudges. The X1 is very much representative of the Konica Minolta merger, a slim X-series camera in the shiny reflective skin of a Konica G-series. In some ways, the DiMAGE X1 is a departure from what have been some of the mainstays of the X-series. Read on, and find out whether we liked the the overall result as much as we've enjoyed some of the past X-series cameras.
With its prism-folded lens design, the Konica Minolta DiMAGE X1 has an extremely slim body, but overall it is actually the largest X-series camera to date. The X1's lens is vertically mounted inside the leftmost portion of the camera's body (as seen from the rear), and is unique amongst prism-folded cameras on the market right now, in that it also features an Anti-Shake mechanism that tilts the entire optical unit, including the CCD sensor. Measuring just 3.7 x 2.7 x 0.8 inches (95.0 x 68.0 x 19.5 millimeters), the DiMAGE X1 is the thinnest X-series camera to date, but is just under half an inch (one centimeter) taller and wider than the tiny DiMAGE X60. Considering the new inclusion of such advanced technology as Anti-shake, the Konica Minolta X1 is very light, at just 4.8 ounces (135 grams) without the battery and SD memory card. Even if it is not quite as small as past X-series cameras, the DiMAGE X1 is still a very portable model that will fit nicely in most shirt pockets, and will slip easily into the smallest of purses.
The unique "folded" optical design means that there's no wait for a lens to telescope out of the body when the camera is powered up, although startup times aren't as swift as the competition. (The folded design does keeps moving parts to a minimum, and protects the lens inside the camera's body - reducing both power consumption, and the risk of accidental damage). The Anti-Shake mechanism - unusual in such a compact camera - means that you can get clear shots at slower shutter speeds, reducing the need to use higher ISO sensitivities that increase image noise or a burst of flash that gives unflattering lighting, or disturbs your subject. The sleek design is almost completely free of protrusions, and the lens is protected by a spring-loaded barrier that slides into place when the camera is powered off, eliminating any concern over misplacing a lens cap. The metal body (which is lined by a smooth sheet of perspex on the rear) feels solid, but is quickly marred by fingerprints and smudges, and might not prove the most durable against scratches. To protect the X1's fashion accessory looks, you'll want to keep it inside a soft case when not in use - and perhaps have a lens cleaning cloth handy to wipe away the fingerprints.
The DiMAGE X1 features a high resolution 8.1 megapixel CCD imager capable of prints up to 16 x 20" (or 11 x 17" with some cropping), coupled to a 3.0x, 7.7-23.1mm lens, the equivalent of a 37-111mm lens on a 35mm camera. That's the exact same range as the DiMAGE X21 and Xg models. The autofocus covers a range from 4 inches (10 cm) to infinity. A Super Macro scene mode reduces this to a minimum of just 2 inches (5 cm). Depending on the lens zoom position, the maximum aperture ranges from f/3.5 to f/4.3. In addition to the optical zoom, the Konica Minolta X1 offers a 4.0x digital zoom, in increments that vary from 0.1x to 0.3x across its range. (Although I always remind readers that digital zoom decreases the overall image quality because it simply enlarges the central pixels of the CCD's image.) The DiMAGE X1 offers a large 2.5-inch LCD display on which to compose images, which at 99% accurate is useful for framing iamges, but offers a fairly coarse resolution of 118,000 pixels. An LCD mode that Konica Minolta has dubbed "Hibright" increases brightness significantly for better visibility in bright sunlight, although this will come at the cost of some battery life when enabled. There is no optical viewfinder on the X1 - most likely because there's simply no room to fit one without increasing the size of the camera significantly. For the record, the optical viewfinder in past X-series cameras was very tight, and not very useful, with the LCD delivering a far more accurate view. In playback mode, images can be enlarged up to 6x, as an aid to checking critical focus and framing.
Exposure is automatically controlled at all times, with only a few exposure options available. A tiny button on the camera's top powers it on, and a Mode switch lets you select between fully automatic, scene, and movie / sound modes. The Scene Mode function, which customizes exposures for common photographic situations, offers a choice of Automatic Selection, Portrait, Sports Action, Landscape, Sunset, Night Portrait, Text, Super Macro, and Auto Recording settings. Thanks to the all-internal lens design, there's no need to wait for the lens to extend before you can shoot, but startup times are still a little longer than average - in my tests, the camera took about 1.8 seconds to capture the first picture after power-up, though Konica Minolta claims a 0.9 second startup time. Most exposure options are controlled through the LCD's on-screen menu system, which offers very straightforward navigation. You can control flash mode, lens zoom, wide / spot autofocus, and your choice of either drive mode, exposure compensation, white balance, or ISO sensitivity externally, via buttons and controls on the camera's rear panel. Shutter speeds range from 1/1,250 to one second, though the chosen value is not reported to the user. The left and right, and the up and down button pairs control your choice of one variable each - either drive mode, exposure compensation, white balance, or ISO sensitivity, or are disabled in Record mode (depending on a menu setting). Exposure Compensation ranges from -2 to +2 exposure equivalents (EV) in one-third step increments. Sensitivity is adjustable to values of 50, 100, or 200 - an unusually low upper limit - with an Auto setting that varies the ISO depending on the current light level. White Balance is adjustable through the settings menu, with options for Auto, Daylight, Cloudy, Tungsten, and Fluorescent light sources. The Konica Minolta DiMAGE X1's built-in flash operates in Auto, Auto with Red-Eye Reduction, On, Off or Slow Sync modes. Sharpness and Contrast are both adjustable in one arbitrary step above or below the default setting.
In addition to the basic exposure options, the Konica Minolta DiMAGE X1 also offers a few extra shooting modes, controlled through the settings menu. In Movie exposure mode, the camera captures 320 x 240 or 640 x 480-pixel resolution moving images with sound, at a rate of 20 frames per second, and with a duration limited only by the size of the memory card. The included 32MB SD memory card should hold approximately 29 seconds at 640x480; larger cards will store proportionately more. Unusually, the movie mode allows use of the camera's optical zoom during recording - although the mechanism's functioning is clearly audible as a high-pitched whine on the movie's audio track when zooming in or out. Konica Minolta has also included the ability to disable sound recording on movies, should you want to do so.
A Self-Timer mode provides a 10-second delay between the time the Shutter button is pressed and when the camera actually takes the picture, allowing you to get into your own shots. For shooting fast action subjects, the DiMAGE X1's Continuous Advance mode captures a rapid series of images when you hold down the Shutter button, much like a motor drive on a traditional 35mm camera. Provided that there's enough space remaining on the memory card, the camera can capture up to three large/fine images before having to pause to write the image data to the memory card. Details like image size and shutter speed can affect the shooting interval, but it averages approximately 0.5 frames per second. An Ultra-High Speed Continuous Advance mode locks the image resolution to just 640 x 480 pixels, but allows up to 15 images to be captured at a speedy 10 frames per second. A Progressive Capture mode captures a series of images with a speed of 0.5 frames per second for as long as you hold down the Shutter button, and saves only the final three images when the shutter button is released. An Ultra High Speed Progressive Capture mode functions similarly to the standard Progressive Capture, but at 640 x 480 pixel resolution, with a frame rate of 10 frames per second, and saving the final 15 images. A Multi-Frame mode captures nine low-res images at a rate of three frames per second, which are then combined as a single 2048 x 1536 pixel image in a three-by-three grid. Finally, an Audio Recording mode lets you record sound clips as long as 180 minutes without an image, although the maximum recording time may also be limited by the amount of available memory card space. (The included 32MB SD memory card can hold about 31 minutes of audio.) The Konica Minolta DiMAGE X1 also features a Voice Memo option, for recording short sound clips of up to 15 seconds in length to accompany recorded images.
The Konica Minolta DiMAGE X1 stores its images on an SD memory card (or the slightly-less-expensive MMC cards), with a 32MB SD memory card included in the product bundle. Connection to a host computer for image download is via USB. The DiMAGE X1 is a "storage-class" device, which means that it doesn't require any separate driver software for Windows 2000 and XP, or for Mac OS 8.6 and later. Download speed is only fair, I clocked it at 533 KBytes/second on my Sony VAIO computer, running Windows XP. That's about what you'd expect for a USB v1.1, as found in the X1. The camera utilizes an NP-1 rechargeable lithium-ion battery for power, one of which is included with the camera, along with the necessary battery charger. A fully-charged battery is good for about 150 shots as tested by the company to CIPA standards. My standard recommendation of picking up an additional battery pack and keeping it freshly charged applies for the X1. The optional AC adapter may also be useful for preserving battery power when using the camera as a webcam, for reviewing and downloading images, or when viewing images and movies on a television, via the supplied A/V cable.
Basic Features
- 8.0-megapixel CCD.
- 2.5-inch color TFT LCD monitor.
- Glass, 3.0x, 7.7-23.1mm lens, equivalent to a 37-111mm lens on a 35mm camera.
- 4.0x digital zoom.
- Automatic exposure control.
- Shutter speeds from 1/1,250 to one second.
- Maximum aperture f/3.5 to f/3.8, depending on lens zoom position.
- Built-in flash.
- SD/MMC memory card storage, 32MB SD memory card included.
- Images saved as JPEG files.
- Power supplied by one NP-1 rechargeable lithium-ion battery or optional AC adapter.
- DiMAGE Master Lite, Kodak EasyShare software and USB drivers included for both Windows and Mac platforms.
Special Features
- Movie mode with optional sound, and ability to use optical zoom during recording.
- Continuous , UHS Continuous, Progressive, UHS Progressive, and Multi-Image Shooting modes.
- 10-second Self-Timer for delayed shutter release.
- Voice Memo mode for recording captions.
- White balance (color) adjustment with five modes.
- Scene mode with nine presets.
- Adjustable ISO.
- Adjustable sharpness and contrast.
- Both multi-segment and spot metering.
- DPOF (Digital Print Order Format) compatibility.
- PictBridge compatibility.
- USB cable for connection to a computer (driver software included, can function as a webcam).
Recommendation
The Konica Minolta DiMAGE X1 is larger than past X-series models, but is still a small and compact camera - perhaps more so than it may appear in product photos. Its full automatic exposure control provides true point-and-shoot operation, although the user does have a few options for lightening or darkening the image, or adjusting the color balance. The 8.0-megapixel CCD delivers very high resolution images, suitable for good-looking prints as large as 16x20, or 11x17 with some cropping, and a low resolution option for email purposes. An Anti-Shake feature helps ensure sharp photos in situations where flash would be unacceptable, helping you capture the natural mood of dimly lit birthday parties and the like. The DiMAGE X1's small size and rugged case design make it a natural for "anywhere/anytime" photography, and the extremely stylish design will doubtless start a few conversations as well. With its point-and-shoot appeal and ease of use, the Konica Minolta X1 is great for novice users who simply want to take good pictures without getting too involved in the technicalities. Even sophisticated users will appreciate its exceptional portability and good picture-taking capabilities, making it a good "second camera" for enthusiasts too - although they may be the most likely to miss the presence of an optical viewfinder and manual controls. It's an appealing camera, with good build quality and surprisingly good image quality for a subcompact model.
 Like the other DiMAGE X-series cameras before it, the Konica Minolta DiMAGE X1 has an extremely slim body, but counting its other dimensions it is actually the largest X-series camera to date. Measuring just 3.7 x 2.7 x 0.8 inches (95.0 x 68.0 x 19.5 millimeters), the DiMAGE X1 betters the most svelte of its X-series predecessors in thickness by a scant half-millimeter, but is just under half an inch (one centimeter) taller and wider than the tiny DiMAGE X60. With that said, the DiMAGE X1 is still a very portable camera that combines an extremely stylish rectangular body and few protrusions to remain extremely pocket-friendly. It should fit nicely in most shirt pockets, and will slip easily into the smallest of purses. Matching its diminutive size, the Konica Minolta X1 is also very light at just 5.5 ounces (155 grams) with battery and SD memory card. The secret to the DiMAGE X1's compact design is its internally-mounted lens, which stretches vertically inside the leftmost portion of the camera (as seen from the rear), rather than protruding from the front of the camera body. An internal prism reflects light from the subject sideways into the lens itself, like a periscope. As well as providing protection for the lens mechanism, the internal lens mounting means that there's no wait for the lens barrel to extend when you power up the camera - reducing startup times (although at about 1.8 seconds from power on to the first shot captured, the X1 is not as quick as some of the earlier X-series models.) This folded optical design also offers protection for the lens, and reduces the number of moving parts - saving power and potentially offering better reliability, plus less risk of lens mechanism damage from the camera coming on while in a pocket or bag.
Cameras with prism-folded optics are becoming more common these days, but the X1 has another feature to its lens that makes it unique among internal digital camera lenses: its Anti-Shake mechanism. Konica Minolta offers this technology in larger digicams, like the Z-series and its Maxxum digital SLRs, but this is a first for a camera as slim as the X1. Whereas the company's other designs shift the image sensor on a platter that moves in two dimensions to correct for camera shake, the DiMAGE X1 uses a completely new system that tilts the entire optical unit, including the CCD sensor. The company says that this new anti-shake system allows it to keep the camera's thickness to a minimum, something borne out by the extremely svelte body. We should note that unlike past Konica Minolta cameras with Anti-Shake, you can actually feel and hear the camera body vibrating ever so slightly when the function is operating - probably because of the extra weight of the optical unit being moved, and the fact that the camera body is so small and light to start off with. Still, while it can be ever so slightly disconcerting the first time you notice it, that's a small price to pay for a very useful feature that could make the difference between a blurry photo and a sharp one.

The front of the camera includes the lens window (normally covered by a spring-loaded automatic lens barrier when the camera is turned off), as well as the flash, three holes for the microphone, and the self-timer lamp. The lens barrier retracts automatically when the camera is powered on, and springs back into place as the camera is powered back off again (although as with most such barriers, it could be easily bumped to one side if the camera is placed loosely inside a purse or bag containing other objects). The front surface of the camera is almost perfectly smooth and shiny, and doesn't provide a lot of grip when holding the camera with one hand. A bundled wrist strap will provide peace of mind and guard against accidental drops, if used.
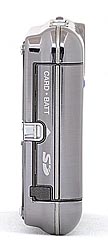
On the right side of the camera (as viewed from the rear) is the battery / memory compartment, covered by a springloaded door that slides forward slightly before swinging open. The Secure Digital card slot and rechargeable Lithium Ion battery are located behind the door, with the battery held in place by a spring-loaded latch, ensuring it doesn't accidentally fall to the floor when you open the compartment. A small rubber tab in the compartment door can be popped out of place to allow the cable for the AC adapter's dummy battery to enter the camera while the door is closed, and is securely connected to the camera body to guard against accidental loss. Finally for this side of the camera, a small eyelet for the included wrist strap is located on the camera body, surrounded by the rear center of the compartment door.
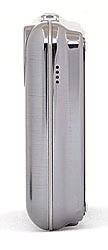
The opposite side of the camera is featureless, with the exception of four tiny holes for the camera's speaker, fairly well positioned to prevent you accidentally covering them with your fingers.
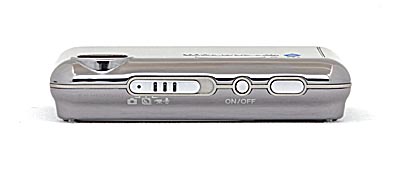
The Konica Minolta X1's top panel is sleek, smooth, and gently curved towards the front and rear of the camera. The Mode switch near the left of the camera and the Shutter button near the right both protrude only slightly to allow your fingers to easily locate them. In between, the tiny Power button is mounted nearly flush with the camera's surface to prevent against accidental bumps. The Mode switch offers three settings - Still Image, Scene mode or Movie / Audio mode.
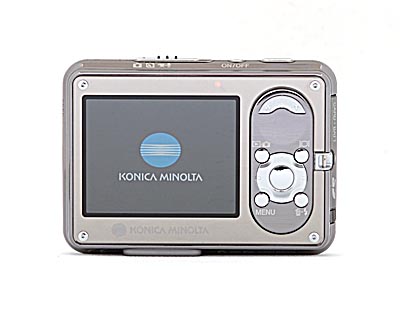
The remaining camera controls are on the back panel, which is dominated by the large 2.5-inch color LCD monitor. The entire rear panel of the camera, with the exception of the LCD display and one oval panel on the right hand side, has a mirrored surface. This entire mirrored area plus the LCD display are covered by a smooth piece of acrylic, which makes for an exceptionally attractive camera - at least, until you touch it. While it looks great in photos, it isn't quite so practical - the smooth, shiny surface is a magnet for smudges and fingerprints, as is the front of the camera to a lesser extent. If you're using it as a fashion accessory, you'll either want to wear gloves, or keep an eyeglass cloth handy to clean the camera every time you touch it. If you can put up with the smudges, they obviously don't affect the camera's function in the least.
A single red LED lamp above the top right corner of the LCD display reports the camera's status, such as when the battery is drained, when the flash is charged, when the Secure Digital card is being accessed, etc. Just to the left of this and centered over the LCD display, a green LED illuminates the words "Anti-Shake" alongside a symbol of a shaking hand whenever the camera's Anti-Shake system is active. You'll have to take our word for the location of both of these indicators however, because when the camera is switched off or they're not illuminated, they're completely invisible behind the camera's mirrored finish. To the right of the LCD on a metallic oval trim panel are all of the camera's rear-panel controls. At the top, a rocker button controls the optical and digital zoom, as well as the playback zoom and thumbnail index functions. Below this, four buttons are located in a square around a four-way multicontroller with central OK button. The upper left of these four buttons accesses the Playback mode, and can also double as a Power button that brings the camera straight to Playback mode without retracting the sliding lens barrier. The upper right button enables or disables the LCD's information overlay, and can also be held in briefly to toggle the LCD's Hibrite mode, which when in use increases brightness for better visibility in sunlight, or when disabled lets the camera reduce the backlight intensity to save battery life. The bottom left button calls up the camera's Menu system in any mode. Finally, the bottom right button selects from the available flash modes in Record mode - Auto, Auto with Red-Eye Reduction, On, Off or Slow Synch - or calls up the Image Deletion dialog in Playback mode, where you can either confirm deletion of the current image, movie or audio clip, or you can cancel deletion.
In the middle of the last four buttons mentioned, the four-way multicontroller with central OK button at the lower right corner navigates through the camera's menu system and selects options. In regular still image mode, all four directional buttons can be configured to control your choice of either drive mode, exposure compensation, white balance, or ISO sensitivity, or can be disabled altogether. In Scene mode, the left and right buttons select from among the available scene modes (Automatic Selection, Portrait, Sports Action, Landscape, Sunset, Night Portrait, Text, Super Macro, and Auto Recording), and the up and down buttons retain their functions configured in the regular still image mode. The central button, when held in for a second or so, switches between wide and spot focusing. In playback mode, the left and right buttons page through captured images, movies and sounds, while the lower button rotates images counter-clockwise in 90-degree steps (the upper button has no playback function). The central button starts playback of movies or sound clips. When in zoomed playback, all four buttons move your view up, down, left or right in the enlarged playback image. When viewing a movie, the left and right buttons fast-forward or rewind the clip, and the up and down buttons raise or lower the volume. When viewing a slideshow, the left and right buttons skip through the slideshow.
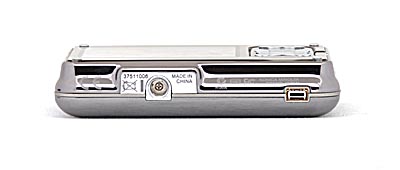
The bottom panel of the Konica Minolta DiMAGE X1 reveals only the metal, threaded tripod mount - located off-center near the left hand side of the camera - and a small connector for the included camera cradle. The cradle connector is not protected by any kind of cover when the camera isn't seated in the cradle, and users will want to take care to ensure that water, sand, or other particles don't damage the delicate contacts inside. The tripod mount is surrounded by a flat area of the camera body that will help make for a slightly more secure tripod mount, although given how slim the camera is it may still not provide the most stable platform. The tripod mount is also a fair way from the center-line of the lens, which will make it harder to shoot photos including nearby objects for a panorama. A bonus - although perhaps one that many users won't take advantage of - is that since the battery / card compartment is not located on the bottom of the camera, it is easy to change batteries and flash cards while leaving the camera on a tripod. This is something that's generally of more importance on cameras used in studios, but given the number of studio test shots we capture with every camera we test, it is something we're rather sensitive to.
The Konica Minolta DiMAGE X1's user interface is straightforward, as the camera employs automatic exposure at all times. While Scene mode, zoom setting, flash mode, wide / spot autofocus and your choice of either drive mode, exposure compensation, white balance, or ISO sensitivity can be adjusted via the top or rear-panel controls, all the other features and functions are controlled through the LCD menu system. In both capture and setup menus, the camera's menu system is divided into four pages, while the playback menu features three pages. These are all indicated by subject tabs at the top of the screen - similar to past DiMAGE X-series cameras. To the right of the subject tabs on the capture and playback menus, a "Setup" button takes you from the record or playback menus to the setup menu. On the setup menu, a button in the same location takes you back, either to the capture or playback menu. The Playback button lets you quickly switch to Playback mode, even if the camera is powered off. Considering the camera's automatic exposure control and limited user options, most users should be able to become familiar with the camera's operation in 30 minutes to an hour.
 Record Mode Display: In record mode, the LCD monitor displays the subject
with a minor amount of overlaid information, indicating battery life, operating
mode, flash, sharpness, contrast, color mode, white balance, ISO setting, anti-shake,
the current size/quality setting, metering area, focusing area, drive mode,
exposure compensation, date imprinting, and the number of images that can be
stored on the remaining memory card space at the current size/quality. Pressing
the Display button beneath the LCD once removes the information overlay (except
for the date imprinting indication, and critical battery warning), and pressing
it a second time restores the default display. When you half-press the shutter
button, a small dot appears in the lower right-hand corner of the LCD indicating
whether the camera is focused (white dot) or not (red dot), and a "shaking
camera" symbol appears at the middle of the right-hand side of the LCD
the focus dot if the shutter speed is slow enough that you'll need to be careful
not to jiggle the camera during the exposure.
Record Mode Display: In record mode, the LCD monitor displays the subject
with a minor amount of overlaid information, indicating battery life, operating
mode, flash, sharpness, contrast, color mode, white balance, ISO setting, anti-shake,
the current size/quality setting, metering area, focusing area, drive mode,
exposure compensation, date imprinting, and the number of images that can be
stored on the remaining memory card space at the current size/quality. Pressing
the Display button beneath the LCD once removes the information overlay (except
for the date imprinting indication, and critical battery warning), and pressing
it a second time restores the default display. When you half-press the shutter
button, a small dot appears in the lower right-hand corner of the LCD indicating
whether the camera is focused (white dot) or not (red dot), and a "shaking
camera" symbol appears at the middle of the right-hand side of the LCD
the focus dot if the shutter speed is slow enough that you'll need to be careful
not to jiggle the camera during the exposure.
 Playback Mode Display: In playback mode, the default image display shows the
most recently captured image, video, or sound file, with an information overlay
showing (as applicable) the resolution and quality setting used, the date and
time of capture, the file number, and the sequence number of the image among
those currently stored in the memory card. Pressing the Display button once
dismisses the information overlay, and pressing it a second time restores the
informaton overlay. With an image displayed full-screen, pressing the zoom control
in the "W" direction shows a set of six thumbnails, letting you browse
images quickly. Pressing the zoom control in the "T" direction zooms
in on the image up to a maximum magnification of 6x. At any magnification level,
pressing the center button of the multi-controller reverts to a full view of
the image, while the four arrow buttons let you scroll around the magnified
image. The screenshot above right shows all the available display options in
playback mode.
Playback Mode Display: In playback mode, the default image display shows the
most recently captured image, video, or sound file, with an information overlay
showing (as applicable) the resolution and quality setting used, the date and
time of capture, the file number, and the sequence number of the image among
those currently stored in the memory card. Pressing the Display button once
dismisses the information overlay, and pressing it a second time restores the
informaton overlay. With an image displayed full-screen, pressing the zoom control
in the "W" direction shows a set of six thumbnails, letting you browse
images quickly. Pressing the zoom control in the "T" direction zooms
in on the image up to a maximum magnification of 6x. At any magnification level,
pressing the center button of the multi-controller reverts to a full view of
the image, while the four arrow buttons let you scroll around the magnified
image. The screenshot above right shows all the available display options in
playback mode.
External Controls
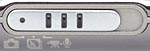
Mode Switch: Located just left of center on the camera's top panel,
this control sets the X1's record mode. Options include still capture, scene
mode, and movie/audio capture.

Power Button: Located to the right of the Mode switch, this tiny button is almost flush with the camera body to prevent accidental presses. On the first press, it powers the camera on in Record mode, automatically sliding the lens barrier down. A second press powers the camera back off again, sliding the barrier back in front of the lens.

Shutter Button: Just to the right of the Power button, this button
sets focus and exposure when pressed halfway, and fires the shutter when fully
pressed.
![]()
Zoom Rocker: Located at the top right of an oval metallic trim panel on the Konica Minolta X1's rear, this roughly semi-circular rocker control adjusts the optical and digital zoom in any record mode. In Playback mode, this control lets you zoom in on an image as much as 6x. When an image is fully zoomed out, pressing this control to the "W" position switches the camera to a 2x3 display of thumbnail images for rapidly reviewing photos in the camera.

Playback Button: Below the Zoom rocker, about halfway
down the right-hand side of the LCD display and nestling into the top left
corner of the five-button multicontroller, this button switches the camera
to playback mode when in record mode. If the camera is powered off, briefly
holding this button in powers the camera on in playback mode without retracting
the lens barrier. When in playback mode, pressing this button returns the
camera to record mode, regardless of whether the camera was powered on with
the Power or Playback button.

Display Button: To the right of the Playback button and nestled in
the top right corner of the five-button multicontroller, this button controls
the LCD display. In Record or Playback mode, pressing this button once disables
the information overlay, and a second press recalls both the information overlay.
Holding the button in for a second or so calls turns the camera's Hibrite
LCD display mode on or off, making the screen brighter for viewing in direct
sunlight, or dimmer for improved battery life when used indoors.

Menu Button: Below the Playback button and nestled in the bottom left
corner of the five-button multicontroller, this button calls up the settings
menu in both Record and Playback modes. A second press cancels the Menu display.

Delete / Flash Button: To the right of the Menu button and nestled
in the bottom right corner of the five-button multicontroller, this button
cycles through the available flash modes in Record mode: Auto, Auto with Red-Eye
Reduction, On, Off or Slow Synch. In Playback mode, this button calls up the
Image Deletion dialog, where you can either confirm deletion of the current
image, movie or audio clip, or you can cancel deletion.

Five-Button Controller: Located in
between the previous four buttons, this controller consists of a single donut-shaped
button which can be pressed up, down, left or right, as well as a circular
button in the center, which together control a wide variety of functions.
In the standard Still Image record mode, the left and right, and the up and down button pairs control your choice of one variable each - either drive mode, exposure compensation, white balance, or ISO sensitivity, set through the Capture mode menu. The button pairs can also be set to have no function whatsoever, to prevent accidental settings changes by bumping them. In Scene mode, the left and right buttons select from the available scene modes, and the up and down buttons control whichever variable you set in the standard Still Image record mode menu. Strangely, this setting is grayed out when you call up the menu in Scene mode, and to change it you have to return to the standard Still Image record mode. In any settings menu, these buttons navigate through menu options. In playback mode, the left and right buttons scroll forward or back through previously captured images, videos and sounds. The upper button has no effect, and the lower button rotates images counter-clockwise in 90-degree steps. When in zoomed playback, these buttons move your view up, down, left or right in the enlarged playback image. When viewing a movie, the left and right buttons fast-forward or rewind the clip, and the up and down buttons raise or lower the volume. When viewing a slideshow, the left and right buttons skip through the slideshow.
The central button on the Five-Button controller also serves multiple functions. In Record mode, briefly holding this button switches the camera between wide and spot AF modes. In playback mode, this button starts playback of sounds and movie clips. When viewing a slideshow, this button pauses or resumes the slideshow.
Still-Image Record Mode: In normal or scene Record modes, the camera can capture still images. The Record menu is displayed by pressing the Menu button, and the following options are available:
- Menu
1
 Drive Mode: Sets the camera's drive mode to Single, Self-timer,
Continuous, or Advanced Modes. The Advanced Modes option calls up a
submenu where you can select between Ultra High Speed Continuous, Progressive,
Ultra High Speed Progressive, or Multi Frame modes.
Drive Mode: Sets the camera's drive mode to Single, Self-timer,
Continuous, or Advanced Modes. The Advanced Modes option calls up a
submenu where you can select between Ultra High Speed Continuous, Progressive,
Ultra High Speed Progressive, or Multi Frame modes.
- Image Size: Adjusts the image resolution to 3,264 x 2,448; 2,560 x 1,920; 2,048 x 1,536; 1,600 x 1,200; or 640 x 480 pixels.
- Quality level: Sets the image compression level to Fine, Standard, or Economy (JPEG file format).
- White Balance: Adjusts the overall color balance of the scene. Options include Auto, Daylight, Cloudy, Tungsten, and Fluorescent.
- Anti-Shake: Selects whether the Anti-Shake System is activated
only during the exposure itself or any time the Shutter button is halfway
pressed. (If you select "Exposure Only," Konica Minolta cautions
to wait a moment after half-pressing the shutter button before snapping
the picture, so the Anti-Shake system has time to take effect.) The
Anti-Shake System can also be disabled altogether.
- Menu
2
 Sensitivity: Lets you set the camera's ISO sensitivity to Auto
(the default), 50, 100, or 200.
Sensitivity: Lets you set the camera's ISO sensitivity to Auto
(the default), 50, 100, or 200.
- Metering Mode: Select between MultiSegment (the default) or Spot exposure metering.
- Exp.Comp: Set the exposure compensation from -2 to +2 EV units in 0.3 EV steps.
- Inst. Playback: Off by default, when turned on this causes the camera to display each image on the LCD for two seconds after it's captured.
- LCD backlight: Allows you to select whether the X1's LCD should operate with normal brightness, or in "Hibright" mode for better visibility in bright sunlight (beware the decrease in battery life).
- Menu
3
 Color Mode: Sets the camera's color mode to color (the default),
black and white, or sepia.
Color Mode: Sets the camera's color mode to color (the default),
black and white, or sepia.
- Sharpness: Adjusts the overall image sharpness to Normal, Hard, or Soft.
- Contrast: Adjusts overall image contrast to Normal, High, or Low.
- Digital Zoom: Enables or disables (the default) the digital zoom function, which functions in increments that vary across the digital zoom range from 0.1x to 0.3x, up to a maximum of 4.0x.
- Date Imprint: Enables the imprinting of the current date or
date and time in small white characters outlined in black, in the lower
right-hand corner of each image. Off by default, options include YYYY/MM/DD,
or MM/DD/hr:min.
- Menu
4
 Up / Down Key Func: This menu item lets you change the function controlled
by the Up/Down keys on the camera's rear panel. Options include Drive
mode, Exposure compensation, White balance, ISO sensitivity, and Off
(the default).
Up / Down Key Func: This menu item lets you change the function controlled
by the Up/Down keys on the camera's rear panel. Options include Drive
mode, Exposure compensation, White balance, ISO sensitivity, and Off
(the default).
- Left / Right Key Func: This menu item lets you change the function controlled by the Left/Right keys on the camera's rear panel. Options include Drive mode, Exposure compensation, White balance, ISO sensitivity, and Off (the default).
- Setup: Accesses the camera's setup menu.
Playback Mode: This mode allows you to review captured images on the memory card, erase them, protect them, set them up for printing, etc. Pressing the Menu button displays the following options:
- Menu
1
 Delete: Erases the current frame, the audio caption attached
to the current frame (if applicable), all frames, or marked frames from
the memory card.
Delete: Erases the current frame, the audio caption attached
to the current frame (if applicable), all frames, or marked frames from
the memory card.
- Format: Formats the SD card, erasing all files, including protected ones.
- Audio Caption: Allows you to record a short (15 seconds max.) sound clip to accompany a previously recorded image. If a clip is already recorded, prompts you for whether you wish to replace it with a new one.
- Lock: Write-protects the current image, marked images, or all images, preventing them from being manipulated or erased (except via card formatting). An option also exists to Unlock all images. You can unlock single images by using the current image option, or toggle the status of multiple images from locked to unlocked or vice versa using the market images option.
- Menu
2
 Slide Show: When selected, this menu item triggers a slideshow
of all images, sounds and movies on the camera.
Slide Show: When selected, this menu item triggers a slideshow
of all images, sounds and movies on the camera.
- Dissolve: When enabled, the camera randomly chooses a dissolve effect to use when switching images in a slideshow.
- Crop frame: Allows you to crop a portion of the image, using the same controls as the digital zoom to select the area to be saved. When satisfied, you press the shutter button to save the resulting cropped image as a new file.
- Menu
3
 DPOF Set: Sets images for printing on an output device supporting
the Digital Print Order Format (DPOF) standard. Options are to mark
the current frame, all frames, marked frames, or to cancel the print
orders for all images.
DPOF Set: Sets images for printing on an output device supporting
the Digital Print Order Format (DPOF) standard. Options are to mark
the current frame, all frames, marked frames, or to cancel the print
orders for all images.
- Date Print: Either on or off, this selects whether the camera should print the date with all images in a DPOF order.
- Index Print: Sets up a DPOF order for an index print showing all images on the memory card.
- E-mail Copy: Makes a smaller copy of images for convenient emailing. The original images aren't changed, a smaller copy is made. Options are to make a copy of the current image only, or of all marked images.
- Setup: Accesses the camera's setup menu.
Movie/Audio Mode: This mode allows you to record either movies (with sound) or audio-only files. Pressing the menu button displays the following options.
- Menu
1
 Movie / Audio: Sets the camera to capture either movies or
audio.
Movie / Audio: Sets the camera to capture either movies or
audio.
- Image Size: Adjusts the movie resolution to 640 x 480 or 320 x 240 pixels.
- Optical Zoom: Enables or disables (the default) the optical zoom function during movie recording. When enabled, the optical zoom is clearly audible as a high-pitched whine captured by the camera's microphone.
- Digital Zoom: Enables (the default) or disables the digital zoom function, which functions in increments that vary across the digital zoom range from 0.1x to 0.3x, up to a maximum of 4.0x.
- Anti-Shake: Enables (the default) or disables the Anti-Shake System, which is active at any time the Shutter button is halfway pressed, or a movie is being captured.
- Menu
2
 White Balance: Adjusts the overall color balance of the scene.
Options include Auto, Daylight, Cloudy, Tungsten, and Fluorescent.
White Balance: Adjusts the overall color balance of the scene.
Options include Auto, Daylight, Cloudy, Tungsten, and Fluorescent.
- Exp.Comp: Set the exposure compensation from -2 to +2 EV units in 0.3 EV steps.
- Color Mode: Sets the camera's color mode to color (the default), black and white, or sepia.
- Focus Mode: Sets the camera's focus mode to Single AF (the default) or Continuous AF.
- Movie Mode: Sets the camera's sensitivity when capturing movies. Standard maximizes movie quality, but gives lower sensitivity. Night Movie increases sensitivity, but with a potential decrease in movie quality.
- Menu
3
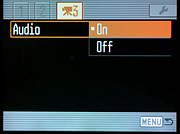 Audio: Enables (the default) or disables the camera's audio
recording function during movie capture. If enabled in combination with
the optical zoom function, the camera picks up the sound of the optical
zoom changing quite clearly.
Audio: Enables (the default) or disables the camera's audio
recording function during movie capture. If enabled in combination with
the optical zoom function, the camera picks up the sound of the optical
zoom changing quite clearly.
Setup Menu: This mode lets you adjust various camera options and settings. Clicking on the Setup button in any other menu displays the following options:
- Menu
1
- LCD Brightness: Adjusts the brightness of the
LCD display in eleven steps.
- Auto Reset: When enabled, the camera will automatically reset the flash mode, monitor display, AF area, drive mode, white balance, anti-shake, camera sensitivity, metering mode, exposure compensation, Hibright LCD, color mode, sharpness, and contrast to their default settings. When disabled, these options will be remembered after the camera is power-cycled.
- Language: Changes the menu language to English, Japanese, German, French, Spanish, Italian, Swedish, Russian, Simplified Chinese, Traditional Chinese, or Korean.
- Menu
2
- Audio Signals: Select from two sets of audio signals that occur
whenever a button is pressed, or disable them altogether.
- Focus Signal: You can select your choice of two standard autofocus lock sounds, or disable this sound altogether.
- Shutter FX: You can select your choice of two standard shutter sounds, or disable this sound altogether.
- Volume: Sets the volume of the camera's audio signals and shutter FX sounds. Playback of recorded audio is not affected. Options are 1 (Low), 2, or 3 (High).
- Power Save: Sets the camera to automatically shut off after 1, 3, 5, 10, or 30 minutes of inactivity.
- Menu
3
 Reset Default: Resets most settings to their default values.
- File # Memory: Specifies whether file numbering starts over with new folders, or continues regardless of folder or memory card.
- Folder Name: You can have the camera name the folders it stores its images in on the memory card using either the camera's standard scheme, or by Date. (The latter being a handy way to keep track of photos you've shot over a period of time.)
- Date/Time Set: Self explanatory - Sets the date and time.
- Date Format: Sets the format for dates used by the camera. Options are YYYY/MM/DD, MM/DD/YYYY, and DD/MM/YYYY.
- Menu
4
 Video Output: Selects whether the Video Out connector should
comply with the NTSC (US) or PAL (European) standards.
Video Output: Selects whether the Video Out connector should
comply with the NTSC (US) or PAL (European) standards.
- Transfer Mode: Through its USB interface, the DiMAGE X1 can appear as either a data storage device or PictBridge device, for printing images on PictBridge-compatible printers over the USB connection, without the need for a computer.
- Firmware Version: Allows you to see the firmware version of the camera. In the case of the camera used in this review, the firmware version is 1.00.
In the Box
The Konica Minolta DiMAGE X1 ships with the following items:
- Hand strap.
- USB and AV cables.
- 32MB SD Memory Card
- NP-1 lithium-ion battery pack.
- Camera cradle.
- DiMAGE software CD (the user manual is on the CD).
- Registration card.
- Large SD memory card (128 MB or larger recommended)
- Additional NP-1 lithium-ion battery pack.
- AC adapter.
- Small camera case.
Recommended Software: Rescue your images!
Just as important as an extra memory card is a tool to rescue your images when
one of your cards fails at some point in the future. I get a lot of email from
readers who've lost photos due to a corrupted memory card. Memory card corruption
can happen with any card type and any camera manufacturer, nobody's immune.
A surprising number of "lost" images can be recovered with an inexpensive,
easy to use piece of software though. Given the amount of email I've gotten
on the topic, I now include this paragraph in all my digicam reviews. The program
you need is called PhotoRescue, by DataRescue SA. Read our review
of it if you'd like, but download the program now, so you'll have it.
It doesn't cost a penny until you need it, and even then it's only $29, with
a money back guarantee. So download PhotoRescue
for Windows or PhotoRescue
for Mac while you're thinking of it. (While you're at it, download the
PDF manual
and quickstart
guide as well.) Stash the file in a safe place and it'll be there when you need
it. Trust me, needing this is not a matter of if, but when... PhotoRescue
is about the best and easiest tool for recovering digital photos I've seen.
(Disclosure: IR gets a small commission from sales of the product, but I'd highly
recommend the program even if we didn't.) OK, now back to our regularly
scheduled review...
See the specifications sheet here.
We ran the Konica Minolta DiMAGE X1 through our usual battery of tests, and have summarized our findings here. To see the full set of our test images, with explanations of what to look for in them, see the DiMAGE X1 Sample Pictures page. For a complete listing of all our test and "gallery" shots, go to the Thumbnails page.
A collection of more random, pictorial images can be found in the DiMAGE X1 Photo Gallery.
Not sure which camera to buy? Let your eyes be the ultimate judge! Visit
our Comparometer(tm)
to compare images from the DiMAGE X1 with those from other cameras you may
be considering. The proof is in the pictures, so let your own eyes decide
which you like best!
Lens
Zoom
A typical 3x optical zoom range, with good performance.
 |
 |
 |
| 37mm |
111mm |
4x Digital Zoom |
The DiMAGE X1 zooms over the equivalent of a 37-111mm range, a typical zoom range for its class. Details are just a hint soft at full wide angle, though still with good definition, and telephoto performance is very good. Coma distortion is barely noticeable at the wide angle setting. The 4x digital zoom takes it out to 12x total, albeit with the loss of quality that digital zoom creates, namely lower resolution and stronger blurring.
Macro
A very small macro area with excellent detail and resolution, and
minimal blurring in the corners of the frame. Flash is much too powerful
for this close range though.
 |
 |
| Standard Macro | Macro with Flash |
The DiMAGE X1's macro setting performs very well, capturing a tiny minimum area of 1.2 x 0.9 inches (31 x 23 millimeters). Detail and resolution are both very good, with only moderate blurring in the corners of the frame. (Most cameras have some softening in the corners in macro mode.) The flash exposure is surprisingly quite bright, as the flash has trouble throttling down accurately for the macro area.
Distortion
High barrel distortion, and moderately high pincushion.
This is the tendency for the lens to bend straight lines outward (like a barrel--usually at wide angle) or inward (like a pincushion--usually at telephoto). The DiMAGE X1's 1.14% barrel distortion at wide angle is quite high, and the 0.72% pincushion is also higher than I'd ideally like to see.
| Barrel distortion at 37mm is 1.14% |
| Pincushion at 111mm is 0.72% |
Chromatic aberration
Moderate, small effect on images at edges.
 |
 |
| Wide: moderately high, top left @ 200% | Tele: quite low, top right @200% |
Chromatic aberration is moderately high at wide angle, showing about 6-7 pixels of moderately bright coloration on either side of the target lines, but decreases to much a lower level at the telephoto setting. (This distortion is visible as a very slight colored fringe around the objects at the edges of the field of view on the resolution target.)
Corner Sharpness
A minor amount of blurring in the corners, but not too bad.
 |
 |
| Slightly soft in the upper right corner at wide angle |
Slightly more blurring in the same corner at telephoto. |
The DiMAGE X1 produced just slightly soft corners in a few shots, though the effect wasn't very strong.
Sensor
Exposure and White Balance
Indoors, incandescent lighting
Strong warm cast with the Auto white balance setting, though
good color with Incandescent. Less exposure compensation required than
usual.
 |
 |
| Auto White Balance +0.7 EV | Incandescent WB +0.7 EV |
Color balance indoors under incandescent lighting was unusably warm in Auto white balance mode, but the Incandescent setting produced very good results. The DiMAGE X1 only required a +0.7 EV exposure compensation boost to get a good exposure, a bit less than average for this shot. Overall color is a bit dark and yellow here, making the blue flowers very dark and purplish. (A very common outcome for this shot.) Our test lighting for this shot is a mixture of 60 and 100 watt household incandescent bulb, a pretty yellow light source, but a very common one in typical home settings here in the US.
Outdoors, daylight
Good color balance, very bright colors. Good exposure accuracy
as well.
 |
 |
| Daylight White Balance, +0.3 EV | Auto White Balance, Auto Exposure |
Outdoor shots generally showed accurate exposure with a moderate tendency toward blown out highlights. Shadow fell apart somewhat as well, but results were still quite good considering the compact, point-and-shoot nature of this digital camera. Exposure accuracy overall was pretty good, the camera typically requiring less exposure compensation than we're accustomed to seeing with consumer digital cameras.
See full set of test images with explanations
See thumbnails of all test and gallery images
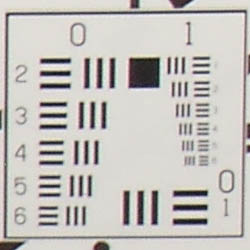
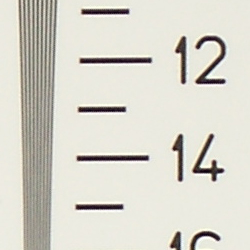
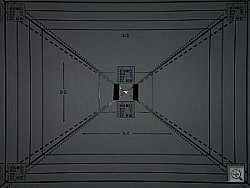
Resolution
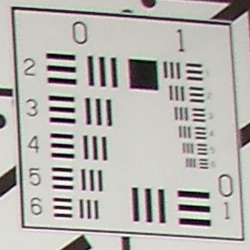
High resolution, 1,300 - 1,400 lines of strong detail.
Our laboratory resolution chart revealed sharp, distinct line patterns down to about 1,300 lines per picture height horizontally, and to about 1,400 lines vertically. Extinction occurred around 1,500 horizontally, and around 1,850 lines vertically. (The camera produced slight color artifacts at lower line frequencies though, visible in the full-sized res target shots.) Use these numbers to compare with other cameras of similar resolution, or use them to see just what higher resolution can mean in terms of potential detail. Beware that while you might be able to make out what looks like distinct lines at numbers higher than those we've mentioned here, the camera is just doing its best to continue interpreting the lines. If you zoom in and follow them from the wider portions, you'll see the lines converge and reappear several times, so the lines you see at higher frequencies than those cited are really only artifacts generated by the camera's imaging system.
 |
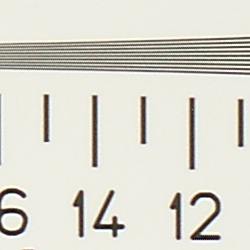 |
| Strong detail to 1,300 lines horizontal | Strong detail to 1,400 lines vertical |
See full set of test images with explanations
See thumbnails of all test and gallery images
Sharpness & Detail
Fairly sharp images, with some blurring of detail from noise suppression.
 |
 |
| Fairly sharp details and good definition in high-contrast elements. | Subtle detail: Hair Noise suppression tends to blur detail in areas of subtle contrast, as in the medium-toned areas of Marti's hair here. (The effect is relatively slight though, not too obvious at low ISOs and modest print sizes.) |
The DiMAGE X1's images are reasonably sharp, without too much over-sharpening or edge enhancement on the camera's part. (Edge enhancement creates the illusion of sharpness by enhancing colors and tones right at the edge of a rapid transition in color or tone.)
Noise-suppression systems in digital cameras tend to flatten-out detail in areas of subtle contrast. The effects can often be seen in shots of human hair, where the individual strands are lost and an almost "watercolor" look appears. The crop at far right shows this, with the medium-toned areas of Marti's hair showing only limited detail, though brighter, individual strands are quite visible. We found that this loss of detail wasn't too apparent at print sizes of 8x10 inches and smaller, but did become pretty glaring when we went to larger print sizes. In 13x19 inch prints, the effects of the noise-suppression system was very obvious in patches of foliage, where patterns of leaves were reduced to impressionistic blobs of color.
ISO & Noise Performance
Generally low noise at the lowest sensitivity settings, though a
much higher level at the highest setting.
 |
 |
 |
| ISO 50 | ISO 100 | ISO 200 |
Noise was low and details fairly distinct at the DiMAGE X1's ISO 50 setting, but there was a perceptible increase even with the initial jump to ISO 100. At ISO 200, noise was much higher and definitely more distracting, blurring finer details. It's important to keep in mind though, the difference between viewing an 8-megapixel image 1:1 on a computer screen, and printing that same image at 8x10 on a photo printer. When we ran prints on the Canon i9900 printer in our studio, we were surprised by how unobtrusive the noise actually was. Make no mistake, you can see the noise in ISO 200 shots printed at 8x10 inches (particularly in shadows and darker midtones), but the overall impact is really quite minimal. - We suspect that most consumers would be quite happy with 8x10 inch prints from the X1, displayed on their walls and tables.
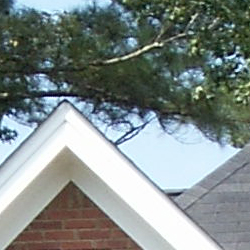
Extremes: Sunlit and low light tests
High resolution with good overall detail, though limited shadow detail.
Limited low-light performance, just bright enough for average city street
lighting, but not much darker.
 |
|
 |
| Normal | +0.3EV | +0.7EV |
Sunlight:
Because digital cameras are more like slide film than negative film
(in that they tend to have a more limited tonal range), we test them
in the harshest situations to see how they handle scenes with bright
highlights and dark shadows, as well as what kind of sensitivity they
have in low light. The shot above is designed to mimic the very harsh,
contrasty effect of direct noonday sunlight, a very tough challenge
for most digital cameras. (You can read details of this test here.)
The DiMAGE X1 turned in about an average performance with the high-contrast lighting, producing only moderately blown-out highlights, though shadow detail was limited. The camera required a +0.3 EV exposure compensation boost to get bright midtones, which is a fair bit less than average for this shot. (In "real life" though, be sure to use fill flash in situations like the one shown above; it's better to shoot in the shade when possible.)
| 1 fc 11 lux |
1/2 fc 5.5 lux |
1/4 fc 2.7 lux |
1/8 fc 1.3 lux |
1/16 fc 0.67 lux |
|
| ISO 50 |
1 sec f3.5 |
1 sec f3.5 |
1 sec f3.5 |
1 sec f3.5 |
1 sec f3.5 |
| ISO 100 |
1 sec f3.5 |
1 sec f3.5 |
1 sec f3.5 |
1 sec f3.5 |
1 sec f3.5 |
| ISO 200 |
1 sec f3.5 |
1 sec f3.5 |
1 sec f3.5 |
1 sec f3.5 |
1 sec f3.5 |
Low light:
Our low light testing revealed significant limitations in the lens and sensor's ability to gather and process light. The DiMAGE X1's longest shutter speed is just one second, so the camera had some trouble during this test. At ISO 50, images weren't even bright enough for use at one foot-candle, which is about the equivalent of average city street lighting. However, at ISO 100, images were bright at one foot-candle, and ISO 200 captured bright images to 1/2 foot-candle. Surprisingly, the X1 could actually focus down to a bit more than 1/4 foot-candle, so it's safe to say that it can capture any subject that it can focus on. Bottom line, the camera will capture reasonably bright images under average city street lighting, though not much darker.
Color
Saturation & Hue Accuracy
Generally good hue accuracy and saturation, though some colors shift
toward a darker hue. Still, good overall results.
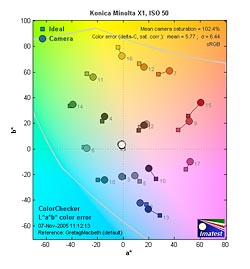 |
| In the diagram above, the squares show the original color, and the circles show the color that the camera captured. More saturated colors are located towards the periphery of the graph. Hue changes as you travel around the center. Thus, hue-accurate, highly saturated colors appear as lines radiating from the center. |
The other important part of color rendition is hue accuracy. Hue is "what color" the color is. Here, the DiMAGE also performed pretty well. Hue shifts were generally fairly small, some purples and deep blues being shifted slightly toward pure blue. Other colors tended to be quite accurate.
 |
 |
 |
Our random "Gallery" shots showed very pleasing color across a wide variety of subjects. (See our DiMAGE X1 Photo Gallery for more shots taken with the camera.)
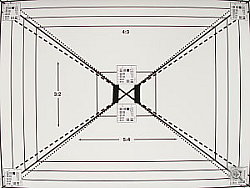
Viewfinder
Coverage
A very accurate LCD monitor.
 |
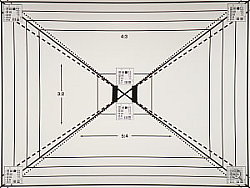 |
| 37mm eq., LCD monitor | 111mm eq., LCD monitor |
The DiMAGE X1's LCD monitor proved pretty accurate, showing about 99% of the final image area across the full zoom range.
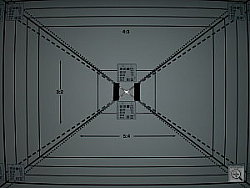
Flash
Coverage and Range
The DiMAGE X1's small flash has a limited range, typical of subcompact digital cameras. It does have somewhat better uniformity at wide angle than those of many competing cameras.
 |
 |
| 37mm equivalent | 111mm equivalent |
 |
 |
| Normal Flash +1.0 EV | Slow-Sync Flash Default Exposure |
Flash coverage was a bit uneven and dim at wide angle, with slightly uneven (and very dim) results at telephoto. (Uniformity at wide angle was a bit better than average among the cameras we've tested.) In the Indoor test, the flash on the DiMAGE X1 underexposed our subject at its default setting, requiring a +1.0 EV exposure compensation adjustment to get reasonably bright results, about typical for this shot. Even here, the exposure is a little dim, with a strong pink cast. The camera's Slow-Sync flash mode produced slightly brighter and more even results, but with a stronger orange cast from the room lighting. No exposure compensation adjustment was required, as Marti's shirt almost glows in the Slow-Sync shot.
| 8 ft | 9 ft | 10 ft | 11 ft | 12 ft | 13 ft | 14 ft |
1/100 sec f3.8 ISO 100 |
1/100 sec f3.8 ISO 100 |
1/100 sec f3.8 ISO 100 |
1/100 sec f3.8 ISO 100 |
1/100 sec f3.8 ISO 100 |
1/100 sec f3.8 ISO 100 |
1/100 sec f3.8 ISO 100 |
Even at eight feet, our closest test range, the flash did not illuminate the DaveBox target adequately. This agrees with Konica Minolta's published specs, which claim a flash range of 7.2 feet at wide angle, decreasing to 6.9 feet at telephoto. Most compact and subcompact digital cameras have very limited flash ranges, and the DiMAGE X1 is no exception.
Output Quality
Print Quality
Good print quality, great color, very usable 11x14 inch prints. ISO 200 images are a bit soft and noisy at 8x10 inches, but better-looking than similar prints from many competing models.
Testing hundreds of digital cameras, we've found that you can only tell just so much about a camera's image quality by viewing its images on-screen. Ultimately, there's no substitute for printing a lot of images and examining them closely. For this reason, we now routinely print sample images from the cameras we test on our Canon i9900 studio printer, and on the Canon iP5000 here in the office. (See the Canon i9900 review for details on that model.)
Compared to full-sized 8 megapixel cameras, images from the Konica Minolta DiMAGE X1 were a little soft. That is we'd normally expect images from an 8-megapixel digital camera to still be fairly sharp when printed at 13 x 19 inches, while those from the X1 were a little soft at that size. That said, 11 x 14 prints looked fine, and 8 x 10s were tack sharp. If you'd never print your photos at sizes larger than 8 x10 (even with a little cropping), the Konica Minolta X1 will have plenty of resolution for you.
The other factor that relates to print size is image noise at high ISO settings. As we noted above, we felt that the X1 did surprisingly well, although it must be pointed out that its maximum ISO setting is only 200, half the maximum level of much of its competition. At ISO 200, the image noise was rather distracting on-screen, but when we made 8 x 10 prints from the images, the noise was surprisingly tolerable. There was no question that there was noise present, and in shadow areas it could still be said to be obtrusive and objectionable, but the overall impact was quite a bit less than we'd have expected, after viewing the images on-screen. At print sizes of 5 x 7 and below, image noise was really a non-issue, regardless of ISO setting.
Color-wise, the Konica Minolta X1's images looked quite nice when printed on the i9900. Given the rather restrained color saturation levels that we saw in our laboratory tests, we expected the X1's shots to be a little drab-looking. Contrary to our expectations, our "gallery" photos of random subjects were very pleasing when printed, although we did feel that some foliage and sky colors could have been a tad brighter. All in all, a very good performance.
Timing and Performance
Konica Minolta DiMAGE X1 Timing
Slow to very slow performance, but very fast cycle times with the high-speed continuous mode.
| Startup/Shutdown: | |
| Power On to first shot | 1.8 seconds |
| Shutter response (Lag Time): | |
|
Full Autofocus Wide
|
1.9 second
|
|
Full Autofocus Tele
|
2.0 second
|
|
Prefocused
|
0.22 second
|
| Cycle time (shot to shot) | |
| Normal large/fine JPEG | 4.95 seconds |
| Flash recycling | 6 seconds |
| Continuous mode (normal) | 1.86 second 0.54 frames/second (3 large/fine frames) |
| Continuous mode (ultra high speed) | 0.10 second 9.9 frames/second (15 640 x 480 frames) |
| Download speed | |
| Windows Computer, USB 2.0 | 533 KBytes/sec |
Responsiveness is clearly the Konica Minolta X1's weakest area. Its 1.8 second startup time isn't too bad compared to the full range of digital cameras out there, but is definitely slow for a camera with an internal, non-telescoping lens design. Its shot to shot time of 4.95 seconds for large/fine JPEG files is slow by any standard these days.
Shutter response verges on glacial, with 1.9 and 2.0 second shutter lag at wide angle and telephoto (respectively). (Oddly, there seems to be an appreciable delay after the camera has focused, but before the shot is taken. The autofocus alone is on the slow side, but with the added "thinking time" after the autofocus thrown in, the overall delay gives it one of the slowest shutter responses we've ever tested. If you can get away with "prefocusing" by half-pressing and holding down the shutter button prior to the exposure itself, the lag time is cut to only 0.22 second, a very tolerable level.
The camera's normal Continuous shooting mode captures only 0.54 frames per second with a cycle time of 1.86 second, which is again very slow. The one saving grace is the X1's Ultra High Speed option, which captures as many as 15 low-res (640 x 480 pixel) files at 0.10 second cycle times, or 9.9 frames per second. The flash takes about six seconds to recharge after a full-power shot, a little slow, but not bad at all.
Connected to a computer, download speeds are fast enough that you probably won't feel a need for a separate card reader, but nonetheless aren't as fast as many cameras currently on the market.
Battery and Storage Capacity
Battery
Typical (short) battery life for a subcompact camera.
The Konica Minolta DiMAGE X1 uses a custom rechargeable 3.7V, 820 mAh LiIon battery for power. Because it uses a custom power connector, we couldn't perform our usual direct measurements of power consumption, so instead have to rely upon Konica Minolta's published specs, based on the CIPA battery-life standard. (Which involves a combination of intermittent use, some zooming of the lens mechanism and firing the flash on 50% of the shots.) Using the CIPA protocol, Konica Minolta claims 150 shots for a fully-charged battery, and further report an approximate continuous run time in playback mode of 140 minutes. These aren't bad numbers for a subcompact digital model, but if you plan on any extended outings with the X1, you should definitely plan on purchasing a second battery along with the camera.
Storage
The DiMAGE X1 comes with a 32MB SD memory card, though you'll want a larger capacity card to accommodate its high resolution images.
| 28.5MB Internal Memory |
Fine | Normal | Economy | |
| 3,264 x 2,448 | Images | 10 | 15 | 30 |
| File Size | 3.0 MB | 2.1 MB | 1.1 MB | |
| 2,560 x 1,920 | Images | 17 | 24 | 47 |
| File Size | 1.8 MB | 1.3 MB | 675 KB | |
| 2,048 x 1,536 | Images | 26 | 37 | 70 |
| File Size | 1.2 MB | 849 KB | 452 KB | |
| |
Images | 42 | 59 | 107 |
| File Size | 753 KB | 540 KB | 297 KB | |
| |
Images | 191 | 241 | 343 |
| File Size | 167 KB | 133 KB | 93 KB | |
I strongly recommend buying at least a 128MB SD card, preferably a 256MB one, to give yourself extra space for extended outings.
| Pro: | Con: |
|---|---|
|
|
| Free Photo Lessons | |
|


Follow Imaging Resource: