The Imaging Resource
Quick Review
Minolta DiMAGE Xg Digital Camera
 |
Camera QuickLook | |
Review
Date |
04/23/04 | |
|
User Level |
|
|
|
Product Uses |
|
|
|
Digicam Design |
|
|
|
Picture Quality |
Very Good, 3.2-megapixel CCD | |
|
Print Sizes |
4x6 to 11x14 inches | |
|
Availability |
March, 2004 | |
|
Suggested Retail Price (at introduction) |
$299 | |
|
||||||||||
Minolta really turned heads a little over two years ago, when they first introduced the diminutive DiMAGE X, a two megapixel camera in the form of a square block of metal, just barely over three-quarters of an inch thick. The DiMAGE X's clever "folded" optical system not only enabled the super-thin design, but made for rapid startup times, since there was no need to wait for the lens assembly to telescope out when the camera was turned on.
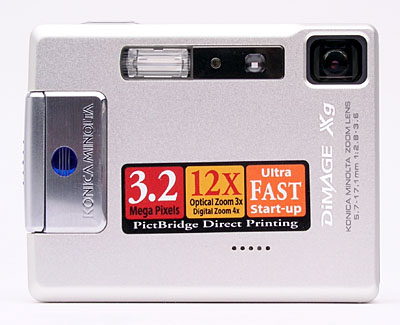
This year, Minolta has introduced the fourth update to the popular "X" line, the DiMAGE Xg. The new model takes last year's 3 megapixel "Xt" upgrade, keeping an almost-identical body, adding several new features and removing in-camera battery charging and video output. With each generation, Minolta's "X" series has continued to improve, and the image quality of the DiMAGE Xg is arguably the best of the lot: Bright, clear colors, and seemingly a sharper lens as well. Read on for all the details, but if you're looking for a super-portable, stylishly different camera, the DiMAGE Xg deserves a close look.
Differences from the DiMAGE Xt
For those of you who've read my review of the DiMAGE Xt, much of this one will look familiar - The basic functions are the same, so much of the descriptive text here is just a copy/paste from the earlier version. There are several changes in the user interface though, so you may want to read the sections of this review dealing with controls and menus closely, even if you're already familiar with the Xt. And of course all the test photos, analysis, and conclusions are new, as are the freshly-measured parameters in the Picky Details section.
The table below presents a quick summary of features that I found to be new or enhanced in the Xg. - This may save some of you from having to slog through the whole review to find what's new:
| Feature | DiMAGE Xg | DiMAGE Xt |
| Branding | Konica Minolta | Minolta |
| LCD display | 1.6", 85k pixels | 1.5", 110k pixels |
| Scene modes | Five ( portrait, sports action, landscape, sunset, night portrait) | None |
| In-camera battery charging | No (no contacts on bottom of camera) | Yes (contacts on bottom of camera) |
| AC adapter connection | Proprietary dummy battery (camera has small sliding door to allow cable to enter battery compartment) | Standard plug connector |
| Tripod Mount | Centered in bottom of camera | Off-center |
| Styling | More silver trim around control buttons / mode dial, slightly restyled buttons and battery door grip, battery door now has matte finish, On/Off text now screen-printed instead of engraved | - |
| Battery Life (Record Mode) | 220 frames | 130 frames |
| Battery Life (Playback Mode) | 240 minutes | 120 minutes |
| Image Processor | CXProcess II | CXProcess |
| Video Out connectivity | No | Yes |
| Setup Menu | Accessed through the Record or Playback menus | Has its own position on the Mode dial |
| Key Function | Left / Right arrow keys can be set to control Exposure Compensation, White Balance, Drive Mode, Sensitivity or Off | Left / Right arrow keys can be set to control Exposure Compensation, White Balance, Drive Mode, Sensitivity or Color Mode |
| PictBridge Compatibility | Yes | No |
| Uncompressed TIFF image format | No | Yes |
| DPOF date option | Yes | No |
| Startup Time | 0.8 seconds | 1.1 seconds |
| Burst Speed | 1.5 frames per second | 1.3 frames per second |
| Movie Frame Rate | 15 or 30 frames per second | 15 frames per second |
| Movie Modes | Standard, Night (High ISO) | Standard |
| Movie Editing | Yes | No |
| Still Image Extraction from Movie | Yes | No |
| Image Pasting | Yes | No |
| Multi-Frame (9-in-1 shot) | Yes | No |
| Image Cropping | Yes | No |
| Slideshow | No | Yes |
Camera Overview
With its unusual vertical lens design, Minolta's DiMAGE Xg, like the DiMAGE Xt, Xi and X before it, has a tiny, extraordinarily thin all-metal body. The new model is the same size and weight as its predecessor, measuring a mere 3.6 x 0.92 x 2.6 inches (92.2 x 23.4 x 67 millimeters) and weighing just 5.0 ounces (143 grams) including the battery and SD memory card, making the DiMAGE Xg one of the smallest multi-megapixel digicams on the market. With the extremely compact design, there's no excuse for leaving it behind, as the camera can tag along in even the smallest shirt pocket, or be quickly tucked into an evening bag or pants pocket. The unique "folded" optical design means that there's no wait for a lens to telescope out of the body when the camera is powered up, resulting in very fast startup and shutdown times. The sleek design includes a built-in lens cover which conveniently slides out of the way whenever the camera is powered on, eliminating any concern over misplacing a lens cap. An all-metal case is rugged and solid-feeling, and should withstand the wear and tear of daily use better than most cameras. The 3x zoom lens, combined with the full automatic exposure control makes the camera suitable for most common shooting conditions. The 3.2-megapixel CCD produces high resolution images for printing, as well as lower resolution images better suited for email.
The DiMAGE Xg has a 3x, 5.7-17.1mm lens, the equivalent of a 37-111mm lens on a 35mm camera. The autofocus covers a range from 5.9 inches (15 cm) to infinity. There's no separate macro mode, but the 5.9 inch close-focusing combined with a telephoto lens setting produces very good macro performance. Depending on the lens zoom position, the maximum aperture ranges from f/2.8 to f/3.6. In addition to the optical zoom, the DiMAGE Xg offers a 1.1 - 4.0x digital zoom, in increments of 0.1x. (Although I always remind readers that digital zoom decreases the overall image quality because it simply enlarges the central pixels of the CCD's image.) You can choose between the real-image optical viewfinder or the 1.6-inch, color TFT LCD monitor to compose images, although as usual, the LCD monitor provides the most accurate framing. (The optical viewfinder is unusually "tight", showing only 72-75% of the final frame area.) In playback mode, images can be enlarged up to 6x, as an aid to checking critical focus and framing.
Exposure is automatically controlled at all times, with only a few exposure options available. An On/Off button on top of the camera powers the camera on, and a Mode switch lets you select between Record and Playback modes (newly added to the mode dial is the Scene Mode function, which customizes exposures for common photographic situations - Portrait, Sports Action, Landscape, Sunset, and Night Portrait). Thanks to the all-internal lens design, there's no need to wait for the lens to extend before you can shoot, so startup times are very short. (Startup time is claimed to be slightly faster than the DiMAGE Xt at approximately 0.8 seconds, although in my own tests, the camera consistently took 2.1 seconds to capture the first picture after power-up, still pretty fast.) Most exposure options are controlled through the LCD's on-screen menu system, which offers very straightforward navigation. That said, you can control flash mode, lens zoom, wide / spot autofocus and your choice of either exposure compensation, white balance, drive mode or ISO sensitivity externally, via buttons and controls on the camera's rear panel. Shutter speeds range from 1/1,000 to four seconds, though the chosen value is not reported to the user. The right and left arrow keys on the camera's back panel control either the Exposure Compensation, white balance, drive mode or ISO sensitivity, or are disabled in Record mode (depending on a menu setting). Exposure Compensation ranges from -2 to +2 exposure equivalents (EV) in one-third step increments. Sensitivity is adjustable to values of 50, 100, 200, or 400, with an Auto setting as well, that varies the ISO between 50 and 160, depending on the current light level. White Balance is adjustable through the settings menu, with options for Auto, Daylight, Cloudy, Incandescent, and Fluorescent light sources. The DiMAGE Xg's built-in flash operates in Auto, Red-Eye Reduction, Forced, Suppressed, or Slow Sync modes.
In addition to the basic exposure options, the DiMAGE Xg also offers a few extra shooting modes, controlled through the settings menu. In Movie exposure mode, the camera captures either 320 x 240-pixel or 160 x 240-pixel resolution moving images with sound, with duration limited only by the size of the memory card. Movie frame rate has been improved from the DiMAGE Xt's 15 frames per second - in the Xg, you can choose either 15 or 30 frames per second. (The included 16MB SD card should hold approximately 21 seconds worth of movies at the highest resolution and frame rate, larger cards will store proportionately more.) A Self-Timer mode provides a 10-second delay between the time the Shutter button is pressed and when the camera actually takes the picture, allowing you to get into your own shots. For shooting fast action subjects, the DiMAGE Xg's Continuous Shooting mode captures a rapid series of images when you hold down the Shutter button, much like a motor drive on a traditional 35mm camera. Provided that there's enough space remaining on the memory card, the camera can capture up to 5 large/fine images, or over a hundred small/economy mode ones before having to pause to write the image data to the memory card. Details like image size and shutter speed can affect the shooting interval, but it averages approximately 1.4 to 1.5 frames per second. Finally, Audio Recording mode lets you record sound clips as long as 180 minutes (without an image), although the maximum recording time may also be limited by the amount of available memory card space. (A 16 MB memory card can hold about 30 minutes of audio.) The DiMAGE Xg also features a Voice Memo option, for recording short sound clips (up to 15 seconds in length) to accompany recorded images.
The DiMAGE Xg stores its images on an SD memory card, and a 16MB card accompanies the camera. (The camera also works with the slightly less expensive MMC cards.) Connection to a host computer for image download is via USB. The DiMAGE Xg is a "storage-class" device, which means that it doesn't require any separate driver software for Windows 2000 and XP, or for Mac OS 8.6 and later. (Download speed is also very good, I clocked it at 837 KBytes/second on my Sony VAIO computer, running Windows XP. - That's faster than USB v1.1 can support, so the Xg must in fact have a USB v2.0 interface.) The camera utilizes an NP-200 rechargeable lithium-ion battery for power, one of which is included with the camera, along with the necessary battery charger. While the DiMAGE Xg's battery life is better than most subcompact cameras, I still highly recommend picking up an additional battery pack and keeping it freshly charged. The optional AC adapter is also useful for preserving battery power when using the camera as a webcam, for reviewing and downloading images, or when viewing images and movies on a television, via the supplied A/V cable.
Basic Features
- 3.2-megapixel CCD.
- Real-image optical viewfinder.
- 1.6-inch color TFT LCD monitor.
- Glass, 3x, 5.7-17.1mm lens, equivalent to a 37-111mm lens on a 35mm camera.
- 1.1-4.0x digital zoom, in 0.1x increments.
- Automatic exposure control.
- Shutter speeds from 1/1,000 to four seconds.
- Maximum aperture f/2.8 to f/3.6, depending on lens zoom position.
- Built-in flash.
- SD/MMC memory card storage, 16MB card included.
- Images saved as JPEG files.
- Power supplied by one NP-200 rechargeable lithium-ion battery or optional AC adapter.
- DiMAGE software and USB drivers included for both Windows and Mac platforms.
Special Features
- Movie mode with sound.
- Continuous Shooting mode.
- 10-second Self-Timer for delayed shutter release.
- Voice Memo mode for recording captions.
- White balance (color) adjustment with five modes.
- Scene mode with five presets.
- Adjustable ISO.
- Both multisegment and spot metering.
- DPOF (Digital Print Order Format) compatibility.
- PictBridge compatibility.
- USB cable for connection to a computer (driver software included, can function as a webcam).
Recommendation
The DiMAGE Xg is very small and compact. Its full automatic exposure control suits standard point-and-shoot operations, although the user does have a few options for lightening or darkening the image, or adjusting the color balance. The 3.2-megapixel CCD delivers good quality images, with enough resolution to make sharp 8x10 prints, and a low resolution option for email purposes. The DiMAGE Xg's tiny size and rugged case design make it a natural for "anywhere/anytime" photography. With its point-and-shoot appeal and ease of use, the DiMAGE Xg is perfect for novice users who simply want to take good pictures without getting too involved in the technicalities. Even sophisticated users will appreciate its exceptional portability and good picture-taking capabilities, making it a good "second camera" for enthusiasts, too. All in all, a very appealing little camera, with good build quality and surprisingly good image quality for a subcompact model.
Design
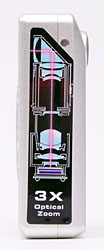
Like the other DiMAGE X-series cameras before it, the DiMAGE Xg has an amazingly thin, tiny case. Its sleek rectangular body shape and lack of protrusions make the DiMAGE Xg one of the most portable cameras on the market. Measuring just 3.6 x 0.92 x 2.6 inches (92.2 x 23.4 x 67 millimeters), the DiMAGE Xg fits just about anywhere, including the smallest of shirt pockets. Matching its diminutive size, the DiMAGE Xg is also very light weight at just 5.0 ounces (143 grams) including the battery and SD memory card. The secret to the DiMAGE Xg's compact design is its internally-mounted lens, which stretches vertically up the side of the camera rather than protruding from the camera's front. An internal prism reflects light from the subject down into the lens itself, almost like a periscope. As well as providing protection for the lens mechanism, the internal lens mounting means that there's no wait for the lens barrel to extend when you power up the camera - making startup times very quick. (Only about two seconds from power on to the first shot captured.)
The front of the camera holds the lens window, flash, optical viewfinder window, and self-timer lamp. A shutter-like, retractable lens cover protects the lens window whenever the camera is powered off, sliding quickly out of the way when the camera is turned on. As with the DiMAGE Xt, the DiMAGE Xg has a little bulge on its right side (viewed from the front of the camera), that provides welcome purchase for your fingers. You can also see the horizontal row of five tiny holes, marking the location of the Xg's microphone.
The design of the DiMAGE Xg almost dictates a one-handed grip, something that took me a little getting used to. I realized that I almost always hold a camera with both hands, for a more stable shooting platform, minimizing camera shake. With the DiMAGE Xg, when I steadied the camera with my left hand, I initially often found myself putting a finger over the lens opening. Not a big deal, as I quickly got used to just using a couple of fingers on the bottom left corner of the camera, but something to watch for when you first start shooting with it.
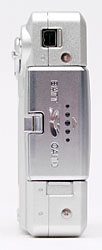
On the right side of the camera (as viewed from the rear) is the combined SD memory card and battery slot, and a wrist strap attachment eyelet. A sliding door protects the battery/card compartment, with a few blue plastic pips (for lack of a better term) on it to make it easier to open. Beneath the compartment door, the battery and SD card fit side-by-side. I thank Minolta for providing side access to both the battery and memory card slots, meaning you don't need to dismount from a tripod to change out either one. (Although I frankly doubt the DiMAGE Xg will be used on a tripod very often.) Directly beneath the battery/card door is a small sliding cover which allows a cable for the optional dummy battery-style AC adapter to enter the camera. The USB jack is above the battery / card door, protected by another little sliding cover.
The opposite side of the camera is featureless, with no connectors or controls on it at all. This view of the camera shows the decal that illustrates the clever lens design Minolta is so justifiably proud of. Be reassured though, that the label can be easily removed after purchase, to result in a very sleek, elegant case design.
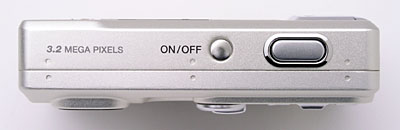
The DiMAGE Xg's top panel is sleek and smooth, with only a minor protrusion from the Shutter button. The power button is also located here, slightly recessed to prevent accidental actuation when the camera is slid in and out of pockets.
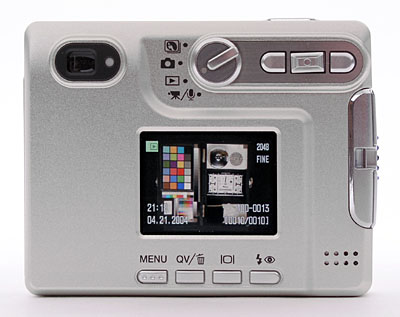
The remaining camera controls are on the back panel, along with the optical viewfinder eyepiece and 1.6-inch color LCD monitor. A single LED lamp next to the optical viewfinder reports the camera's status, such as when focus is set, when the flash is charged, etc. To the right of the viewfinder eyepiece is a small mode dial, with positions for scene modes - new to the DiMAGE XG - along with still image recording, playback, and movie/audio recording. (The "setup" position from the DiMAGE Xt has been removed, as the setup menu is now accessed through either the record or playback-mode menus.) To the right of the mode dial are three multi-function buttons, which access different settings in Playback and Record modes, also serving as navigation arrows in the menu system (the rocker button in the center serves for up and down menu navigation). The center button of this set of three controls the zoom lens in record mode and image zoom in playback mode. It also serves as the "OK" button in the menu system, when pressed straight down. Arranged under the LCD monitor are the Menu, QuickView/Erase, Display, and Flash buttons. A small speaker in the lower right corner plays back recorded sounds.
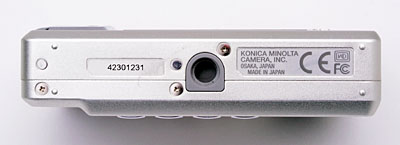
The bottom panel of the DiMAGE Xg reveals only the plastic, threaded tripod mount - now centered under the lens for a more stable mount and easier panorama shooting, a welcome improvement from the off-center placement of the DiMAGE Xt. Gone are the contacts to allow in-camera battery charging - the battery must now be removed before it can be charged (although charging in-camera took considerably longer, it was quite nice to be able to leave the battery in the camera at all times, and know it would be fully charged whenever you grabbed the camera).
Camera Operation
The DiMAGE Xg's user interface is very straightforward, as the camera employs
automatic exposure at all times. While zoom setting, flash mode, wide
/ spot autofocus and your choice of either exposure compensation, white
balance, drive mode or ISO sensitivity can be adjusted via the rear-panel controls,
all the other features and functions are controlled through the LCD menu system.
In both capture and playback modes, the camera's menu system is divided into
three pages, delineated by subject tabs at the top of the screen - very similar
to the DiMAGE Xt, although the visual styling has been changed slightly. To
the right of the subject tabs, a new "Setup" button replaces the DiMAGE
Xt's "Setup" position on the mode dial, taking you from the record
or playback menus to the Setup menu. The Mode dial lets you quickly switch between
Playback and Record modes. Considering the camera's automatic exposure control
and limited user options, most users should be able to become familiar with
the camera's operation in 30 minutes to an hour. (And experienced users may
not even need to crack the manual.)
Record-Mode Display
 In
record mode, the LCD monitor displays the subject with a minor amount of overlaid
information, indicating flash, white balance, ISO setting, the current size/quality
setting, and number of images that can be stored on the remaining memory card
space at the current size/quality. Pressing the Display button beneath the LCD
once removes the information overlay, pressing it again turns the LCD off entirely,
and pressing it a third time restores the default display. When you half-press
the shutter button, a small dot appears in the lower right-hand corner of the
LCD indicating whether the camera is focused (white dot) or not (red dot), and
a "shaking hand" symbol appears above the focus dot if the shutter
speed is slow enough that you'll need to be careful not to jiggle the camera
during the exposure.
In
record mode, the LCD monitor displays the subject with a minor amount of overlaid
information, indicating flash, white balance, ISO setting, the current size/quality
setting, and number of images that can be stored on the remaining memory card
space at the current size/quality. Pressing the Display button beneath the LCD
once removes the information overlay, pressing it again turns the LCD off entirely,
and pressing it a third time restores the default display. When you half-press
the shutter button, a small dot appears in the lower right-hand corner of the
LCD indicating whether the camera is focused (white dot) or not (red dot), and
a "shaking hand" symbol appears above the focus dot if the shutter
speed is slow enough that you'll need to be careful not to jiggle the camera
during the exposure.
Playback-Mode Display
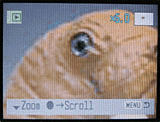 In
playback mode, the default image display shows the most recently captured image,
with an information overlay showing the resolution and quality setting used,
the date and time of capture, the file number, and the sequence number of the
image among those currently stored in the memory card. Pressing the Display
button once dismisses the information overlay, and pressing it a third time
shows a set of six thumbnails. With an image displayed full-screen, pressing
the zoom control in the "T" direction zooms in on the image in steps
of 0.2x, up to a maximum magnification of 6x. At any magnification level, pressing
the "OK" button (pressing the center of the T/W lever) switches you
to scrolling operation, in which the left/right buttons and the T/W control
let you scroll around the magnified image. Pressing the center of the T/W lever
again returns you to zoom operation. The screenshot above right shows all the
available display options in playback mode.
In
playback mode, the default image display shows the most recently captured image,
with an information overlay showing the resolution and quality setting used,
the date and time of capture, the file number, and the sequence number of the
image among those currently stored in the memory card. Pressing the Display
button once dismisses the information overlay, and pressing it a third time
shows a set of six thumbnails. With an image displayed full-screen, pressing
the zoom control in the "T" direction zooms in on the image in steps
of 0.2x, up to a maximum magnification of 6x. At any magnification level, pressing
the "OK" button (pressing the center of the T/W lever) switches you
to scrolling operation, in which the left/right buttons and the T/W control
let you scroll around the magnified image. Pressing the center of the T/W lever
again returns you to zoom operation. The screenshot above right shows all the
available display options in playback mode.
External Controls
![]()
Power Button: Unobtrusively located near the center of the camera's top panel, this slightly recessed button turns the camera on and off.
![]()
Shutter Button: Directly to the right of the Power button, this button sets focus and exposure when pressed halfway, and fires the shutter when fully pressed.
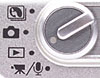
Mode Dial: Just behind and below the power button, at the top of the camera's rear panel, this control sets the Xg's main operating mode. Options include scene mode, still capture, playback, and movie/audio capture.

Right and Left Arrow Keys: Located in the top right corner of the back panel, these buttons control
your choice of either exposure compensation, white balance, drive mode or ISO sensitivity
while in Record mode. In any settings menu, these buttons navigate through menu choices. In playback mode, these buttons scroll forward or back through previously captured images. When in scrolling mode during zoomed playback (see the following entry for more info), these buttons move your view right or left in the enlarged playback image.
Zoom Toggle Button (Up and Down Arrow Key): Centered between the Right and Left Arrow keys, this control adjusts the optical and digital zoom in any record mode. It also serves as the up/down control when navigating LCD menu choices. This button also serves as the "OK" button for confirming menu selections.
In Record mode, pressing and holding this button for a few seconds switches the camera from area autofocus (the default) to spot autofocus or back again.
In Playback mode, this button lets you zoom in on an image, as much as 6x. Once you've zoomed in on an image, pressing the center of this button switches to scrolling operation, after which up/down actuation moves your view up and down in the enlarged image. Pressing the center of the button again returns you to control of the playback zoom level.

Menu Button: The first in a series of four buttons arranged along the bottom of the rear-panel LCD display, this button calls up the settings menu in both Record and Playback modes.

QuickView / Erase Button: To the right of the Menu button, this button lets you immediately review the most recently captured image, without having to switch the camera to playback mode. Pressing the button a second time brings up a dialog box asking if you want to delete that image. While in QuickView mode, you can scroll back and forth through the images on the memory card, zooming in on them if you wish. Pressing the Menu button returns you to capture mode though, rather than calling up either the playback or record menu screens. Half-pressing the shutter button also cancels the QuickView mode, returning you to capture mode.
In Playback mode, this button lets you delete the displayed image.

Display Button: Next in line to the right of the QuickView/Erase button, this button controls the LCD display. In Record mode, pressing this button once disables the information overlay. A second press cancels the image display altogether and shuts off the LCD monitor (great for saving battery power), while a third press recalls both the information and image displays.
In Playback mode, pressing the Display button displays or dismisses the information display. A third press switches to a 2x3 display of thumbnail images for rapidly reviewing photos in the camera.

Flash Button: The left most of the set of controls under the LCD screen, this button cycles through the available flash modes in still image Record mode. Options include Auto, Red-Eye Reduction, Forced, Suppressed, and Slow Sync. In Playback mode, this button has no function.
Camera Modes and Menus
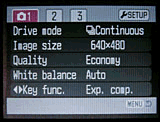
Still-Image Record Mode: In normal Record mode, the camera can capture still images. The Record menu is displayed by pressing the Menu button, and the following options are available:
-
 Menu
1
Menu
1
- Drive Mode: Sets drive mode to Single, Self-Timer, Continuous or Multi Frame.
- Image Size: Adjusts the image resolution to 2,048 x 1,536; 1,600 x 1,200; 1,280 x 960; or 640 x 480 pixels.
- Quality level: Sets the image compression level to Fine, Standard, or Economy (JPEG file format).
- White Balance: Adjusts the overall color balance of the scene. Options include Auto, Daylight, Cloudy, Tungsten, and Fluorescent.
- Key Func: This menu item lets you change the function controlled
by the left/right keys on the camera's rear panel. Options include exposure
compensation, white balance, drive mode, ISO sensitivity, and Off (the
default).
 Menu
2
Menu
2
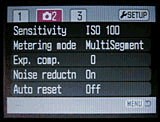
- Sensitivity: Lets you set the camera's ISO sensitivity to Auto (the default), 50, 100, 200, or 400.
- Metering Mode: Select between MultiSegment (the default) or Spot exposure metering.
- Exp.Comp: Set the exposure compensation from -2 to +2 EV units in 0.3 EV steps.
- Noise Reductn: Enable or disable the camera's automatic noise-reduction system, which takes effect during longer exposures.
- Auto Reset: Resets most of the camera's settings to their default
values whenever the camera is turned off.
 Menu
3
Menu
3
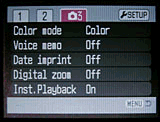
- Color Mode: Sets the camera's color mode to color (the default), black and white, or sepia.
- Voice Memo: Enables the recording of an audio track up to 15 seconds long after the capture of each image. (Default is off.)
- Date Imprint: Enables the imprinting of the current date or date and time in small white characters, in the lower right-hand corner of each image. Off by default, options include YYYY/MM/DD, or MM/DD/hr:min.
- Digital Zoom: Enables or disables (the default) the digital zoom function.
- Inst. Playback: Off by default, when turned on this causes the
camera to display each image on the LCD for two seconds after it's captured.
- Setup: (Sorry, no images for this screen.) Accesses the
camera's setup menu.
Playback Mode: This mode allows you to review captured images on the memory card, erase them, protect them, set them up for printing, etc. Pressing the Menu button displays the following options:
 Menu
1
Menu
1
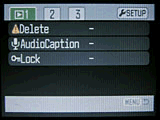
- Delete: Erases the current frame, the audio caption attached to the current frame (if applicable), all frames, or marked frames from the memory card.
- Audio Caption: Allows you to record a short (15 seconds max.) sound clip to accompany a previously recorded image.
- Lock: Write-protects the current image, marked images, or all
images, preventing them from being manipulated or erased (except via card
formatting). An option also exists to Unlock images.
 Menu
2
Menu
2
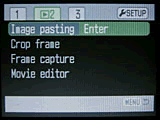
- Image Pasting : Allows you to superimpose images on each other. The currently-selected image acts as a background, and one of nine templates (vertical rectangle, square, horizontal rectangle, bear, circle, heart, speech bubble, oval and though bubble) can then be selected and overlaid on the image. Three sizes can be chosen for any template, and the template can be positioned where you want it in the image. Finally, the camera superimposes a live viewfinder view in the template, and you can frame and capture another photo to fill the template with. The result is saved as a new image, and the process can be repeated on the resulting image.
- Crop frame : Allows you to crop a portion of the image, using the same controls as the digital zoom to select the area to be saved. When satisfied, you press the shutter button to save the resulting cropped image as a new file.
- Frame Capture : Lets you cue backwards and forwards through a movie frame by frame with the left and right arrow keys, and save a specific frame as an image file. If the arrow keys are held down instead of tapped to cue frame by frame, the movie cues at normal playback speed for a couple of seconds, then switches to a high-speed cue. If desired, the movie audio can be attached to the image (if the movie is longer than fifteen seconds, then the fifteen seconds of audio immediately surrounding the captured frame will be saved).
- Movie Editor : Allows you to crop a movie, specifying a start
and end-point. The resulting movie can be previewed, and then saved as
a new file.
 Menu
3
Menu
3
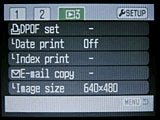
- DPOF Set: Sets images for printing on an output device supporting the Digital Print Order Format (DPOF) standard. Options are to mark the current frame, all frames, marked frames, or to cancel the print orders for all images.
- Date Print: Either on or off, this elects whether the camera should print the date with all images in a DPOF order.
- Index Print: Sets up a DPOF order for an index print showing all images on the memory card.
- E-mail Copy: Makes a smaller copy of images for convenient emailing of them. The original images aren't changed, a smaller copy is made. Options are to make a copy of the current image only, or of all marked images.
- Image Size: Sets the size for making email copies. Options are
640x480 (VGA) or 160x120 (QVGA).
Movie/Audio Mode: This mode allows you to record either movies (with sound) or audio-only files. Pressing the menu button displays the following options.
- Menu 1 (Sorry, no images for this screen)
- Recording Mode: Selects either Movie (the default) or Audio recording modes.
- Image Size: Selects the size of images recorded in movie files. Options are 320x240 (the default) or 160x120.
- Frame Rate : Selects the frame rate of movie files. Options are 15 fps or 30 fps.
- Movie Mode : Standard movie (default) or Night Movie (uses higher ISO sensitivity).
- White Balance: Adjusts the overall color balance of the scene. Options include Auto, Daylight, Cloudy, Tungsten, and Fluorescent.
- Color Mode: Sets the camera's color mode to color (the default),
black and white, or sepia.
- Menu 2 (Sorry, no images for this screen)
- White Balance: Adjusts the overall color balance of the scene. Options include Auto, Daylight, Cloudy, Tungsten, and Fluorescent.
- Exp. Comp.: Sets the exposure compensation from -2 to +2 EV units in 0.3 EV steps.
- Color Mode: Sets the camera's color mode to color (the default), black and white, or sepia.
Setup Menu : This mode lets you adjust various camera options and settings. Clicking on the Setup button in any other menu displays the following options:
 Menu
1
Menu
1
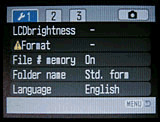
- LCD Brightness: Adjusts the brightness of the LCD display in eleven steps.
- Format: Formats the SD card, erasing all files, including protected ones.
- File # Memory: Specifies whether file numbering starts over with new folders, or continues regardless of folder or memory card.
- Folder Name: You can have the camera name the folders it stores its images in on the memory card using either the camera's standard scheme, or by Date. (The latter being a handy way to keep track of photos you've shot over a period of time.)
- Language: Changes the menu language to English, Japanese, German,
French, or Spanish.
 Menu
2
Menu
2
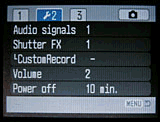
- Audio Signals: Select from two sets of audio signals that occur whenever a button is pressed (one replicating those in the DiMAGE Xt), or disable them altogether.
- Shutter FX: You can select your choice of two standard shutter sounds, or a custom sound, which you can record.
- Custom Record: Lets you record your own custom sounds for the focus signal and shutter release. (Pretty amusing, I made my test unit say the word "click" whenever the shutter fired.)
- Volume: Sets the volume of the camera's audio signals and shutter FX sounds. Playback of recorded audio is not affected. Options are 1 (Low), 2, or 3 (High).
- Power Off: Sets the camera to automatically shut off after 1,
3, 5, 10, or 30 minutes of inactivity.
 Menu
3
Menu
3
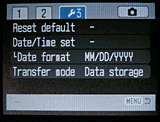
- Reset Default: Resets most settings to their default values.
- Date/Time Set: Self explanatory - Sets the date and time.
- Date Format: Choose between three different date formats used for monitor displays and date imprinting. Options are YYYY/MM/DD, MM/DD/YYYY, and DD/MM/YYYY.
- Transfer Mode: Through its USB interface, the DiMAGE Xg can appear
as either a data storage device or a remote camera. (The remote camera
option allows the Xg to be used as a USB-connected webcam.). This option
also allows you to set the camera to PictBridge mode, for printing images
on PictBridge-compatible printers over the USB connection, without the
need for a computer.
In the Box
Packaged with the DiMAGE Xg are the following items:
- Wrist strap.
- USB cable.
- 16MB SD memory card.
- NP-200 lithium-ion battery pack.
- Battery charger.
- DiMAGE software CD.
- Operating manual and registration card.
- Large capacity SD memory card.
- Additional NP-200 lithium-ion battery pack.
- AC adapter.
- Small camera case.
Recommended Software: Rescue your images!
Just as important as an extra memory card is a tool to rescue your images
when one of your cards fails at some point in the future. I get a lot of email
from readers who've lost photos due to a corrupted memory card. Memory card
corruption can happen with any card type and any camera manufacturer, nobody's
immune. A surprising number of "lost" images can be recovered with
an inexpensive, easy to use piece of software though. Given the amount of
email I've gotten on the topic, I now include this paragraph in all my digicam
reviews. The program you need is called PhotoRescue, by DataRescue SA. Read
our review of it if you'd like, but download the program now,
so you'll have it. It doesn't cost a penny until you need it, and even then
it's only $29, with a money back guarantee. So download PhotoRescue for
Windows or PhotoRescue for
Mac while you're thinking of it. (While you're at it, download the
PDF manual and quickstart guide as well.) Stash the file in a safe place and
it'll be there when you need it. Trust me, needing this is not a matter of
if, but when... PhotoRescue is about the best and easiest tool
for recovering digital photos I've seen. (Disclosure: IR gets a small commission
from sales of the product, but I'd highly recommend the program even if we
didn't.) OK, now back to our regularly scheduled review...
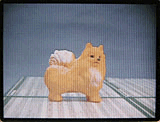
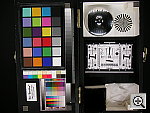
Sample Pictures
See the full
set of my sample pictures and detailed
analysis here. The thumbnails below show a subset of my test images.
Click on a thumbnail to see the full-size photo.

|

|

|
| |
|
|
|
|
|
|
| |
|
|
|
|
|
|
| |
|
|


"Gallery" Photos
For those readers interested in a set of less "standardized" photos from the Xg, we've prepared a "gallery" of images for your viewing pleasure. (Thanks to News Editor Mike Tomkins for the great shots. - Click here to visit the gallery.)
Specifications
See the specifications sheet here.
Picky Details
Information on shooting speed, battery life, etc. can be found here.
- Minolta DiMAGE Xg user reviews on PriceGrabber.com
- Minolta DiMAGE Xg user reviews on PC PhotoREVIEW
Test Results
Not sure which camera to buy? Let your eyes be the ultimate judge! Visit our Comparometer(tm) to compare images from the DiMAGE Xg with those from other cameras you may be considering. The proof is in the pictures, so let your own eyes decide which you like best!
As was the case with the DiMAGE Xt before it, I was pleasantly surprised by the quality of the images from the DiMAGE Xt. See the DiMAGE Xt's sample pictures page for the full results of my testing, but meanwhile, here's a summary of my findings:- Color: Very good color outdoors and with flash, acceptable performance with incandescent lighting. Color from the DiMAGE Xg was generally very good. Colors were accurate and properly saturated in all my test subjects, and the camera did a better than average (if not wonderful) job with incandescent lighting indoors. The white balance system left some color cast in the images shot under incandescent lighting, but for the most part did better than most cameras I test under that light source. Color outdoors was very good to excellent as well, with good skin tones and good handling of the always-difficult blue in my Outdoor Portrait shot. Overall, I found the DiMAGE Xg's color to be accurate and very pleasing.
- Exposure: Good exposure accuracy, but contrasty, and often a large variation between exposure steps. Like the DiMAGE X, Xi, and Xt before it, the DiMAGE Xg did pretty well in the exposure department. It's a little prone to losing highlight detail in contrasty scenes under sunlit conditions, but not more than I'm accustomed to seeing in many other digicams. As with the Xi and Xt before it, I was pleased by how well it did under even fairly dim indoor shooting conditions, where it could produce sharp, well-exposed images even under rather inadequate living-room lighting. My biggest complaint was that it seemed to have larger than average increments in exposure between adjacent exposure-compensation settings, despite it's supposed 1/3 EV adjustment step size.
- Resolution/Sharpness: Good for a 3-megapixel subcompact digicam. Like most subcompact cameras, the DiMAGE Xg's images were just a little soft when compared with the best full-sized three-megapixel digicams. The Xg's lens does appear to be somewhat improved over those of previous X-series cameras, with better sharpness in the corners, and less chromatic aberration, my two main complaints about the earlier models.
- Image Noise: Low noise at low ISO settings, moderate at 200, bad at 400. The Xg's images were characterized by low levels of image noise, particularly at ISO 50 and 100. Noise increases sharply after that, becoming noticeable at ISO 200, and rather objectionable at ISO 400. (Personally, I don't consider the Xg's images at ISO 400 to be usable.)
- Closeups: Excellent macro performance, but the flash doesn't throttle down far enough. The Xg captured a surprisingly tiny macro area, at 1.90 x 1.43 inches (48 x 36 millimeters). The Dimage Xg performed pretty well in the macro category, capturing a minimum area of only 1.90 x 1.43 inches (48 x 36 millimeters). Resolution was high, and detail was strong in the dollar bill, coins, and brooch. Details were slightly sharper in the coins and brooch, however. As is common with digicam macro shots, there was a lot of softness in the corners, extending down the entire left side of the image. The Dimage Xg's flash had some trouble throttling down for the macro area and overexposed the shot. Plan on using external illumination for the closest shots, but overall, the Xg is an excellent macro performer.
- Night Shots: Quite usable for city night shots at all ISO settings, but not a great low-light performer. The Xg's low light performance is about the same as that of the Xt, meaning that it can shoot good-looking images under typical city night lighting, but wouldn't be your first choice for shooting under really dim lighting. (Although you can get recognizable images all the way down to the 1/16 foot-candle limit of my test at ISO 400.) Image noise levels are generally quite good, and the optional Noise Reduction system reduces some of the image noise, but not to a great extent. Like the Xt, the Xg has difficulty focusing at light levels darker than about 1/2 foot-candle (about half the brightness of typical city night scenes.) Either a manual focus option, an AF-assist illuminator or both would be quite welcome.
- Viewfinder Accuracy: Excellent accuracy with the LCD viewfinder, but a very (!) tight optical viewfinder. One of my biggest gripes with the DiMAGE Xi and Xt persists in the Xg: Its optical viewfinder is very tight, showing approximately 75 percent frame accuracy at wide angle, and about 72 percent at telephoto. The LCD monitor fared much better, showing approximately 98 percent accuracy at wide angle, and about 99 percent at telephoto. Given that I like LCD monitors to be as close to 100 percent accuracy as possible, the Dimage Xg's LCD monitor does very well, but I'd really like to see a more accurate optical viewfinder.
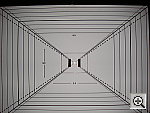
- Optical Distortion: Higher than average optical distortion, but significant improvements in edge sharpness relative to the earlier Xt. Optical distortion on the Dimage Xg is a little higher than average at the wide-angle end, where I measured approximately 0.9 percent barrel distortion. The telephoto end fared only a little better, as I measured a 0.5 percent pincushion distortion. (Most 3x-zoom digicams have around 0.8 percent barrel (still too much IMHO) at wide angle, but 0.3 percent or less pincushion at telephoto.) There's about six or seven pixels of coloration on either side of the target lines, but it's fairly faint, indicating only moderate chromatic aberration. (This distortion is visible as a very slight colored fringe around the objects at the edges of the field of view on the resolution target.) The good news is that Minolta seems to have made significant improvements in the Xg's lens, in that it's much sharper in the corners of the frame than were the lenses of previous X-series models.
- Shutter Lag and Cycle Time: Shutter lag on the fast side of average, slow cycle times though. Overall, the word that best describes the Xg's performance is "average." It's fast starting up, on the fast side of average for full-autofocus shutter lag, very fast for prefocus shutter lag, but on the slow side in terms of shot to shot cycle time. Continuous-mode performance is average, but the camera's deep, 10-shot buffer is nice.
- Battery Life: Improved battery life, not bad for a subcompact model. Like most subcompact digicams, the DiMAGE Xt's battery life is a little limited, but it does seem to be significantly improved over the battery life of the Xt. In its worst-case power drain mode (record mode with the LCD enabled), battery life is about 112 minutes, a very good performance indeed for a subcompact digicam. Because the Xg lacks an external power terminal, I wasn't able to conduct my usual power measurements on it, so I don't have numbers for battery life in playback mode, or with the LCD turned off. Minolta claims 240 minutes in playback mode, and I have no reason to dispute that number. (The Xt's power consumption dropped to nearly zero with the LCD off, so I suspect the Xg would behave the same.) As always, despite the Xg's generally good battery life performance, I still strongly advise purchasing a second battery when you buy the camera.
| Free Photo Lessons | |
|


Follow Imaging Resource: