SilverFast(R) Archive Suite, version 8.5, New great features, but with bumps
posted Thursday, September 3, 2015 at 1:25 PM EDT

SilverFast has recently updated their scanning software from v. 8 to v. 8.5. If you already own version 8, this update is free. There are some improvements to existing features, nifty new features are, well, they are new. Some of the new features include:
- You can now save high-color high bit-depth images in the DNG format.
- The Job Manager has been updated to provide more efficient operation.
- A new Job Manager application for the iPhone to help you monitor what's happening back at the scanner.
- A new frame-finding dynamic that can better locate the individual frames of slides and negatives when preforming batch scanning.
But first, before I discuss the new features, the initial question is "why bother with 3rd party scanning software, my scanner came with software?"
If you've been taking photographs for more than 10 years, you probably have a number of photos, slides, and negatives lying in drawers, boxes and probably some on the walls in frames. Chances are, if you've been taking photos within the past ten years, you probably have a hard drive with a bunch of images (which may or may not be organized but that's a different issue). I'm in both categories as I have thousands (and thousands) of slides in boxes and since I typically do not bring out my slide projector on a regular basis, I almost never see these images. SilverFast(R) Archive Suite helps me digitize my slides so that I may add them onto the images on my hard drive. While SilverFast can do a lot more than one needs for standard scanning, it does what it needs to do quite well. Keep in mind that the biggest issue with SilverFast is that it does take some time to learn. Fortunately, they do have an easy scan approach with fewer abilities to customize and fine tune the scan and a custom scan approach that does provide the user more control but requires more scanning knowledge. An approach for everyone but be aware that their help leaves a lot to be desired. More on this later.
During this review, I've been scanning a number of slides I took some 36 years ago as I traveled in Europe. One of the things I found is that even though these slides were kept in a metal box in a "relatively" safe range of temperatures and (since I live in Southern California) modest humidity, there was noticeable degradation of color lost in the slides. Of particular note though were some slides I purchased of the "Sephardi Synagogue of Amsterdam" who's color was completely shot. Since these were industrially made, I've no way to know their manufacturer and/or technique used to make them. My point is that digitizing your images may be the best way to keep them for the ages. Their age-degradation notwithstanding, this did provide a great opportunity for SilverFast to demonstrate what it could do with severally challenged images and it did an outstanding job of recovering as much as it did as you will see later in this review.
There are a number of ways to digitize things like slides: I have one friend who solved his problem by projecting his slides on a screen and taking digital photographs of the slides on the screen. I still cringe as I think about the quality (and complete loss of dynamic range) that came from that approach, but admittedly he's happy and he got the job done. To be honest, using SilverFast will not be a fast a process. In fact, it will be a lot slower, but the quality you get will be excellent.
When going through the process of digitizing your images, and you plan on performing subsequent processing of the images via Photoshop or any other image manipulation application, you will always get better results out if you start with as good of an image as possible. This is simply the "garbage in garbage out" principle. If you have good quality photos, slides, or negatives, the amount of time to make the final product look good will be less (or even dramatically less) than if you have a poor quality image to begin with.
This also goes with your scanner. If you have an inexpensive scanner, the options available to you are significantly less than if you have a good quality scanner. For my testing, I used an Epson V700 Photo (a good quality scanner) for this review. The software that came with the scanner was decent. However, Epson tends to not update their software as user's operating systems update. This leads one, at a certain point, to either use Apple's Image Capture, which is pretty bad, or purchase a 3rd party scanning software.
Why use good quality scanning software?
The key point in scanning is that any adjustment you do at the time of scanning will give you a better quality than if you make the same adjustment after-the-fact in Photoshop.
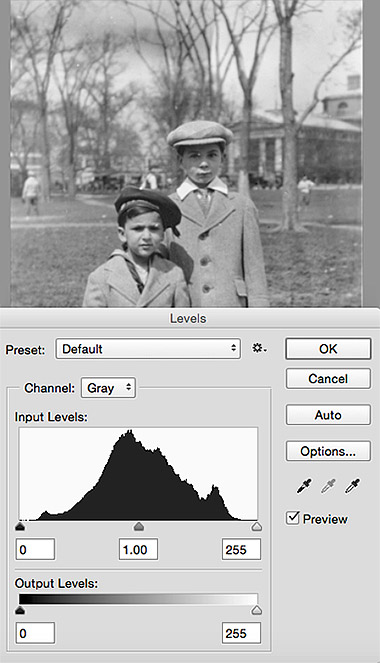
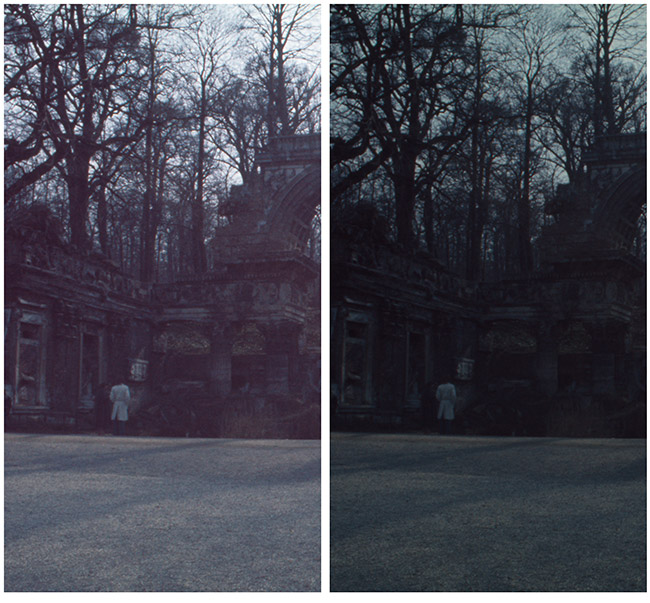
Let me show you an example of why this is important. Below is an image I scanned using Apple's Image Capture. I then opened this up in Photoshop and since this is an old photograph, it suffers from limited dynamic range (it's faded). The fast and easy way to fix this is to open up Levels and move the dark and light endpoints to the left and right base of the histogram as shown below on the left. When you then close and re-open levels, you can see all of the "combing" that action has caused. [Note: if you do this as an Adjustment Layer the results are the same, it's just not permanent to the image.]
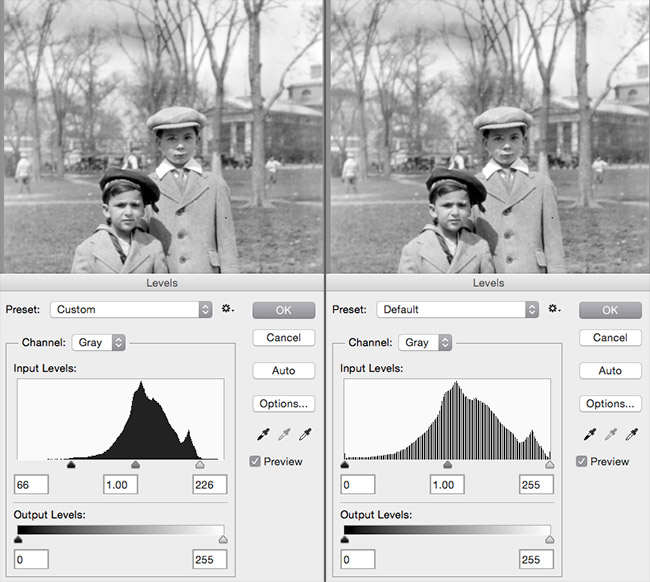
This is caused by the fact that the original image was captured (when scanned) with limited dynamic range and when you have Photoshop increase the dynamic range, it doesn't have access to the information to extract the full information of image's information. This may not look too bad on a monitor, but when printing, there is very likely going to be posterization and banding.
Now look at the same image scanned in SilverFast. Note that the histogram was set during the scanning process so that instead of inventing or ignoring the missing data, SilverFast looked for the missing data and incorporated that into the final image. When you look at this image, you can see a significant amount of expanded dynamic range, not only for the global aspects of the image but the local as well.
[Note: the space in between the absolute black and absolute white and the histogram is due to my setting the Preferences of SilverFast to provide this gap so that any printing done on an image remains within the printable range and not blow out the black and white regions of the image.]
What comes in the SilverFast Archive Suite box?
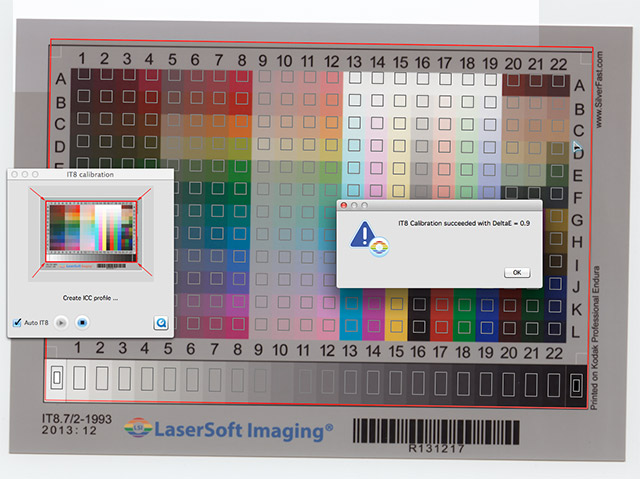
The CD box comes with SilverFast AI Studio Version 8.5 (the actual scanning application), SilverFast HDR Studio Version 8.5 (an extra application for processing already scanned images, more about that later), and two IT8 Targets, one for Reflective images and one for Transparent images (slides or negatives). Within the SilverFast software are automated processes to read the IT8 Targets which have per-calibrated colors so that SilverFast knows that any given color it's reading is the same color that it purports that color to be. This takes about a minute to do and guarantees the colors you are scanning are what they are supposed to be. Below is a screenshot of a successful IT8 calibration on the reflective Target.
While you do not need to have your monitor calibrated to receive full benefit of the IT8 Target calibration, a calibrated monitor will help insure that you are LOOKING at the correct color during any enhancement you are doing. Nothing here will allow you to calibrate your monitor. You will need dedicated monitor calibration hardware and software to calibrate your monitor.
The SilverFast scanning process
Much of the SilverFast approach is dependent upon the need for you to know "what you have" and "what you want." That is, if you have a grayscale image and scan the image as if you have a color image, you will end up using extra storage space because a grayscale image occupies 1/3 the storage space than a color image. Similarly, if you have a color image, you are better off scanning the full color of the image even though you may initially want a grayscale image because if you later want a color image, you will have to scan the original image all over again to get the color data. [Keep in mind that some grayscale images may have obtained a bit of colorcast over the years and you might end up with greater control on recovering the full dynamic range by doing the scan as if the image was color to more fully utilize all of the information within that image. [Ironic, yes, but that's the way this can work.]
The basic SilverFast window is shown below (after a pre-scan). On the left are the controls to adjusting the image and on the right is the image in progress. Across the top right is the Standard Toolbar and down the middle is the Special Toolbar. After placing your image(s) on the scanner, you now have two choices: you can work on your own and select the tools you want in the order you need, or you can use SilverFast's Workflow Pilot.
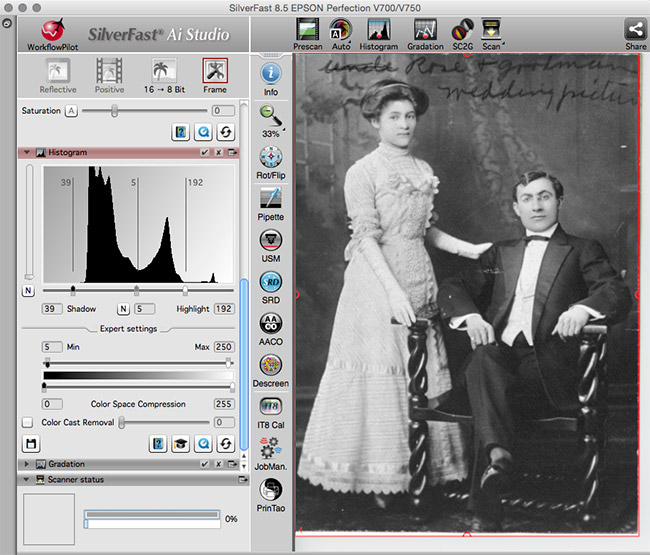
If you look in the upper left corner of the image above, you'll see a red ball with a zigzag line running through the icon. If you look below you see the same icon is now blue, that means that icon has been clicked on and I'm in Workflow Pilot mode. This lets SilverFast takes you by your hand (as it were) and leads you through the various steps needed to get the results you want. Notice that the Standard Toolbar is filled with gray icons. By selecting the WorkflowPilot, SilverFast is making sure you do things in the order that will give you the best result and you cannot click on things out of that order. As you click through the various steps (starting with choosing what kind of document your scanning and what kind of end result you want) you then continue step by step as you click on the Start button for each process). As you go through each step, the icons go from gray to color and then back to gray.

If you look at the earlier image above with my grandmother and grandfather (showing the complete SilverFast window) you can see that on the left side there are many collapsed panels to select from. This is because the Workflow Pilot is not initiated. When using the Pilot, only the workflow windows for that operation are shown. When you are learning SilverFast, this is a big time saver and confusion reducer.
When you consider the amount of potential tools to finish each scan, the Pilot is, at a minimum, a great way to learn the scanning process. Probably the biggest limitation is the inability to go off of the workflow to adjust something in a different manner: you can't. Another limitation is that you have to know exactly what you want to end up with. If you didn't properly consider the options for what you wanted to end up with when you started, you might have to restart the process from the beginning.
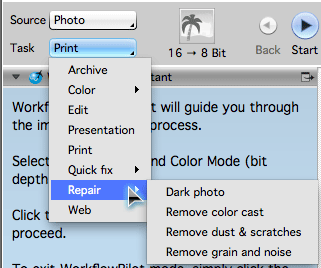
As an example of both, consider the image below. When selecting what I want to end up with, notice that I can either remove a color cast OR I can remove grain and noise. If you are not using the Workflow Pilot, you can do both, but if you want to use the Pilot, you're stuck. Also, it's curious that there is one option for "Presentation" and one for "Web." Both do low-resolution scans but the presentation defaults to the width and height of a Power Point or Keynote slide. Nonetheless, the makers of SilverFast wish to have you covered regardless what you know or do not know.
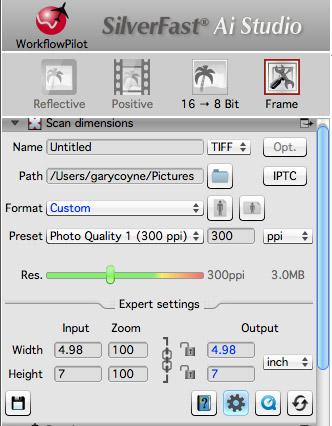
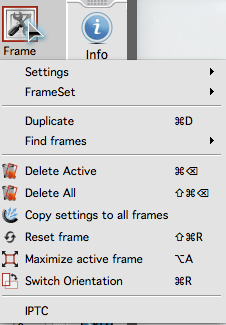
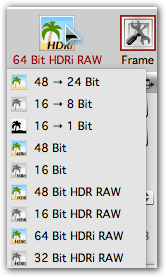
If you are not using the Workflow Pilot, the initial process is pretty much the same as if you were using the Workflow Pilot. You still need to first set the type of image to be scanned (transparent/reflective), if the image is a positive or negative (slide or negative), and then the color format and Bit depth. Finally if you have multiple images (multiple slides, negatives, or images) what kind of Frame you want/need. What you actually find though is that the Frame icon hides a variety of tools in a dropdown menu as shown to the right. Everything under the Frame icon is also in the Frame menu so this is a redundant option. However, despite this redundancy, there is no right-click for any of these options, a lost opportunity for greater efficiency.
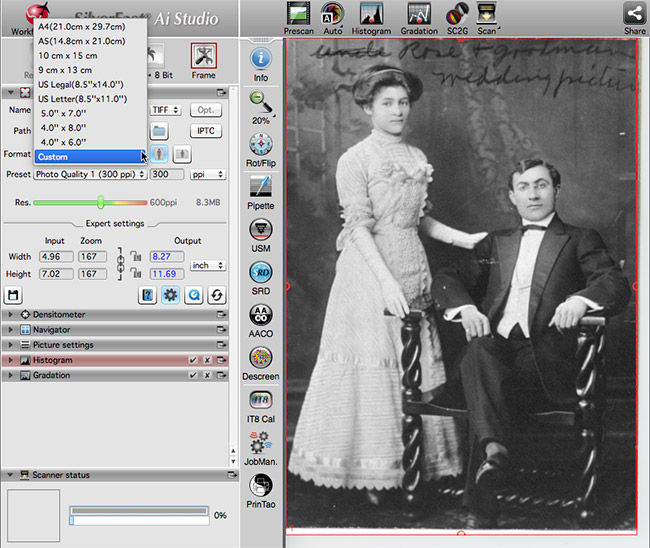
Then set the output format, both in image kind and size. As you can see below, you can select a predetermined aspect ratio, or if you select Custom, there is no restriction on the height and width. Clicking on the Gear icon (just to the left of the Quicktime icon near the bottom left) reveals the "Export Settings" where you can set a specific output size. [The "link" icon maintains the aspect ratio.] Lastly, if you look just below the dropdown menu on the left-hand side, you'll see a green-to-yellow-to-red sliding bar. This sets the resolution of your scan. The full range of this depends upon your scanner. On the Epson V700, I can scan a slide easily up to 1800 ppi, that's just at the final edge of the green. Beyond that, I'm starting to get into interpolated data. This is no different than the difference between Optical Zoom and Digital Zoom on a camera. Both "interpolated data" and "Digital Zoom" create "invented" pixels. Since I'm creating an image that I want as a "keeper," I'd rather do the best quality scan with known quantities than take the time to do this scan only to learn that some other software can do a better job of interpolating greater resolution. Note that once you set your aspect ratio, zoom and the resolution, the Output size is automatically set.
One thing you'll quickly encounter when working with SilverFast is that they LOVE Initializations and Acronyms.
You find things like ACR (Adaptive Color Restoration), SCC (Selective Color Correction), SC2G (Selective Color to Grey scale), ME (Multiple Exposure), iSRD (infrared based Dust & Scratch Removal), and others. But my favorite is MidPip (Multiple Neutralizing Pipette). The good news is that it doesn't take too long to learn which means what and in the meantime you can mouse-over the button to read the full name. Knowing what that name means and does is another issue. Likewise, learning how to use them properly is another issue which I'll get to a bit later.
As I mentioned, scanning can take some time. It takes a more time to scan an image at 1800 ppi than at 300 ppi but if you want an image that is not a mess of blurry pixels and be printed at a reasonable size, you need the greatest amount of resolution you can achieve out of your scanner. Thus, if you wish to scan small things such as slides so that they can be viably be printed out in a reasonable size can take some time. Processes that can add to that time include ME and iSRD as both of them must be done at the time of scanning and both require multiple passes of the scanner to do their job.
As an example of the value of ME (multiple exposure) is any image with dark regions. During a regular scan, the scanner does a general pass, but if you've selected an ME pass to be done, the dark regions get an extra pass. An example below shows an image on the right as it came out of the scanner when not using ME. On the left is the result when using ME. Also, please note that this is before I've done any other enhancement within SilverFast, this is straight out of the scanner.
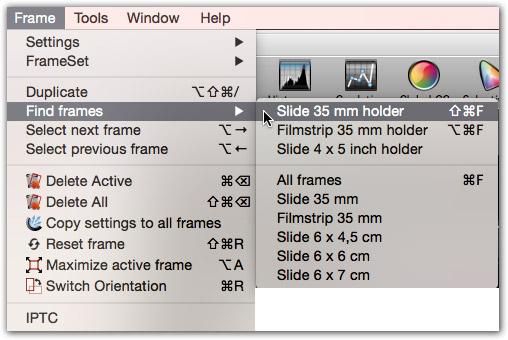
As mentioned, if your scanner supports multiple scans you can process multiple slides at the same time. One of the very nice updates with v. 8.5 is another one of their initializations: "IFF" which stands for "Intelligent Frame Finding, and it's pretty good. The process is fairly straightforward, first you do a Prescan, then go into the Frame menu, select Find Frames and extend out to the kind of image you are scanning. SilverFast knows what kind of hardware you have so if you select "Slide 35 mm holder," it already has a good clue what and where to look. IFF's ability to recognize that a slide is in portrait or landscape mode is spot on.
In the previous version of SilverFast (version 8), the automatic slide detection tended to grab a lot of the material holding the slide which thereby required a lot of time to fine-tune the frame crop. Now, as long as you have positioned the slides properly in their holder, you will get very good results. The one problem I found was if there was any rotation of the slide in their holder, SilverFast didn't seem to be able to rotate the frame region for the slide as shown below. This required you to manually rotate the scanning frame to match the slide. However, simply doing one last extra "set" on each slide into their respective holder resolved this issue.
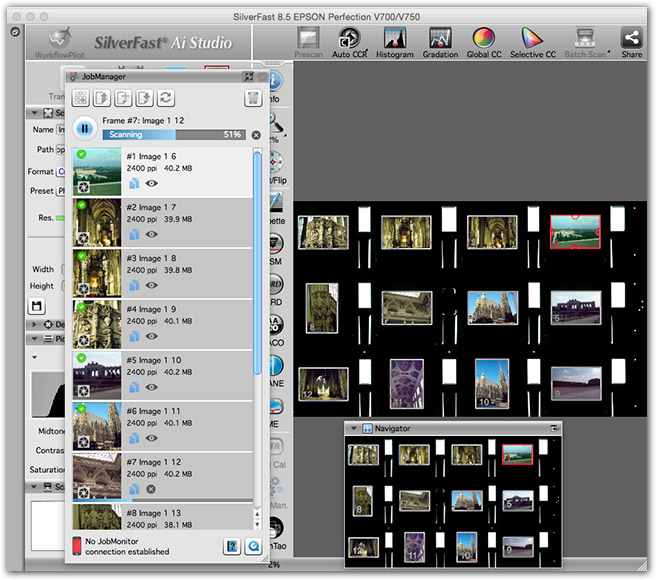
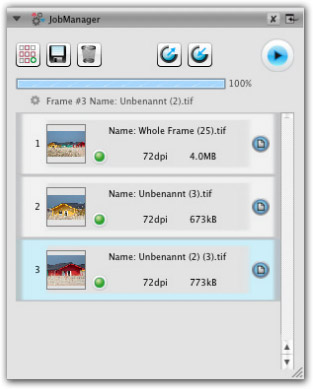
Below shows a full set of twelve scans in the slide holder. On the right you see the twelve slides, the top right one (in red) shows that that slide is selected but all of the slides have been "framed." On the left is the Job Manager floating above the rest of the workplace. [Note: I've decreased the size of this window considerably to better take a screenshot.] Also, shown as a floating panel, the Navigator on the bottom right shows the global view of what you are looking at just as one uses the Navigator in Photoshop. Double-clicking an individual slide in the Navigator will zoom into that slide so that you can fine-tune the size of the frame and set any minor rotation that might be necessary.
Then click on the slide in the Job Manager and add any additional processes you wish to have performed on that slide. When I did this run of slides that all had some dark regions, I selected the ME process. I had gone through the motions to remove the dust from the scanner table and the slides but I ran the iSRD anyway just in case (which is always wise). Running all 12 slides with ME at 1800 ppi to 48-bit TIFF (ends up with a 16-bit TIFF) takes about 40-ish minutes to process. However, during that time I was working on other things on the computer. The Job Manager is your friend.
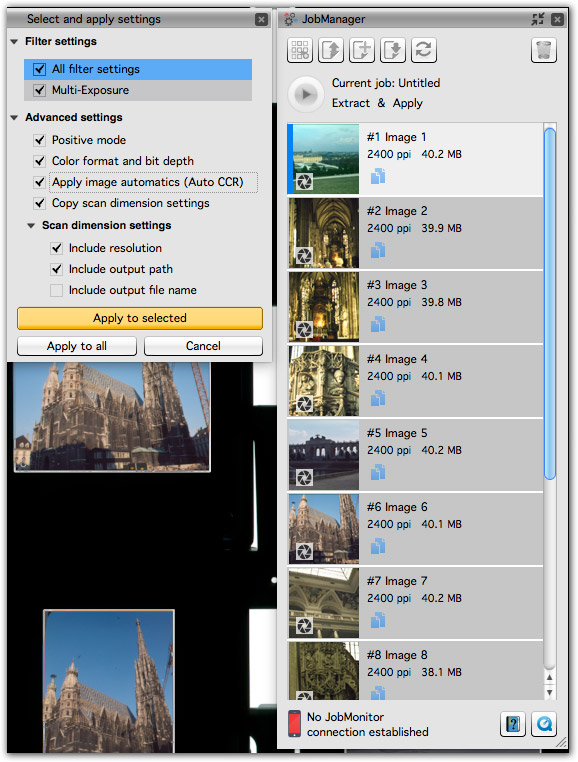
One big change with the Job Manager in Version 8.5 is controlling the action on all of the slides. Below shows how it was done in Version 8.0. After selecting the various processes you wanted done to a given slide, you'd click on the left "C" shaped icon on the top-middle (right-ish). This let you copy the settings. Then you could Command/Control-click all of the slides you wanted to have the same setting and tap the "Paste" "C" icon on the right.
This has been significantly improved with the new 8.5 release as shown below. If you look to the right of each slide you'll see a blue "page-over-page" icon. After setting all of the scanning options you want, you click on that and that let's you check off what options you want to do to that slide and then Command/Control-click on the sides you want those specific processes to be processed with those settings or simply click on "Apply to all." The big warning here though is that not all of SilverFast's manuals are up-to-date, and some show the older approach while the newer ones show the recent improvements. Amusingly, even the manuals that are for the new update have sections in the same document that show the older UI.
As stated earlier, you'll note that the panels in the image above have been moved out from the where the Panels are normally stored and are now considered "floating" panels. These Panels can be moved out or snapped back in with ease and can be dragged to separate monitors (if you have extra monitors) or at a minimum, different parts of your single monitor.
One of the new features in 8.5 is directly related to the Job Monitor. As stated, when performing full scans such as one might do on a collection of slides, it can take almost an hour to do a full deep scan including an infrared scan to remove dust and to obtain a multi-exposure scan. This means you can either sit by the scanner doing other work on the computer, reading a book or walk away from the computer not knowing when everything will be done. To solve this issue, SilverFast now has a Job Monitor app for your iPhone that shows the progress of your scan as well as when everything is done. This is one of those things that sounds better than it turns out to be in reality.
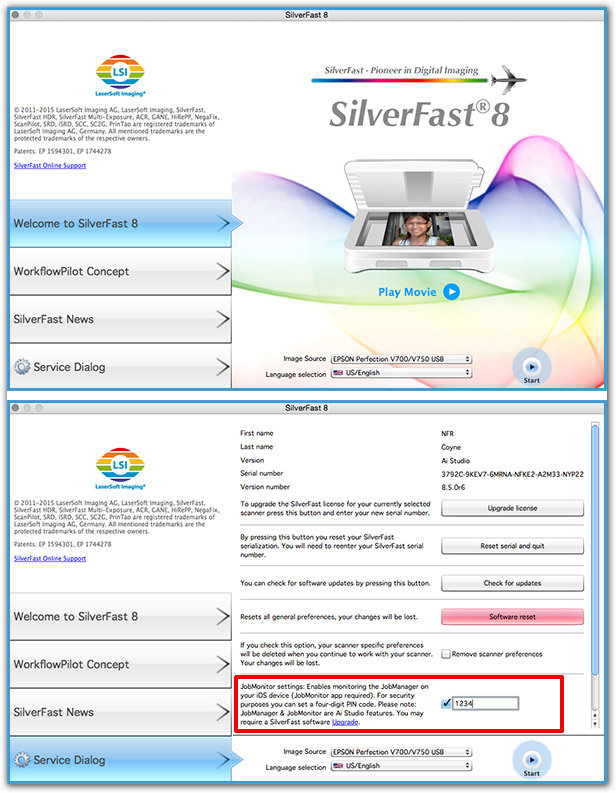
The first problem is that you have to plan ahead to do this. When you first start SilverFast, you will see your intro-screen shown below in the top screenshot. Normally, if you have nothing to do here but continue onto the scanning process, you tap the Start button seen in the circle on the bottom right. However, if you want to have your iPhone let you know how things are progressing, you need to first tap the bottom left button called "Service Dialog." Tapping this brings you to the second screenshot below. Then, in the region that I've outlined with the red rectangle, you need to check the check box and enter four numbers in the field (here I've entered "1234") as this will be used by your iPhone to link to your computer.
The particularly thorny issue is that if you do not do this when starting SilverFast, you need to quit and restart as there is no way to access this window outside of the moment when you've first started SilverFast.
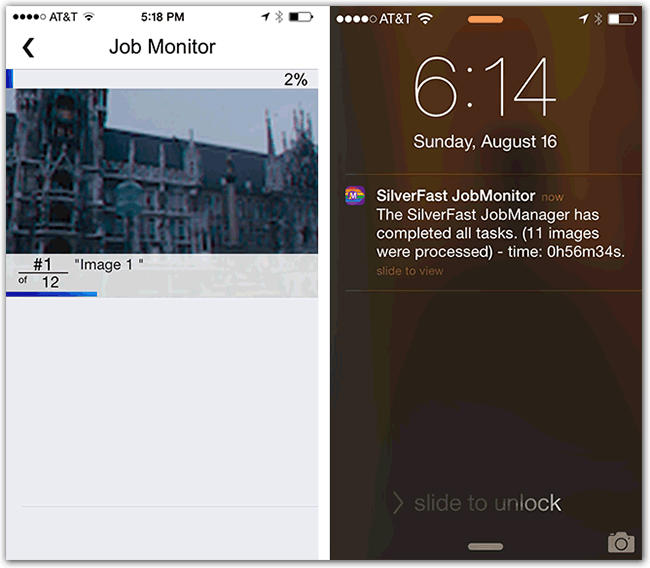
At this point you can go to your phone, open the free JobMonitor app, and link up with the 4-digit number you created. Then when you start the scan, you can watch the progress as well as see how far along your scans are coming as shown in the screenshot below on the left. Once everything is completed you will be told by a noise from your phone also showing a new window that that job is now complete (as shown on the right) and that you can go back to your computer and start a new round.
The problem with this is that watching your phone is not all that much different from watching your scanner. And, once you know how long to expect this process to take, you can always tell Siri to "Let me know when 60 minutes have past." In other words, this is one of those features that seems better in theory than it performs in practice. And, as far as efficiency, as I was writing this review, I managed to scan hundreds of slides because scanning is something that can easily be done while you are doing other things. As soon as you hear the scanner become quiet, it's time to load up a new bunch of slides.
As for features I wish that SilverFast had, the appropriate one here would be some mechanism to make sure that your computer does not fall asleep during the scan. Mine did at one point and I had to do parts of the scan all over. Nonetheless, if you plan on walking away during the scan, be sure to set your computer's energy saving settings to not sleep before your scan is done.
Extra capabilities of SilverFast.
Not covered in this review are the aspects of scanning negatives (it does a great job) and scanning images from magazines or newspapers for descreening. I found both of these worked as expected and since I wish to keep this review from being any longer than it already is, I'm only mentioning the capability. One point I do want to make about scanning negatives, is that by identifying that your scanning subject is a negative, what you see on the screen is the positive, not the negative so you do not have to guess what you will end up with, SilverFast will show you.
One rather curious ability that SilverFast can do is an area that I scratch my head a bit and wonder "why is this in scanning software?" You can select a color, say the color of a car or jacket, and change that color using SilverFast. Why scanning software is involved in doing this, I'm not sure but they can. If the image has the same color in different regions of the image and you only want to affect one region, simply draw a mask around the desired object to recolor and only that object's color will be changed. Admittedly, this is well done; I'm just not certain I'd run to SilverFast to do this kind of work.
SilverFast HDR Software
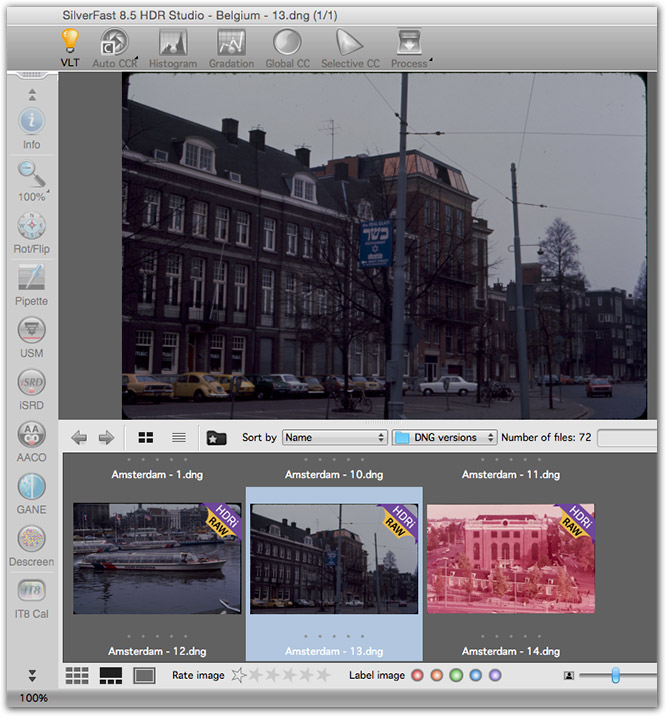
Starting up SilverFast HDR for the first time can be one of the most frustrating events you can do if you do not fully know what to expect. SilverFast HDR does everything that SilverFast can do, except scan. As such, it's a strange bit of software to wrap your head around when you first try to figure it out. Even loading images can be a bit of a challenge. Below I have a screenshot of the main SilverFast HDR region. [I've not captured the left-hand side as that has the same Panels as the normal SilverFast software.] The important points to bring out are that in the upper left-hand corner of the image below: instead of the Prescan button is the VLT (Virtual Light Table) button. When you click on this button, the bottom part of the window opens up and you can either manually select a folder or drag your folder/images into that region. Below I have the thumbnail-view option showing, there is also an option for a list-view. There is no place anywhere in this software that offers a message saying "Load Images." You just need to know that selecting VLT loads images. [Note: the reddish-magenta image amongst the thumbnails, this will be discussed a bit later.]
When scanning and enhancing images, one of the big slowdowns is that some of the processes, such as iSRD, require an additional scan at 100%. If you add doing that at the time of the scan, it can add to the scanning time process. By doing all of your scans at the full amount of color and extra scans at the onset, if you then bring the scans into SilverFast HDR, you simply need to select your tools and use them--all of the scanning is done.
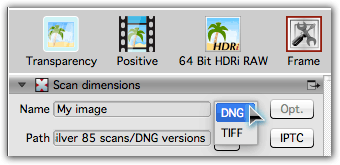
So, what LaserSoft Imaging did was to create a 2nd piece of software, SilverFast HDR, that doesn't scan but does everything else that SilverFast can do. To use SilverFast HDR, when performing the original scan, one of the options using the AutoPilot is Archive and this will give you the proper format for using SilverFast HDR. If you are scanning manually, than you can save that as a 16 bit, 48-Bit HDR image, or larger if you want the IR data for removing dust and scratches. And now you cal also save the image as a "RAW" format, more specifically as a DNG image.
Note: if you wish to save the image in the raw format, be sure to also switch the format of the image to DNG as well as shown below. One would think that this selection would be automatic if selecting the RAW format, but it isn't (yet it should be).
A brief interruption and introduction to the DNG format.
In this new release, SilverFast adds the DNG format as one of the saving options for their higher-bit data formats. This is a great addition to their software. Because of the significance of this addition, let me provide a bit of introduction to the DNG format itself.
First, to understand the DNG image, let me quickly explain a raw image. When you look at a digital image, you are not really looking at red, blue and green pixels. Rather, you are looking at three grayscale images, each representing the amount of red, blue and green that activated that part of the sensor. Each camera manufacturer uses their own code and algorithms to interpret (demosaic) that data into a color image. In addition, camera manufacturers generally consider their image format to be special and proprietary and as such, there is no way to easily open a camera's raw image. They want their software to manipulate their images. Because Adobe wanted to manipulate these raw images, what they did was to reverse engineer the code so that both Lightroom and Adobe Camera Raw (ACR) could have access to the raw data. In fact, part of that proprietary interpretation is to how each manufacturer has their own recipe to interpret their data to achieve their camera's look. [This is one area where SilverFast drops the ball, I'll get back to this a bit later.]
There are two primary advantages to using raw images: one, you are using ALL of the data, significantly more data than the JPEG that usually comes out of the camera. By "more data," I'm referring to such aspects as the amount of color or the light range (from black to white) is greater. The other dynamic of raw images that are important, is that you cannot alter a pixel of a raw image. All you can do is alter the interpretation of that pixel. When you take an image in a camera, the raw image data is processed (called demosaicing) within the camera according to the pre-set preferences by the manufacturer to show the image as to how they think it should be shown best when it's saved as a JPEG. These demosaic instructions let us see how that image should be viewed. What this means is that you never are looking at a raw image directly, but rather at instructions on how it could/should be viewed. Thus, when looking at a JPEG image, you are looking at the result of how that image was interpreted by the default settings of that camera manufacturer. If you are working on the raw data, you can change that interpretation and never touch one pixel. Think of holding a color filter in front of an image: you are changing the color of that image but not changing the image itself.
When using Lightroom or ACR, and using the default camera's raw images, the software creates what are called "sidecar" files that contained all of the adjustments that the user created. These very small sidecar files simply sit in the same folder as the raw images and when you view the images in Lightroom or Adobe Bridge, you are automatically viewing the image with the interpretation of the sidecar instructions. If you move that file outside of that folder and do not take the sidecar file with that file, all of your adjustments are no longer with that file and the file will look as it did when first opened. At any time, if the image is now saved with those alterations in a standard image format (TIFF, PSD, JPEG, etc.), anyone can see the new altered image but the original data is still contained in the original raw image who's pixels remains untouched.
Adobe created the DNG (aka Digital Negative) as an open source format to resolve these and several other problems with using raw image formats directly from camera manufacturers. Adobe provides the ability to convert a camera's raw images into a DNG either during ingestion from the camera's card, or at a later time using Adobe's DNG Converter. [One small fringe benefit is that the storage size of a DNG is typically much smaller than the original file (and yet, no information has been lost).]
One of the benefits of the DNG format is that it contains the sidecar data within the DNG file because the DNG is a container file. This means that because the instructions are contained within the file, if you move the image from folder to folder, the instructions on how to view the file are never lost or misplaced. However, at any time, one can simply delete the instructions and you are back to seeing the original file before any changes were made. [Note: ACR and Lightroom, can also adjust both JPEG and TIFF images. If you double-click either of these files after an adjustment, they will open up directly in ACR or Lightroom respectively. If you send these files to someone and the recipient doesn't have either of those applications, than the image will be viewed as if the image had never been altered.] Otherwise, at any time the user can save out a new image from the DNG/raw image as a TIFF, JPEG or PSD that has all of the changes that the user has done to the image but that new file is not a raw image format and any subsequent changes will be part of that image. Nonetheless, the original raw image remains and can be altered, adapted or adjusted as much as you want, but none of those adjustments are ever permanent.
SilverFast HDR using the DNG format.
By converting the image into a DNG image, several things were accomplished: first off, this format can contain a significant amount of data such as all of the expanded color range (16 bits for each channel) and all of the IR data (an extra 16 bits) for dust and scratch removal. Also, since you cannot change the pixels of a DNG image, you do not run the risk of making any changes into a one-way street of repair. By that, I mean that any change you make to a DNG image, by definition, is non-destructive. Think of the very first image I show in this review: that's a destructive adjustment. Once you make a change that deletes data, that data is gone. But with a raw image, any deletion is only the interpretation of deleting the data, you've never removed any data.
An additional benefit of scanning to DNG is that you do not need to make any decisions during the scanning process: load the images, make sure that you're scanning at the resolution you want, make sure that you are scanning to 64-bit RAW and are saving at the DNG format and click, done. Later, you can do all of your adjustments in SilverFast HDR and not need to rescan for any dust, multiple exposures or anything. Since everything is all digitized, the correction process goes very quickly.
Admittedly, one negative of creating these larger bit images is that they are larger (storage) images. Consider that a scan of 48->24-Bit image saved as a TIFF image (3234 x 2144 pixels) was 21.3 MB. The same image as a 48-Bit HDRi was 42.7 MB and the 64-Bit HDRi raw was 57.1 MB. However, Because you captured ALL the data during the original scan, most of the scanning operations that require extra scanning time is not done during the scanning process, so time is saved there. In addition, let's say that next year SilverFast comes out with whole new algorithms to deal with dust and scratches, USM (Unsharp Mask) or GANE, you would not need to scan again, only run your previously scanning DNG images through SilverFast HDR once again.
One warning about looking at your DNG images after scanning: they are going to look pretty bad. If you recall, I did mention that part of the demosaicing process is to give an interpretation of the raw image data. SilverFast does not provide any guesses as to how it looks, it provides the basic data of that image and, well, it looks pretty dreadful. However, once you start to perform some basic image enhancements to the image, it will look very good. If you recall back to my explanation of the DNG format, I mentioned how camera manufacturers have their own recipes to interpret their data. Well, SilverFast has not done this and that's why their images look pretty dreadful at this point: you have all of the data, but no interpretation of that data into an image that anyone wants to look at.
And this brings me to:
The Achilles' heel of SilverFast HDR: the VLT (Virtual Light Table)
Instead of a scanner, SilverFast uses their VLT to collect and interact with your previously scanned images. Occupying the location of the PreScan button, the VLT is used to access the images you scanned with SilverFast. These can be either standard TIF or JPEG images, or the new option of the DNG format images.
As any raw format (DNG, CR2, NEK, whatever), the software needs to know how to interpret the data. SilverFast VLT has no clue how to interpret neither the original data nor any altered data. So, when you double-click a DNG image to process while selected and being processed, you see all of the great aspects of your image. But once you close that image and are back in the VLT, the image looks just as bad as it did before you started enhancing the image. If you select that image and open it up again to process, you will see all of the alterations you had previously done. What is desperately needed here is for the VLT to know how SilverFast interprets its own images and display those changes. In fact, it would do them well to also provide a "guess" view as to how the image sort of looks, even if it's a simple use of the Auto CCR (Auto Color Correction).
I should also point out here that Adobe's engineers has not reverse-engineered how to interpret SilverFast's DNG data. As such you cannot open images created in SilverFast in ACR or Lightroom and expect any ability to adjust the images.
There are other issues as well with VLT: as a minor point, the VLT cannot understand successive numbers. By this I mean that if you have your image names with successive numbers, they show up as 1, 10, 11, 12, 13, 14, 15, 16, 17, 18, 19, 2, 20, etc. Yes this can be resolved by adding zeros before each number, but one really shouldn't have to.
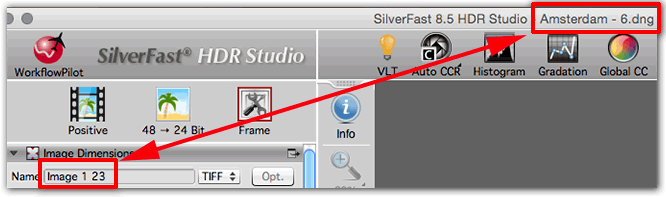
Another strange quirk with the VLT and its interaction with SilverFast HDR is how names are kept but ignored. Let me explain: when scanning images, the easiest way to deal with names is to simply let them develop successive numbers (image 1, image 2, etc.). Later, in Adobe Bridge, the Finder or Explorer, go ahead and rename them with individual names. Then, go back to SilverFast HDR, and look in the VLT and select an image to process. If you look in the name of the image in the top of the window below (Amsterdam - 6) , you can see that SilverFast HDR properly recognized the renamed name of the image. But if you look at the assigned name, it reverted to the original name (Image 1 23) that was created at the time of the file's creation.
My guess is that this data is held within the binary data of the file as nothing in the XMP listings exhibits any indication of the originally created name. You do have several options: re-change the name in the "Name" field shown in the image above, re-chance the name in Adobe Bridge, the Finder or Explorer, or do not change the name until you've finished all alterations. Sadly, you cannot change names or any other data, in the VLT. Simply, the VLT has extremely limited capabilities.
SilverFast's ability to fix an image can be excellent.
Before I delve into one last complaint about SilverFast, I do have one BIG praise. If you recall, earlier I included in an image of SilverFast HDR, a pinkish-red image and I mentioned that I'd get back to that later. This image was a small set of 6 images I had purchased in Amsterdam at a museum where you were not allowed to take photos. Now, almost 40 years later, whatever type of film and/or whatever type of processing was used had deteriorated so badly that the blue and yellow dyes had significantly faded leaving primarily the red. On a whim, I scanned the images anyway. Below is a "before and after" set.
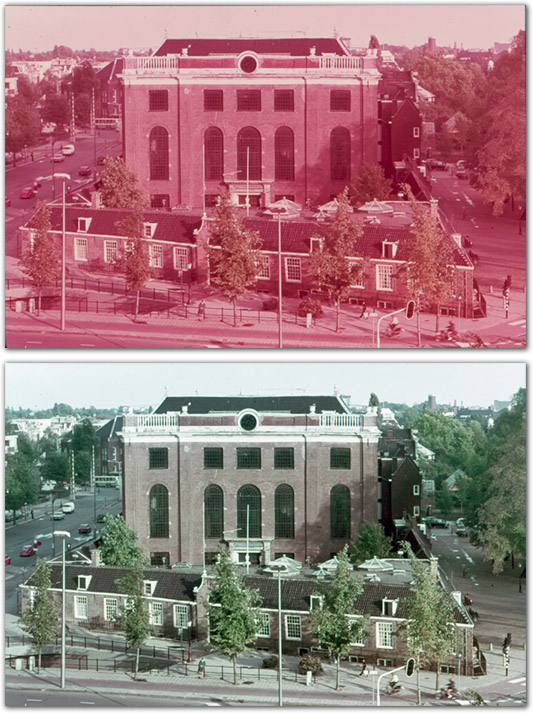
I'm not saying in any way that I restored the image to its original quality, far from it. What I was able to do was to bring the image back to a state that lets the viewer get some idea of what the image looked like. I have to add that the process was very straightforward and didn't take much time.
My biggest complaint
My biggest complaint with SilverFast is the documentation. They have quite a lot of short videos but typically it only shows what to do, not why. Or they may say what something is, but not adequately how or why to use it.
For example, when setting the midtone, you can have the slider be either Normal or Logarithmic. In addition the Saturation can be either Adaptive or Classic. In either of these, a user is bound to ask "Why? What makes one better/worse than the other? Under what conditions would I want to use one or the other. What should one be looking for in the image to make a decision?"
I suppose it could be argued that people who use SilverFast should know, so why bother explaining this information. The simple argument against that approach is why not use this as a learning experience for those who do not know and make them better scanners and more likely to want to use SilverFast because it does give you the choice.
Another aspect of the problem is that there is no "ONE" manual. Rather, you have a large number of manual pieces covering bits of information. And, since they are trying to be as short as possible, they really say nothing.
On every Panel there is a Question Mark offering you to click on that for further information. Most of these link to the LaserSoft Imaging web site where you can watch a video or read a PDF. From the website you can also download every video and every PDF they have, and they mean it. When you do this, you get the videos for the standard software, the SE version of the software and the Studio version of the software. In some cases there are differences between the former two, but usually not. The Studio version typically has more information (and is longer) because the Studio version has more features. Nonetheless, if you purchased one of these versions, why are you also downloading the videos to the other software that you do not have? In addition, if you now click on any of the question marks in the Panels, you still are sent off to the LaserSoft Imaging website to watch the video there. If you are hoping for some PDF manuals, they do have a few of those, but they are just as terse as the videos. Plus, as I learned with this new updated release, you are likely to have screenshots of an older version in the same PDF as screenshots for the newer version.
One of the built-in complications with SilverFast is that the set of tools you are looking at can change depending on which mode you are in and/or what you've clicked on. In these videos you will see the instructor tell you to click on such and such a button but does not tell you what you need to do so that you can see that button. There almost needs to be a "Start Here" button within SilverFast so each video can say "OK, click the Start Here button and then..." One other example of this are the videos to help you through the Preferences. As I looked through these videos, I didn't recognize a thing. Finally I thought that maybe these were the Preferences and sure enough, they were. But nowhere in the dialog that's spoken does it say. "After opening up the preferences, the first tab you have..."
Now, with all of those complaints made about the help material, let me also add that they do have an aggressive support staff on their forums. Most of the questions and/or problems I had could be found in those forums. The disappointment is that no one seems to think that these questions could be complicated into a standard manual or a Q&A on the website itself after being organized by topic.
Overall, a lot of effort went into these videos and PDFs with an end result that provides more confusion than answers. If you look at the forum on the website, you'll see a number of answers that should have been covered in the PDFs that they do not (yet) provide.
I do want to provide one alternative for their dreadful Help: at Lynda.com, Taz Tally (one of the best instructors on scanning around) has a whole teaching session on using SilverFast Version 8.0 and it is excellent. Taz takes you through simple scans using the WorkflowPilot through to complex scans using the manual approach. There is a number of hours of instruction here and every hour you spend will save you 4-fold of the time you will spend trying to figure this out yourself using LaserSoft Imaging's PDFs and videos. Learning from Taz will not only teach you how to scan using SilverFast, but you will learn many tips and tricks on how to do better scans in general. While this series does not include the latest features, it will get you sufficiently tutored on how to use SilverFast that it will be much easier to figure them out yourself.
In Short
Simply, the software that came with your scanner is probably OK and may be very good. But the level of what SilverFast can do dwarfs much of what I've seen by 1st party software. As you've kept your scanner over a period of time, you may not have any choice but to get 3rd party software and SilverFast is something that you should check into.
At a minimum, SilverFast can do much more than just help you get good images to start with. The range of features that SilverFast provides is probably much more than most people are likely to use. Also, people who want the level of scanning support probably have Photoshop and to be honest, Photoshop can do a number of the extra capabilities better than SilverFast. On the other hand, those who are rebelling against the rental of software (E.g., The Creative Cloud) might find SilverFast a welcome relief.
But, for those who want those good quality scans of their images, and make the time to do those scans, you will be rewarded with excellent scanned documents.
One would expect that a company who's spent as much time as they have to develop as good a product as they have would create a better manual than they have. However, when you first get SilverFast, plan on a day of experimenting and learning. After that things should go much more smoothly.
SilverFast 8.5 requirements:
- 64-bit systems: Windows Vista, Windows 7, 8 or Mac OS X from 10.7
- 2 GHz Processor or faster (Multi-core recommended)
- 2 GB RAM main memory (4 GB RAM recommended)
- 2 GB free space on hard disk drive for the software file
- Up to 20 GB free space on the main system hard disk drive for the cache
- Supported scanner
- DVD drive or internet connection
- Latest firmware installed on scanner device