TKActions Panel V5 Review: A powerful Photoshop panel that makes luminosity masks easier
posted Monday, July 10, 2017 at 12:40 PM EDT
Note: I reached out to Tony Kuyper, the creator of TKActions Panel, earlier this year about reviewing his software. A copy of TKActions Panel V5 and an accompanying video guide series were provided to me for the purposes of this review. No other compensation was received.
Introduction
Back in 2006, photographer Tony Kuyper published his first tutorial on luminosity masks. Since then, he has created many more tutorials, PDFs and even his own Photoshop extension panels, which is the subject of this review. As of this spring, Kuyper is now on his fifth major revision of his TKActions Panel for Photoshop. TKActions Panel V5 is one of the most powerful tools you can purchase to enrich your Photoshop experience, and it will save you an incredible amount of time and put a lot of power right at your fingertips.
What are luminosity masks?
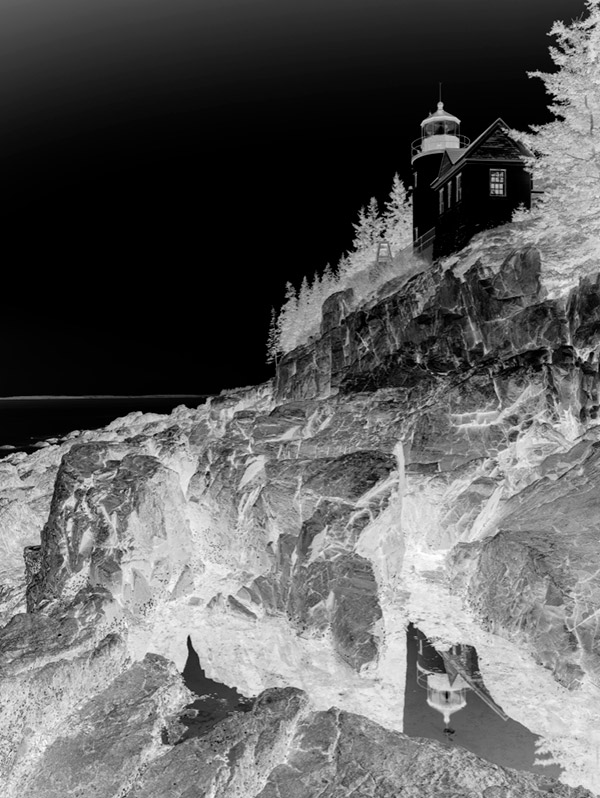
Let’s not get ahead of ourselves here though. Just what are luminosity masks? Let’s let Tony tell us: “Luminosity masks are the cornerstone of tone-based image adjustments. These masks provide a convenient way to select specific tones in an image, which can then be altered as the user sees fit. They have the ability to overcome shortcomings in the tonal values that were captured by the camera or film and to correct tones that shifted during image manipulation. Beyond simplifying these standard adjustments, however, luminosity masks also encourage a very individual approach to interpreting light. Luminosity masks make the captured light incredibly flexible and thereby provide the artist photographer unique opportunities to use Photoshop to explore their personal vision through photography.”
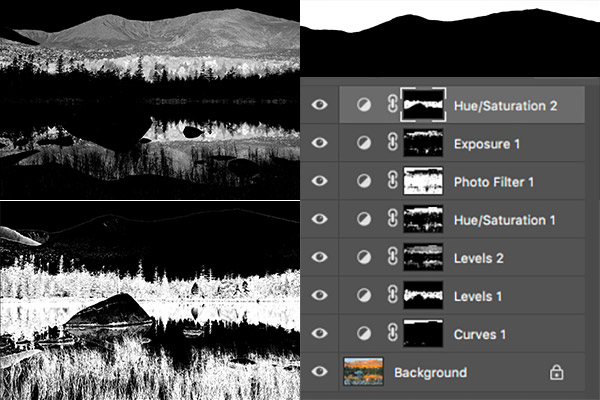
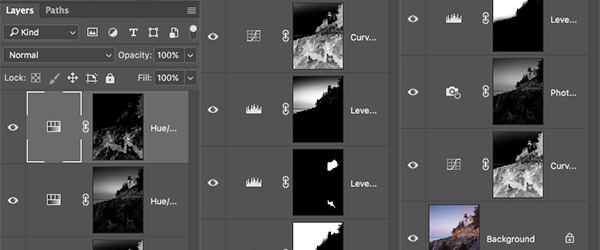
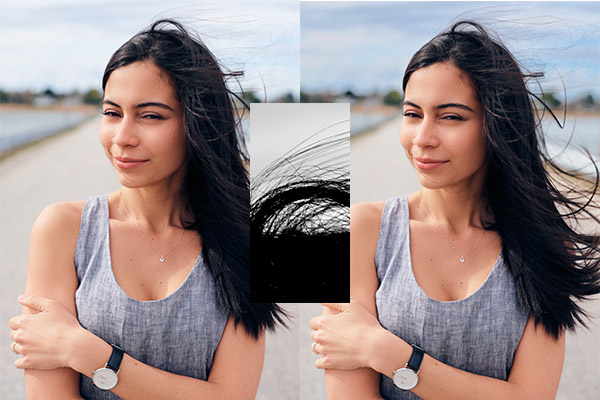
It can still be a little difficult to wrap your head around precisely what he is describing above, at least it was for me. It becomes immediately obvious when you make your first click on a panel in TKActions Panel V5, however. See the screenshot below.
Improvements in Version 5
While there are far too many improvements to cover in detail (click here for more information on what's new in TKActions Panel V5) there are a few critical ones that should be quickly evident to veteran users. It is worth pointing out that TKActions V5 was coded from scratch, so it is a brand-new, built-from-the-ground-up version of the software, rather than a collection of tweaks.
- There are now five modules instead of a gigantic mega panel, which makes organizing the components of the TKA V5 Panel much easier and offers a cleaner, streamlined workspace. Further, it's fully customizable!
- TKA V5 Panel is a mask-based interface. Luminosity masks are seen up-front by users and are seen in real-time. The entire workflow is very fast. This is in contrast to V4 and earlier versions of the TKActions Panel, which used a selection-based workflow. You can still make selections, of course, but they are 8-bit by default and the panel tries to avoid 8-bit workflow when possible. Masks allow you to see what the actual mask looks like rather than "marching ants" all over your screen.
- There are many modification buttons in the panel to allow for fine-tuning luminosity masks and making precise selections.
- Masks can now be "infinitized" through a dedicated infinity button
- Component channels, color, saturation and color range can also be used to make selections with as much precision as luminosity masks.
- 16-bit workflow.
- Improved "zone masking" functionality.
- Faster through RapidMask panel. Once the first mask is created, any other mask can be generated at speeds up to 90 percent faster than previous versions.
- New control module makes it easier to run Photoshop.
- All modules have rollover help information for every button. Further, you can change the color and language of the panels.
- Redesigned Actions module.
- Updated web sharpening action with more options, including batch web sharpening.
- History panel now tracks V5 Actions as they're used.
- Triple Play is back. It was removed from TKActions Panel V4 as it required 36 separate buttons, but now it has returned and uses only two buttons in the TK Actions module.
Getting started with TKActions Panel V5
By their very nature, luminosity masks can be a bit obtuse. If you are not used to that type of image editing, as I was not before installing TKA v5, everything can feel a little overwhelming. For interested customers, Tony Kuyper teamed up with photographer Sean Bagshaw to create an excellent collection of video tutorials. There are multiple video tutorial series available from Kuyper and Bagshaw, and Tony was kind enough to provide me a copy of Bagshaw's “V5 Video Guide,” which normally costs $29. This helped me learn the ropes of the TKActions V5 Panel and was indispensable for me.
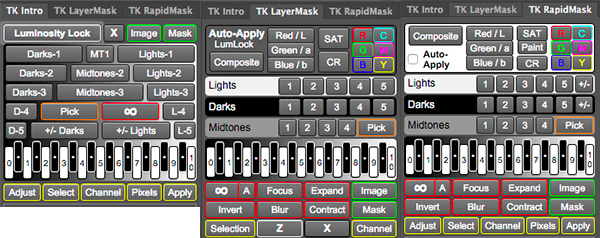
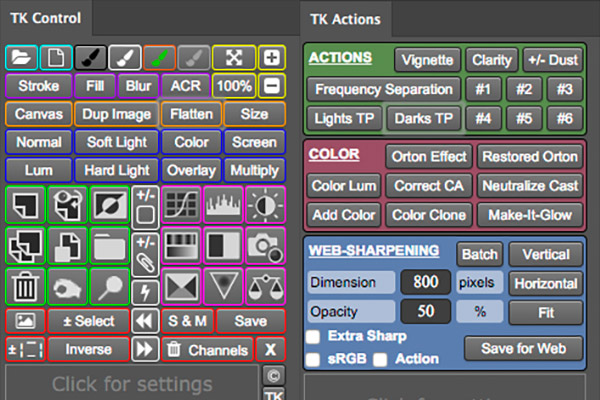
Notice I said “panels” up above. That’s because the full V5 suite is actually multiple panels: The TK Control, TK Intro, TK RapidMask, TK LayerMask and TK Actions panels.
The TK Control panel provides access to a lot of commonly-used Photoshop tools and features easy accessibility via icons. For example, there's a button to open an image, a button for opening Adobe Camera Raw, there are buttons for black and white brushes, there are buttons for all adjustment layers, saving, making an inverse selection, dodge (creates a new dodge pixel layer with overlay blending mode by default), burn (creates a new burn pixel layer with soft light blending mode set by default), and so on and so forth. It's very useful once you get used to where everything is, and it significantly sped up my workflow.
The TK Intro panel is a good place to start making luminosity mask-based selections and adjustments. It has a different layout than the more versatile TK RapidMask and LayerMask panels, which makes it a bit more approachable. It doesn't offer as many options for editing your images, but it still allows for a lot of flexibility and is a good way to ease into the suite of panels.
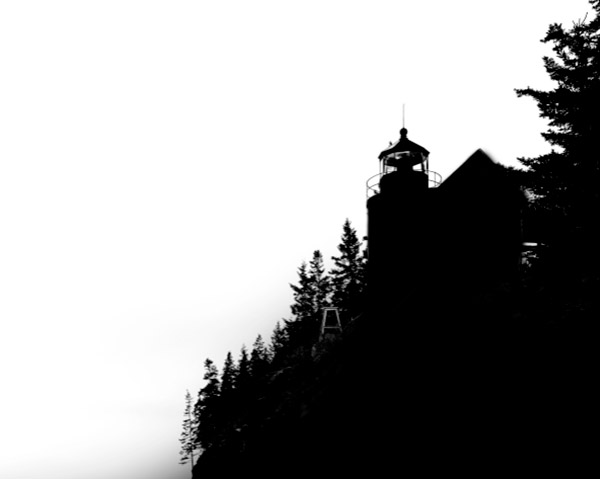
Looking at the RapidMask panel next, which expands upon the functionality of the Intro panel, there is a lot you can do within the RapidMask panel. I will not go into detail on every aspect of the panel, but it offers considerably more control over masking than the Intro panel. Features that I like a lot are the Infinity and Auto Levels buttons, which are located right next to each other. Infinity allows you to customize a mask through a levels adjustment whereas the Auto Levels button adjusts levels automatically to make the brightest parts of your mask pure white and the darkest areas pure black, which is especially useful when making midtones adjustments, as these often have huge swaths of gray area, which are not as useful for precise adjustments to your images.
There are ways to make additional masks more quickly than you might think looking at the lights, darks and midtones buttons. By inverting a mask, which is achieved quickly by hitting the 'Invert' button in the panel, you can nearly double the number of available masks with a single click. If you're using a Lights 1 mask and you invert it, it's the same as a Darks 1 mask. But, if you invert a Lights 2, 3, 4 or 5 mask, they are not the same as Darks 2-5 masks, for example.
Additional masks are available through the color picker tool, which is in the Midtones mask row. By selecting a color and then potentially expanding it or shrinking it with the color picker add and subtract tools, which pop up as soon as you hit the "Pick" button, you can make a highly precise, custom mask, which can then of course be further modified using the modification tools such as the "Infinity" button mentioned above. Control is the name of the game when talking about the TK RapidMask and TK LayerMask panels.
The LayerMask panel is the fastest way to use layer masks. It is nearly the same as the RapidMask module except all masks created by the LayerMask module are automatically applied to the active layer as a layer mask. This is a new way to visualize and create luminosity masks and allows for different kinds of customization. You don't look at the mask to decide which works best, but instead you look at the image while the LayerMask module applies masks to the active layer; it is an image-based approach to choosing a luminosity mask.
When working in the LayerMask module, you want to first make an adjustment layer and then make desired adjustments. Then you simply click through different luminosity masks and pick one which looks best, while remaining free to modify the mask further, which is also displayed in real-time with the image itself, making it very easy to quickly see what you are doing to your image and determine what your next step should be. This approach lets you see adjustments in real-time on the actual image rather than looking at a grayscale mask. If you want to view the mask, that's easy to do too, just click on the "mask" button in the LayerMask module. Further, you can make an adjustment layer to your image without a layer mask applied and then cycle through your mask options and see the effect on your image after the fact, while remaining free to modify the mask as you see fit. It's all very flexible.
It is worth pointing out that if you are using Photoshop CC, you can combine the RapidMask and LayerMask functionality into a single module. This is achieved by clicking the "Auto-Apply" checkbox in the RapidMask panel. When this is enabled, the RapidMask module functions just like the LayerMask module described above.
User Interface
As has been mentioned already, the panels are customizable and you can organize them as you see fit, whether that involves multiple separate modules, removing one or more of the modules or giving them each their own space. Beyond that level of customizability, the TK Actions module itself has six numbered slots for you to record and save your own actions in Photoshop. Further, it is important to take note of the colored borders and backgrounds in the TKActions Panel V5 modules. They are organized coherently by color, which helped me a lot when learning to use the panels in my own workflow.
System compatibility: TKActions V5 is built for Photoshop CC
While Photoshop 6 users can take advantage of many of the features in TKA V5, they cannot take full advantage of the software because some of the new features rely on the Extensions capabilities introduced in Photoshop CC. Check the product listing for more information on compatibility and software requirements.
It isn't all about luminosity masks
There are many other useful tools within the TKActions Panel V5 modules besides those used for making and modifying masks. In the TK Actions module, there are numerous actions which many photographers will find invaluable. Of course, as part of the overall TKA V5 experience, the actions can be fine-tuned and precisely applied to your image through masking.
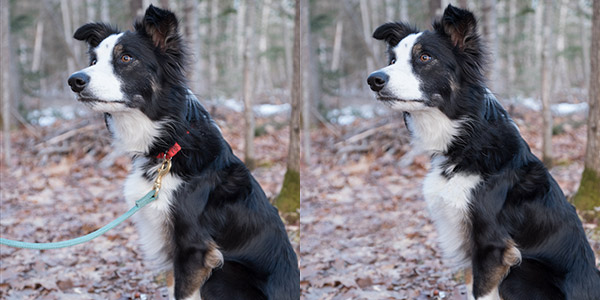
For example, there is a spot removal action. Cleaning up files is typically one of the first things you should do to an image. Dust is unfortunately an issue most of us must deal with and there are many ways to achieve good results and TKA V5 offers a quick, reliable method. Not all dust spots are immediately obvious but can show up after you've made adjustments to your image. How do you deal with those in the TKActions V5 panel? When you click the "+/- Dust" button in the TK Actions module, it creates multiple layers automatically, increases contrast and removes color, making dust spots easier to see. And then it's a simple matter of using the content aware heal or clone tools to remove spots. Some spots might still be tough to see, so you can go to the created Amplify Dust layer and then turn on Soft Light or Overlay blending modes and additional spots may become visible. You then have to go back to the Heal/Clone layer to fix the spots, but they should be easier to see. Once you're done, you click the "+/- Dust" button again and your image goes back to its normal appearance.

Clarity is another action available. It uses the High Pass filter, and you can then use the LayerMask module to confine the clarity adjustment to specific parts of the image, such as applying it to shadows using a "Darks" luminosity mask.
Frequency separation is a useful technique for portrait photography, although it works for other types of images too. Frequency separation basically separates texture from color so you can deal with each of them independently. TKActions Panel V5 has a Frequency Separation action built-in. Running the action generates two layers, one with texture information and the other with color information. When you run the action, you first must select a radius for Gaussian Blur. Potential uses for frequency separation span both artistic and practical uses, but some options include removing lens flare from images, adding selective glow to the sky in your image or perhaps smoothing out water. It is useful for much more than just portraits, and the implementation within TKA V5 is very good.
Triple Play
The Triple Play action was removed in TKA V4 due to space limitations, but has returned in V5. It comprises Lights TP and Darks TP. It creates a group of ten layers, and all ten layers have their visible turned off by default. To use the Triple Play, you turn on different yellow and blue layers - there are five of each - to find the look you want. The Triple Play affects brightness, contrast and detail simultaneously using different luminosity masks and adjustment layers, so it is a powerful, quick way to add pop to your images. Once you've selected the desired layers, delete the hidden layers to reduce file size and you're all set.

Color Actions
In the TK Actions module, there's a red section dedicated to color actions such as fixing chromatic aberration, neutralizing a color cast, adding color and more. Let's take a look at some of these very useful functions in detail.
There are "Orton Effect" and "Restored Orton" options, which give your image a vibrant, painterly look. The Restored Orton effect is similar to the Orton effect except without the additional blur introduced to your image.

The "Color Luminosity" action lets you selectively adjust the brightness of particular colors. When you play the action, a black and white adjustment layer is introduced and set to the luminosity blending mode. Opening the adjustment, you can change the luminosity of individual colors. This can obviously be done manually in Photoshop, but it's nice to have a quick way to access the settings.
Another interesting color adjustment tool is the "Add Color" function, which has been popularized by photographer Ryan Dyar. The concept of the Add Color technique is similar to dodging and burning except that you are using color rather than black and white "brushes." When you use the action, the color picker comes up and you can then pick a color from the image, for example a color from the sky in a landscape image.
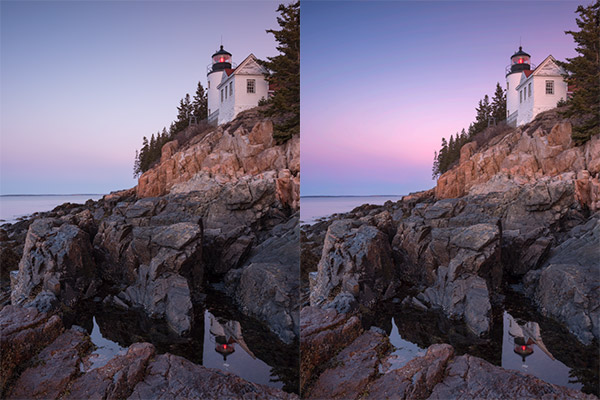
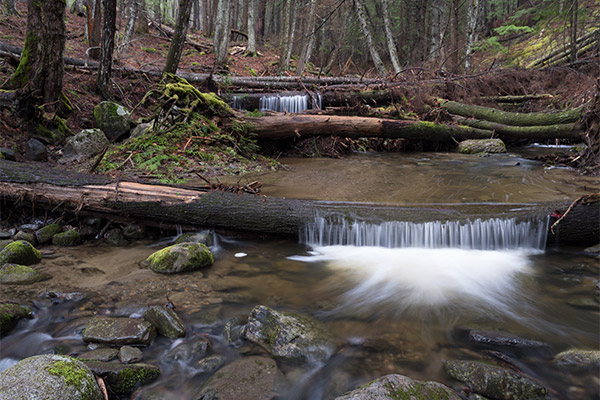
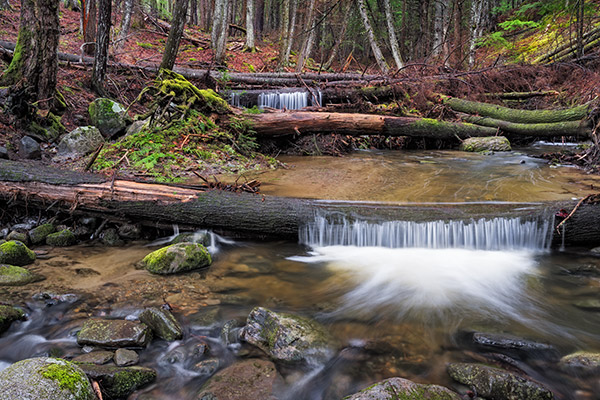
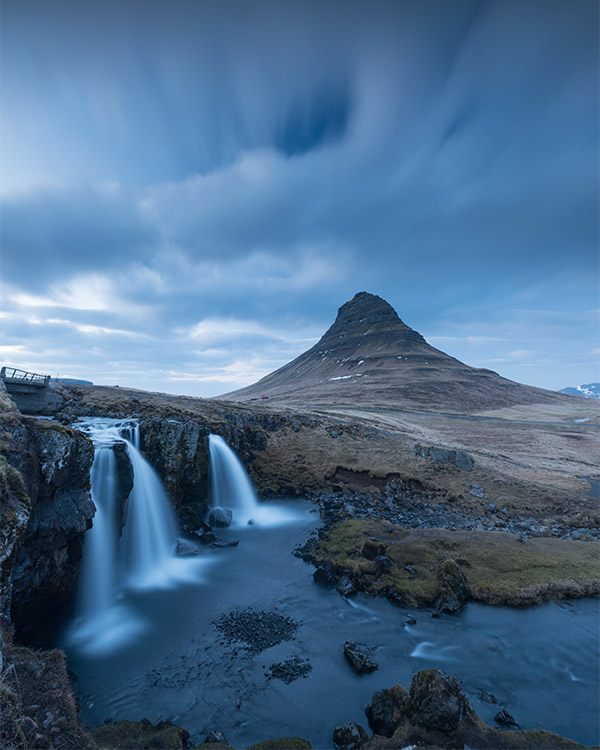
The "Make-It-Glow" function is one I've used on numerous occasions. It affects the colors in an image without changing the texture. Basically, it makes color more saturated and slightly blurred, giving an image a filtered glowing effect of sorts, although the glow is quite subtle. The effect can be quite heavy, so I typically turn the opacity down, although I left it at 100 percent for the comparisons below.

Performance: Remarkably fast, even when working with large flies
The TKActions Panel V5 is very fast. I didn't use V4, but based on the list of new features and remarks made by Sean Bagshaw in his video series about the V5 panel, it's clear that a lot of improvements have been made to the performance of the panel in the newest version. Even when dealing with a large, multi-layered 50-megapixel RAW image, the panel updated quickly and offered nearly real-time visual feedback. It's incredible given the amount of tasks that the panel regularly performs that it runs as well and as quickly as it does.
TKActions Panel V5 In Use
For my own work, which mostly comprises landscape and nature photography, TKActions Panel V5 is an immensely powerful tool for image editing. For example, it's not unusual for me to want to target a highly specific part of an image to make a very localized adjustment. This is normally not easy to do, especially to produce natural-looking results, but luminosity masks make it much easier, and TKActions Panel V5 makes luminosity masks themselves much easier to create and work with.
It can be tricky at first to know precisely how to use TKActions Panel to make the desired adjustments - Sean Bagshaw's videos helped a lot - but the software is also friendly to experimentation thanks to everything being accurately accounted for in Photoshop's History. Once I found a personal workflow that was suited well to my needs and editing style, I was able to make edits in a few minutes that would have taken me hours to complete without luminosity masking.
TKActions Panel V5 is not necessarily a one-stop shop, and there are other image editing tools that remain in my workflow, but it makes a ton of functionality to Photoshop much more approachable and functional, especially to those without the years of technical knowledge of Photoshop.
Conclusion: TKActions V5 is a must-have for anyone looking to improve their editing in Photoshop
What I liked:
- Flexible and powerful
- 16-bit workflow
- Good user interface
- Make precise, highly-selective edits in seconds
- Makes regular Photoshop functions easier to use
- An excellent value

What I disliked:
- The panels can be overwhelming at first
- For those completely new to luminosity masking, there can be a steep learning curve
At $35, Tony Kuyper's TKActions Panel V5 is an excellent value for any heavy Photoshop user. If you have wanted to start using luminosity masks or have been doing them yourself manually, you owe it to yourself to give TKActions Panel V5 a try. While it took me considerable time to feel comfortable with the panels - and I still have a lot to learn - I can confidently say that it's become an important and indispensable part of my image editing workflow. If you want to dive right into it, I recommend grabbing one or more of Sean Bagshaw's video guides, as well, because his videos were crucial in helping me learn the ropes of the software and how to take advantage of the capabilities.