5D III strip tease: Is beauty more than skin deep?
posted Friday, April 13, 2012 at 4:28 PM EDT
 The
The best worst thing happened today: a nearly new Canon 5D Mk III came back from rental with a loose screw rattling around inside. We had to decide if it went back to Canon or if we should go looking for the screw ourselves. That’s a tough decision. So we thought about it for a while. Until Tyler and Drew went to lunch. Then we decided it had to be handled in-house. Since we had to open it up to find the screw (there really was a loose screw, we swear) it seemed a good idea to take a few pictures along the way. In case we needed documentation to help with the reassembly. Yeah, that’s it. We were being extra careful to make sure we could get it back together. We weren’t doing this just to take a look inside at all.
But not being total idiots, we didn’t completely take it apart like we did with the NEX or D7000 cameras. So this is only a strip-tease, not a strip down. But it’s still fun (and educational too!!!). One thing that is readily apparent: I made the comment when the camera first came out that this could well have been named the 6D, it was really that different from the 5D Mk II. Nobody else seems to think so, but looking inside confirms what I thought: inside this camera is largely redesigned and it’s one of those where I want to compliment the engineers. This camera is beautiful inside, logically laid out and well built.
The Usual Disclaimer Stuff
First things first: if your camera is in one piece, then leave it alone. We’re semi-trained, semi-professionals with another 80 of these on the shelf. If we screw it up, we’ll only have 79 left, which is probably less critical than if you screw up the only one you have and then need to ‘splain to your wife why you have to buy a new camera. (And for those of you wondering if we got in trouble for doing this – no, we had it completely reassembled before Tyler and Drew got back from lunch. They’ll never know about it.)
So Let’s Have a Look!
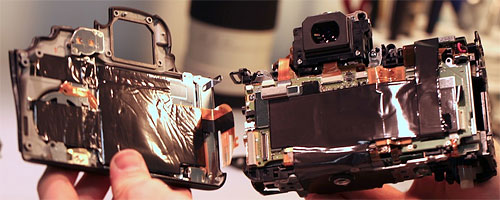
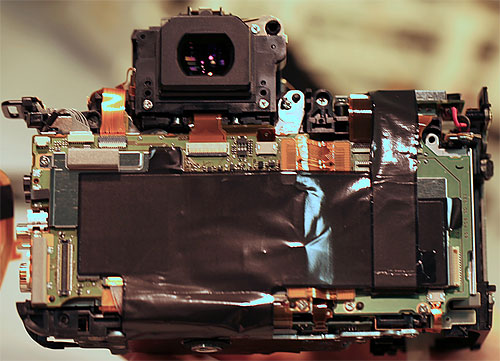
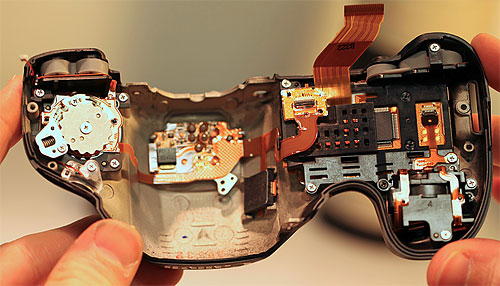
Aaron started the disassembly while I went looking for a macro lens, so by the time I got back he’d already peeled off the grips, removed 20 odd screws, and opened the case (Aaron just likes to show off sometimes). Differences from the 5D II are immediately apparent: there is only a single flex attaching the back assembly to the main board, and one flex and a wire harness from the top assembly. The circuit boards and flexes for both the camera body and back are covered with black rubberized sticky plastic, protecting things inside (and possibly adding some electrical shielding). I haven’t seen this on other cameras, it’s a very reassuring thing (and may explain why the loose screw didn’t short anything out).
Looking more closely at the back, several other changes are apparent. All of the flexes take short, direct routes to where they are going. No long winding flexes stuck down hither and yon. There are also a lot more of the robust ‘plug-in’ type connectors and fewer of the ‘slide-and-lever-lock’ which (I know from unfortunate experience) are rather delicate. There are also several places where wiring harnesses (look at the upper left corner of the main circuit board) are used rather than flexes. They’re certainly sturdier and (I assume) provide better electrical insulation.
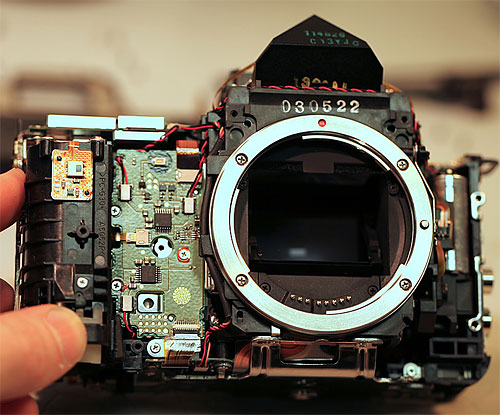
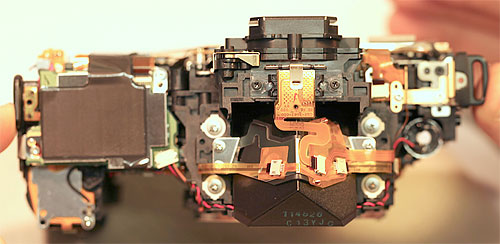
Looking at the front of the camera, it’s again notable how clean and organized everything is. No long wires running here and there. Wire pairs are nicely braided and there are grooves and hooks in the plastic to keep them in place. That’s a nice touch that you don’t often see.
Another minor, but very nice touch that shows how carefully this design was thought out: the battery latch is right at the front of the compartment as an easily replaced screwed in assembly. On other cameras (including the 5D II) it requires major disassembly to replace a broken battery latch, which is a common repair. This one can be done in minutes.
Looking at the top, there’s nothing remarkable except more of the same: everything is neatly laid out in its place with minimal wiring and connections.
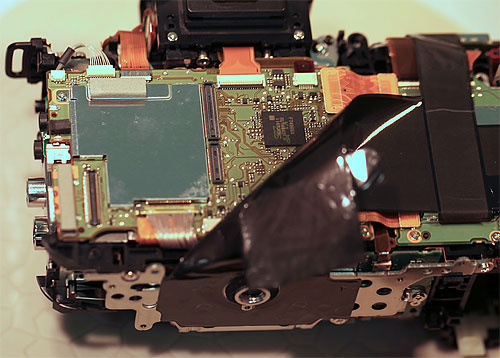
Going back to the back of the camera, the sticky plastic protective sheet pulls up easily. As an aside it has already shown its worth: the loose screw was in the crease along the edge of the plastic sheeting – the sheeting kept it from shorting out anything on the circuit board.
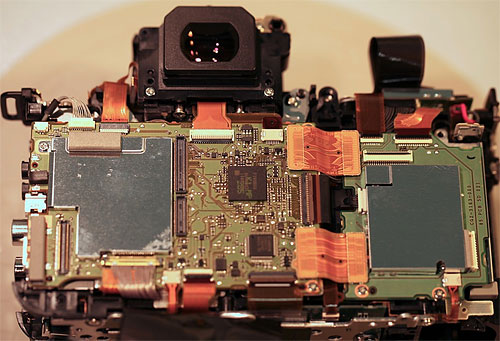
With the sheeting removed you get a really good look at just how well this camera’s electronics are laid out: every flex run is short and direct, insulated wiring harnesses are used in several places, and heavy-duty plug-in connectors are used more frequently than I’ve seen on any other camera.
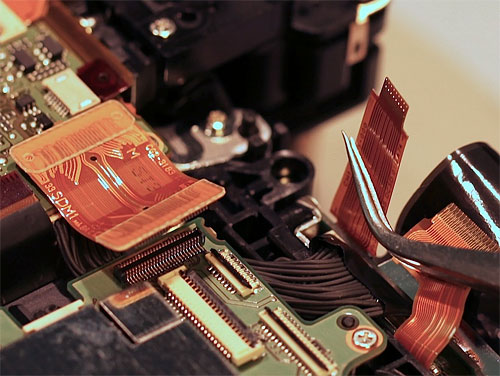
The difference in connections is obvious in this close up. Slide-in flexes (held up by the forceps) are used in almost every connection in most cameras. The heavy-duty plug in type on the left and thickly insulated wiring harnesses (deeper and between the two connectors) I’ve rarely seen except in this camera and Pro (1D xxx or D xxx) bodies.
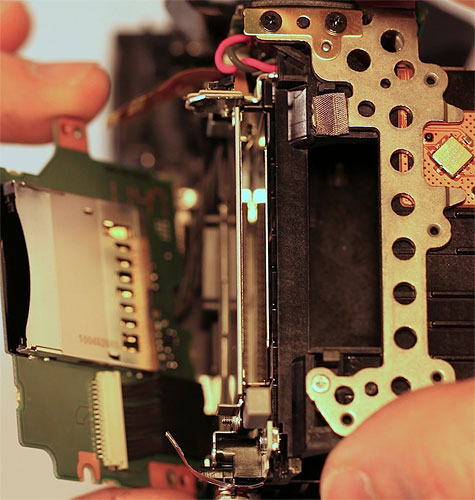
You can see another nice touch if you look at the two large flex connectors between the main board on the left, and the smaller board on the right (in the image of the entire back, above). The right board contains the SD card (lifted up, on top in the image below) and CF card slot (underneath). CF pins break frequently and if they can’t be resoldered can require a main circuit board replacement in a 5D II. On the III only the card assembly would require replacement. A very nice touch from an engineer who is thinking about future maintenance as well as the current camera.
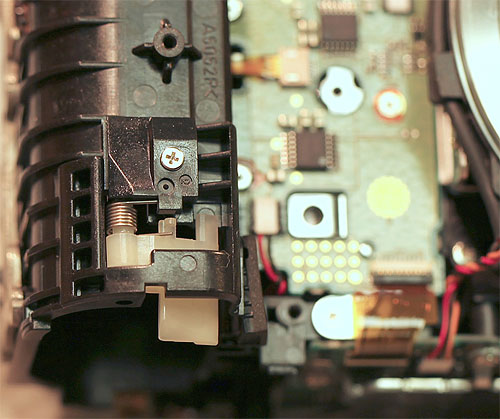
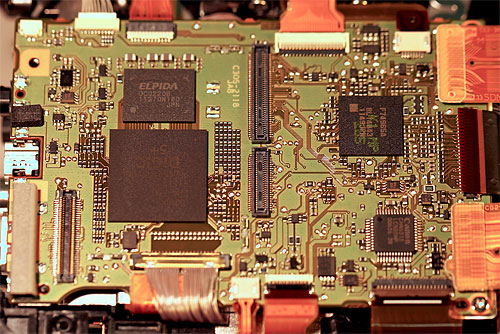
A last close-up of the circuit board before we put this thing back together. The Digic 5+ chip is really rather huge. The chip above it is, I believe, DRAM, but I’ve no idea on the other two.
There is probably more goodness to see down deep in this camera. But Tyler and Drew were heading back from lunch, we’d found the missing screw and put it back where it belonged (it was one of 4 holding the card readers in place – the card reader’s were still firmly in place and wouldn’t have missed it but the rattling would have freaked someone out) so we thought it best to get things put back together before anyone noticed we’d taken it apart. It’ll be just our secret.
Ooops, I almost wrote an article without a lame pun. But I know what you’re thinking: we must have a few screws loose to be opening a 5D III like this.
(Roger Cicala is the founder of LensRentals.com. Visit LensRentals.com to check out that cool lens you've been hankering for, and for some of the best customer service on the Internet!)
