Crazy-cool: Behind the scenes for the creation of “Gradus” - Pinhole-camera Bullet Time!
posted Saturday, June 14, 2014 at 6:04 PM EDT
Meet Brandon Griffiths: sports photographer, designer, and innovator. He is fascinated with exploring new ways to capture live action using modern technology, and does so in a unique fashion, by placing special emphasis on maintaining ties with the traditional roots of photography. Griffiths is in pursuit of the perfectly immersive experience for his audience. And in an effort to more fully convey emotion and experience from subject to audience, he has created a device to illustrate action in greater detail through the imperfection of pinhole photography. His project -- Gradus -- is the remarkable culmination of these efforts.
We first heard about Brandon's amazing production a couple of days ago, but held off posting the story until we could bring you some of the behind-the scenes details about how he pulled it off. Read on for the details, we're awed by Brandon's patience and dedication!
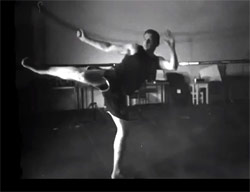
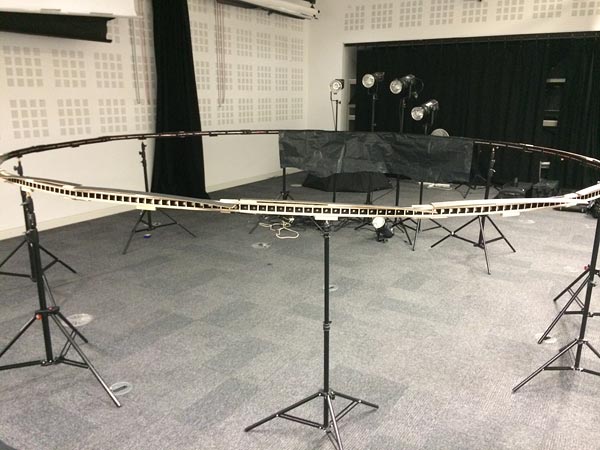
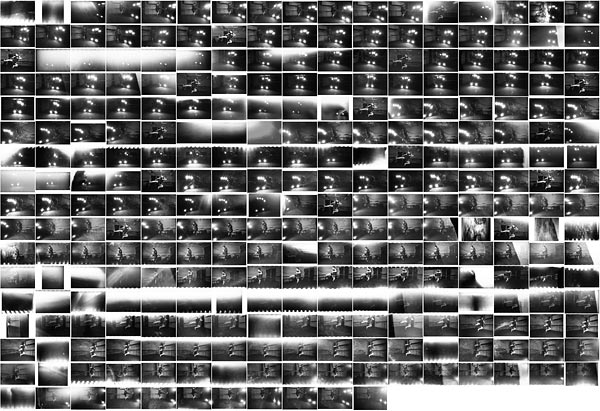
Brandon's rig is an engineering marvel that successfully achieves a 360-degree pinhole capture of a single moment in time. Familiar to anyone who's seen The Matrix or any of dozens of films since then, the effect is called ‘bullet time’, and in this case was created using 364 pinhole cameras on a custom-built platform, shooting onto 35mm black and white film -- 60 meters of film, to be precise. Each image has been individually scanned and collated into a cinematic sequence to produce this video, the result of over 4300 hours of creative effort by Brandon and his assistants. Enjoy!
We emailed back and forth with Brandon, to learn a bit more of how he came up with and ultimately executed this project. Here's what he told us:
Imaging Resource: How'd you initially come up with the idea for this? What was your inspiration?
Brandon Griffiths: When I started looking at what to do for this project, I knew I wanted to do something with bullet time. It has always been something that I found really interesting, and it brings out a completely unique perspective, or multiple perspectives, on a situation. I looked at some of Eric Paré’s work, and specifically his light spin project. The more I researched it, the more I found, and then I saw London Grammar’s pinhole music video. And I thought I could do that and combine it with sports photography, and make it my own. And so the idea of combining traditional photography practices and modern technology came about and I really liked it!
IR: You mentioned it was a final project for a class or degree program. What sort of class/program was it?
BG: It was for my final project of my Photography BA(Hons) Degree at The University of Hertfordshire, which I have now finished.
IR: You mentioned pages of calculations: What sort of calculations did you need to do to set up the design parameters, and to make sure you'd end up with the magnification and field of view you wanted?
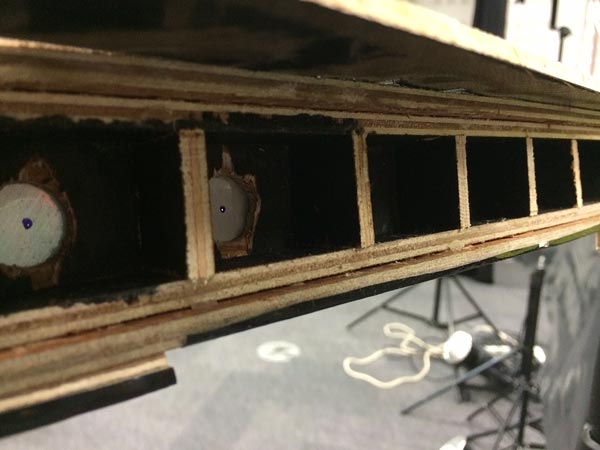
BG: Ha! Well everything had to be calculated! However, the main calculation was to do with the field of view and getting that right, which meant working out the correct pinhole size, as well as the distance of the pinhole to the focal plane, which in this case was the 35mm film. Some of the other calculations were just in the rig design itself, how to actually make a full circle, splitting the circle into different sections, and the sizes everything needed to be so that the 35mm film can fit in the back of the rig.
IR: Can you describe the process you went through to develop the pinhole camera design you used? What were the design considerations, and how many prototypes did you make on the way to the final version? What were the stages of the design?
BG: It started off with a few sketches to come up with a few concepts and ideas to actually create this rig. After that I went straight into the workshop together with my dad and brother who is incredible with his woodwork. If you need anything built, he is your man! We built the first prototype: it was just one section with about 20 pinholes on it. I then went and did some tests with this initial design and came back because the field of view was too small. The field of view was one of the main considerations of the project, I needed to have as much as I could on that 35mm frame so that my model was completely in the frame even when he was jumping around doing his various kicks. After these tests I made a few changes and I had the basis of the pinhole rig, just one section, which needed to be repeated multiple times to create the full circle.
IR: What were the biggest challenges along the way?
BG: Light leak. Light leak was not my friend. During the shoot day, together with my small team we blacked out the entire studio, or so we thought. It takes about 20 minutes or so for your eyes to adjust to the dark, so we ended up starting to be able to see each other during the first shoot. This meant that there was a lot of light leak! And so it just meant blacking out everything, waiting for our eyes to adjust properly and then blacking out some more. Another challenge for me was the actual creation of the final piece. I had been so careful to label everything to keep all of the film in the correct order when I scanned it in, however some managed to get mixed up and this created a huge headache for me. I spent hours staring at a rough sequence knowing something was wrong but being unable to figure out where or what! And then there was the alignment in Photoshop… this took forever! Each frame was imported individually and then lined up with the previous one. I ended up with huge files with hundreds of layers.
IR: You mentioned in the "making of" video that you used 6 light packs. What was the total watt-second rating you ended up with?
BG: Each light has a rating of 500 watt/seconds so I think that would mean I have a total of 3,000 watt/seconds. I just kept adding light until I got it right in my previous test so I knew on the day exactly what to do.
IR: How'd you manage to get all the film loaded and unloaded in total darkness? Was it perhaps an orthochromatic emulsion? (Insensitive to red light, so you can work with it under a safelight.)
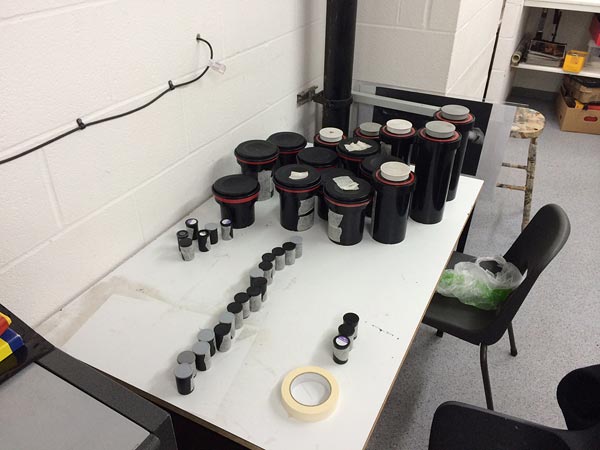
BG: We had some fun doing this! Everything was shot in complete darkness, we had a roll of 100ft 35mm film which between us we loaded into the back of the rig, exposed the film and then had to unload it. So I had all of the developing tanks ready and each section of the rig was the length of a 24 exposure film so I could cut the film to a length that would fit in the tanks. We had a laugh doing this because I sat loading the film, and then everyone else was crawling around on their hands and knees trying to get to me with the film. Using orthochromatic emulsion might have been a better idea… haha!
IR: What sort of film did you use, and was it unspooled from standard 35mm film cannisters, or from a bulk roll?
BG: I used Ilford HP5 plus from a 100ft roll. I used 200ft in total and shot 4 different sequences.
IR: What did you do to scan the film into digital format? A dedicated film scanner, or a camera on a copy stand with a backlight & macro lens?
BG: I used a dedicated scanner. An old Agfa scanner, the exact one that Magnum photos used to scan a lot of Martin Parr’s work. The University bought it from them. The only problem with this was that it used Mac OS9 so it was so slow and kept crashing because Agfa have not updated their software since they went out of business.
IR: What software did you use to get all the images properly aligned with each other? What did you use to output the final movie?
BG: I used Lightroom to organize all of the photos into the correct order, I then used Photoshop to align every image. I then used software called Time-Lapse to produce the sequence. Finally, I imported it into Premier Pro to do overall adjustments to the sequence, like a small vignette, and then produce the final piece.

IR: Now that you have it built, do you plan on using the rig to make more bullet-time photos, or is it just too much hassle to consider?
BG: It did take me forever to do this project, however it is something I would absolutely love to do again. It was so much fun and the results were worth all the time and effort. I have learnt so much from doing it that I know how to speed up a lot of the processes and I know what I would like to change on the rig to make it even better.
IR: Anything else you'd like to share with our readers about your pinhole bullet-time project?
BG: I would like to say that no one should underestimate pinhole photography. There is so much more to it than what I first thought when I began this project. It can be as complicated or as simple as you like. I have learned so much about my photography and the way we take photos and I think everyone should have a go with pinhole at least once! It is fun, and the results can be a lot better than expected!
IR: What sort of commercial photography are you interested in doing, and how could potential clients find your work and contact you?
BG: I do advertising photography and commercial work, a lot of it based around sports photography. I also do lifestyle shoots, for action sports brands and clothing companies. If anyone would like to get in contact with me they can head to my website to view some of my work: www.brandonfoto.com. Or send me an email at [email protected].
(You can check out more of the pinhole ‘bullet time’ behind-the-scenes action here!)