The Art of Capturing Aurora: An interview with photographer Jeremy Gray
posted Tuesday, September 30, 2014 at 4:27 PM EDT
When the sun unleashes a certain type of solar flare out into the surrounding cosmos in our general direction, the result is often an impacting plasma cloud bombarding our magnetosphere. OK - so that's a mouthful, but the result to us down here on Earth is generally twofold, as havoc can be wreaked on our power grids and electrical systems, while incredibly beautiful skies often result from the aurora that are created from the powerful collisions.
These breathtaking phenomena generally occur at or near the poles due to their high magnetic charge, and can generally be seen as far as ~20° from the poles, and sometimes even further depending on the severity of the geomagnetic storm. Having grown up in the southeastern part of the United States and having spent very little time north of New York City, I have never had the privilege of witnessing a full-blown auroral display myself, which is why I'm grateful to the photographers who pour their time, energy and money into capturing them in their full glory for the rest of us to see.
Jeremy Gray is one of these adventurous souls, hailing from Orrington, Maine, which is fortunately well within the auroral viewing band. His nature and landscape photography first came to my attention with this Astronomy Picture of the Day from Nasa just a few weeks ago, and he graciously offered to share some of his techniques and shooting tips with our readers, including details about his chosen gear for the job.
Imaging Resource interview with Jeremy P. Gray
IR: Was there anything special that led you to wanting to shoot aurora?
JPG: When I became interested in photography during high school, I saw a lot of wonderful aurora images on the internet. It was seeing those images that motivated me to capture the aurora myself. Additionally, during my final term at McGill University this past spring, I took an astrophysics course and did night photography for class projects. The colors of the aurora are a big draw, an auroral display is constantly changing, and every individual event is unique.
IR: What's your primary shooting rig for aurora photography (camera, lens, extra gear)?
JPG: My primary shooting setup for aurora photography (and night photography in general) is a Nikon D800E camera body with a Nikon 14-24mm f/2.8 lens. I also occasionally use a Nikon 24-70mm f/2.8. In both cases, I keep masking tape handy so that I can hold the focus ring at infinity when I am shooting the sky. It’s really easy to bump things out in the field only to realize after you've been shooting that the focus was a little bit off. If I have any filters on the lenses, I make sure to remove them before shooting at night, especially when shooting auroras. A good-quality tripod, head and a cable release are important to ensure stability so that everything remains sharp over long exposures. Additionally, a headlamp or flashlight is important for safely moving around in the night but also for setting up my composition. I always bring fully-charged extra batteries and empty memory cards. It would be unfortunate to have great shooting conditions and be forced to stop because batteries are dead or memory cards are full.
IR: What general exposure settings do you tend to start with, and does this vary from shot to shot?
JPG: To counteract camera shake from the mirror mechanism or hitting the shutter release, I use my camera in mirror lock-up mode with a cable release to minimize any chance of camera shake disrupting an exposure.
With my camera, I find that files are acceptable up to around ISO 2000-2500, but I prefer shooting at ISO 1600 and below. Everyone has different acceptable ISO settings with their own equipment and preferences, so it is important for photographers to test their camera out at night and determine acceptable ISOs. The most important thing for me is that I have a plan before I go out in the field, and this is doubly important when dealing with auroras, as they can appear and disappear in a very short period of time. Knowing my usable ISO range, I tend to start at ISO 2000 and an exposure time of 15 seconds and see how that works. I always shoot wide open, which is f/2.8 for me.
When shooting auroras, I prefer to shoot exposures less than 20 seconds and will shorten the exposure to 10 or 5 seconds if the conditions allow. The longer your exposure, the more blended the movement of the auroras will be. On the other hand, the shorter your exposure, the more detail you will capture in the aurora, particularly the brilliant pillars of bright light apparent in strong aurora displays. If you have to increase your ISO to shorten an exposure to 15 seconds, it’s a worthwhile tradeoff. If you’re unsure if your exposure is the correct one, set your camera to display ‘Highlights’ when reviewing your images. This allows you to check for any blown out areas in the sky. If you do have overexposed areas, decrease your ISO or shorten your exposure time. A histogram works well for this too.
Additionally, every auroral display is different (which is a big part of the appeal!). Faint displays may require 20-30 second exposures while other more powerful displays may require only 5-10 second exposures. Auroral displays vary in color. White balance is something I don’t want to have to consider out in the field. To accommodate this, I only shoot RAW files and either leave my white balance around 4850 K or just set the camera to Auto white balance. The RAW files allow opportunity for white balance adjustments during image processing.
IR: Do you experience focusing issues due to extreme cold, and are there ways to deal with this?
JPG: I rarely have issues with my equipment in the cold. Only in very cold conditions have I been forced to attach hand warmers to my gear to keep it operational. However, I would hate to have my shooting disrupted by weather, so I always bring hand warmers, elastic bands, and plastic bags with me for night shooting in case I have to attach the hand warmers to the lens barrel. The hand warmers are great to bring anyways, I keep them in my gloves so that my hands stay warm enough to manipulate the dials and buttons on my camera equipment. When I am done shooting, I place my gear in a plastic bag and keep it sealed until it has warmed up again.
On the topic of extreme cold and shooting, I find it just as important to keep myself warm out in the field so that I can concentrate on my photography and stay out in the field as long as necessary. Battery life is often limited in cold weather, so be sure that your batteries are fully charged and that you always bring an extra battery out in the field. I like to keep my extra battery in an inside chest pocket of my jacket so that it stays warm.
IR: Do you generally use long exposure noise reduction for these shots?
JPG: When shooting auroras, I do not use long exposure noise reduction. The extra exposure time required by the camera is not worth losing time you could be using to shoot more images. However, when I am shooting a long exposure foreground shot to be blended later, I will often use long exposure noise reduction for that particular shot.
IR: What post-processing software do you use, and are there any special techniques you've discovered for bringing out the best in auroras?
I use Adobe Photoshop CC with Nik Software plug-ins. When processing aurora images, I tend to increase saturation and contrast. After this, I will selectively increase contrast in and around pillars in an aurora to help bring out the depth and detail that you can see in the field with the naked eye. If you do not have access to selective plug-in software like Nik’s software suite, utilize Photoshop’s adjustment layers and layer masks to ‘brush’ the adjustments just where you want them. After these adjustments are made, I use Photoshop’s Lens Correction filter and occasionally will perform noise reduction.
What can you share about scouting out the best locations for catching these?
JPG: Preparation is important for my work in general, but it becomes absolutely essential when shooting auroras. I use spaceweather.com and NOAA/Ovation to track geomagnetic activity. I've spent a lot of time scouting locations that I believe present good opportunities for shooting auroras. Characteristics that I look for in a location are north orientation relative to interesting landmarks or structures, foreground elements that I could utilize well at night, bodies of water that might reflect the colors from an aurora, distance from nearby areas and how much light pollution is present, and whether or not there are tall trees or land masses to the east and west that might provide extra shooting time during moonrise and/or moonset.
Once I have selected good location options, it becomes a matter of following the geomagnetic conditions, the weather, and making sure that my gear is always packed and ready to go at a moment’s notice. I have scouted locations at varying distances from my home, so I have a good variety of options. If it's possible, I try to get to my chosen shooting location before sunset so that I can set up my equipment and composition in natural light.
IR: Do you have any additional suggestions on tips, tricks, tripods, etc?
JPG: If possible, get to your desired location and set up before nightfall. I would suggest getting a sharp, well exposed foreground image that you can later blend with aurora images. Exposure times for shooting the foreground vary dramatically with ambient lighting conditions, but if you are able to blend a naturally-lit foreground with your aurora images, you can bring a new element to your aurora photography. There are lots of nice shots of auroras, but an interesting and well-composed foreground helps to take an image to the next level.
I always prepare my equipment before I head out. I attach my wide angle lens in manual focus mode and put my camera into manual mode. I set the camera to ISO 1600, a 15 second exposure, 4850 K white balance, Mirror-Up mode, and attach my cable release before I head out. Preparation may well be the difference between getting a great image or no image at all.
Getting good aurora images also requires that aurora activity conditions and weather are cooperative so do not become discouraged if you come home with nothing. As long as you're planning and thinking in the field, you will always come home with new knowledge about the night sky and the location you were shooting. This knowledge can pay immense dividends when those variables outside of your control (geomagnetic activity, cloud cover, moonlight) come together.
IR: Thanks, Jeremy!
To see more of Jeremy Gray's nature and landscape photography, head over to his website!
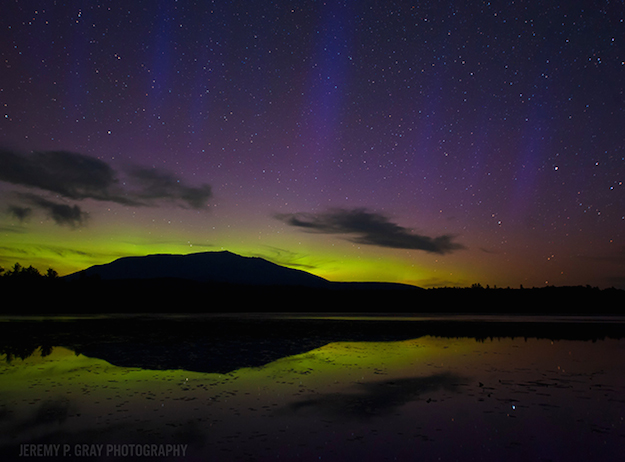
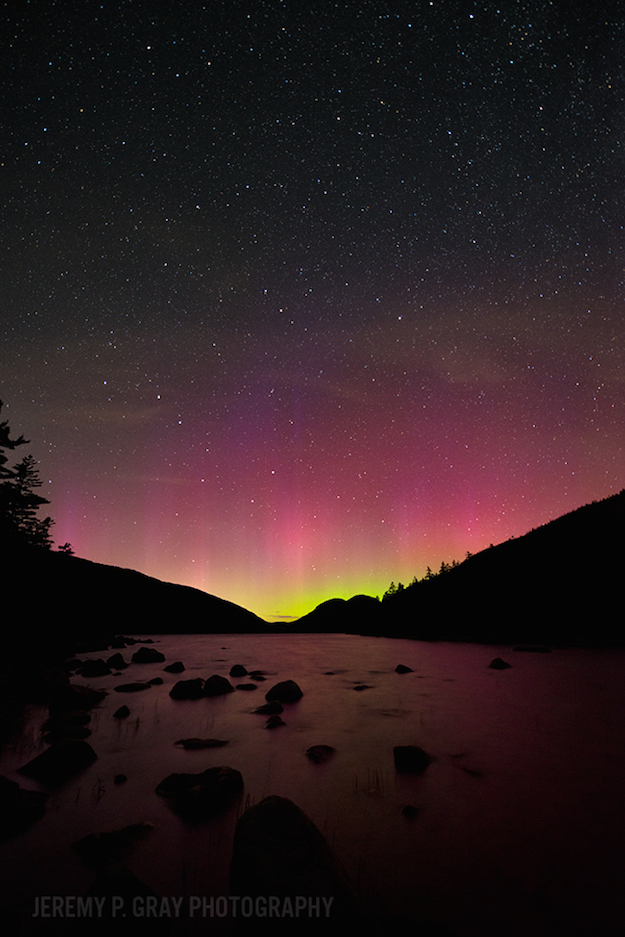
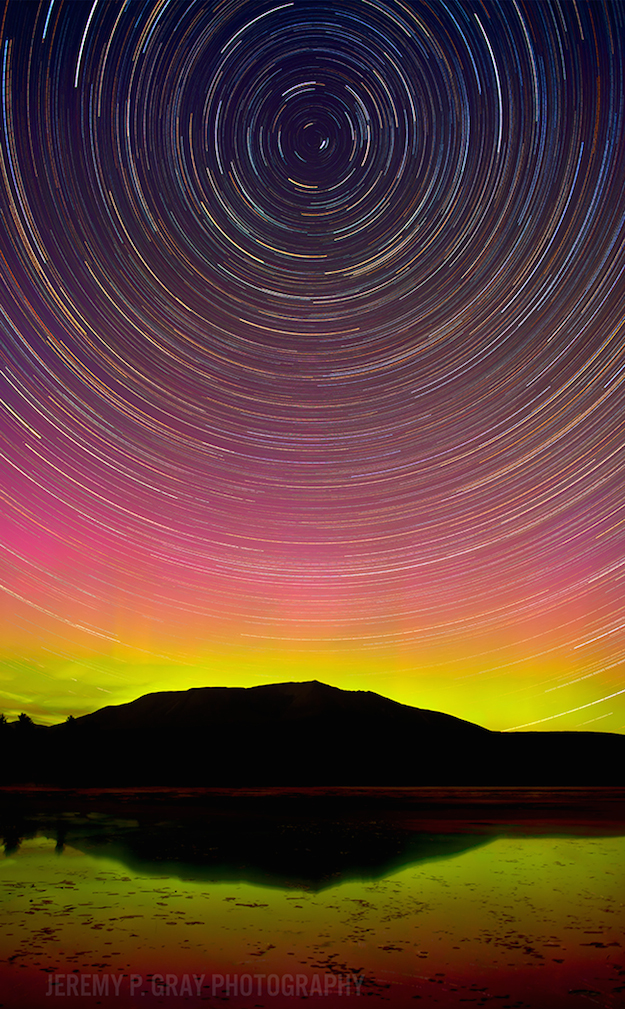
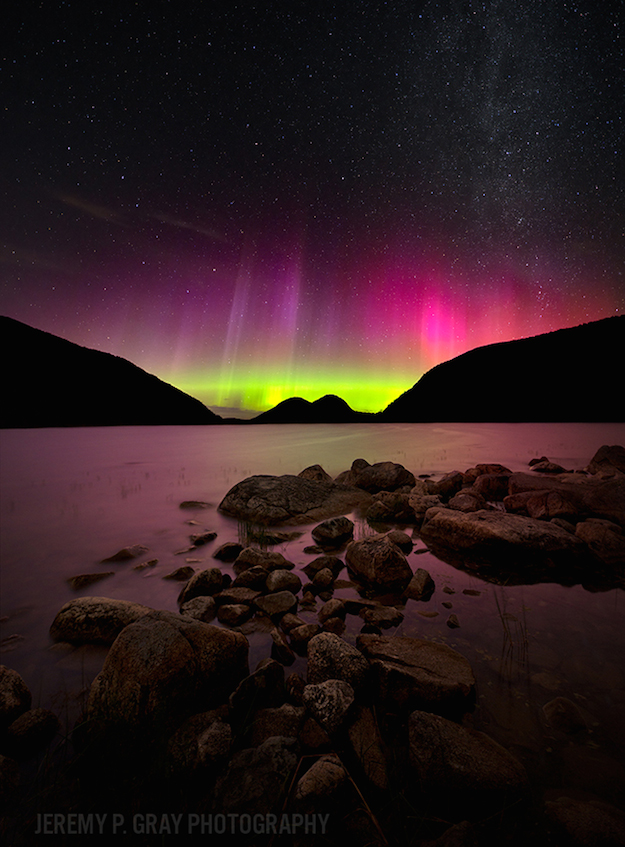
[All images copyright © Jeremy P. Gray Fine Art Photography]