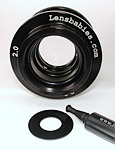
SELECTIVE FOCUS LENS
Lensbaby 2.0 -- More Than a Little Fun
 By MIKE PASINI
Editor
The Imaging Resource Digital Photography Newsletter
Review Date: August 2006
Whenever we're confronted with a profound philosophical question, we put our feet up (grateful not to be a centipede) and sigh audibly (and, we admit, repeatedly). We find this alerts the neighbors in sufficient time to avoid any awkward pleasantries.
The Lensbaby provided just such an occasion. After shooting with this peculiar lens over a period of several months, we stopped to ask ourselves just what it is we see when we look at things.
Speaking strictly for ourselves, when we cast our vision out upon the world, it focuses only on a small circle of attention. We don't, that is, take in the whole scene at once, but in bite-sized pieces as we scan over it.
We assemble those bite-sized pieces in our brain, comprehending the scene bit by bit. Often we rescan a particular piece of it to see if we really got it right.
All of that happens very rapidly, as if we had snapped a shutter and gotten the picture immediately. Unless we were out too late the night before.
So what if we were able to capture in an image not the whole scene in one gulp but just that initial impression? The moment when our attention was directed to some inspired or prominent point in the scene? What would that look like?
It would look like you shot it with a Lensbaby.
SELECTIVE FOCUS | Back to Contents
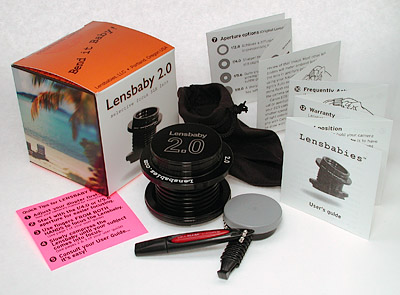
In the Box. The Lensbaby 2.0 is surrounded by (clockwise from the product box): a soft cloth carrying bag, accordian folded instruction sheet, aperture disc holder with aperture puller and complimentary Lenspen cleaner, plus pink Quick Tips.
The Lenbaby (http://www.lensbabies.com) focuses only on a small circle of the whole scene. Everything else smears toward the center of attention, where ever it's located in the frame. Brides, of course, love this. Birthday boys don't need convincing. And, when you think about it (with your feet up), it makes sense.
It's a "selective focus" lens for your dSLR, which means you can control how much and which part of the scene is in focus by squeezing the lens into its bellows extension. Fully extended, the Lensbaby focuses about 12 inches ahead. As you pull in and bend the flexible extension, you change focus and move the lens's sweet spot around.
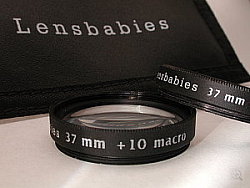
Macro Kit. The kit includes a +4 and +10 converter lens in a soft pouch. The lenses screw onto the front of the Lensbaby and can be stacked.
To increase the size of the sweet spot and its depth of field, you change aperture rings. These are nothing more than black magnetic washers. A complimentary mini Lenspen lifts the installed aperture ring out and you simply drop another in.
The lens itself is a coated, high refractive index, low dispersion, optical glass doublet that is about a 50mm equivalent focal length. A macro kit can focus as close as two to three inches away.
When we first tried it, we immediately found it fun to use, but we also immediately realized it takes some practice. It would be a great converter lens for a digicam (especially in Movie mode), but Lensbaby 2.0 is available only as dSLR lens.
SPECIFICATIONS | Back to Contents
Here are the details on the Lensbaby 2.0 itself:
- Construction: Coated, high refractive index, low dispersion optical glass doublet
- Focal Length: About 50mm
- Focus: Manual from about 12 inches to infinity
- Aperture: interchangeable aperture discs ranging over f2.0, f2.8, f4, f5.6 and f8
- Size/Weight: 2.25x2.5 inches (HxW) and 3.7 oz.
- Mount: Canon EOS/FD/EF, Nikon F, Pentax K, Konica Minolta Maxxum/Manual, Leica R, Olympus 4:3/OM, Contax/Yashica and screw mounts
- +4 Lens: Focus from 6 to 13 inches
- +10 Lens: Focus from 3.5 to 5 inches
- +4 on +10 Lenses: Focus from 2 to 3 inches
We tried the Lensbaby on both a Nikon FM2 film SLR and a Nikon D70s dSLR. It has sufficient coverage, even when manipulating its sweet spot to cover a full frame of 35mm film, as well as the smaller frame of the dSLR.
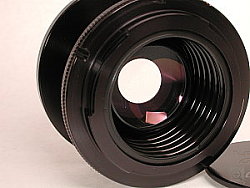
Rear View
USING THE LENS | Back to Contents
Mounting the lens is just like mounting any other SLR lens. But focusing a Lensbaby is unlike focusing any other lens.
The Lensbaby focuses about 12 inches in front of itself. That could prove embarrassing in many social situations, so it is actually mounted on a small (but stiff) bellows. When you compress the bellows, focus shifts further away. You can even get to infinity.
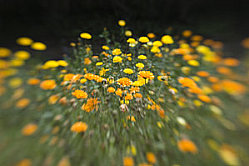
Typical Centered Effect
How you compress the bellows is not as tricky as it sounds, but it does take two hands. Or fingers. The longest finger on each hand collars the front ring of the lens and pulls in on one or both sides. There's plenty of resistance (so the lens stays aligned when not manipulated by hand), so you won't forget you are manually focusing. In fact, you're really manually focusing.
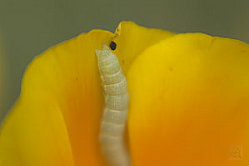
Macro Shot
That doesn't take a lot of practice, but the next trick takes some. Compressing the bellows straight back keeps the in-focus part the image in the center of the frame. But the bellows can compress asymmetrically. That allows you to move the in-focus part of the image around the frame.
Focus is the fun part of the game (even if it takes some practice). But changing apertures is part of the focusing game, too.
HOW TO CHANGE APERTURES | Back to Contents
The interchangeable aperture discs are held above the front glass element of the lens by three strong magnets. Drop a disc into the lens well and it snaps right into place without touching the glass. The three magnets actually create a magnetic shield that protects the lens.
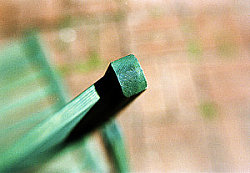
Off-Centered Effect
To remove a disc, Lensbaby includes a tool with a holder for the other discs and a plastic finger you insert into the hole on the disc to simply lift out the lens. They also include a small Lenspen to clean the lens.
METERING EXPOSURE | Back to Contents
No matter which disc you put in, it can't be adjusted so that leaves shutter speed alone to change exposure. Some dSLRs just won't meter exposure at all if they can't control everything, so you're reduced to evaluating the histogram after every shot. Life could be worse.
San Andreas Fault?
We found we needed some pretty fast shutter speeds to get a good histogram, often shooting over 1/1000 second in sunlight.
The company recommends you adjust your viewfinder diopter before using the Lensbaby. With an autofocus lens, that may be just a convenience. But with a manual, selective focus lens, it's a necessity. Make the adjustment using any lens but the Lensbaby, though.
If you practice with the f4 or f5.6 aperture discs, it will be easier to focus. These apertures have a greater depth of focus and larger sweet spot.
Slow and small adjustments to the bellows are more effective. You can easily move right past the focus point without realizing it. One trick worth remembering if you have trouble finding focus on close subjects is to lean in or out without changing the bellows.
Finding -- and holding -- focus is a problem, though. Researching this review, we were amused to see sample images from reviewers who had not spent much time mastering the bellows. All slightly, jarringly, out of focus. A successful selective focus image must have some circle of sharp focus. It isn't really relative. And hitting the sweet spot could be easier. It can be very shallow.
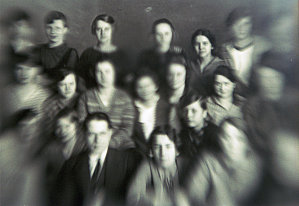
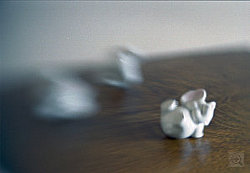
Focus!. It can be hard to hold focus on a close image with a narrow depth of field. Here what looked good in the viewfinder just didn't cut it.
The problem is that, even when you do find focus, it's hard to hold it. There's no detent that locks in the lens position, so you have to freeze your grip.
SOFTWARE ALTERNATIVE? | Back to Contents
So can you do this in software? Well, to some extent but not quite as dramatically as the Lensbaby.
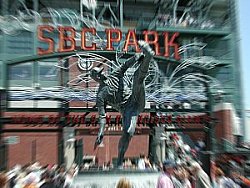
Zoom Radial Blur. This gives the effect of a zoom lens blur with Juan Marichal's face in focus.
Start with a sharp image. You're going to be introducing blur, so you want to have a sharp image to begin with.
Duplicate the image on a new layer. Then select one of your image editor's blur filters to run on the new layer. A Gaussian blur will blur the image uniformly to the degree you specify.
The next trick is to mask that layer so you can 1) reveal part of the sharp background image underneath it and 2) gradually fade the blur in.
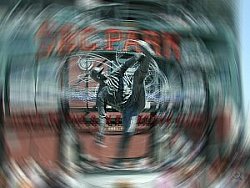
Spin Radial Blur. But use a Spin instead of Zoom and your radial blur delivers a different pitch.
In Photoshop, you simply click on the Layer Mask button at the bottom of the layers palette. In the Tool bar, try the Radial gradient and click the Transparency check box so it's active. You'll also want to switch the foreground color to Black and the background color to White (the opposite of what it normally is).
Contact Sheet. Our Lensbaby Contact Sheet collects the D70s shots and the FM2 shots (subsequently scanned) below them. The D70s shots were taken as Raw images and batch converted as JPEGs for this review, with no special attention taken to optimize them. All shots were manually exposed using a variety of aperture discs and macro converters.
Now just draw your mask by clicking at the center of the point you want focus to be sharpest and drawing straight out toward the edge of the image. The further you draw, the more subtle the gradient will be. If you draw a short line, your mask will move more abruptly from focused to unfocused.
The key to this is really the type of blur you select and how you adjust its parameters. These change the direction and distance the blur moves. You can also adjust the opacity of the layer to show more of the sharper image underneath.
A radial blur with a radial gradient will give the image a spin. A motion blur with a linear gradient in the direction of the motion blur will give a completely different effect.
Sure, it's a gadget lens but it's surprising how often it's just the right approach. Even with the macro kit, which we highly recommend, it isn't expensive. Unless you count the second camera body you'll inevitably want to acquire to keep it handy!