A BRIGHT IDEA
Pandigital Digital Photo Frames
Editor
The Imaging Resource Digital Photography Newsletter
Review Date: April 2007
Seems like a no-brainer. Frame an LCD with a card reader slapped on the back and -- presto! -- you've got a digital photo frame. The idea isn't new. Early attempts like those from Ceiva Logic in 1999 even featured a built-in modem to dial into online accounts and refresh the subject matter nightly.
But it's harder than it looks.
For one thing, these things just don't show 24-bit (full) color for some reason. They're all 16-bit. Thousands, not millions, of colors. And you can't calibrate those colors, either (except manually, which we'll explain below).
Then there's the problem of framed art in general. You have a print you love, you frame it and hang it. And it sits unaltered on the wall ready to engage your interest whenever you look its way. It's passive but constant.
A digital frame, however, has an On/Off switch. But why would you leave it on?
And that switch, of course, leads to a power supply, which is actually a power brick plugged into a wall socket. So you have this ugly cord to conceal. And why are they all black when so many walls are white?
A digital frame also has a number of viewing modes. It can certainly display a single image just like your framed print. But will that burn that image into the LCD?
And it can run a slide show of whatever images it finds either in its internal memory, an inserted memory card or even some online gallery. But how do you know what you've missed? Do you have to watch it like a television?
In fact, it's easier to think of a digital frame as a television than a frame. You'd never frame a portrait in a horizontal frame with big black bars inside the mat on the left and right sides. But you'd put up with that on a television.
But that's all theory and highly refined anxiety. Just the quibbles of a weary reviewer who has spent years staring down one LCD or another, expecting some spark of life to flicker before him.
What's it like to actually have one of these things?
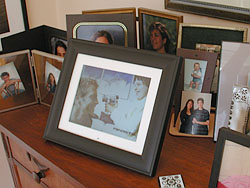
Black Wood Frame
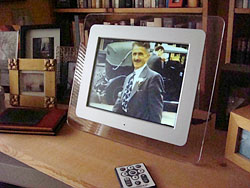
Clear Acrylic Frame
With the house quiet, we made a little space on the dresser topped with family photos and slipped Pandigital's 8-inch frame amongst them. We had a few recent pictures from the snow country on an SD card, so we put that in, fired it up and let the slide show run.
Then, noticing the time, we rattled some almonds into a dish, made a drink and turned on the television to catch the evening news.
"What's this?" we heard in a few minutes from a voice near the dresser. "Hey, that's Tahoe! Cool!" A breath or two later, "How did you do that?"
It is a little exciting to see your pictures flash by on what looks like an ordinary frame. No matter what quibbles weary reviewers have.
PANDIGITAL FRAMES | Back to Contents
Several companies are offering affordable digital frames now, among them Digital Foci, Digital Spectrum, Fidelity Electronics, Kodak, Pandigital, Smartparts and Westinghouse, all of which showed their wares at PMA 2007. Pandigital sent us a review unit before the show (where we met with them), on which this report is based. Smartparts, for its part, has developed simplified transfer software to copy images into its frame's internal memory. The company also offers telephone support.
While the hardware used by each of these companies seems to come from just a few sources, the software is home grown. Westinghouse, for example, can simultaneously display two images and, with its MosaicView technology, show three images on the screen at the same time. Fidelity is developing small format LCD frames to replace those family photos on your office credenza as well as larger ones designed to be used in store windows. And Digital Spectrum has a Vista-ready wireless frame that can display images in your My Pictures directory. Kodak's EasyShare digital picture frames also have wireless support and add PictBridge printing capability as well.
The Pandigital frames are based on a "personal media" (MP3 player) chipset rather than the DVD chipset designed for portable DVD players that is commonly used in other frames. The company says that provides faster image loading, music playback during a slide show, faster copying to internal memory and an easy-to-use menu interface. The frames are also quite affordable.
The frame can play JPEG stills and MPEG1 and MPEG4 movies shot by digicams. It can also play MP3s.
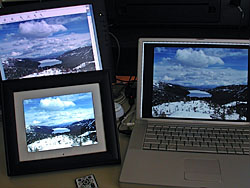
Comparison. The bright little frame (bottom left) is the Pandigital. A Sony SDM-S51 is behind it and an Apple PowerBook 15-inch TiBook on the right.
In Las Vegas, Pandigital President Dean Finnegan told us the company sold 520,000 frames in the last quarter of 2006. Seventy percent of the buyers were female and they bought an average of 1.8 frames, coming back for a second frame after the delight of experiencing the first. The frames are in 6,000 retail outlets including Macy's, Mervyn's, Office Depot, JC Penney, Linens 'N Things and more.
The small remote (whose battery lasts forever, Finnegan promised us) is shaped like a CompactFlash card so it can be stored in the CompactFlash slot, a neat idea.
We asked why the 8-inch frame we're reviewing is so bright compared to the LCD monitors connected to our computers (the nice LCD monitors, we should say). Finnegan explained that particular model (which can display millions of colors, we were told, but see below) doesn't use fluorescent lamps to illuminate the screen but backlit LEDs. And newer Pandigital frames will all use that technology.
In fact, the company is looking forward to updating the chipset in June with some exciting new options, which (as options) also keep the base price low. One is Wireless B/G connectivity. Another is a lithium-ion battery (so you can hang the thing on the wall and forego the power brick, except to recharge it). The chipset also supports a timer for turning the frame on and off at regular intervals. And supports more document formats so you can store recipes in the internal memory, bring it into the kitchen and cook with it. And it will allow the housing to be thinner.
We asked Finnegan how people use the things. Do they leave them on or only turn them on when they want to look at them? Do they use them like a real framed photo or more like a television?
Finnegan said you can really just leave them on. They use very little power, the LED backlight version consuming 25 percent less than conventional LCDs.
The company uses only A grade panels, he said, from the same source as Sony's LCD TVs. They have almost no returns.
Which surprised us because when we were researching the review, we Googled Pandigital and found some nasty comments on amazon.com. Finnegan knew all about that. He even knows who one of the posters is. But there's nothing he can do about, he said. Amazon told him to write his own reviews for it.
Even better, however, would be an independent review, we thought.
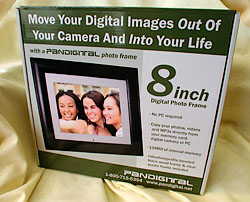
The Box. This is what you'll see on the shelf.
Pandigital sent us their 8-inch LCD digital photo frame with 800x600 pixels resolution and 128-MB internal memory retailing for under $200. A 6-inch model is available for $114.99. All Pandigital frames include a 90-day parts and labor warranty.
In the retail box was:
- The 8-inch frame
- a 9V, 2 amp power adapter
- a small remote control
- a USB cable
- an additional frame
- documentation (a User's Guide and a Quick-Start Guide)
INSTALLATION | Back to Contents
Installation was simple. Pandigital recommends you first plug in the sideways power brick (which doesn't block access to adjacent plugs).
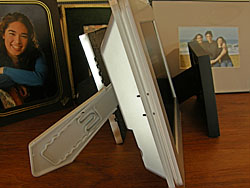
The Stand. It expands to be as long as the whatever frame you attach. The small dark arm attached to the frame slides into the notches on the lighter part of the stand.
Then insert a memory card in one of the four slots of the built-in card reader which supports Secure Digital, Multi Media Card, CompactFlash, xD Picture Card, Memory Stick, Memory Stick Pro, Memory Stick Pro Duo, Memory Stick Duo and USB flash drives.
There are three ways to mount the frame:
1) You can stand it up like an easel using the adjustable stand in the back. Unlike ordinary stands, however, this one can be pulled out past the corner of the LCD panel, to the corner of the actual frame, so the frame can be tilted back at the same angle as other frames.
2) You can hang it on the wall from the slot on the back.
3) You can screw it onto a tripod using the brass tripod mount on the bottom of the LCD.
You should also remove the plastic tab that protects the battery from the remote control.
That's all there is to it.
Then just turn on the Power switch to enter Slide Show mode automatically. The frame will find the images on your card and display them at random with a variety of transitions, all of which you can configure from the Setup menu.
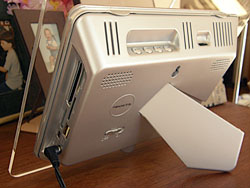
Rear View. The stand makes for quite a steep angle. The On/Off switch is just below the circle to the left of the stand.
Meanwhile, you can see what's on the card by pressing Exit button on the little remote control. That shows you thumbnails you can navigate with the arrow keys. The Enter key will display the selected image.
The 8-inch frame displays an image in a 6.25x4.75-inch area. The LCD is mounted behind a normal (but rather poorly cut) single off-white mat board which is mounted under glass. A small hole in the middle of the bottom edge of the mat exposes the remote receiver. The black molded wood frame is beaded like traditional framing material while the clear acrylic frame is flat.
Landscape images fill the frame but portraits have black bars on the side. The remote does provide a Zoom function to enlarge the images.
There are a number of physical controls on the unit behind the frame but mostly you use the small remote control.

The Remote. The small dot on the frame itself is the sensor. If you make your own mat, you'll have to drill a small hole for it.
Remote Control. The thin plastic remote includes a four-way navigator with an Enter key in the middle. Above it to the left is the Exit key and to the right is the Setup key. Directly below it is a Rotate key bordered to the left by a Slide Show/Zoom key and to the right by the +/- Volume key. A small battery door slides out from the back to reveal the battery with the help of a little tool of some kind. You can store the remote control in the CompactFlash slot of the card reader built into the frame.
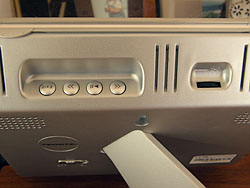
Buttons. The unit has a small set of buttons on the top panel of the LCD. Back, Play/Pause, Forward and Exit sit in the right well together while in the left well there's a Brightness control dial.
In addition to the four slots of the 6-in-1 card reader and the power adapter port, there are two USB ports. The standard USB port connects to either a thumb drive or your computer or camera via the included USB cable. There's also a mini USB port for a direct connection to your digicam.
Buttons. Not really necessary.
The back panel has the adjustable stand and two speakers near the top. The bottom vented panel includes a tripod mount.
DISPLAY QUALITY | Back to Contents
Pandigital told us the LCD was "capable" of showing 16 million colors (24-bit color), but our experience suggests it is only showing thousands of colors (16-bit), like every other digital frame out there.
You may not notice the difference -- and you may not care if you do. It isn't a deal breaker. But here's how we could tell. We had a shot of two of our nephews at the top of one of the highest hills in San Francisco and we'd framed it to include a lot of sky because the moon was just overhead. On our computer LCD monitor, the blue of the sky was smoothly graduated into darker tones as it climbed toward the moon. But on the frame that same blue was posterized into steps. The frame simply couldn't display as many colors as the LCD on our computer.
You can't eliminate this problem, but you can minimize it if you spend a little time with the frame's setup options. In fact, we recommend you do this anyway to get the best possible display you can.
SETUP FUNCTIONS | Back to Contents
Pressing the Setup button on the remote displays a column of text commands (in IBM PC type) that include:
- Slide Show Effect: Select a transition style among the these options: Off, Fade, Shutter, Cross Comb, Mask, Brick, Dissolve and Random.
- Slide Show Speed: Options include 3, 4, 10, 30 and 60 seconds per image.
- Slide Show Shuffle: Toggles whether the display order is random.
- Music Repeat: Sets whether the selected music file repeats continuously, all of them do or none of them.
- Video Repeat: Sets whether the selected video file repeats continuously, all of them do or none of them.
These are followed by a set of interactive commands.
- Start Slide Show: Immediately begins the slide show.
- Zoom: Zoom in on the displayed image.
- Rotate: Rotate the displayed image counter clockwise 90 degrees.
- Copy File: Copy files from the flash card to internal memory.
- Delete File: Delete the selected files from internal memory.
And those are followed by some maintenance functions:
- Reset Settings: Restore default values to all settings.
- Language: Choose between English, Italian, German, French, Spanish, Dutch and Portugese.
- Brightness/Contrast: Adjusts brightness and contrast.
- Color/Tint: Adjusts color saturation and color temperature.
MAKING ADJUSTMENTS | Back to Contents
The last two commands on the Setup menu are the important ones. You can run them at any time. So if a particular image looks off to you, just call up the Setup menu and select one of these commands to improve the display.
Brightness/Contrast displays two sliders in the lower right corner. You use the four arrow keys to make adjustments (up and down for one slider, left and right for the other).
On the left, running up and down, is the Contrast slider. Moving it up (in discrete steps) increases contrast and moving it down decreases contrast. We decreased contrast on the review unit.
On the right, running left to right, is the Brightness slider. There is a Brightness dial on the back of the unit, and we had it all the way up. But still there was more brightness hidden in the slider. We cranked it all the way up.
That helped the posterization in our sky, but it didn't eliminate it.
The next trick was to adjust the color using the Color/Tint option. Again, two sliders were displayed in the lower left corner.
Color, running up and down, changes the saturation. Even all the way down, there's still some color (not a black and white image).
Tint let us adjust the color temperature, either cooler or warmer. We adjusted it so our skin tones (particularly faces) looked more natural.
Those two steps will "calibrate" your LCD, showing as much detail in the shadows as possible with the most natural skin tones.
LOADING IMAGES | Back to Contents
The frame can display images stored in its internal memory, from a card inserted in its 6-in-1 card reader, from a device (like a USB thumbdrive) attached to one USB port or even a camera attached to the other USB port. We loaded a set of images onto a USB thumbdrive's root directory and they displayed just fine from the frame's USB port.
You can move images into the frame's internal memory from any of those sources, as well as directly from your computer. But before you do, you might take the trouble to resize them on your computer to no more than 800x600 pixels, which is the maximum size the frame displays. If you do that, you'll be able to fit the maximum number of images the frame's 128-MB of internal memory can hold.
You can move images from your cards or USB thumbdrive to the frame's internal memory using the Setup menu's Copy command. You can also delete files from internal memory that way.
But it's a lot easier to plug the frame into your computer, using the supplied USB cable and copy or delete images that way. Make sure both devices are on before connecting the cable, forcing the computer to recognize the frame as a removable drive. The frame's screen will highlight Internal Memory among the sources.
The frame ships with 12 default images that play if nothing's in the card reader. The first thing we did was copy them to a folder on our hard drive and delete them from internal memory.
The second thing we did was resize a folder of images to no more than 800x600 (taking our own advice) and copying them to internal memory using nothing more than drag-and-drop simplicity. The resized images took about a second each to move over. We used about 5.3-MB of the 124-MB total to store 28 images that ranged in size from 90K to 225K. Your mileage should not vary.
When the copy had completed, we unmounted the removable device.
While our Kodak movies couldn't be played (because only Kodak devices play Kodak movies, folks), we had more success with movies captured with a Sony DSC-T100.
We switched into Video mode on the frame and ran several movies captured at 640x480 and 320x240 directly off a Memory Stick Duo. None ran well, so we copied a standard quality 640x480 movie to internal memory. There it ran better, but still skipped frames. Sound wasn't broken up, however.
In short, not a great way to watch your digicam movies. They seem to play more as slide shows.
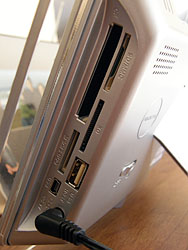
Card Reader. It handles quite a few formats and USB thumbdrives, too.
CARD READER | Back to Contents
The device does function as a card reader. Considering the wide array of formats it supports (SD/MMC, CompactFlash, Memory Stick/PRO, Memory Stick/PRO Duo, xD Picture Card), that's good news. It was a little difficult getting it to sync with an Apple PowerBook until we removed the USB hub, though.
We followed protocol by inserting a Memory Stick Duo in the frame with power off but the USB cable connected. When we turned on the frame, it appeared on the Mac desktop as two volumes, one representing internal memory and the other representing the Memory Stick Duo.
We unmounted the card, removed it from the frame, and then popped it back in again. And it mounted as we would have expected. So, yes, the frame does function as a card reader, too.
CHANGING FRAMES | Back to Contents
The black molded wood frame, installed at the factory, can be swapped with a clear acrylic frame.
To exchange the frames, turn the frame on its face and remove the two large screws from opposite corners of the wood frame. Then just lift out the gray LCD screen.
Install the acrylic frame by slipping it on from the back until it meets the front bezel on the gray LCD. It snaps into place, no screws required.
It's a little narrower than the wood frame, so the angle is less severe when you stand it up. But we propped up the easel back anyway to get an angle similar to our other frames.
With 2006 sales exploding 300 to 400 percent over 2005 for some manufacturers, digital picture frames are one hot ticket. But a lot of these sales were driven by holiday gift giving. And who looks a gift horse in the mouth?
Well, we do.
We looked at so many of them at PMA recently that we began to wonder if there was really any difference between them. While they are all easy to use if you pop a card into them, things get a little stickier if you want to copy the images or use the frame as a card reader. The firmware just isn't very sophisticated.
Even as frames we find them a bit difficult to place. No, we don't like leaving electronic devices on when we leave the house. But we don't like looking at black screens in frames either. A timer sounds like a good idea, but it all reminds us of the early days of word processing on personal computers when we wished someone had invented the pencil.
Still, after we calibrated the display by eye and copied some images from 2005 to it, we enjoyed the show. And we were a bit surprised to see the images rendered better than some of our prints. These frames may only display 16-bit color, but that can be good enough most of the time.
Pandigital's 8.0-inch frame is a bargain that can perform a lot of useful tricks, too. And the choice of frames is quite versatile, fitting into a more traditional room design with its black wood frame or a trendy loft with its clear acrylic frame. By June (another holiday season), the company promises even more tricks (like timers, battery power and WiFi) -- all of which strike us as good ideas. Pandigital is keen on keeping the price down and getting the product on the shelves we all walk by, too. What else could you possibly ask for?