Touch Screen, Clock, Calendar, WiFi
Pandigital PanTouch Frame -- New Dimensions
Editor
The Imaging Resource Digital Photography Newsletter
Review Date: May 2008
Pandigital (http://www.pandigital.net) isn't a very familiar brand name but its digital picture frames are among the best in the business. That's because the company doesn't just put its logo on a generic frame like a few hundred other companies with unfamiliar names. It engineers useful features into them.
You could say much the same about Kodak's frames and even Westinghouse's frames with their mosaic display (multiple images at one time in the frame). But, familiar brand or not, Pandigital is among the more widely distributed.
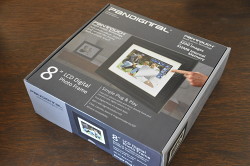
The Box. The big '8' tells you it's an eight-inch frame. And that's just the beginning of the story.
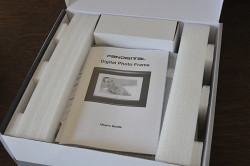
Inside the Box. Very nicely packed, if you're worried about shipping.
Whenever we have a Pandigital frame here for review, they're an instant hit with visitors. And when they ask where they can find one for themselves, we just say, "Everywhere." Because you can find them at Macy's, Target, Bed Bath & Byond, Costco, Wal-Mart, Staples, JC Penney, Office Depot, Sears, Fry's, Sam's Club, Meijer, Mervyn's, Long's Drugs, QVC, Circuit City and even more (http://www.pandigital.net/wheretobuy.html).
For the last few weeks we've had a $170 8-inch PanTouch frame here, which will is available now at Sears and Wal-Mart. It features a backlit LED screen with a 4:3 aspect ratio (common to digicams and preferred for portraits), 512-MB of internal memory to hold about 3,200 800x600-pixel images (if resized to the frame's dimensions). You can load images through the 6-in-1 built-in card reader and the standard or mini USB 2.0 Hi-Speed port (for thumbdrives, cameras or direct connection to a computer). The stand is adjustable but only one frame, a black one, comes with this product.
USEFUL FEATURES | Back to Contents
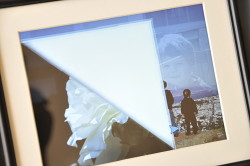
The PanTouch series of frames features one big advance over previous Pandigital frames: a patent-pending touch sensor that is sensitive enough to work behind multiple surfaces.
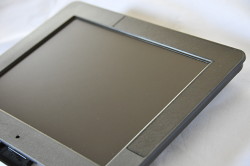
PanTouch Revealed. We took the frame off to show you the touch sensitive top right corner.
Pandigital has deployed this technology to provide a new interface to the frame's capabilities while keeping the display area of the screen itself clean. All the touching occurs on the glass covering the mat, not the picture. But the picture area does display soft buttons that it's hard to avoid tapping the icons instead of the mat above them at first.
On the frame we tested, the sensitive areas were along the top of the frame and along the right side, converging in that top right corner. The frame recognizes two gestures. You can tap to click or slide a finger for slider controls.
Top Rear. A few basic control buttons (Forward, Back, Enter, Exit, Setup) sit on the top panel just above the two stereo speaker grills. Not the extended stand, too.
The touch controls are designed to substitute for most of the remote control functions, which are disabled when the touch controls are active. After about three seconds of inactivity, the touch control icons fade away. You can activate the touch controls any time just by touching the top right corner of the mat, which is the Home button.
This frame sports some much-appreciated new features beyond the touch sensor, though.
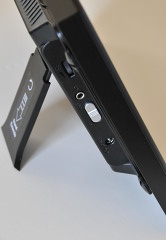
Power Side. Volume dial, Audio out, Power switch, AC port.
We particularly applauded the inclusion of programmable on/off times (and hence a clock). The frame also includes calendar and alarm clock functions. Calendar mode not only displays the month but runs a slide show, too.
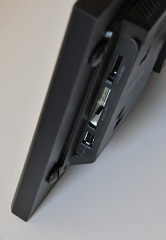
Data Side. Two slots for cards above the USB port. Pretty tight fit for an SD card, though.
The frame can play mp3-encoded but not iTunes-compatible music (with or without images) through its built-in stereo speakers or its audio-out port to your speaker system. And it can play video you take with your camera, too. As long as it takes AVI or MPEG movies.
Also among the new tricks is some intelligence. The frame can resize and compress images as they are copied to it so you can store more photos in the frame's 512-MB available memory. If you like to zoom in to see more detail, this may not be a great idea, but otherwise, it's a big help. And images stored on the frame and rotated to the proper orientation will be saved that way for future viewing.
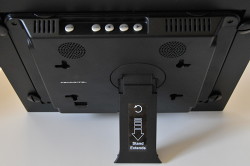
Bottom. Big thumbscrew holds the frame on. Note the mini-USB port and the plastic tab you have to remove to keep the clock ticking.
If you've got a WiFi adapter, you can also connect the frame to your wireless home network to tap into Picasa, specifically. We didn't have one around to test that feature, alas. That's unfortunate, because this feature addresses one of the dirty little secrets about digital frames. The company said their own adapter will be available from Gateway, Best Buy and directly from its site later this month.
DIRTY SECRETS | Back to Contents
Like any other digital frame, the PanTouch series suffers from a few issues common to the species.
For one thing, these things just don't show 24-bit (full) color for some reason. They're all 16-bit. Thousands, not millions, of colors. And you can't calibrate those colors, either (except manually, which we'll explain below).
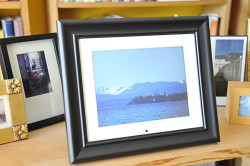
Fits Right In. But it can hold 3,200 images, unlike the other frames behind it.
Then there's the problem of framed art in general. You have a print you love, you frame it and hang it. And it sits unaltered on the wall ready to engage your interest whenever you look its way. It's passive but constant.
A digital frame, however, has an On/Off switch. But why would you leave it on? And that switch, of course, leads to a power supply, which is actually a power brick plugged into a wall socket. So you have this ugly cord to conceal. And why are they all black when so many walls are white?

View Mode Options. Press Setup on the remote and you can Rotate, Zoom, Copy, Delete, Show the time/date stamp, Adjust the LCD color, Enable the clock display, Activate the schedule.
A digital frame also has a number of viewing modes. It can certainly display a single image just like your framed print. But will that burn that image into the LCD?
And it can run a slide show of whatever images it finds either in its internal memory, an inserted memory card or even some online gallery. But how do you know what you've missed? Do you have to watch it like a television?
Remote Setup. Press the remote Setup button to see the remote version of System setup.
In fact, it's easier to think of a digital frame as a television than a frame. You'd never frame a portrait in a horizontal frame with big black bars inside the mat on the left and right sides. But you'd put up with that on a television.
And that is pretty much what Ron Glaz, IDC director of Digital Imagine Solutions and Services, described as the preferred way to view images at home during his presentation on digital frames at PMA earlier this year.
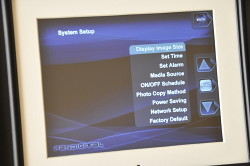
PanTouch Setup. Tap the corner of the mat to see the PanTouch version of System setup.
Citing the big challenge as stimulating users "to release photos from the PC," he acknowledged that digital frames are a popular and inexpensive way to view your growing image collection. People paid a mean price of $75 some time after acquiring a camera (not at the same time) but 38 percent didn't know what brand they'd bought. Card slots and battery power (to hide that cord) were the top deal makers.
But Glaz pointed out the last dirty little secret we'll reveal. If you don't refresh content on the frame, it gets old quickly. That's where the home network and HDTV displays come in. With the network connection cooking, updating content isn't a big deal. Ask anyone with an Apple TV.
But while you're waiting for that home network to be built, these little frames sure are a crowd pleaser.
Contents. The frame, remote, AC adapter, USB cable and documentation are almost all you need (a few photos help). An overlay shows you where the blue icons will appear in the display area and where you should tap on the mat to activate them.
Packed in the box are:
- the 8-inch Pandigital PanTouch frame
- AC power adapter with a five-foot reach
- Remote control
- USB cable
- Quick Start Guide
- User Guide
- Warranty Card
The frame can be replaced by unscrewing four large screws on the back. Pandigital does have various styles available, although no alternate frame ships with this model.
Another accessory worth considering is a WiFi adapter if you use Picasa. Of course, Picasa is free, so it might be worth setting up an account just to refresh the frame content -- particularly if you're buying this for someone else.
PHYSICAL SETUP | Back to Contents
Setup is quick and quite easy.
There are a couple of plastic tapes that should be pulled to allow installed batteries to make contact. One is in the small remote control. The other is in the frame itself. This provides battery backup to the clock.
Main power is delivered from your wall through the included AC adapter with a five foot reach. Where you place the frame has to take that requirement into account.
Once connected to a power source, you can turn the frame on using the Power button on the side. The frame automatically starts a slide show of the included images. Pandigital populates the frame with a set of photos you'll no doubt want to dispense with after proving the thing works.
The easiest way to start viewing your own images is to slip a card into the card reader on the opposite side of the frame from the Power button.
You can also attach a thumbdrive to the USB port just below the card reader. That port also functions for direct camera connections (using the USB cable that came with the camera and with the camera set to behave like a USB host) or to connect a computer to the frame. A mini-USB port is also available. Images can be imported to the frame through these connections.
A computer isn't necessary to use the frame, but it does make managing the content a lot easier. The frame appears to your computer like a removable disk, otherwise known as a USB mass storage device. You can delete content, move it around and copy files back and forth. There are three folders on the frame to start with: photo, video and audio. Load your respective media there so the frame can find it.
The review unit mat has a small hold for the infrared remote sensor that you won't see on your frame. It isn't necessary.
SOFTWARE SETUP | Back to Contents
To setup the frame's behavior, visit the context sensitive Setup menu by pressing the Setup button.
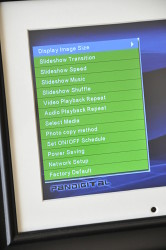
System Setup. The main setup mode allows you to:
- Configure the image size (Original Size or Size to Fit)
- Set the time (both Date and Time)
- Set an alarm (Time, Frequency and Tone or Music)
- Select a media source (Internal memory, CF-Card, SD/MMC, xD-Card, MemoryStick/MemoryStick Duo, USB)
- Set the on/off schedule (without activating it, however)
- Set a photo copy method (Optimized or Non-optmized)
- Set power saving options (2, 4, 8 Hours or None)
- Enter your network settings (SSID, Security, IP Address, Search for Network, Connect)
- Restore the factory default settings
These are pretty self-explanatory, except for the Network settings. Even though we didn't have a WiFi adapter to test this feature, we did go through the setup. A screen-based keyboard is displayed to use PanTouch technology to enter your router's name (SSID). You use the same keyboard to enter your network password after describing the type of security in use (WEP, WPA). We left IP Address dynamic because our router assigns an address.
Viewing Setup. Pressing the Setup button when an image is displayed presents the Viewing Setup menu. From this menu, you can:
- Rotate the photo (orientation is remembered)
- Zoom photo (if your image size exceeds the frame's 800x600 displayable size, you can see more detail by zooming in; to return to full screen, just keep pressing Zoom)
- Copy photo (a card or computer connection must be active to enable this choice)
- Delete photo
- Photo/Date timestamp (On or Off)
- Adjust LCD Color (Brightness, Contrast, Tint, Color)
- Enable Clock Display
- Start Schedued On/Off (ah, there it is)
These options use a fly out menu but the color scheme is less than clear. Unavailable options appear on a gray background, available ones on a green background and the selected one on a blue background. Fortunately a box to the right of the background indicates which setting is active.
USING THE FRAME| Back to Contents
When you turn on the frame, a signon screen is displayed for a few seconds. Then a slideshow starts, with music if available. The time is displayed in the top left corner, too, if that viewing option is enabled.
But you can set the frame to behave in several different modes:
- Besides, the slide show, it can also display just a single image while still allowing you to manually navigate to other images. You can also select just a few images of those stored on the frame for display. And you can set duration and transitions.
- It can display a desktop calendar with a slide show in one part of the screen. And it can sound an alarm for you too.
- It can play AVI or MPEG videos copied to its video folder.
- It can turn itself on or off on schedule.
To set these various behaviors, you exit the current display mode and visit a setup menu. Which setup menu is displayed depends on which mode you were in. And to get into a different mode, just visit the Home screen.
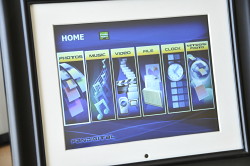
Home Screen. Access the various modes here: Photos, Music, Video, File system, Clock, Network Photos.
Home Screen. The Home screen displays six options: Photo, Music, Video, File, Clock and Network Photo.
These options let you manage each of these assets on the frame. Photos brings up the Photo Screen, Music lists your mp3 files, Video lists your AVI movies, File shows the file system with its photos, video and audio folders, Clock shows the clock, calendar and alarm functions and Network Photo plays images from your Picasa account.
Photo Screen. This screen displays thumbnails of all the images available for display on the storage medium selected. You can navigate to a single image to display and select images for display or deletion.
Touch Navigation. Under attach by a couple of Ninjas, we swipe them away with a finger.
Page Animation. The screen flips a page when you swipe to navigate.
When a single image is displayed, you can slide your finger across the top right corner of the mat to display the next or previous image. It depends on which way you slide. A page-turning animation indicates the direction of the slide.
Slide Shows. When you first turn on the frame, it starts up in Slide Show mode but you can start a slide show using the button on the remote or any of the PanTouch slide show buttons. You might, for example, only want to see a selection of images. You select those images from the thumbnail screen and then run the slide show.
To change how long an image appears and the transition between images, select the slide show Setup option either on the remote or the frame. You can also select any mp3 files stored in the audio folder of the frame to play during the slide show. The frame does not support mp3 files purchased from "licensed music download services," however. Pressing the Enter button on the remote mutes the music.
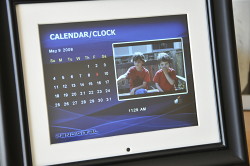
Calendar/Clock. The desktop calendar function also displays a slide show.
Options. And has its own set of options: Set clock, Set alarm, Activate schedule.
Clock/Calendar. With a built-in clock, this frame can behave like a desktop calendar -- with a slide show.
Adjustments. We tried to optimize the display by making it brighter and increasing the contrast. By default these are set to middle values. But we really didn't improve on the default.
That's not to say we were satisfied with the default, however. It wasn't bad -- and certainly none of our visitors was bothered by it -- but we found it a little less rich than our usual viewing experience.
Loading Images. There are several ways to load the frame with images. You can plug in a memory card or thumbdrive. You can cable a camera or a computer. The frame will switch to that device from its internal memory. Setup mode will then let you copy any displayed image to internal memory, resizing it to a maximum of 600 pixels deep or 800 pixels wide if you haven't disabled that feature.
If you've cable the frame to your computer, you can simply drag and drop folders and images to it.
Movies. Movie playback works well but control is pretty rudimentary. From the Home screen, select Video mode to see what video is available. Some files listed in File mode may not be compatible.
Select the movie file and press the Enter button on the remote or the Play PanTouch area. The Exit button stops playback and you can also control sound volume with the Plus and Minus keys. But there is no Pause or Fast Forward or Rewind commands.
Playing video from a card or thumbdrive can degrade the playback quality if the medium isn't fast enough to keep up. But you can also copy the movie file to the frame's internal memory to solve that problem.
Not all movie formats are supported. We played AVI and some MPG files without an issue. Everything that played, however, was displayed full-screen.
Card Reader. One unfortunate issue with the card reader is that, while you can easily insert a card, it's very difficult to get the card back out of the slot. That's because you have to grab it not by the top and bottom but by the thin sides. With SD cards, very little protrudes so grabbing the card can be challenging. The slots are just too close to the back of the frame.
Timer. The timer function that can turn the frame on and off on schedule (a different one for weekdays and weekends), is a bit tricky.
You use the System Setup screen to set the schedule but you have to activate the timer in whatever mode you use the frame. So if you use Slide Show mode, you have to activate the timer there. And if you use the frame in Calendar mode, you have to activate it there.
But any "user operation" like pressing a button on the remote or swapping memory cards cancels the activation.
You can also set an alarm from the System Setup menu. In addition to setting the time for the alarm to activate, you can set the frequency (off, once or daily) and the tone (default beep or your mp3 files).
We had a few vibrations on the old Quibble meter when we plugged this frame into it.
The first is viewing angle. Unlike an HDTV with an LCD, you don't get a very wide viewing angle with this frame.
Timer activation is a bit too fragile for us. You set on/off times for weekdays and weekends but you have to activate them in the View or Calendar mode and you can't touch the remote or pop in a card after that. If we set a schedule, we expect it to be honored. Period.
We also had some difficulty pressing the stiff buttons on the remote control. You get used to that, certainly, but what we'd give for a remote that had soft-touch buttons. We could also use a repeat function, so when you do finally hold the button down, the control continues to do what you want.
The power adapter has a five-foot reach, which may seem generous for table-top use but if you're planning to place the frame on a dresser, it can be a bit of stretch. You may need to plug it into an extension cord to place the frame where you want it.
The more we used the frame, the more we liked it. Slide shows replaced the pass-the-camera around routine after an event but the Movie mode was even more compelling. We could download video from some relative's blog and share it on the Pandigital frame. Even the Calendar mode amused us for a while.
But we preferred the remote to the touch screen and looking at a single still didn't seem to make much use of the frame. It wants an audience. Maybe that's what our visitors really liked about it. There was something to see on the screen.