HOME BOOKBINDING
PhotoBook Creator
Puts It All Together
By MIKE PASINI
Editor
The Imaging Resource Digital Photography Newsletter
Review Date: August 2009
A few Newsletters issues back, we recounted our experience printing a book of images to celebrate a baptism. As we said then:
"So we wanted control over production, too. And that meant using the inkjet to print the book, binding it in a stiff presentation cover using some sort of ribbon and a hole puncher. It sounds primitive, but it actually works out very nicely. You punch two holes next to each other at the top of one side of the sheet and another set at the bottom and use two thick ribbons tied in a bow to bind the pages."
That prompted a letter in the next issue about using an online service, which was not something we were inclined to do. But in our reply, we said, "We have just requested a Unibind system for review, though, that might make the binding process a bit less crafty. We'll let you know!"
We are here to let you know.
We got our hands on the $125.99 Unibind PhotoBook Creator, a resin steelbinding system made in Belgium by Peleman Industries.

PhotoBook Creator. The oval base with metal heat unit and two plastic wings holds a cover.
The system consists of two parts:
• a 16.5x8.5x3-inch Book Creator that plugs into a 3-prong outlet
• variously-sized hardback book covers, one of which is included
There is a third part to the system but it isn't part of the binding itself. That's the software you use to lay out and print a book. Unibind provides My Photo Books, an 82-MB cross-platform application that does the job simply enough. Simply register your PhotoBook Creator and download the application, which runs on Windows 98SE/ME/2000/XP/Vista and Mac OS X.
If you read our previous stories, you know we prefer using Apple's Pages for this sort of thing. It's fun and easy to make changes, although someone should probably write a nice book about it for people who haven't spent years of their lives pushing Quark XPress up the hill or Adobe InDesign in circles.


Papers. Print on anything you like. Uncoated (top) and coated papers, too.
You can use any kind of paper you like, print on one or both sides, in any size sheet you can find a Unibind cover for. There are covers in all sorts of sizes and shapes. And, no, you can't make your own covers. They have to have a little resin and a steel spine.
A 90-day manufacturer warranty is included.
ABOUT THE COMPANY | Back to Contents
Peleman Industries Inc., a privately held manufacturer of binding, laminating and presentation products was founded in 1939. Headquartered in Puurs, Belgium, the company opened its U.S. corporate office in Alpharetta in 1999. Unibind products are distributed on six continents in more than 120 countries.
The company's binding products are the result of over 30 years of research and development of unique binding technologies including resin steelbinding, punch steelbinding and staple steelbinding systems.
Based in Alpharetta, Ga., Unibind Inc. is the North American arm of Peleman Industries. The Unibind PhotoBook is the company's first product designed specifically for individual users rather than businesses.
THE PROCESS | Back to Contents
Creating your book is actually the hard part, as it should be. But once you've printed something you want to bind, Unibind makes binding the simple part.
Installing the PhotoBook Creator isn't much work. You take it out of the box and remove the metal washer on the magnetic strip that forms the bed on the unit. It's there to secure the magnet during shipping.

Resin Binding. No mess, no fuss, the resin sits in the slotted spin of the cover.
With the washer removed, just plug in the PhotoBook Creator. You do need a three-prong outlet and you should not try to circumvent that requirement even though the unit draws only 1.5 amps and 175 watts.
Next, grab a Unibind hardback cover and open it up. Tap your printouts into alignment and slip them into the cover. Make sure they stayed in alignment and that there's an even border all around the book cover.


In Action. The red light (top) indicates the heating element is hot and the green light means it's cooling down.
Some reviewers confessed that they bound the pages together with a paper clip or put a rubber band around the cover to keep everything together. But we found this really wasn't necessary and can prevent a good seal between the resin and the pages. Let gravity pull the sheets into the resin.
Then just drop the book, spine down, into the PhotoBook Creator. Don't hold it, let it sit there.
There's no Power switch but the magnetic switch in the unit is activated by the steel binding in the cover. As soon as it does, the unit's light comes on in red to confirm the binding cycle is in progress. Which means the resin is being heated up and the paper pages of your book are gradually sinking into it.
While the unit doesn't get hot enough to scorch the linen cover, we had no more inclination to touch it than to test a hot iron. We did hover over it and found it was quite warm if not scorching.
After just about 90 seconds, the light will turn green indicating the unit is cooling down and the resin is hardening, sealing the pages into the cover. Let the book sit in the unit with the green light for at least two minutes before you remove it. Green doesn't mean the book is done. It just means it has stopped warming the resin and is letting it cool. Be sure to let it cool completely.
When you do remove it, you've got a very nicely bound book.
If you don't have a very nicely bound book, just drop it back into the unit, reheat, remove the pages and try again. Our first attempt came out perfectly, so we didn't have to bother. It's really very easy.
But because you can undo the binding as easily as you set it, it's perfect for projects that require some revision (like everything we do around here).
OUR PROJECT | Back to Contents
We actually did use the product to bind a book we made. Joyce had taken her digicam home to visit the family for a week (furloughs are good for something) and returned with a card full of images. She took a jet lag-inspired nap and we grabbed the card from her camera.

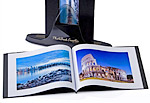
Our Album. Piece of cake.
There were a batch of photos from two parties that cried out to be printed. And they cried out to be printed in groups of two or three.
Pages made that easy. Just drag the images to the page. Apply a photo border (with a nice shadow smart enough to modify itself if it falls over another border) and give it a little rotation as if you just dropped the image on the page. Crop as necessary. We even optimized a few of the images a bit.
We had selected a landscape cover so we laid the pages out that way, which made sense in an irrefutable way. For the cover, which had a landscape cutout, we simply put one signature image (a rainbow over Lake George in New York) on the page large enough to cover the cutout and added a little type over the image to mark the occasion. You know, a title page.
It's hard to convey how much fun it is to work in Pages. We really liked not only what we'd done but how we did it. And Joyce was still snoozing.
We printed the book on 10 pages of plain but high quality paper. That took longer than we liked, but it always does. When the sheets were out of the printer, we jogged them together, flipped through them to make sure we had them in the right order and slipped them into the Unibind cover.
We checked to make sure that we had centered them on the binding and that the cover window showed our signature image properly. Oops, it didn't. We'd rotated that image and it had the horizon in it, so it looked crooked. We quickly went back into Pages, straightened the image and reprinted it. When we replaced the page, all was well.
We plugged in the PhotoBook Creater and dropped the assembled book into the unit. The light turned red, warmed the resin for a couple of minutes and then turned green. When the cover was cool to the touch, we removed it from the unit and flipped through the pages.
It seemed like the only thing to do was put it on the coffee table, so we did. When Joyce woke up from her nap, she thought she was still dreaming. A book of her trip! Her favorite pictures! Everyone will want one, she said.
You're dreaming, we pointed out.
Online companies selling the unit include Adorama, the Digital Scrapbook Place, Samy's and Target. It's cheaper to buy the kit with the unit at Adorama or Samy's, where it's $99.95, than at Digital Scrapbook Place, where it's $125.99. Even cheaper is Target's $69.99 online price. But there are a number of kits available with different combinations of books and paper, so be sure to read the product description when ordering.
There are a wide variety of covers made for the unit but you'll have to hunt them down. Sizes include lettersize, 8x10, 5x7, 4x6, 12x12 and 8x8. All of those come in black or white linen. Lettersize covers come in metallic blue, metallic silver, metallic pink and several leathers. Spine sizes also vary with 5x7 and 4x6 covers in 3mm or 5mm sizes and everything else in 3, 5, 7 and 9mm sizes.
Lettersize covers feature a photo window cut centered in the cover in various sizes.
Twenty pound plain paper from 10 to 25 sheets will fill a 3mm cover, 25 to 40 sheets a 5mm cover, 40 to 55 sheets a 7mm cover and 55 to 75 sheets a 9mm cover. Photo paper, which is thicker runs 6-13 for 3mm, 13-20 for 5mm, 20-27 for 7mm and 27-35 for 9mm covers.
At Adorama, lettersize, black linen or white pearl covers with a picture window are $19.99 for a pack of two in either portrait or landscape format. They're 5mm thick and hold up to 40 pages of regular paper.
Square 8x8 covers in black or white linen are $7.99 at Digital Scrapbook Place. 12x12 covers are $9.99.

Foil Stamping. A variety of covers are available.
The company said that custom covers are also available. The press kit we received has some lovely foil-stamped samples. You can also personalize the covers with paints, stickers, stamped and paper craft.
Most online options don't offer the full line of covers, but LexJeet sells ten packs of the windowed landscape book covers for $80 to $89 in various hard-to-find sizes and covers.
Unibind's green PhotoBook covers are manufactured with a natural cover of 100 percent cotton-flax, made from natural and recycled materials. The company, in fact, is quite proud of its environmental initiatives.
"Peleman Industries Worldwide's mission was always to be 'green,'" said Brigitte Peleman-Vantieghem, CEO of Unibind North America. "An example is our commitment to environmental ethics. Thirty-five percent of our products sold are made with recycled materials, and all of our office building's roofs in Belgium are being solar-paneled. In addition, we have implemented recycling programs at both our Belgium and U.S. operations."
The only caution we could come up with is that the binding system will not accommodate the Great American Novel. The very most you can cram into a 9mm cover is 75 sheets of plain paper.
The heated resin does tend to wrinkle the pages slightly at the binding edge but that didn't really bother us. We've seen paperbacks with glued bindings that were worse. So it isn't just about presentation. It's a working book.
At about $10 each for a lettersize cover, they aren't inexpensive. But you can make half a dozen books for what it would cost to do just one with a commercial service. Roughly speaking.
Which is probably another thing to watch out for. One will not be enough. Show one of these to someone, confess you made it at home and they'll want one. That's happened here with Joyce's photo book. We've resorted to hiding it under the sofa cushions when we have company now.
Our baptism project relied on a handmade cover of handmade paper bound with craft twine. We can't tell you how we sweated over the prototype and drew deep breaths as we precisely cut and carefully punched the final. It was, nevertheless, a nice approach for a personal book.
But the book we made of Joyce's trip was a very classy presentation for her photos. The black linen cover looks great and the photo window is an excellent alternative to titling the cover. If we had a dozen of these, they'd be quick to flip through to find what we were looking for.
And it was no sweat. Just jog the sheets together, drop them into the cover and let the PhotoBook Creater seal them into the resin of the attractive cover. That makes it a winner in our book.