SIMPLE PORTABLE DATA REDUNDANCY
ToughTech Duo
-- RAID For Photographers
By MIKE PASINI
Editor
The Imaging Resource Digital Photography Newsletter
Review Date: December 2011
We've been taking digital photos since 1998. And in that time we've archived some 53,000 images. Our earliest images had pretty small storage requirements so our total disk usage is only 170-GB, although these days we're shooting about 4-GB a month.
And while all that would fit on today's typical laptop hard drive, storing them there isn't a good idea. Drives, like all mechanical devices, fail. Unlike other mechanical devices, which merely require replacement to get back on the road, drives that fail lose all their data.
So if you take photos and store them on a hard drive, you have also inadvertently appointed yourself a sort of photo historian whose job it is to preserve these relics of the past despite the failing mechanical devices.
We've discussed previously how to archive your collection to DVD and why you should refresh the archive every few years (DVDs don't last forever either). And that's still something we do and recommend to you.
But the other day we were trying to stuff yet another few hundred megabytes onto a bloated external USB drive and we thought there has to be a better way.
EXTERNAL DRIVES | Back to Contents
The old external drive category has diversified into several layers of complexity, probably more than any happy-go-lucky photographer cares to study. But that's what we're here for.
A simple 1-TB USB 3.0 external drive can be had for under $90 these days (even despite the flooding in Thailand that promises to restrict supplies). And that's good as far as it goes.
For a bit more cash, you can turn that into a 1-TB network drive. WD makes some nice solutions for the home and Apple builds one into its router. This approach lets you run backup software almost without feeling it on any machine connected to the network.
But backups and archives are different beasts, although they both eat drive space and like company. You can, of course, keep adding individual drives to your network or USB ports and populate them however you like, for archiving or backup.
But there's another approach called RAID or redundant array of independent disks. To play this game, you combine several hard disks into one logical unit. So your system still sees just one place to copy things to, but it's composed of multiple hard disks.
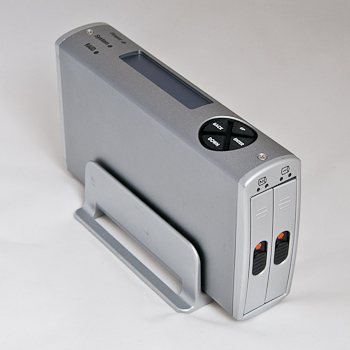
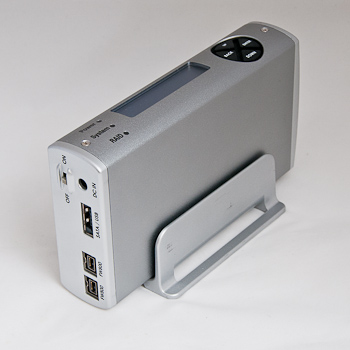
ToughTech Duo. Shown in its vertical stand. Note the two drive bays in front.
The advantage to this scheme depends on how you configure the RAID. And you have some choices. The two most common are RAID 0 and RAID 1, although the options go up to RAID 6, not counting hybrid variations. Remember, as far as your operating system goes, there's just this external storage unit out there.
RAID 0 combines the capacity of the various drives in the unit, splitting your data between the two drives to speed writes. So if you have two 250-GB drives, your system sees one 500-GB storage unit.
RAID 1 mirrors the drives, providing some redundancy for your data. There are usually two drives in this scheme (but there could be more) and they both contain the same data. As your system copies a file to the external unit, it is written to both drives.
While both approaches provide a second copy of your original data, RAID 1 provides a third. So if one of the drives in your RAID 1 fails (and, it must be added, the other does not), you still have a good copy.
And you can swap out the defective drive with a new one to rebuild the third copy. Which can take a while.
That's a dangerous concept. Some people think only one drive will ever fail at a time so they believe their RAID 1 is secure. But buildings burn down, blow away, flood and otherwise fail to protect single entity systems. Not to mention theft, malware, viruses and other evils. RAID 1 is simply not sufficient.
But it can be an important part of your survival strategy if you swap out one of the drives regularly and move it offsite. When you replace it, the new drive will be updated with a copy of what's on the drive you left in.
Unlike a USB 3.0 external drive, a RAID has to be managed. There has to be some smarts in the box. Call that the firmware.
And various units do offer a variety of intelligence, even including utility software to configure the firmware.
They also offer a few more ports. It isn't uncommon to find Ethernet, FireWire, eSATA, USB and even SCSI ports on them.
And finally they offer much simpler drive swapping than you may be familiar with if you've ever swapped a drive in your computer.
But the two big advantages of a RAID are capacity and data redundancy. Those are two things every photographer can appreciate.
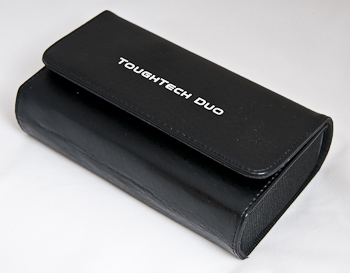
Traveling Case. A nice touch.
THE TOUGHTECH DUO | Back to Contents
So a few hundred words later, it's obvious that this is a topic that can get hairy fast. Simplicity is, therefore, one attribute any photographer would prize in a RAID.
And that wasn't lost on CRU-DataPort when it designed the ToughTech Duo.
In a few weeks it will be fours years since CRU-DataPort in Washington bought WiebeTech in Kansas. WiebeTech had made a name for itself providing high performance, portable storage solutions. CRU-DataPort focused on removable hard drive enclosures designed for physical data security and safe data transporting.
The WeibeTech guys are still in Wichita and the CRU-DataPort guys still in Vancouver, but they've delivered a very intriguing external storage solution that looks like both parents.
Sometimes things just work out well.
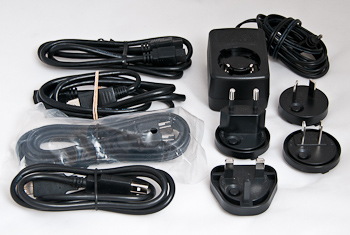
Accessories. A wide range of cables plus a power brick with four plug adapters.
We were frankly astonished at what comes in the box. When CRU-DataPort says the ToughTech is portable, they mean it:
- Aluminum ToughTech Duo unit with the Oxford 936 chipset
- Leather travel case
- Vertical stand
- Power brick with multiple adapters (U.S., European, U.K. and Australian)
- eSATA cable
- FireWire 800 cable
- USB type A to A cable
- FireWire 800 to 400 cable
- Screw kit
- Quick Start Guide and Warranty (two year limited warranty)
Not only is there a cable for about any connection you need to make, but there's a plug adapter for the power brick for any country you visit. Nicely done.
A bare unit goes for between $410 and $475. You can also buy the unit with drives, if you prefer. With two 500-GB drives, MacMall lists it for $614 and with 750-GB drives, Amazon lists the ToughTech Duo at $683. Our test unit included two 750-GB Seagate Momentus drives.
You can also buy an empty drive sled for $36.96
The ToughTech Duo can also function with a single disk, in addition to its RAID 0 and RAID 1 options.
Connections. Back end has all the power and data connections.
A tour of the hardware is revealing. The first thing you notice is that it isn't a large unit thanks to the smaller drives it uses. It's just 3.5 x 6.26 x 1.34 inches (WxLxH). It's weighty, though, at 1.65 lbs. with drives, 1.05 without. The accessories add a couple of pounds to the package.
On the back end, the connectors run from left to right: two FireWire 800 ports, a combo eSATA/USB 2.0 port, DC In (which we didn't need), and just above the power input a Power switch with a protective bezel around it so it isn't accidentally turned off.
Many external drives do not have a Power switch these days and I miss them. So I was glad to see one on the ToughTech Duo.
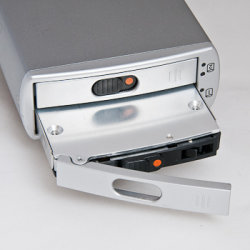
On the front of the case are the two bays for drives labeled 1 and 2 with a pair of activity LEDS above them. Two sleds slide into the bays. The sleds have a slide lock (with a red dot to indicates the unlocked position) and an eject lever you push in to release the sled from the bay. It's a very elegant system.
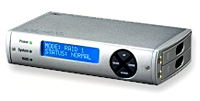
On top there are three LEDs to let you know what's going on: Power, System and RAID. A large LCD screen provides further information, which you navigate with a big four-way navigator to its right.
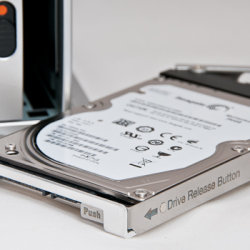
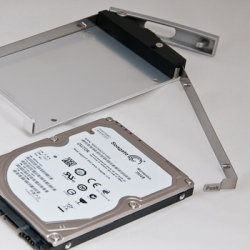
Loading a Sled. Look, Ma, no tools!
LOADING A SLED | Back to Contents
The drive sleds are, again, a marvel of engineering. They require no tools to load or unload. Here's all you do:
- Push the sled eject lever in and it pops open
- Slide the sled out
- Push in the release button at the end of the sled to swing the side panel out
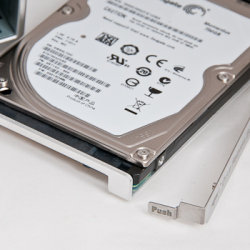
- Slide a drive into the sled with the label up until it mates with the mounting pins on the side of the sled
- Close the side panel, making sure the mounting pins are fully inserted into the side of the drive
- You can optionally secure the drive to the sled with four screws on the bottom (but we didn't)
- Slide the sled back into its bay
- Close the lever and lock the sled
It takes longer to read that than to do it.
The LEDs on the unit let you know what's going on:
- Power is green when the unit is on
- System is configurable but glows amber when a drive reaches 50 degrees or red at 55 degrees (but you can set the temperatures; ours ran up to 50 degrees when in use making the unit hot to the touch)
- RAID glows amber when the RAID is degraded or red when the RAID has failed or is invalid
THE LCD indicates the RAID level used and it status (Normal or Degraded). It can also display the temperature of the drives and allow you to change the RAID mode (which will erase all your data).
When you add a new disk to your RAID 1, the LCD will ask you for permission to add a new disk. When you press the Right arrow or Enter key, the disk is added to the RAID and it rebuilds while the LCD shows you how far it's gotten. A 750-GB drive takes about 2.5 hours to rebuild, CRU-DataPort said. But you can work while it's rebuilding.
CRU-DataPort warns (as we did) against thinking your RAID is a sufficient backup. "Follow the 3-2-1 backup rule," it advises. "Your data should exist in three different places on two different storage media and at least one of those copies should be maintained offsite." In a nutshell.
USING THE TOUGHTECH | Back to Contents
CRU-DataPort markets the ToughTech Duo as a portable RAID. It's certainly small enough to pack along requiring not much more space than an external drives. If you use the FireWire port, you can leave the power adapter at home. You can power the unit via FireWire and use the eSATA port for data to speed things up, too.
The case is a ruggedized aluminum housing that requires no fans and runs very quietly. We can't call it ruggedized in any sense other than that the aluminum housing is pretty tough. But dropping a fragile drive in any housing is not a good idea.
Still, it's well enough sealed and strong enough to take onsite for a shoot or travel on vacation.
And it's as simple to use as a USB external drive. You just have to decide how to use it.
We used it two ways.
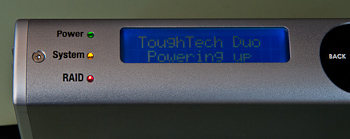
LCD. Nice to have a little feedback every now and then.
The first thing we did was configure it as a RAID 0 to work with Time Machine to back up a laptop running Lion. We ran it like that for a couple of weeks with no issues except it was hot to the touch. The case itself is not vented.
Then we got tricky and turned off Time Machine, erased it with Disk Utility and reformatted it as a RAID 1 from the front panel. Then we backed up a year of images to it. We removed a drive (which caused the ToughTech Duo to report our RAID was degraded) and added a few more images, then restored the drive and updated it. The update took a bit less than an hour.
Having the sophistication of a RAID device in a portable, affordable and attractive package is, well, irresistible. And with RAID 1 making it easy to copy of our current system for offsite safe-keeping, it becomes even more compelling. CRU-DataPort has designed an excellent solution to a persistent problem for any photographer. Bravo!