Triggertrap -- Computer-Aided
Remote Release
By MIKE PASINI
Editor
The Imaging Resource Digital Photography Newsletter
Review Date: November 2012
There's a moment in the Matt Morris film American Tintype in which photographer Harry Taylor removes the cap from the lens of his old folding camera to make an exposure. There's a lot going on in that scene but that one motion is exactly what a shutter release was designed to automate.
And automating that was no simple bit of engineering, requiring a cocking mechanism, a button and a shutter, too. Which lead to the invention of the cable release to isolate the pressure required to press the button from the camera itself.
Which brings us to today's innovation in remote releases.
TRIGGERTRAP | Back to Contents
Triggertrap Mobile is an iOS and Android app that runs on your smartphone or tablet to provide an exciting set of options for capturing an image without pressing your camera's shutter button. Some of them don't even require you to press any button at all.
We'll get to those in a moment. A few of them are only possible with special chips on the handheld devices so we want to discuss them at length.
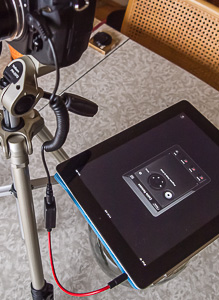
But there's another aspect to this tool that we should mention right off the bat. While it works with the camera built into your smartphone or tablet, it can also trigger your real camera. You just need a two-piece cable that attaches to the camera's remote port on one end and your device's audio out port on the other.
Hold on, though, there's one more little trick to this. Install Triggertrap on a second iOS or Android device and you can shoot wirelessly, with the second device triggering the camera-connected device over a WiFi network (or even directly in some cases).
TERMINOLOGY | Back to Contents
Some terminology before we go any further. To simplify things, we're going to refer to smartphones and tablets as devices from here on out. When we say "device," just think Android or iOS phone or tablet.
We're also going to refer to the two-part cable as a dongle when we mean the part that connects to the camera and as a cable when we mean the part that connects to your device.
Finally, even though we call it Triggertrap, it's full name is Triggertrap Mobile.
WHO ARE THESE GUYS | Back to Contents
Triggertrap began life in 2011 as a Kickstarter project.
The project hoped to raise $25,000 for Triggertrap v1, which was a universal laser remote shutter release with some unique modes. Interest was so strong, the company raised over 300 percent of the target amount from nearly 900 backers.
While working on Triggertrap v1, the company also developed Triggertrap Mobile, which launched in May.
CEO Haje Jan Kamps is Triggertrap's inventor. Tinkering with a laser trigger for his own camera gave him the idea. He's written several books on photography and has an extensive list of credits as a technical editor, project manager and photographer. In addition, he blogs at Photocritic.org and runs the Photocritic Photography School.
CTO Matt Kane is a Web and mobile app developer from Bristol, England. His first photography software was CleVR, which launched in 2001. Matt and Haje used to be housemates and have been saying they should work together for the best part of a decade, but Triggertrap is their first proper joint project.
They're joined by Lucy Parakhina, Michael Grant, Noah Shibley, Ziah Fogel and a number of freelancers who make up the Triggertrap team.
COST & CONFIGURATIONS | Back to Contents
There's a free version of the app but the $4.99 premium version is free during the holidays, which makes this review rather urgent.
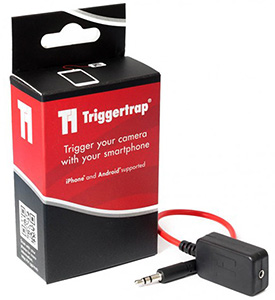
Cable. This is what the cable itself looks like. You also need the dongle that attaches to your camera's remote release port.
The dongle with a cable kit for your camera is $29.99. You can also buy the dongle separately from the cable, if you have more than one camera type you want to use. Cables are available for Canon, Leica, Nikon, Olympus, Panasonic and Sony cameras, over 300 of them, the company said.
The dongle itself, which mates to your camera, is $9.99. The cable (which connects to your device and the dongle) is $19.99.
There's even a $19.99 twin head flash adapter so you can use Triggertrap with flashes instead of cameras.
Compare that to Nikon's MC-DC1 remote release at $32.50. Canon's RS-60E3 remote switch is $19.95 and its RS-80N3 is $44.95 (for its higher end dSLRs). The Nikon and Canon options provide just a shutter button on a cable instead of Triggertrap's extensive options.
HOW IT WORKS | Back to Contents
The app provides a number of ways to trigger the shutter on the camera ranging from a simple virtual button (which emulates a cable release) to tricks like facial recognition (the shutter will fire when a face is recognized by the device's built-in camera) to releases that are triggered by distance covered rather than time elapsed.
These triggers all depend on the device's capabilities (GPS for distance triggers, for example). So a smartphone may have more than a tablet. And a few of them depend on the camera's shutter control (like Bulb mode).

Flash Adapter. Send your signal to the flash instead of the shutter.
Once the app knows the trigger should fire, it either triggers the built-in camera or sends a high-pitched audio signal to the dongle, which itself is plugged into the audio out jack of the device. That signal is converted into an electrical impulse by the time it gets to the camera, triggering the shutter via the camera's electrical contact (so the camera has to have an electronic remote release connection).
You can extend the distance between the camera and the triggering device two ways. One is with an extension cable, although matching the 3/16ths miniplug is not for the faint of heart. But the triggering signal itself can be transmitted from one copy of Triggertrap to another over a WiFi or Bluetooth connection, too.
The app provides up to 17 different triggering modes, depending on the capabilities of your device (14 on iOS and 10 on Android).
- Cable Release Mode. Pretty basic concept. Press the on-screen shutter button to fire the shutter. But there are four modes. Program mode does just what we've described. Bulb mode will keep the shutter open as long as you hold down the on-screen shutter button. Time mode will open the shutter when you first press the on-screen shutter button and close it when you press it again. Manual mode lets you set the length of your exposure with a slider.
- Sound Sensor (Bang) Mode. Make a sound, capture a shot. You set the decibels required to trip the shutter. Here's where we had to fool around with the trigger delay so we didn't take more than one shot. But it was also fun to change the dBs, triggering the shutter with a shout or a whisper. A red needle shows you the tripping point and a black needle responds to ambient noise.
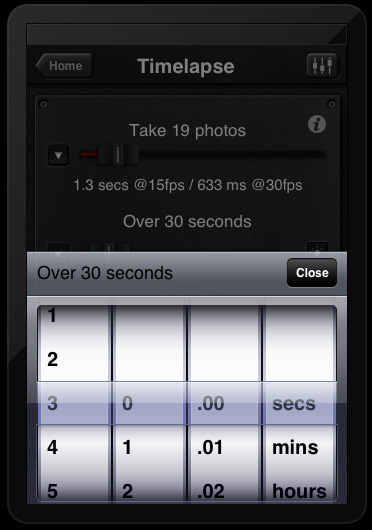
- Timelapse Mode. Take a series of images at fixed intervals. You set the number of photos and the duration of the series (like 10 photos in 10 minutes) and the screen reports how often the shutter will trip (a photo every minute). Don't miss the little button on the right of the duration slider because it tells you when the sun rises or sets where you are.
- TimeWarp Mode. If you want to vary the interval between shots, use this time lapse mode. You can ease in, ease out or do both. A curve plots the intervals on screen so you can get a sense of how the capture will go. You can adjust how aggressive the acceleration is.
- DistanceLapse Mode. If you want an interval that depends on distance traveled rather than time, this mode will read your GPS position to trip the shutter. Your device has to have a GPS chip for this to work, of course.
- Shock & Vibration Sensor (Seismic) Mode. If your device has an accelerometer built into it, this mode will trigger the shutter when the device moves. Put your device on a table, for example, and bump the table to trigger the shutter. You can set the sensitivity.
- Facial Recognition (Peekaboo) Mode. In this mode, you point the device at the area you want to look for faces. You also set the number of faces required to trip the shutter. When that many faces appear in front of the device, the shutter will trip. So if you use the device's main camera surveying on the scene, it works like facial recognition in a point-and-shoot. And if you use the backward-facing camera trained on the photographer, the photographer can trigger the exposure by moving into view.
- Star Trail Mode. Set your camera on Bulb mode then set how many exposures to take for how long and with how long a gap between each shot. Instead of taking a one-hour exposure of star trails, you can take shorter exposures instead.
- LE HDR Mode. The LE stands for Long Exposure, the HDR for High Dynamic Range. You set the camera to Bulb mode and Aperture Priority, picking the aperture you want. The app will control the shutter speed to vary the exposure by the EV setting you select (1/3, 1/2, 1 or 2 EV). You also set the ideal exposure as the middle exposure and the number of exposures per set.
- LE HDR Timelapse Mode. Same as above but as a timelapse, adding the interval between sets.
- Metal & Magnetism Sensor (Tesla) Mode. If your device has a magnetic sensor, this mode will trip the shutter when it senses a change in magnetism. Two red needles indicate the hot zone and a black one the current magnetism.
- Motion Detection Mode. The shutter will fire if anything in the scene moves. You sample the background as a base image and then set a slider to to indicate how much of a change will trigger the signal.
- Bulb Ramping (Bramping) Timelapse Mode. This mode avoids the vagaries of auto exposure by setting a starting exposure and an ending exposure and gradually changing exposure through the range. You set the number of photos to take and the duration of the sequence, just as you would for any timelapse series. Then you set the duration of the first exposure and the length of the last one.
- Wi-Fi Slave Mode. Look for a signal from another device running Triggertap and pass it along to the dongle.
- Wi-Fi Master Mode. Trigger other devices running Triggertrap Mobile. Send a signal over WiFi even though no camera is connected.
- Sunset & Sunrise Calculator. See Timelapse mode above.
- Lag-o-Meter. Measure the lag between the time the signal is sent by Triggertrap and when the capture occurs. It's useful for adding a delay to the Shutter Lag slider.
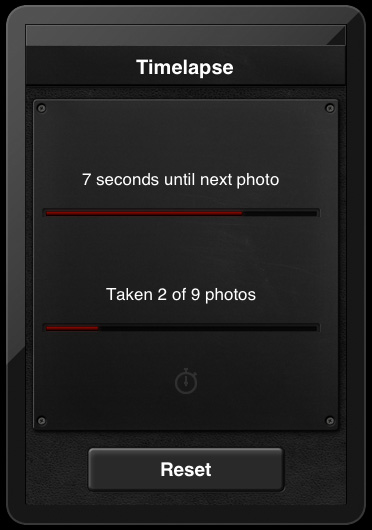
Timelapse. Counting down until the next shot.
Everything is started by pressing the virtual shutter button on the device's screen. We didn't see a delay timer to, say, start shooting in a half hour.
Help. Detailed explanations a tap away.
An iPhone app originally, the screen display is small on an iPad (but can be enlarged).
Generally, we liked the interface and found it easy to get help, which is extensive. Sliders were useful for rough setups but the finer controls, indicated by a down arrow, were always available for a more precise setting.
Fine Tuning. Tap the Down arrow to make more precise settings.
One thing that always confuses us is the On/Off symbols of a bar and a circle. Triggertrap makes them even more confusing by coloring On red instead of green and leaving Off gray. But now you know.
We know, they're really a one and a zero, but they look so Helvetica we think of them as "I" and "O."
If you want to use Triggertrap with a camera other than the one built into your device, you'll need the dongle and cable kit for your camera. You can get one via Triggertrap itself or from the company Web site.
Triggertrap sent us an MD-DCO, which includes both the dongle and the cable.
This particular dongle identifies itself as "Suitable for Nikon" with a circular 10-pin connector. Those models include the D100, D1H, D2, D200, D2H, D2HS, D2X, D2XS, D3, D300, D300S, D3X, D3s, D700, D800 and D800E. With its telephone-curl cable it stretches to about a foot and is very well made.
The cable, on the other hand is about nine inches long with a home-made look to it. Perfectly serviceable, though.
The problem with the hardware is the short distance the two pieces stretch. This isn't a big deal if you're connecting to a smartphone with some sort of mounting device so you can clamp the phone to your tripod. But it gets inconvenient fast with a tablet.
Our attempt to extend the length with an extension cord between the two pieces failed at the local Radio Shack where we would have had to buy not just an extension cable but adapters as well. You can find the cable online, but it's a shame the cable isn't a little longer.
There isn't a lot of setup required to use the app, but a little goes a long way.
The first thing to do is pick a camera preset from the pop-up list. We found one for our camera which needed only a little tweaking, depending on what we were doing. There are also universal presets if a specific one for your camera isn't available. The company recommends Universal Slow Autofocus as "the most bullet-proof triggering mode."
The company also recommends using manual focus rather than autofocus. This may seem to be pretty contrary advice, but it's actually genius. Your camera is unattended so it's likely (unless you're tracking a moving subject) that focus won't change from one image to the next. So just set it manually and skip the focus lag.
But you can use autofocus and there are autofocus presets available to help. The manual has a section discussing it as well. In fact, the manual has some very nice decision trees to help figure things out, too.
You also have to make sure the Shutter signal (and optionally the Focus signal) is sent to the camera. You do that by enabling their channels in the app by clicking on the icon for each. Some cameras require both to function even if only the Shutter signal is used.
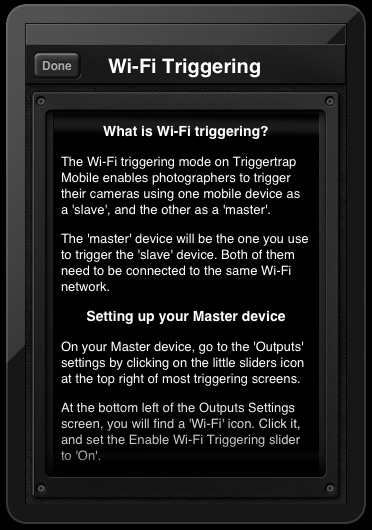
WiFi. If you want to use WiFi triggering, you have to set up the connected device as a slave and the other device as the master. It's easier than it sounds. There is a Slave mode in the TriggerTrap menu. And it will display any Master devices it finds. You just have to click on the name of the Master device in the pop-up menu to enable it.
On the Master device, which you should set up first so Slave mode can see it, you just tap the Outputs settings icon at the top right of most screens and turn on WiFi triggering.
Now you can control the camera over WiFi from the unattached device. We were surprised just how responsive that was, although we have to caution that at least on the device we used as a Master, the shutter isn't activated until you lift your finger off the on-screen shutter.
The WiFi icon will blink as the command is sent, a nice visual confirmation of what's going on.
Delays. One of the refinements you may have to make is delaying the signal so the camera doesn't think you want more captures than you intend.
You can set a delay before capture or one after (which is the most handy). And you can change the length of the pulse sent. There's also a shutter lag slider. So you have a lot of control over timing the signal.
Bluetooth. To communicate to your camera via Bluetooth, you need another piece of equipment. That's an inexpensive (about $10) Bluetooth audio receiver that supports A2DP.
Pair the receiver to your device. Then set the Output Settings output option to the receiver. Finally connect the dongle to the reciever.
Now signals from the device will be sent over Bluetooth to the receiver, which will signal the dongle to trip the shutter.
TRIGGERTRAPPING | Back to Contents
You do have to set up your camera intelligently. Aim it at something interesting. Focus the lens. Set the exposure.
But then you can walk away and let the app do the work.
Our first setup was pretty simple. We just cabled the tripod-mounted camera to an iPad. And with the right preset enabled, we tried cable release mode. Piece of cake.
Macro. Works with Live View, too.
A proof of concept. It works. So on to something interesting.
Like macro photography. Getting your hand off the camera is the primary thing but we were also pleased to discover that cable release mode worked just as we expected with Live View. A tap to wake up the LCD and another to fire off the exposure.
We moved on to a timelapse series. Which was easy. We just set the number of shots and the duration for the whole series and pressed the button. The camera fired off shot after shot while the app counted down to the next shot.
We tested the sound-activated option, too, setting the limit at various levels so the shutter was triggered by anything from a shout to a whisper.
Then we tried the face recognition mode. The trick here is to point the device (by picking the right camera) toward the face that matters. That could be yours as the photographer so when you enter the recognition field, the shutter trips. But more likely it's your subject in the scene. You can trigger on up to five faces and you can pick which camera (front or back facing) to use. Really a nice touch, although at a certain point we really wished it had smile recognition with blink protection, too. One becomes spoiled so quickly these days.
Motion detection was one mode we really think we're going to revisit. We have a lot of wildlife in our part of the city. Coyotes, raccoons, possums, gophers, you name it. They have parties at night and don't invite us. We didn't get the iPad set up optimally to capture them (yet) but it's promising. We've just been capturing cars running the stop sign below our dining room window so far. You sample the background and set a percent of change to trigger the shutter. Bang, got 'em. Or they got themselves, technically.
Timelapse. Opened as a sequence of images in Photoshop CS6 and saved as a QuickTime video.
We didn't try everything. Everything wasn't available on the iPad, after all. But just those basic triggering modes were worth the price of admission.
Then we decided to set up the WiFi connection.
We have to admit when we first read about Triggertrap and were evaluating it for review, we were a bit confused about the WiFi capability. We thought -- incorrectly -- that the dongle was a WiFi connection itself. Add the dongle and the camera would be on your network. Well, not quite (at least not yet).
Instead, you need two devices, each of which runs a copy of Triggertrap. That's a good incentive to download it before the end of the year while it's still free. The copy on the device attached to the camera is run in slave mode while the one that stays with you is the master.
On the master, you can do everything you would do normally. The master just sends the signal over your WiFi network instead of through the audio port. So the master is the sensor for motion, face recognition, everything.
And it worked flawlessly. In fact, we were a little curious if there was any kind of shutter delay over the network. We could have used the Lag-o-meter but we wanted a purely subjective sense of it. Frankly, we couldn't detect one. Which, in itself, was pretty cool.
One more observation. We had to entice a second device owner to help us out and they had no trouble at all running Triggertrap. In fact, we had a hard time getting them to stop, it was so much fun. And easy to use. The control screens are very straightforward and if you need an explanation of the trigger, a help screen explains it in plain English. Very nice.
OK, so we wish it had a longer cable and smile recognition. But really, that's all we could come up with to complain about. Mainly it's just fun. Lots of fun. More fun than we've ever had with a shutter.
Sure, our dSLR has interval timing but the setup requires an advanced degree in physics. We look at screen after screen of settings and have no idea how to set what. But with Triggertrap it was obvious.
And another thing. These electronic cameras just won't respond to a plain old mechanical cable release. So we often resort to the self-timer to avoid camera shake on long exposures. Buying an electronic cable release is an option, but an expensive one. Triggertrap is an affordable alternative with a lot more going for it.
So outright prolonged applause. And get yours if only for your device's camera while it's still free.