
|
|
Computer Driver Menus Main Menu  Launching the printer setup utility displays this set of tab-based menu screens. The first is the Main menu, which allows you to set the basic printer parameters, including the type of paper to be printed on, the ink color, and the printing mode. Under the Media Type pulldown menu, you can specify the type of media you'd like to print to. A wide variety of paper choices are available, and are categorized into groups, including Plain Paper, 360 dpi Ink Jet Paper, Photo Quality Ink Jet Paper, Matte Paper-Heavyweight, Photo Paper, Premium Glossy Photo Paper, Photo Quality Glossy Film, and Ink Jet Transparencies. Below the Media Type menu is the Ink selection box, which specifies which ink cartridge will be used, Color or Black. The Mode selection box establishes how much control you have over the actual printing, with three modes available to choose from: Automatic: Automatic mode places the printer in control of the print quality and speed settings, based on the current Media Type and Ink selections. Depending on the Media Type selected, a slider bar appears under the "Custom" setting, listing Quality and Speed. You move the slider bar to the position that's most important. The printer will optimize the print job depending on which value is selected, Quality or Speed. Photo Enhance:  This mode provides a range of preset image corrections to choose from, depending on the type of image being printed. Choices are Standard, People, Nature, Soft Focus, and Sepia. The Digital Camera Correction checkbox appears under the correction type, which smoothes lines and contours in images shot with digital cameras, eliminating some artifacts and "jaggies." Photo Enhance mode is only selectable when printing in 8-, 16-, 24-, or 32-bit color mode, and is not recommended for use when the Roll Paper media type is selected, as gaps may appear in the printing. Custom: The final mode available is Custom, which allows you to set more specific settings. Under the Custom Settings list, you can select Economy, ICM, or sRGB. Economy mode is best for printing text, as it makes minimal adjustments and prints at a slightly lower quality setting. "ICM" matches the color of the printout to match the monitor currently in use, and "sRGB" matches the color of the printer to other sRGB devices. Clicking the Advanced button pulls up a dialog box for making further adjustments:  The Advanced adjustments include a variety of specialized settings, expanding color management options, as well as providing more control over image attributes and quality settings. At the top left of the dialog box are the Media Type and Ink selection tools, which provide the same options as on the Main menu page. The Print Quality pulldown menu offers a variety of quality settings, allowing you to select the one that best matches the use of your printout. Below the Print Quality setting, a variety of controls set options for printing speed, image orientation, detail, and smoothing edges in low-resolution originals. On the opposite side of the dialog box, a handful of color management options make more fine-tuned adjustments. If Color Controls is selected, you can adjust the cyan, magenta, and yellow values individually, as well as the brightness, contrast, and saturation. The "Mode" option lets you select between Photo-Realistic or "Vivid" rendering, or "Automatic" as shown above. You'd used "Vivid" for business graphics where you want the brightest colors, while Photo-Realistic would be for photo printing (no surprise there). We ended up just leaving this option set to Automatic for all our prints and they looked just fine. Once you've made your selections, you can save them to apply to other images via the Save Settings button. This is particularly useful for batch processing. 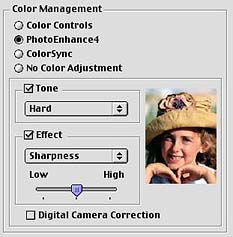 If you select the "PhotoEnhance" option in the color management controls, you'll get options for setting tone (think "contrast") and a variety of effects, including Sharpness, Soft Focus, Canvas, or Parchment. (The last two overlay a texture on whatever subject you're printing, making it look like it was printed on canvas or parchment.) Buried at the bottom of this panel is one of the most significant aspects of the 1280. The box marked "Digital Camera Correction" enables Epson's PRINT Image Matching for files that came from cameras supporting that technology. PRINT Image Matching improves color handling in digicam files. It's most visible in certain bright blues and greens, but the most common benefit will be greatly improved skin tones. Very cool! (You'll need the latest driver software from Epson, released in August, 2001 to be able to take advantage of PRINT Image Matching. Check their site for the download.) 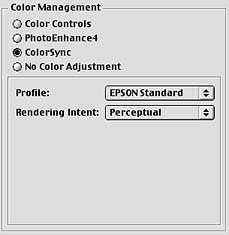 Serious color gurus will be pleased by Epson's support for ICC color profiles. On the Mac, if you have a custom profile made for the 1280, it'd just appear in the pulldown labeled "Profile" above. On the PC, there are actually two separate options here, one for simply selecting the ubiquitous (and awful) sRGB color space, the other for selecting ICM color profiles the name for ICC profiles under Windows. The remaining tools available on the Main menu page are the Ink Levels and Print Preview utilities. Ink Levels simply shows you the current amount of ink available in each cartridge. Clicking on the Print Preview checkbox and then the OK button pulls up a preview screen, allowing you to review the image before printing it. You can always go back to make changes. Paper Menu  The next tab in the printer setup utility is the Paper menu, which establishes all of the paper attributes. The Paper Source pulldown menu specifies where the printer is pulling paper from, either the Sheet Feeder or Roll Paper. Click the No Margins checkbox to enable borderless printing. With this option checked, you want to set the image size in your software to be just slightly larger than the paper size you're printing on. In this mode, the printer can cleverly print right up to all four edges of the paper, but the print times nearly double as a result. The Paper Size pulldown menu selects the actual size of the paper being printed on, and includes a Custom option for adding any special paper sizes not listed. Under the Copies selection box, you can set the number of copies, as well as whether or not multiple-page prints are collated or printed in reverse order. Orientation offers the standard Portrait and Landscape options, as well as an option for rotating the image 180 degrees. The final selection is the Printable Area, which designates where the printer will print the image on the page. The Maximum setting instructs the printer to fill the entire printable area.  If you select Roll Paper for the Paper Source setting, you get a slightly different set of options, as shown above. Banner Mode: Cut Sheet Mode: This mode is for those times when you want to print multiple pages on roll paper, but later separate them into individual sheets again. When this check box is selected, the Print Page Frame check box is enabled. The Page Frames are cutting guides for you to use when you chop up the strip of paper into individual sheets. Save roll paper: This option is the opposite of the Cut Sheet mode, in that it avoids printing any blank space at the bottoms of your documents. Thus, if your page or photo doesn't completely fill a standard-sized sheet, the Save Roll Paper option will trim the extra space from the file, and stack successive pages one right after the other. As noted above, this feature is only available when Banner Mode is selected. Layout Menu  The Layout menu page offers slightly more control over where the image will actually print on the media. Clicking on the Reduce/Enlarge checkbox activates the options beneath it, which include Fit to Page and Custom. The Custom setting lets you define your own paper sizes, including the defined printable areas.
The Double-Sided Printing option lets you print on both sides of the page. NOTE though, that this doesn't mean that the printer is turning the paper for you! This is just a utility to include the proper binding margins on the various pages.  The Multi-Page option lets you choose the layout for printing multiple images. The N-up option prints either two or four images to a page, while the Poster option enlarges a single image to print on 4, 9, or 16 pages.  Clicking on the Settings button when Poster is selected lets you establish the in which pages of the enlarged image will print. The Print Cutting Guides option prints alignment marks or trim lines to help you line up and cut out the image for assembly. (This is a pretty slick option - Only a few years back, you had to pay a lot of extra money for software that would let you "tile" images across multiple pages like this.)  The final option on the Layout menu page is the Watermark option, which lets you place a customized watermark over the printed image. Watermarks can be made up of text or images. (Handy for automatically imprinting copyright information on your prints, without having to modify the original images to do so!)  Once you've selected or created a watermark, the Settings button becomes active on the Layout menu page. Clicking it pulls up the Watermark Settings dialog box, which controls watermark attributes such as color, font, rotation, position, size, and density. Utility Menu  The Utility menu page features six utility buttons for general printer maintenance.
Reader Comments!
|
|
||||