Epson combines 2880 dpi, PRINT Image Matching, and standalone operation for a real winner of a photo printer!
Page 3: Design, Functions & Controls
Review First Posted: 7/18/2001
MSRP $249 US
Design, Functions and Controls
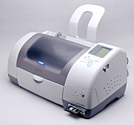
The 785EPX measures 18.4 x 10.1 x 8.4 inches (467 x 255.1 x 212.1mm) without the paper trays extended, and weighs 11.6 pounds (5.25 kg), making it about average in size, but fairly lightweight when compared to similar models. The 785EPX is extremely versatile in terms of paper delivery, with a top-mounted paper support that handles sheets up to 8.5 x 14 inches, and a roll paper adapter that attaches to the back panel. The lower paper output tray stores inside the printer, and pulls out when the printer is in use. Together, they increase the overall size to 23 x 13 x 8.4 inches (584 x 330 x 212.1mm) when fully extended.
Similar
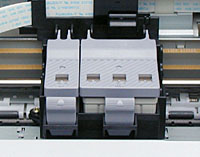
in design to the Kodak / Lexmark PPM 200, the 785EPX has a dust cover on the
front that lifts up to provide access to the two printer cartridges: one Black
and one Color (cyan, magenta, yellow, light cyan, and light magenta). The cartridges
are easy to install, and when in place, are automatically calibrated by pressing
the Ink Replacement button on the bottom of the Printer Control Panel. The ink
cartridges feed into a series of MicroPiezo print heads, with 48 nozzles per
color, and the entire assembly travels back and forth across the paper on a
small metal rod. Ink is deposited by applying pressure to the ink chambers,
forcing the ink out through the nozzles. Epson claims that this process is more
precise and consistent than competitors' "thermal ink printing" process
(heating the ink to force it out of the print head), and based on the positive
market response, seems to have developed a very successful formula. An automatic
cleaning mechanism periodically initiates a three- to five-minute cleaning,
which can be repeated several times for deeper cleaning whenever necessary,
and an automatic Ink Low / Ink Out detection system lets you keep up with ink
levels for each cartridge.
On
the right side of the printer face is the Printer Control Panel, which extends
from the top, where the Display panel resides, to the bottom, where the PC card
slot accepts various adapters to read digital camera memory cards. The Display
panel and the buttons that are located directly below it, are only used when
the printer is in standalone mode (i.e.: printing without a computer). The four
remaining buttons, at the bottom of the front panel, are used when the printer
is connected to a computer.
The Display panel provides access to basic printer settings when printing directly from a memory card, such as Print Mode, Paper Type, Paper Size, and Page Layout menus, plus menu options for choosing which image you want to print (by photo number), the number of copies, and the image quality (which is limited to 360 or 720 dpi in standalone mode). Below the Display panel is a set of four-way Arrow buttons, which is used to scroll through menus and select menu settings. The Select Photo button to the right of the Arrows is used to set the photo number when choosing which image you want to print. (The numbers are provided on an Index sheet, which you will need to print first if your images are not preformatted for DPOF printing.)
A Brightness button (next to the Select button) is provided to access the brightness setting mode on the Display Panel. By holding this button down for several seconds, you can also access the Filter menu, which provides nine options for image adjustment (see "Standalone Printing"). Below the Brightness button is a Cancel button, which interrupts the print operations, or exits from a menu selection. The large green Print button starts printing, once all of your menu selections have been made. The final control on the top part of the panel is the Processing light, which glows when the printer is ready to print, and flashes while processing data.
At
the bottom of the Control Panel, above the PC Card slot, is a series of four
buttons that are used when the printer is connected to a printer. They are identified
by icons, and their functions, from right to left are: 1) Power button to turn
the power On or Off; 2) Maintenance button, which takes care of several operations,
including loading or ejecting paper; resuming printing after a printing error
is resolved; performing print head cleaning; and moving the print head to the
ink cartridge replacement position. (The LED lamp next to this button lights
when an ink cartridge is empty.) 3) Roll Paper button loads and ejects roll
paper, reverses the roll paper feed, and clears the Maintenance error light
if roll paper is removed. Finally, 4) Ink Cartridge Replacement button moves
the print head to the ink cartridge replacement position and initiates a calibration
procedure when new ink cartridges are installed.
The
right side of the printer has an Adjust lever, which can be set to the "+"
position when you use thick paper or envelopes, to help prevent ink smearing.
The left side of the printer is clear, with no printer controls.
The
top left corner of the back side of the printer houses a Preview Monitor slot,
covered by a plastic door, which enables you to attach the optional 1.6-inch
Preview monitor for viewing color images. Below the slot, at the bottom of the
printer, are the USB connector for connecting the printer to a computer and
a Preview Monitor cable connector. The Roll Paper holder, which comes standard
with the unit, is attached below the top paper feed by sliding it into two slots
on either side of the paper support.

 Similar
in design to the Kodak / Lexmark PPM 200, the 785EPX has a dust cover on the
front that lifts up to provide access to the two printer cartridges: one Black
and one Color (cyan, magenta, yellow, light cyan, and light magenta). The cartridges
are easy to install, and when in place, are automatically calibrated by pressing
the Ink Replacement button on the bottom of the Printer Control Panel. The ink
cartridges feed into a series of MicroPiezo print heads, with 48 nozzles per
color, and the entire assembly travels back and forth across the paper on a
small metal rod. Ink is deposited by applying pressure to the ink chambers,
forcing the ink out through the nozzles. Epson claims that this process is more
precise and consistent than competitors' "thermal ink printing" process
(heating the ink to force it out of the print head), and based on the positive
market response, seems to have developed a very successful formula. An automatic
cleaning mechanism periodically initiates a three- to five-minute cleaning,
which can be repeated several times for deeper cleaning whenever necessary,
and an automatic Ink Low / Ink Out detection system lets you keep up with ink
levels for each cartridge.
Similar
in design to the Kodak / Lexmark PPM 200, the 785EPX has a dust cover on the
front that lifts up to provide access to the two printer cartridges: one Black
and one Color (cyan, magenta, yellow, light cyan, and light magenta). The cartridges
are easy to install, and when in place, are automatically calibrated by pressing
the Ink Replacement button on the bottom of the Printer Control Panel. The ink
cartridges feed into a series of MicroPiezo print heads, with 48 nozzles per
color, and the entire assembly travels back and forth across the paper on a
small metal rod. Ink is deposited by applying pressure to the ink chambers,
forcing the ink out through the nozzles. Epson claims that this process is more
precise and consistent than competitors' "thermal ink printing" process
(heating the ink to force it out of the print head), and based on the positive
market response, seems to have developed a very successful formula. An automatic
cleaning mechanism periodically initiates a three- to five-minute cleaning,
which can be repeated several times for deeper cleaning whenever necessary,
and an automatic Ink Low / Ink Out detection system lets you keep up with ink
levels for each cartridge. On
the right side of the printer face is the Printer Control Panel, which extends
from the top, where the Display panel resides, to the bottom, where the PC card
slot accepts various adapters to read digital camera memory cards. The Display
panel and the buttons that are located directly below it, are only used when
the printer is in standalone mode (i.e.: printing without a computer). The four
remaining buttons, at the bottom of the front panel, are used when the printer
is connected to a computer.
On
the right side of the printer face is the Printer Control Panel, which extends
from the top, where the Display panel resides, to the bottom, where the PC card
slot accepts various adapters to read digital camera memory cards. The Display
panel and the buttons that are located directly below it, are only used when
the printer is in standalone mode (i.e.: printing without a computer). The four
remaining buttons, at the bottom of the front panel, are used when the printer
is connected to a computer.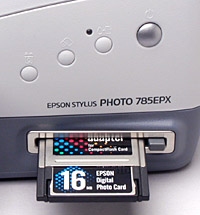 At
the bottom of the Control Panel, above the PC Card slot, is a series of four
buttons that are used when the printer is connected to a printer. They are identified
by icons, and their functions, from right to left are: 1) Power button to turn
the power On or Off; 2) Maintenance button, which takes care of several operations,
including loading or ejecting paper; resuming printing after a printing error
is resolved; performing print head cleaning; and moving the print head to the
ink cartridge replacement position. (The LED lamp next to this button lights
when an ink cartridge is empty.) 3) Roll Paper button loads and ejects roll
paper, reverses the roll paper feed, and clears the Maintenance error light
if roll paper is removed. Finally, 4) Ink Cartridge Replacement button moves
the print head to the ink cartridge replacement position and initiates a calibration
procedure when new ink cartridges are installed.
At
the bottom of the Control Panel, above the PC Card slot, is a series of four
buttons that are used when the printer is connected to a printer. They are identified
by icons, and their functions, from right to left are: 1) Power button to turn
the power On or Off; 2) Maintenance button, which takes care of several operations,
including loading or ejecting paper; resuming printing after a printing error
is resolved; performing print head cleaning; and moving the print head to the
ink cartridge replacement position. (The LED lamp next to this button lights
when an ink cartridge is empty.) 3) Roll Paper button loads and ejects roll
paper, reverses the roll paper feed, and clears the Maintenance error light
if roll paper is removed. Finally, 4) Ink Cartridge Replacement button moves
the print head to the ink cartridge replacement position and initiates a calibration
procedure when new ink cartridges are installed.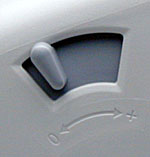 The
right side of the printer has an Adjust lever, which can be set to the "+"
position when you use thick paper or envelopes, to help prevent ink smearing.
The
right side of the printer has an Adjust lever, which can be set to the "+"
position when you use thick paper or envelopes, to help prevent ink smearing.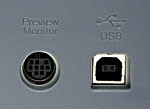 The
top left corner of the back side of the printer houses a Preview Monitor slot,
covered by a plastic door, which enables you to attach the optional 1.6-inch
Preview monitor for viewing color images. Below the slot, at the bottom of the
printer, are the USB connector for connecting the printer to a computer and
a Preview Monitor cable connector. The Roll Paper holder, which comes standard
with the unit, is attached below the top paper feed by sliding it into two slots
on either side of the paper support.
The
top left corner of the back side of the printer houses a Preview Monitor slot,
covered by a plastic door, which enables you to attach the optional 1.6-inch
Preview monitor for viewing color images. Below the slot, at the bottom of the
printer, are the USB connector for connecting the printer to a computer and
a Preview Monitor cable connector. The Roll Paper holder, which comes standard
with the unit, is attached below the top paper feed by sliding it into two slots
on either side of the paper support.