Konica Minolta DiMAGE A2Konica Minolta updates their top-end electronic SLR with a higher resolution sensor, much-improved electronic viewfinder, a faster 3D autofocusing system, and high-speed USB 2.0 connectivity, among other improvements.<<Design :(Previous) | (Next): Optics>> Page 4:ViewfinderReview First Posted: 07/13/2004 |
Viewfinder
 The
electronic viewfinder (EVF) is one area in which the DiMAGE A1 and A2 mark a
significant departure from the direction set by the earlier 7, 7i, and 7Hi models.
In the DiMAGE A1, Konica Minolta reverted to a more ordinary EVF design, based
on conventional TFT LCD technology. With a normal LCD, there's none of the "crackled
glass" look seen on the earlier cameras' reflective ferroelectric LCDs,
regardless of any camera or subject movement. The DiMAGE A2 takes another step
forward from the A1's viewfinder, greatly increasing resolution and offering
the option to trade off some of this resolution for an extremely high frame
rate.
The
electronic viewfinder (EVF) is one area in which the DiMAGE A1 and A2 mark a
significant departure from the direction set by the earlier 7, 7i, and 7Hi models.
In the DiMAGE A1, Konica Minolta reverted to a more ordinary EVF design, based
on conventional TFT LCD technology. With a normal LCD, there's none of the "crackled
glass" look seen on the earlier cameras' reflective ferroelectric LCDs,
regardless of any camera or subject movement. The DiMAGE A2 takes another step
forward from the A1's viewfinder, greatly increasing resolution and offering
the option to trade off some of this resolution for an extremely high frame
rate.
To expand a bit on the subject of EVFs, let me note that I've long held a hearty
dislike of them, for a variety of reasons. For one, resolution is often considerably
less than on the rear-panel LCD, and the view doesn't remotely compare to that
through a purely optical viewfinder. A bigger concern though, is that most EVF
displays are woefully inadequate for low-light shooting. The high refresh rate
required to provide a "live" view of the subject means that the CCD
just can't collect enough light in each frame to make the EVF display usable.
Time and again, I've seen EVF-equipped digicams that are capable of taking pictures
in conditions far darker than levels at which you can see what you're shooting
in the EVF. Without a low-light-capable viewfinder, you're reduced to guessing
where your subject is in the viewfinder.
That said, Konica Minolta's EVFs have proven to be exceptions to my thinking.
The DiMAGE A2's EVF works down to incredibly low light levels (it's usable at
light levels even lower than the 1/16 foot-candle limit of my standard low-light
test), and also has exceptionally high resolution under normal lighting. Below
a certain light level, it switches from a color display to a monochrome one
(although the final camera images are still captured in color), apparently as
a way of increasing sensitivity and reducing image noise. The net result is
that the EVF on the DiMAGE A2 is about as sensitive as my own eyes at
ant given illumination level, making it eminently usable at any light level
most users will care to shoot at. Given that the EVF is about as sensitive as
the average eyeball, it's fair to say that a purely optical viewfinder wouldn't
improve the A2's low-light capability a great deal.
As mentioned above, the DiMAGE A2's viewfinder is a pretty dramatic update over
that in the DiMAGE A1. Where the previous camera offered a resolution of approximately
320 x 240 pixels (230,000 total dots in red, green and blue), the DiMAGE A2
bumps this up significantly to 640 x 480 pixels (922,000 RGB dots). As an added
bonus, you can opt to sacrifice half of this resolution in order to double the
refresh rate of the viewfinder, removing another bugaboo of EVF-based cameras
- problems in tracking fast-moving objects through the viewfinder because of
the low refresh rates. I don't have any exact specifications for the DiMAGE
A1's refresh rate, but suffice to say that with the ability to double the refresh
rate from 30 frames per second - easily as fast as most electronic viewfinders
- to an impressive 60 frames per second, the DiMAGE A2 is a notable improvement,
and should prove much easier to use in this regard. Certainly, in my own use
of the camera, I had no trouble following fast action with it.
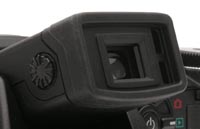
The DiMAGE A2's EVF also features the innovative auto-switching capability first
seen in the original DiMAGE 7. You can choose to have the viewfinder display
always appear on either the LCD or EVF, or switch between the two automatically.
Inset behind a pair of vertical windows on the right side of the viewfinder,
a set of infrared sensors detects your eye as it approaches the viewfinder,
switching the view to the EVF and disabling the LCD monitor if you have the
auto-switching option enabled. To save on battery power, you can optionally
(through the Setup menu) set the Auto mode to simply turn the EVF on and off,
keeping the LCD monitor disabled. To avoid a potential problem where the EVF
eyepiece could press against your chest, triggering the infrared eyeball-detector
circuit, a setup menu item also optionally couples the eyeball detector with
the hand grip sensor. This allows you to set up the A2 so its EVF only turns
on when you're looking through the EVF and your hand is on the handgrip.
As noted, the electronic viewfinder eyepiece tilts upward 90 degrees, offering
a range of viewing angles. A Diopter Control dial adjusts the viewfinder to
accommodate eyeglass wearers, across a range of -3.5 to +1.5 diopters. (This
covers a wider range of eyesight than do many eyepiece adjustments, although
it's a good bit less than the -5.0 to +2.0 range of the EVF on the A1. Regardless,
the A2's dioptric adjustment just handled my own 20/200 vision, at the limit
of its range in the "nearsighted" direction.) The viewfinder has a
fairly high eyepoint, making it reasonably usable with eyeglasses, but the field
of view is slightly restricted when your eye is further from the eyepiece. (Here
again though, the eye relief of the A2's viewfinder represents a slight reduction
in capability relative to that of the A2, as it's apparently about 2.5 mm less
than that of the A1. You can still use the A2's EVF with eyeglasses, but you'll
have to mash their lenses up against the bezel to see the full frame.)
 The
rear-panel, 1.8-inch, TFT color LCD monitor also offers a bright, clear image
display. The LCD monitor lifts off of the rear panel, and can tilt upwards about
90 degrees, or downward by about 20 degrees. Like the electronic viewfinder,
the LCD monitor displays a range of exposure and camera information in both
Record and Playback modes, activated by the "i+" button. A Histogram
setting displays a small "live" histogram overlaid on the viewfinder
image, showing the distribution of tonal information in the image. This is a
handy tool for determining any potential over or underexposure, before capturing
an image.
The
rear-panel, 1.8-inch, TFT color LCD monitor also offers a bright, clear image
display. The LCD monitor lifts off of the rear panel, and can tilt upwards about
90 degrees, or downward by about 20 degrees. Like the electronic viewfinder,
the LCD monitor displays a range of exposure and camera information in both
Record and Playback modes, activated by the "i+" button. A Histogram
setting displays a small "live" histogram overlaid on the viewfinder
image, showing the distribution of tonal information in the image. This is a
handy tool for determining any potential over or underexposure, before capturing
an image.
 I've
often found digicam manual focus features of limited utility, largely because
it can be so hard to tell when you've achieved proper focus. LCD screens just
don't display enough image detail to be able to tell whether an image is exactly
in focus or not. Some manufacturers offer modes in which the viewfinder image
optionally can be magnified by 2x or 4x but even that often falls a little short.
(2x is clearly inadequate in my view, 4x starts to be useful.) In the A1, Minolta
offered viewfinder magnification of 2x or 8x to assist with manual focusing,
and the 8x level worked quite well for determining critical focus. In the A2,
this feature seems to have been replaced with a fixed magnification of 3.3x,
falling somewhere into the middle ground - right on the verge of usefulness,
but not as much so as the old 8x magnification was. That said, the exceptional
resolution of the EVF display helps matters greatly, although there's a significant
increase in the noise level of the viewfinder image when operating in the magnified
view.
I've
often found digicam manual focus features of limited utility, largely because
it can be so hard to tell when you've achieved proper focus. LCD screens just
don't display enough image detail to be able to tell whether an image is exactly
in focus or not. Some manufacturers offer modes in which the viewfinder image
optionally can be magnified by 2x or 4x but even that often falls a little short.
(2x is clearly inadequate in my view, 4x starts to be useful.) In the A1, Minolta
offered viewfinder magnification of 2x or 8x to assist with manual focusing,
and the 8x level worked quite well for determining critical focus. In the A2,
this feature seems to have been replaced with a fixed magnification of 3.3x,
falling somewhere into the middle ground - right on the verge of usefulness,
but not as much so as the old 8x magnification was. That said, the exceptional
resolution of the EVF display helps matters greatly, although there's a significant
increase in the noise level of the viewfinder image when operating in the magnified
view.
 In
Playback mode, the DiMAGE A2 optionally displays a fair amount of image information,
which is again controlled by the i+ button. The same button also accesses an
index display mode, which you can set via a menu option to show either four
or nine thumbnail images to a page. Also, in playback mode, the Magnify button
enlarges captured images (JPEG only, not RAW or TIFF formats), so that you can
more closely check on fine details. The playback-mode magnification can be varied
from 2.0 to 10.2x in steps of 0.2x. A histogram feature is also available in
Playback mode, by pressing the up arrow key.
In
Playback mode, the DiMAGE A2 optionally displays a fair amount of image information,
which is again controlled by the i+ button. The same button also accesses an
index display mode, which you can set via a menu option to show either four
or nine thumbnail images to a page. Also, in playback mode, the Magnify button
enlarges captured images (JPEG only, not RAW or TIFF formats), so that you can
more closely check on fine details. The playback-mode magnification can be varied
from 2.0 to 10.2x in steps of 0.2x. A histogram feature is also available in
Playback mode, by pressing the up arrow key.
Reader Comments! --> Visit our discussion forum for the Konica Minolta DiMAGE A2!

Follow Imaging Resource: