The Imaging Resource
Quick Review
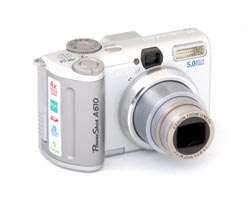
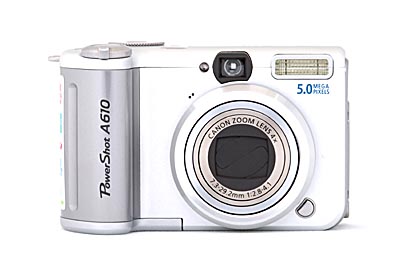
Canon PowerShot A610 Digital Camera
 |
Canon PowerShot A610 Digital Camera | |
Review Date |
||
User Level |
||
Product Uses |
||
Digital Camera Design |
||
Picture Quality |
Very good, 5.0-megapixel CCD | |
Print Sizes |
Very good 11x17 inch or 8x10s with heavy cropping | |
Availability |
||
Suggested Retail Price (At introduction) |
||
NOTE: The 5-megapixel Canon PowerShot A610's features and functions are nearly identical to those of the 7-megapixel PowerShot A620, which we reviewed at about the same time. The majority of this review is therefore almost identical to our Canon PowerShot A620 review. If you've already read the A620 review, you can save yourself some time by skipping down to the Test Results section here.
Introduction
The PowerShot A610 sits at the top of Canon's A-series--a lineup distinguished by cameras that are fairly compact, relatively inexpensive and equipped with a robust set of exposure controls. The A610 is no exception: priced under $300, it has a 5.0-megapixel CCD--ideal for photographers who like especially large prints or who frequently crop their photos. With exposure controls that range from full-automatic, snap-shot simplicity to full-manual creativity, the A610 is a good choice for a family with widely differing photography skills. Given its low price and breadth of features, it should also be attractive to budding shooters on tight budgets who want to advance their photographic skills.
Camera Overview
With a silver-metallic case and stylish shape, the A610 is an impressive step up from Canon's A95, which started out at $400 when it was introduced a little over a year ago. Now, for $100 less, you get the same 5.0 megapixel resolution and a lot more zoom. Both cameras are distinguished by their fold-out LCD panels, but the A610's is 2 inches, versus the A95's 1.8 inches. Though that may not sound like much of a difference, it's quite noticeable when you look at the screens side-by-side. For anyone who loves photography, the fold-out screen is worth the cost it adds to the camera. Rotate it out and down, and you can get better shots in crowds by holding the camera over your head and looking up at the LCD. For shy subjects, you can rotate the LCD up and hold the camera at waist level, when most subjects do not think you are actually taking shots. And if you love to have yourself in the shot, facing the LCD forward lets you make sure you have not accidently left out half of your head from the photo.
Calling the A610 compact would be a kindness. Though the mid-range A510 and A520 saw a reduction in size, the higher end of the A-Series seems to get a bit larger with each generation. The A610 (and its twin the A610, priced about $100 less) is a little bulky compared to past models at 4.1 by 2.6 by 1.9 inches. The large right-handed grip adds a lot to the camera's size--necessary to accommodate the camera's four AA batteries that give it such excellent battery life. It makes the A610 too big to fit in anything smaller than a coat pocket or small carry bag, but it does give your hand a solid purchase on the camera and pushes the shutter release and zoom control well out in front, where your trigger finger comfortably rests.
Every new generation of camera brings a few ergonomic changes--some for the better, some not. The A610 mode dial is one example of an improvement. It's higher and more textured than the dial on the A95, which gives your thumb a better purchase when changing modes. Canon also spread the display, menu, exposure compensation, and transfer buttons further apart, making for more accurate use of the controls when you are in a hurry.
Not an improvement, but still one of the better features in Canon's digital cameras is the Function button, which now resides in the center of the four-way thumb buttons. Pressing the Function button pops up a concise, well-organized menu of key exposure controls on the A610's LCD screen. It lets you adapt to changing scenes and lighting conditions quickly and intuitively. On the other hand, Canon stuck with the sliding record/playback switch. It's a bit more cumbersome to quickly go back and review photos than with the quick-review button you find on most modern digital cameras.
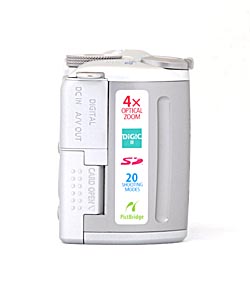
With the A610, the zoom range jumped from the A95's 3X to 4X. The A610 focal length starts at the 35mm film equivalent of 35mm--a basic wide-angle length, and it can accept wide-angle and telephoto accessory lenses--almost unheard of in a camera in this price range.
Exposure modes in the Image Zone include Portrait, Landscape, Night Scene, Stitch Assist, and Movie. Portrait, Night Scene, and Landscape all make automatic camera adjustments to optimize settings for specific shooting conditions. The Portrait mode uses a large aperture setting to focus on the subject, while maintaining an out-of-focus background. Landscape mode slows the shutter speed and maximizes depth of field with a small aperture setting. Night Scene mode illuminates your subject with flash and uses a slow shutter speed to evenly expose the background. The Scene setting accesses several more specialized preset shooting modes, which include Foliage, Snow, Beach, Fireworks, Underwater, Indoor, Kids & Pets, and Night Snapshot, all of which set up the camera for very specific conditions.
The Stitch-Assist mode is Canon's answer to panorama shooting, in which you capture multiple, horizontal, overlapping images. They are then "stitched" together on a computer using Canon's bundled software package or other image editing software. Proper overlap is critical for a successful panorama, and in the A610 you accomplish this by lining up a portion of the image framed in the LCD with a sort of ghost image from the previously recorded shot. It works well in moderate light, but the ghost image can be hard to see in full sunlight. Movie mode in the A610 is significantly better than its predecessor's. You are no longer limited to 30-second clips at 640 by 480 pixels (and only 10 frames per second). You can now shoot at 640 by 480 at 30fps until you run out of room on your memory card (if you purchase a high-speed SD card - we used a Kingston 133x SD card to test the camera with). The higher frame rate should produce better movies when you're shooting fast action. Like most digital cameras, the A610 doesn't let you use the optical zoom while recording a movie; however, you can use the digital zoom.
Canon's bundled photo application is an adequate, if basic, package for managing, downloading, and editing your photos. It does have one interesting utility called Remote Shooting, which, when you connect your camera to a computer via its USB cable, lets you change the camera's settings from a window on the computer as well as let you press a virtual shutter button. The images are then immediately transferred to the computer. It would be a handy feature for photographers who do indoor macro shooting.
Canon's documentation for the A610 (and A610) is relatively well-organized and comprehensive. There is a basic user guide to get you started, quickly, and a more detailed book that covers all of the camera's many functions. The only knock is that the descriptions for some of the more esoteric features are a little cryptic. (And we really dislike having information spread out between two separate manuals.)
Basic Features
- 5.0-megapixel CCD delivering image resolutions as large as 2,592 x 1,944 pixels
- 2.0-inch color LCD monitor
- Optical viewfinder
- Glass, 4x, 7.3-29.2mm lens (equivalent to 35-140mm zoom on a 35mm camera)
- 4x digital zoom
- Auto-focus and manual focus modes
- Auto-focus assist light
- Full-automatic, program auto-exposure, shutter-priority, aperture-priority, and full-manual exposure modes, as well as five preset exposure modes and movie mode.
- Eleven special scene modes.
- Manually adjustable aperture setting ranging from f/2.8 to f/8.0, depending on lens zoom position and shutter speed
- Shutter speed range from 1/2500 to 15 seconds, depending on aperture
- Built-in flash
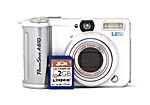
- SD Card memory storage.
- Power supplied by four AA batteries or optional AC adapter.
Special Features
- Audio notes with still images
- Stitch-Assist mode for panoramic shots
- My Color mode for color adjustment
- Color swap mode
- Custom Setting mode for saving frequently used settings
Design
 The A610 and its 7.1-megapixel twin the A620 (around $400) are most closely related to Canon's A520, which was released in February 2005. They have a similar shape and size, including a solid right-hand grip, plus a 4x optical zoom that covers the 35mm equivalent of 35mm to 140mm, the same shutter speed range, most of the same exposure controls.
Though encased in a plastic shell, the A610's body looks sturdy and durable; and the large 2-inch LCD is attached to the camera body by a beefy hinge that should hold up to a lot of use. The PowerShot SD550 has a clean and highly functional design. At 12.4 ounces with its four AA batteries and a memory card, this model is a good four ounces heavier than the A520. But that's still light enough to easily carry in a small bag or large coat pocket. The A610 is a bit larger than its predecessor: 4.1 by 2.60 by 1.9 inches--too big to fit in a shirt or pants pocket.
Fully-extended, the 4x optical zoom increases the camera's depth by about 1.5 inches. Surrounding the lens is a metal and plastic ring that covers the accessory lens mount. A small button on the lower right side (as viewed from the front) releases the ring. Add-on converter lenses offered by Canon include the .7x WC-DC58N wide-angle converter ($199) and 1.75x TC-DC58N tele-converter ($149), plus the LA-DC58F conversion lens adapter ($25) required to attach the two accessory lenses onto the A610. Adding the tele-adapter boosts the A610 telephoto capability to a 35mm equivalent of a 275mm telephoto lens. Also on the A610's front panel are its microphone, small viewfinder window, fixed electronic flash, and a small window for the combination auto-focus assist beam, red-eye reduction lamp, and self-timer indicator.
Looking at the A610's right side (as viewed from the rear) you'll find a substantial-looking wrist strap lug, plus covers for the camera's output connectors and the card slot. The top cover is a rubber square that you have to pry off with your fingernail. Beneath it hides the USB 2.0 port, audio/composite video terminal, and a plug for an optional AC adapter. To gain access to the SD Card slot, you push the door toward the back of the camera with your thumb and then swing the door open. It's easy enough to operate, but the small plastic tabs that hold the door in place could be broken off if you are not careful.
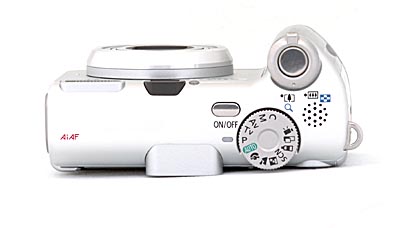
The top of the A610 is dominated by the large, easily-operated mode dial and a large shutter button that is nicely placed at the front edge of the camera's grip--right where your trigger finger naturally falls. The zoom control surrounds the shutter button; a ring with a substantial bump on its front edge, this arrangement makes it quick and easy to set your focal length and snap your photo. The mode dial sits on the top panel's back edge, right where your thumb wants to find it. Canon enlarged the top-mounted on/off switch with the A610: instead of the A520's small dot, its now a oblong button that should be easier to use. The camera's monaural speaker sits between the shutter release and the mode dial.

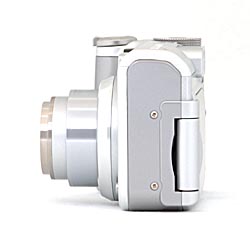
The back of the camera is where the A520 and the A610 depart significantly. The latter's most obvious feature is the 2-inch, hinged LCD--a real bonus on a camera in this price range. Like Canon's higher-end PowerShot G6, the LCD's beefy hinge is on the left edge of the camera's body. The LCD rotates out 180 degrees, and also pivots 270 degrees, letting you point the LCD up, down, toward the front of the camera (for self-portraits), or spin it around so that it faces the back of the camera, protecting it from possible damage. Topping the various controls that cover the right side of the back panel is the shoot/playback switch. Below that is a four-way navigation button with a dual Function/Set center button. Four other buttons controlling the display, exposure value, Menu, and photo downloading surround the four-way.
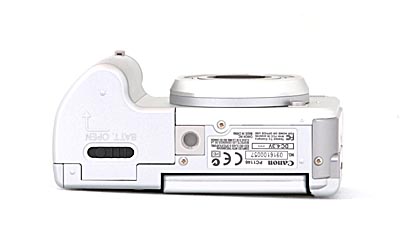
The wide hand grip gives the A610 a flat, stable bottom surface. There is a standard tripod mount, plus a large door that covers the AA battery compartment. Battery doors can be an Achilles Heel for digital cameras, but this one looks durable.
Camera Operation
While the A610's user interface may seem slightly cryptic at first approach, it's actually quite efficient. Most camera functions are controlled externally, and a few of the external control buttons serve multiple functions. When you do need to enter the LCD menu system, navigation is straightforward with only two main pages of options. The A610's external controls cut down on the amount of time spent searching menu screens, and I particularly like the "Function" menu which became standard on Canon digital camera models in the 2003 model year. Combined with the instruction manual, the A610's user interface shouldn't take more than an hour to get comfortable with.
 Record Mode LCD Display: In Record mode, the A610's LCD reports various exposure settings, including camera modes, the resolution and quality settings, number of available images, etc. Half-pressing the Shutter button reports the aperture and shutter speed settings, in all modes except Manual. (Aperture and shutter speed are displayed continuously in Manual mode, whether the Shutter button is pressed or not.) Pressing the Display button cycles through the available display modes, including the image with information, no display at all, and the image only.
 Playback Mode LCD Display: In Playback mode, the LCD reports the image series number, resolution and quality setting, file name, and the date and time of image capture. Pressing the Display button once pulls up an enhanced information display, with a histogram for checking the exposure. A third press cancels the information overlay. The telephoto side of the zoom toggle lets you zoom in on a portion of the image, while the wide-angle side backs you out again, and lets you step out to an "index" view of captured images, displayed as nine thumbnails at a time. Zooming out one step past the point at which the index display appears adds a "jump" bar to the bottom of the screen, letting you jump forward or back nine images at a time, rather than scrolling from each image to the next individually.
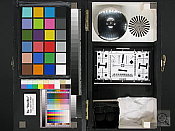
Print Connection: When you connect the Canon A610 to a PictBridge, Canon Direct Print, or Bubble Jet Direct-compatible printer, a new menu option is enabled, allowing easy print to a number of basic paper sizes, all without a computer. A special icon appears in the upper left hand corner, with the word SET right next to it, telling you that to adjust settings, you should press the Set button. You can select not only the size and type of paper, but you can also crop the pictures right in the camera. If you only print one size, full frame, you need only press the Print/Share button and printing of the current image begins immediately. (The screenshot at right is actually from a Canon SD500, but the screens on the A610 are nearly identical.)
External Controls

Shutter Button: Placed on the front edge of the right-hand grip and placed in the center of the zoom lever, this button sets focus and exposure when halfway pressed, and fires the shutter when fully pressed.
Zoom Lever (see image above): Operated by moving your finger slightly forward of the shutter button and rotating the small lever right or left, this smoothly-operating control sets both the optical and digital zoom while in record mode. In playback mode, the wide setting displays a nine-image index display of all images on the memory card. Using the right and left keys of the four-way rocker button lets you rapidly jump through groups of nine shots. Press the Function/Set button before the right/left keys and you can jump direct to the first or last nine shots on you memory card. Alternatively, the telephoto position enlarges the currently displayed image as much as 10x, so that you can check on fine details.

Mode Dial: Nicely placed on the camera's top panel, this large, notched dial is used to select the camera's shooting modes. Canon divides these functions into three categories: Auto, Image zone, and Creative zone. The options are as follows:
- Auto: The camera takes over all exposure settings, except for flash and macro modes, image size and quality settings. The exposure-value (EV) control is disabled.
- Creative Zone
- Program AE (P): Places the camera in control of shutter speed and lens aperture, while you maintain control over everything else (i.e., white balance, ISO, metering, exposure compensation, flash, etc.). Using the EV button, you can change the combination of shutter speed and aperture.
- Shutter-Speed Priority AE (Tv): Allows you to control the shutter speed settings from 1/2,500 to 15 seconds, while the camera controls the aperture. All other exposure settings are available.
- Aperture Priority AE (Av): Allows you to set the lens aperture from f/2.8 to f/8.0, while the camera controls the shutter speed. The maximum aperture depends on the zoom setting, ranging from f/2.8 at the wide angle end to f/4.1 at the telephoto position. In this mode, you maintain control over all other exposure variables.
- Manual (M): Provides complete control over all exposure settings, including shutter speed and lens aperture. As with aperture-priority mode, the maximum aperture varies with the zoom setting from f/2.8 at wide angle to f/4.1 at telephoto. The fastest shutter speed varies with the aperture and zoom setting:
- 1/1,250 at f/2.8-3.2 (wide) or f/4.1 (tele)
- 1/1600 at f/3.5-4.0 (wide) or f/5.6 -6.3 (tele)
- 1/2000 at f/4.5 (wide) or
- 1/2,500 at f/5.6-8.0 (wide) or f/7.1-8.0 (tele)
- Custom (C): This position recalls previously-saved exposure settings of the user's choice.
- Image Zone
- Portrait: Uses a large aperture setting to blur the background while keeping the primary subject in sharp focus. Helps your subject stand out in the photo.
- Landscape: Employs a small aperture setting to keep both the background and foreground in focus. (May use a slower shutter speed, so a tripod is recommended.)
- Night Scene: Uses slower shutter speeds and flash to even out nighttime exposures. The slow shutter speed allows more ambient light to be recorded in the low-light areas, while the flash freezes the subject. The Red-Eye Reduction mode can be used with this exposure mode to eliminate Red-Eye in night portraits.
- SCN (Scene): Displays more preset shooting modes on the LCD screen, including Foliage, Snow, Beach, Fireworks, Underwater, Indoor, Kids & Pets, and Night Snapshot.
- My Colors: Lets you alter the color balance of an image to emphasize specific colors. Options include Positive Film (more vivid colors), Lighter Skin Tone, Darker Skin Tone, Vivid Blue, Vivid Green, Vivid Red, Color Accent (changes all colors except the selected one to black and white), Color Swap, and Custom Color.
- Stitch-Assist: Allows you to record a series of horizontal images, panning either right to left or left to right, and using the bundled software for your computer, stitch your shots together into one large image or panorama.
- Movie: Records video of up to 1GB in size, and up to 60 frames per second. There are four movie modes: standard, Fast Frame (60 fps for up to a minute, each), Compact, and My Colors.

Power Button: To the left of the Mode dial, this button turns the camera on or off.

Mode Switch: Adjacent to the top right corner of the LCD monitor on the rear panel, this switch selects between Record and Playback modes.

Four-way Rocker Button: This four-way rocker button isn't marked with arrows, but actuates left, right, up, and down, simulating arrow keys to navigate through settings menus. In Record mode, the left and right buttons adjust exposure compensation, as well as manual focus, when enabled. The top button controls flash mode, while the bottom button accesses macro and manual focus modes.
In Playback mode, the left and right buttons scroll through captured images. When an image has been enlarged, all four arrows pan within the view.Func./Set Button (see image above): In the center of the four-way controller, this button confirms menu selections. It also launches the Function exposure control menu.
- *
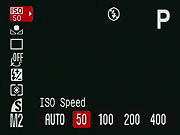 ISO Speed: Sets the camera's sensitivity to Auto (except in Manual), or to 50, 100, 200, or 400 ISO equivalents.
- White Balance: Controls the color balance of images. Options are Auto, Daylight, Cloudy, Tungsten, Fluorescent, Fluorescent H, Underwater, and Custom (manual setting).
- Drive Mode: Accesses continuous shooting and the three self-timer modes (a two- or 10-second delay, or the adjustable timer).
- Photo Effect: Enables Vivid Color, Neutral Color, Low Sharpening, Sepia, or Black-and-White picture effects.
- Flash Output: Adjusts the overall flash intensity in three steps from low to full.
- Light Metering System: Sets the metering mode to Evaluative, Center-Weighted, or Spot.
- Compression: With still images, it sets the amount of JPEG image compression. The less compression, the better the image. Options are Superfine, Fine, and Normal.
- Resolution: Specifies the image resolution and quality settings. Still image resolutions are Large (2,592 by 1,944), Medium 1 (2,048 by 1,536), Medium 2 (1,600 by 1,200), and Small (640 x 480) pixels. Postcard mode also offers 1,600 x 1,200 (or 3:2) pixel resolution. The A610 grays out a portion of the LCD screen top and bottom--but only when you half-press the shutter button.

Display Button: Below and to the left of the four-way controller and adjacent to the lower right corner of the LCD monitor, this button controls the information and image display modes in Record and Playback modes.

Exposure/Erase Button: Above and to the left of the four-way controller, this button let you adjust exposure compensation (EV) in record mode, and erases one shot at a time in playback mode. With EV, you can increase or decrease your exposure from -2 to +2 in one-third-step increments. In manual mode, this button lets you switch between changing the shutter speed or aperture value.

Menu Button: Below and to the right of the four-way control, this button calls up the settings menu in Record and Playback modes. It also dismisses the menu screen and backs out of menu selections.

Print/Share Button: Above and to the right of the four-way control, this button lights up, indicating that sync or printing is one button away, when the camera is connected to a printer or Windows computer.

Battery Compartment Latch: Nestled in the center of the battery compartment door on the bottom of the camera, this sliding switch unlocks the door, so that it can slide forward and open.

Lens Ring Release Button: Tucked under the lens on the camera's front panel, this button releases the lens ring. Once unlocked, the lens ring can then be turned and removed to accommodate accessory lenses.
Camera Menus
Record Mode: Pressing the Menu button in Record mode pulls up the following options (not all options are available in all modes):
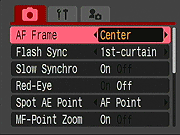 AF Frame: Selects three different auto focus modes. AiAF selects the focal point from one of nine focus areas arrayed in the display. Center focuses on a small area in the center of the image. FlexiZone lets you manually select to point of focus within the viewing frame.
- Flash Sync: Selects whether the flash fires when the shutter opens (1st-curtain) or just before the shutter closes (2nd-curtain).
- Slow Synchro: When switched on, lets you use a slow shutter speed with the flash.
- Red-Eye Reduction: Turns the Red-Eye Reduction pre-flash on or off, which works with all flash modes.
- Spot AE Point: Sets whether the exposure is measured either at the center of the image, or at the same point as the auto-focus focal point (AF Frame menu item above must be set to Center or Flexi-zone to access this option).
- Safety Shift: When on and the camera is set to Tv or Av modes, automatically adjusts both the shutter and aperture if the camera cannot set the correct exposure with the user's setting.
- MF-Point Zoom: Turns the MF Point zoom option on or off. If on, the center of the frame is enlarged on the LCD display for better viewing while adjusting the manual focus.
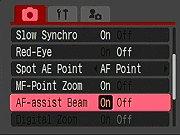 AF Assist Beam: Turns the AF Assist light on or off. If on, the light automatically illuminates in dark shooting conditions.
- Digital Zoom: Turns the digital zoom on or off.
- Review: Turns the instant image review function on or off, with available image display times from two to 10 seconds in one second steps. "Hold" displays the image until you press the shutter release half way down.
- Reverse Display: Turns on or off the function that automatically flips the image in the LCD when the LCD is pointed toward the front of the camera.
- Grid Lines: Turns on a framing grid; helpful, for example, for keeping horizons level.
- Date Stamp: Specifies whether the date and time are overlaid on the image. (Only available in Postcard mode.)
- Save Settings: Saves the current setting to the custom mode.
Playback Mode: This mode lets you review captured images and movies on the memory card, as well as erase them, protect them, or tag them for printing and transfer. The traditional green Playback symbol denotes this mode on the Mode switch. Pressing the Menu button displays the following options:
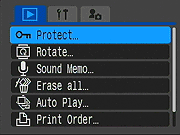 Protect: Marks the current image for write-protection, or removes write-protection. Protected images cannot be deleted or manipulated, except through card formatting, which erases all files.
- Rotate: Rotates the current image 90 or 270 degrees clockwise.
- Sound Memo: Records a short sound clip to accompany a captured image.
- Erase All: Erases all files on the memory card, except protected ones.
- Auto Play: Automatically plays all captured images in a slide show.
- Print Order: Determines how many copies of the current image will be printed, with options for creating an index print, imprinting the date and time, and imprinting the file number.
- Transfer Order: Marks images to be transferred to a computer later.
Setup Menu: This menu is available in all exposure modes, simply by pressing the Menu button and selecting the Setup tab.
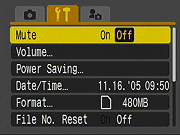 Mute: Turns the camera's start-up, operation, self-timer, shutter and playback sounds on and off.
- Volume: Adjusts the volume settings for the camera's start-up, operation, self-timer, shutter, and playback sounds.
- Power Saving: Sets the camera's Auto Power Down and Display Off settings. Power Down can be enabled or disabled, and Display Off can be set to 10 / 20 / 30 seconds, or 1 / 2 / 3 minutes.
- Date/Time: Sets the camera's internal calendar and clock.
- Format: Formats the SD/MMC card, erasing all files (even those marked for write-protection).
- File No. Reset: Resets file numbering with each new SD/MMC card. If disabled, the camera continues numbering in sequence, regardless of memory card.
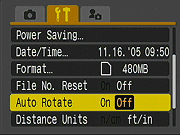 Auto Rotate: Specifies whether images appear vertically in the LCD monitor when the camera is held vertically.
- Distance Units: Sets the manual focus indicator to meters/centimeters or feet/inches.
- Language: Sets the camera's menu language to one of 22 choices. English is the default setting.
- Video System: Designates the camera's video-out signal as NTSC or PAL.
- Reset All: Resets the camera to its default settings.
My Camera Menu: This is the third menu tab on the menu screen, and appears in every mode.
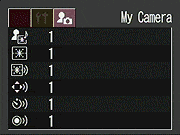 Theme: Selects a common theme for each My Camera menu settings item. Four options are available, the first one being Off. When a theme is selected, all of the following settings automatically adjust to that theme.
- Startup Image: Sets the startup image when you turn on the camera to: Black screen, Canon logo, Canon logo w/sunset, nature scene. The latter two startup images can be overwritten with an image of your own. You can apply your personal image in playback mode by pressing the Display button and choosing an image from the SD card. The image is copied to the camera's internal memory, and is still displayed when the SD card is removed.
- Startup Sound: Sets the startup sound when you turn on the camera to: No sound, musical tone (1), musical tone (2), or birds chirping. You can apply your own sounds in playback mode by using the cameras audio recording function. The sound is copied to the camera's internal memory, and is retained even when the SD card is removed.
- Operation Sound: Sets the sound when any control or switch is used (except the Shutter button). Options include beep, zing, or chirp. You can also record your own custom sound by the same method as the startup sound.
- Self-Timer Sound: Sets the sound that signals you when the shutter release is two seconds away. Options include fast beeps (1), telephone ring, or a Coyote howl. Like the startup and operation sound, you can record a custom tone.
- Shutter Sound: Sets the shutter sound that you hear when you depress the shutter button (there is no shutter sound in Movie mode). Options include beep, zing, bark and custom user sound.
In the Box
The PowerShot A610 arrives with the following items:
- Wrist strap WS-200
- Four AA-type alkaline batteries
- USB cable IFC-400PCU
- Audio/Video cable AVC-DC300
- 16MB SD Card
- Canon Digital Camera Solution software CD
- Instruction manuals, software guide, and registration kit.
Recommended Accessories
- Large capacity SD/MMC memory card. (These days, 512 MB is a good trade-off between cost and capacity.)
- Two sets of high-capacity NiMH rechargeable batteries and a good-quality charger.
- AC adapter kit.
- Soft case.
- Lens accessory kits.
Recommended Software: Rescue your Photos!
Just as important as an extra memory card is a tool to rescue your images when one of your cards fails at some point in the future. We get a lot of email from readers who've lost photos due to a corrupted memory card. Memory card corruption can happen with any card type and any camera manufacturer, nobody's immune. A lot of "lost" images can be recovered with an inexpensive, easy to use piece of software though. Given the amount of email I've gotten on the topic, I now include this paragraph in all my digital camera reviews. The program you need is called PhotoRescue, by DataRescue SA. Read our review of it if you'd like, but download the program now, so you'll have it. It doesn't cost a penny until you need it, and even then it's only $29, with a money back guarantee. So download PhotoRescue for Windows or PhotoRescue for Mac while you're thinking of it. (While you're at it, download the PDF manual and quickstart guide as well.) Stash the file in a safe place and it'll be there when you need it. Trust me, needing this is not a matter of if, but when... PhotoRescue is about the best and easiest tool for recovering digital photos I've seen. (Disclosure: IR gets a small commission from sales of the product, but I'd highly recommend the program even if we didn't.) OK, now back to our regularly scheduled review...
See camera specifications here.
Cycle times, shutter lag, battery life, etc. can be found here.
We ran the Canon PowerShot A610 through our usual battery of tests, and have summarized our findings here. To see the full set of our test images, with explanations of what to look for in them, see the Canon PowerShot A610 Sample Pictures page. For a complete listing of all our test and "gallery" shots, go to the Thumbnails page.
Not sure which camera to buy? Let your eyes be the ultimate judge! Visit our Comparometer(tm) to compare images from the Canon PowerShot A610 with those from other cameras you may be considering. The proof is in the pictures, so let your own eyes decide which you like best!
.
Lens
Zoom
A very good 4x optical zoom range, with more extensive telephoto range than is typical, and very good optical performance.
 |
 |
 |
35mm |
140mm |
4x Digital Zoom |
The Canon A610 zooms over the equivalent of a 35-140mm range, offering slightly more telephoto than most lenses in its class. Results are very good at wide angle, with only slight coma distortion in the corners, but good detail definition. The 4x digital zoom effectively takes the A610's zoom out to 16x, but with the subsequent increased distortion and noise levels I usually expect.
Macro
Excellent macro performance with great detail and resolution, and a very tiny minimum area. Flash exposure is uneven at this close range though.
 |
 |
| Standard Macro | Macro with Flash |
The Canon A610's macro setting performed very well, capturing a small minimum area of just 0.85 x 0.64 inches (22 x 16 millimeters). Detail and resolution are both excellent, with only moderate blurring in the corners. (Most cameras have some softening in the corners in macro mode.) The flash almost throttles down, but the lens barrel casts a large shadow at the extremely close shooting distance. (Plan on using external lighting for your closest macro shots with the A610.)
Distortion
Moderate barrel distortion, though fairly low pincushion.
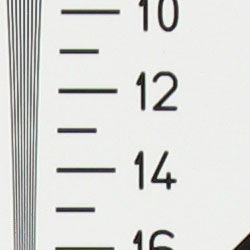
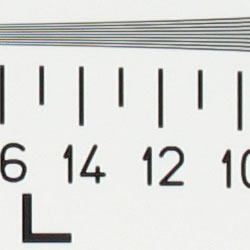
This is the tendency for the lens to bend straight lines outward (like a barrel--usually at wide angle) or inward (like a pincushion--usually at telephoto). The Canon A610's 0.7% barrel distortion at wide angle is a bit less than average among the cameras I've tested, although I still feel that this level is still a little too high. At the telephoto end, the A610's 0.1% pincushion is slight, and just barely noticeable.
| Barrel distortion at 35mm is 0.7% |
| Pincushion at 140mm is 0.1% |
Chromatic aberration
Moderate, small effect on images at edges.
 |
 |
| Wide: moderate, top left @ 200% | Tele: quite low, top right @200% |
Chromatic aberration is moderate but a little bright at wide angle, showing about 4-5 pixels of coloration on either side of the target lines. At telephoto, corners are generally crisper, and very little chromatic aberration is evident. (This distortion is visible as a very slight colored fringe around the objects at the edges of the field of view on the resolution target.)
Corner Sharpness
Only very minor softening in the corners of the frame, with very little effect on images.
 |
 |
| Wide: slight blurring in upper left corner. | Wide: fairly sharp at center. |
 |
 |
| Tele: slight blurring in upper left corner. | Tele: sharp at center. |
The Canon A610 showed only very slight softening in the corners, with the greatest (albeit minor) effect in the upper left corner at both wide angle and telephoto lens settings.
Sensor
Exposure and White Balance
Indoors, incandescent lighting
Pretty good color with the Manual white balance (though a hint greenish), and average exposure.
 |
 |
| Auto White Balance +1.0 EV | Incandescent WB +1.0 EV |
 |
|
| Manual White Balance +1.0 EV |
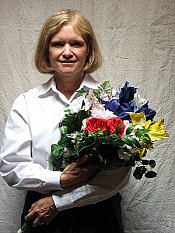
The A610's Manual white balance setting produced the best overall color here, despite just a slight greenish cast. The Auto setting resulted in slightly warm color, and the Incandescent setting had a slight red tint. All white balance options produced results that were within a range we'd consider acceptable though. The Canon A610 required a +1.0 EV exposure compensation boost to get a good exposure, which is about average for this shot. Overall color is bright and nearly accurate, though the blue flowers are a touch dark. Our test lighting for this shot is a mixture of 60 and 100 watt household incandescent bulbs, a very yellow light source that gives many cameras fits, but a type of lighting that is very common in typical home settings here in the US.
Outdoors, daylight
Generally quite good color and exposure accuracy, though high contrast and saturation.
 |
 |
| Auto White Balance, +1.0 EV | Auto White Balance, Auto Exposure |
The Canon A610 typically performed well outdoors, with bright color and good exposures. While contrast tended to be high under harsh lighting, both shadow and highlight detail were still fair.
See full set of test images with explanations
See thumbnails of all test and gallery images
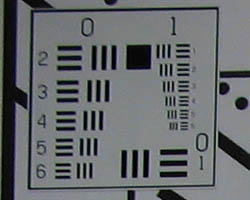
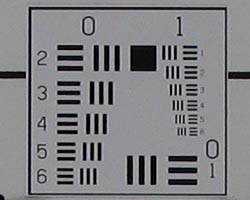
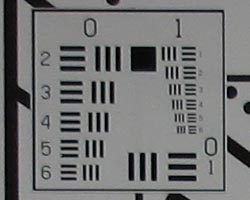
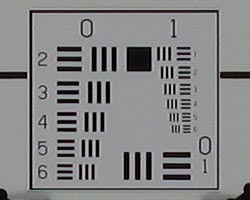
Resolution
High resolution, 1,050 lines of strong detail.
Our laboratory resolution chart revealed sharp, distinct line patterns down to about 1,050 lines per picture height, with extinction at around 1,800. (The camera also produced very slight color artifacts at lower line frequencies, visible in the full-sized res target shots.) Use these numbers to compare with other cameras of similar resolution, or use them to see just what higher resolution can mean in terms of potential detail. Beware that while you might be able to make out what looks like distinct lines at numbers higher than those we've mentioned here, the camera is just doing its best to continue interpreting the lines. If you zoom in and follow them from the wider portions, you'll see the lines converge and reappear several times.
 |
 |
| Strong detail to 1,050 lines horizontal | Strong detail to 1,050 lines vertical |
See full set of test images with explanations
See thumbnails of all test and gallery images
Sharpness & Detail
Overall quite sharp images, though moderate noise suppression.
 |
 |
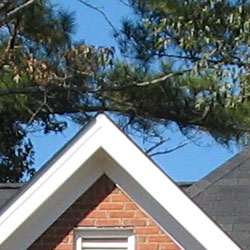
| Good definition of high-contrast elements, such as the branches against the sky here. | Subtle detail: Hair Noise suppression tends to blur detail in areas of subtle contrast, as in the darker parts of Marti's hair here. (But the A610 blurs less than most.) |
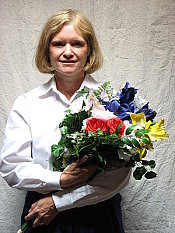
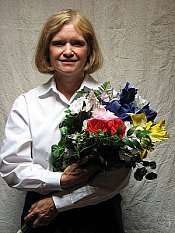
The Canon A610 produces sharp images, with great definition even in the very fine details. In the foliage crop above, the camera handles the tiny details of the smaller leaf size quite well, and only slightly over-enhances the more extreme light and dark edges of the larger leaves. (Edge enhancement creates the illusion of sharpness by enhancing colors and tones right at the edge of a rapid transition in color or tone.)
Noise-suppression systems in digital cameras tend to flatten-out detail in areas of subtle contrast. The effects can often be seen in shots of human hair, where the individual strands are lost and an almost "watercolor" look appears. The crop at far right shows some noise suppression in the darker areas of Marti's hair, though individual strands are still visible in the lighter shadows.
ISO & Noise Performance
Low noise at the normal sensitivity settings, though higher noise that softens detail at the highest setting.
 |
 |
| ISO 50 | ISO 100 |
 |
 |
| ISO 200 | ISO 400 |
The Canon A610 produced low noise at the 50 and 100 ISO settings, with minimal effect on detail. At ISO 200, noise rises and becomes more obtrusive, but is still within reasonable limits. At ISO 400 , some fine detail is lost in the grain pattern and to noise suppression processing, and the noise pixels are brighter, but the overall performance is still better than average.
Extremes: Sunlit and low light tests
Pretty good performance under harsh lighting, but high contrast. Good detail and resolution. Good low-light performance, capable of capturing bright images under average city street lighting and much darker conditions.
 |
 |
|
| +0.3 EV | +0.7 EV | +1.0 EV |
Sunlight:
Because digital cameras are more like slide film than negative film (in that they tend to have a more limited tonal range), we test them in the harshest situations to see how they handle scenes with bright highlights and dark shadows, as well as what kind of sensitivity they have in low light. The shot above is designed to mimic the very harsh, contrasty effect of direct noonday sunlight, a very tough challenge for most digital cameras. (You can read details of this test here.)
The Canon A610 handled the deliberately harsh lighting in the test above pretty well, though contrast is high. The highlights hold onto modest detail, as do the shadows. Noise suppression is visible in the dark shadows, but detail overall is still quite good. Though highlights are quite washed out in the +1.0 EV exposure, the overall exposure was still more pleasing than the darker +0.7 EV shot. (In "real life" though, be sure to use fill flash in situations like the one shown above; it's better to shoot in the shade when possible.)
| 1 fc 11 lux |
1/2 fc 5.5 lux |
1/4 fc 2.7 lux |
1/8 fc 1.3 lux |
1/16 fc 0.67 lux |
|
| ISO 50 |
1 sec f2.8 |
2 sec f2.8 |
5 sec f2.8 |
10 sec f2.8 |
15 sec f2.8 |
| ISO 100 |
1/2 sec f2.8 |
1 sec f2.8 |
2.5 sec f2.8 |
5 sec f2.8 |
8 sec f2.8 |
| ISO 200 |
1/4 sec f2.8 |
1/2 sec f2.8 |
1.3 sec f2.8 |
2.5 sec f2.8 |
4 sec f2.8 |
| ISO 400 |
1/8 sec f2.8 |
1/4 sec f2.8 |
1/1 sec f2.8 |
1.3 sec f2.8 |
2 sec f2.8 |
Low light:
The Canon A610 performed very well here, capturing bright, usable images at the darkest light levels I test at. However, images are just slightly dim at the lowest light level, but still usable. Color balance was good with the Auto white balance setting, though slightly reddish. With the camera's AF assist lamp enabled, the A610's AF system handled the darkest light levels with ease. Without AF assist, the camera could accurately focus down to about 1/8 foot-candle, which is about 1/8 as bright as average city street lighting at night. Do keep in mind though, that the camera's maximum 15-second shutter time absolutely demands the use of a tripod or other camera support to get sharp photos. (A useful trick is to just prop the camera on a convenient surface, and use its self-timer to release the shutter. This avoids any jiggling from your finger pressing the shutter button, and can work quite well when you don't have a tripod handy.)
NOTE: This low light test is conducted with a stationary subject, and the camera mounted on a sturdy tripod. Most digital cameras will fail miserably when faced with a moving subject in dim lighting. (For example, a child's ballet recital or a holiday pageant in a gymnasium.) For such applications, you may have better luck with a digital SLR camera, but even there, you'll likely need to set the focus manually. For information and reviews on digital SLRs, refer to our SLR review index page.
Color
Saturation & Hue Accuracy
Generally good overall color and hue accuracy, though high saturation.
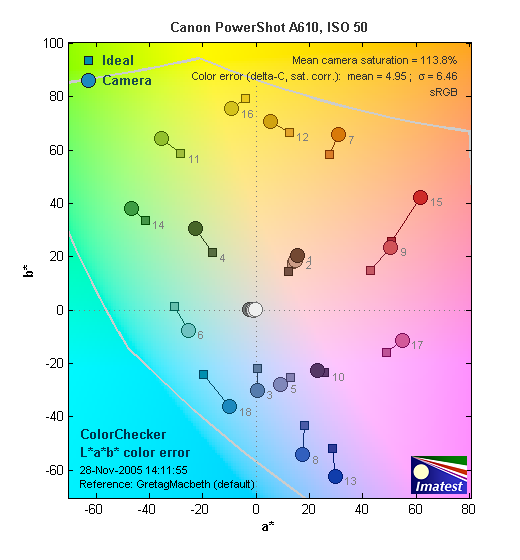 |
| In the diagram above, the squares show the original color, and the circles show the color that the camera captured. More saturated colors are located towards the periphery of the graph. Hue changes as you travel around the center. Thus, hue-accurate, highly saturated colors appear as lines radiating from the center. |
The other important part of color rendition is hue accuracy. Hue is "what color" the color is, and the A610 performed well here. It's guilty of shifting cyan colors toward blue (like many digital cameras), to produce better-looking sky colors, and warming up pinks, but overall hue accuracy was still quite good.
 |
 |
 |
Viewfinder
Coverage
Optical viewfinder tight and skewed toward the bottom of the frame. Very good accuracy from the LCD monitor.
 |
 |
| 35mm eq., optical viewfinder | 140mm eq., optical viewfinder |
 |
 |
| 35mm eq., LCD monitor | 140mm eq., LCD monitor |
The Canon A610's optical viewfinder was quite tight, showing only about 83% frame accuracy at wide angle, and about 81% at telephoto. (A little worse than average.) However, the LCD monitor showed close to about 100 percent frame accuracy at both lens settings.
Flash
Coverage and Range
Pretty good coverage from the A610's built-in flash, though slightly higher than average positive exposure compensation required, and warm color.
|
|
| 35mm equivalent | 140mm equivalent |
 |
 |
| Normal Flash +1.3 EV | Slow-Sync Flash +1.0 EV |
Flash coverage was a little uneven at wide angle, though much more uniform at telephoto. On the Indoor test, the A610's flash underexposed a fair amount at its default setting, requiring a higher than average +1.3 EV exposure compensation adjustment to get bright results. The final images were color-balanced well for the flash, but a very warm tone resulted from the incandescent lighting in the room. (Some cameras do a better job of this, with their flash windows tinted slightly to produce flash illumination that's at least a little closer to incandescent.) The camera's Slow-Sync flash mode required less compensation at +1.0 EV, and produced slightly more even lighting on Marti's features. However, the strong orange color cast is still present.
| 8 ft | 9 ft | 10 ft | 11 ft | 12 ft | 13 ft | 14 ft |
1 sec f3.5 |
1 sec f4.1 |
1 sec f4.1 |
1 sec f4.1 |
1 sec f4.1 |
1 sec f4.1 |
1 sec f4.1 |
The A610's flash remained consistently bright all the way to 14 feet from the test target, a much better than average performance among cameras in its price range.
Output Quality
Print Quality
Good print quality, great color, very usable 11x14 inch prints. ISO 400 images are a little rough at 8x10, but very nice-looking at 5x7.
Testing hundreds of digital cameras, we've found that you can only tell just so much about a camera's image quality by viewing its images on-screen. Ultimately, there's no substitute for printing a lot of images and examining them closely. For this reason, we now routinely print sample images from the cameras we test on our Canon i9900 studio printer, and on the Canon iP5000 here in the office. (See the Canon i9900 review for details on that model.)
The Canon A610's photos looked very nice when printed on our Canon i9900 printer. Its images held together very well up to print sizes of 11x14 inches, and at 8x10 were absolutely tack-sharp. Its high-ISO performance frankly surprised us, in a very pleasant way. Printed at 8x10 inches, its ISO 400 shots did indeed show some visible noise when viewed up close, but at normal viewing distances of a foot or so (as would be the case for a print displayed on a wall or framed on a table) they looked quite nice. At 5x7 inches, ISO 400 shots looked just great, almost certainly acceptable to the vast majority of consumers. ISO 200 images looked very nice at 8x10, even when viewed closely.
The color of the A610's prints was very good as well. To our eyes, they looked just a little pumped-up, the colors being a fair big richer than life, but we tend to prefer color that's a bit less saturated than most consumers prefer. We think that the average consumer would find the A610's color very appealing indeed.
All in all, excellent print quality, particularly for a camera in the A610's price range.
Timing and Performance
Canon A610 Timing
Better than average speed for a consumer camera.
| Startup/Shutdown: | |
| Power On to first shot | 1.4 seconds |
| Shutter response (Lag Time): | |
Full Autofocus Wide |
0.48 second |
Full Autofocus Tele |
0.63 second |
Prefocused |
0.071 second |
| Cycle time (shot to shot) | |
| Normal large/fine JPEG | 1.09 seconds |
| Flash recycling | 5 seconds |
| Continuous mode | 0.41 second 2.44 frames/second (unlimited frames) |
| Download speed | |
| Windows Computer, USB 2.0 | 1,501 KBytes/sec |
The A610 is a fairly fast little consumer digital camera, in almost all aspects of its performance. Start-up is quick, and shutter response time is noticeably better than average at both wide angle and telephoto lens settings. Prefocused (half-way holding down the Shutter button), the A610 is very quick, at 0.071 second. Normal large/fine JPEG cycle times are faster than average in its price class, and its Continuous speed is pretty good as well. However, the boon on the Continuous mode is that the camera can capture an unlimited number of frames this fast, without stopping to clear the buffer. (Note though, that these times were measured with a very fast Kingston 133x SD card. The shot to shot times or the number of frames you can capture without pausing may be lower with a slower card, particularly in continuous mode.) Connected to a computer, download speeds are very fast. Bottom line, the Canon A610 should be perfectly suitable for family photos of fast-moving children, as well as most average situations, including most sporting events.
Battery and Storage Capacity
Battery
Excellent battery life in any of its modes, and truly exceptional with the LCD turned off.
| Still-image capture mode LCD on |
316 minutes |
| Still-image capture mode LCD off |
27 hours |
| Image playback LCD on |
11 hours |
The Canon PowerShot A610 uses four AA batteries for power, and ordinary alkaline batteries are included with the camera. The table above shows maximum run times based on our power measurements and a "standard" set of 1600 mAh rechargeable NiMH AA cells, so your experience with modern, higher-capacity cells should be even better. These are really excellent run times, the camera consumes little enough power that you probably could run it from alkaline cells if you wanted to. We still strongly recommend good-quality NiMH rechargeable batteries and a good-quality charger, as they'll save you many times their cost over the life of the camera.
.
Storage
The Canon A610 accepts SD/MMC memory cards, and comes with a 16MB card.
16MB Memory Card |
Fine | |
| 2,592 x 1,944 | Images | 6 |
| File Size | 2.7 MB | |
| 2,048 x 1,536 | Images | 9 |
| File Size | 1.7 MB | |
| 1,600 x 1,200 | Images | 15 |
| File Size | 1.1 MB | |
| Images | 56 | |
| File Size | 283 K | |
We strongly recommend buying at least a 128 MB, preferably a 256 MB SD memory card, to give yourself extra space for extended outings.
| Pro: | Con: |
|---|---|
|
|
| Free Photo Lessons | |
|


Follow Imaging Resource: