Olympus C-211 ZoomHave your cake and eat it too! - 2 megapixels worth of digital photos, and a built-in Polaroid printer!<<Optics :(Previous) | (Next): Shutter Lag & Cycle Time Tests>> Page 6:Exposure & FlashReview First Posted: 9/25/2000 |
Exposure
The C-211 operates in Automatic exposure mode only, however the user does have control over exposure compensation, white balance, light metering, and flash. Aperture is automatically controlled, with values of f/2.8 or f/8.6, depending on the optical zoom setting. Shutter speeds range from 1/1,000 to 1/2 second, and are also determined automatically.
As there is no optical viewfinder on the C-211, the LCD monitor automatically activates once the camera is powered on. The CCD image is displayed on the screen, in addition to various bits of information about the camera settings. The camera's digital telephoto status, focus distance, and flash modes are displayed on the left side of the monitor; the remaining exposures and image quality are displayed along the bottom; and exposure compensation is displayed on the right. With the exception of exposure compensation and image quality, each of these settings is adjusted using the buttons below the monitor. The camera does not display exposure settings.
Exposure compensation is manually adjustable from -2 to +2 in 0.5 EV increments by pressing the right and left arrow buttons on the back panel touchpad (located inside the zoom lever). White balance (WB) is controlled within the Record menu, with options for Auto, Daylight, Cloudy, Tungsten and Fluorescent. The C-211's Quality mode is also set within the Record menu, with options for Standard Quality (SQ), High Quality (HQ), and Super High Quality (SHQ). A 12-second self-timer can be activated in the Record menu, with the countdown triggered by fully depressing the shutter button.
Two Light metering options are available, ESP and Spot. Digital ESP metering is the default metering system, which calculates the exposure by averaging light readings from several points throughout the image. Spot metering simply determines the exposure by reading the center of the image (inside the brackets). When shooting in Spot metering mode, you can manually lock the exposure by centering the part of the image you want to meter within the LCD monitor, depressing the shutter button halfway, and then recomposing the shot as you continue to depress the shutter button halfway. The same method can also be used to lock the autofocus, which is also based on the center of the image.
An interesting feature of the C-211's Record menu is that it allows you to make temporary menu changes. This means that if you want to change the White Balance for the current shot only, and return to the original setting quickly, you simply bring up the Record menu, make the change without exiting the menu, compose and expose the shot with the menu on the screen, and press the Menu button to close the menu without applying the setting.
 Flash
FlashThe C-211 features a built-in flash with five operating modes: Auto, Redeye Reduction, Off, Fill-in, Slow Sync, and Slow Sync with Redeye Reduction. All flash modes are controlled by the Flash button on the back panel. The Auto mode puts the camera in control of when to fire the flash, based on existing light levels. The Redeye Reduction mode fires a small pre-flash before firing the flash at full intensity, to reduce the occurrence of the Redeye Effect. Setting the flash to Off simply means that the flash never fires, regardless of the exposure, while the Fill-in setting fires the flash with every exposure. For night scenes, the Slow Sync setting combines the flash with a slow shutter speed, allowing more ambient light into the image. Finally, the Slow Sync with Redeye Reduction does the same thing, only it fires the small pre-flash in advance. This mode is perfect for night portraits. Olympus rates the C-211's flash as effective from 8 inches to 13 feet (0.2 to 4.0 meters).
Within the Record menu, you can access an external flash option by scrolling to the bottom of the menu and selecting the special functions screen (a star-shaped icon). The final option is external flash. Although the camera doesn't feature a physical connection for an external flash, the camera is set up to work with a completely separate external flash attached to a slave unit. This means that the camera's built-in flash must be activated to trigger the slave unit. We found this a little interesting, in that it would presumably have been simpler to go ahead and include an external flash sync terminal. Regardless, the camera's ability to work with a more powerful, external flash does increase its flexibility.
The drawback to using this mode is that the camera's flash reverts to a single-pop operation. The C-211 (like most digicam flashes) uses one or more pre-flashes before the main exposure to set the white balance, and adjust other exposure settings. However, when the camera is set on the External flash mode, it switches to a single flash, to avoid accidentally triggering the external slave with the pre-flash. By eliminating the camera's pre-flash feature, you effectively reduce the camera's automatic metering capabilities.
The other challenge associate with using the External flash option is getting out of the mode when you're finished. To do so, you must return to the Record menu, re-enter the special functions screen, highlight the external flash option, and go back to normal flash mode by pressing the left arrow on the camera's keypad. You can also quit the mode by turning off the camera and starting it up again. We'd obviously have preferred a more user-friendly interface design for this feature, but were glad to see it included nonetheless, as we expect that many users of the C-211 will want to use external slave flashes to illuminate larger areas. (Examples might be insurance or police work.)
Sequence Mode
The C-211's Sequence shooting mode is activated through the Record menu by scrolling down to the third row from the top and selecting Change. This mode allows you to capture up to 45 sequential shots at 1.3 frames per second. The actual cycle time and maximum number of shots vary depending on the image quality setting, the amount of image information being recorded, and the available space on the SmartMedia card. Note that the mode is automatically canceled when the mode dial is turned from Record to any other position. Also, the flash is automatically disabled and the shutter speed will go no lower than 1/30 second, so darker scenes may be underexposed.
Movie Mode
The Special Function option under the Record menu (last row) offers a Movie recording mode. The C-211 can record up to 15 seconds of moving images, at approximately 15 frames per second (depending of course on the available SmartMedia space). Movies are automatically recorded at 320 x 240 pixel quality. The number of remaining seconds is reported on the LCD screen, along with a gauge that shows you the processing time. (When the gauge reaches the top, the camera stops shooting.) Optical zoom is available while shooting movies, but may work a little slower than it does in still photography mode.
Whiteboard & Blackboard Modes
Accessing the same Special Function option under the Record menu takes you to the Whiteboard and Blackboard recording modes. Both modes make capturing text at meetings or conferences a little easier, with the Whiteboard mode set up for capturing dark text on a light background, and the Blackboard mode set up for capturing light copy on a dark background. The C-211's manual notes that if the recorded text doesn't appear very clear, try boosting the exposure compensation (EV) for sharper results. Either mode can be canceled through the Record menu or by turning the mode dial to another selection.
Panorama Mode
The Panorama mode is available only when shooting with an Olympus brand SmartMedia card. Once the mode is activated, an alignment grid appears on the LCD screen. The four arrow buttons on the back panel let you determine the direction of your panoramic shot, by shifting the arrows on the alignment grid. You can take as many shots as the SmartMedia card will hold. Images can be "stitched" together on the computer, with the Camedia Master software provided with the camera. The Panorama option in the Record menu also doubles as the Special Function mode when using any of Olympus' special function media cards.
Printing
The most unusual feature of the C-211 Zoom is clearly the Polaroid photo printer that's built into it. We don't have a standard format for reviewing printers, so making direct comparisons against other photo output will be a little difficult. Probably the clearest statement to make about the C-211's output is that it looks every bit like the Type 500 polaroid prints you may already be familiar with from Polaroid's own Joycam or Captiva camera models. The prints measure 4.38 x 2.63 inches (111 x 67 mm), with an image size of 2.88 x 2.25 inches (73 x 57 mm). Color rendition and image resolution appear to be very typical of Polaroid Type 500 film, meaning that, to our eyes, the C-211 takes full advantage of the film's capabilities.
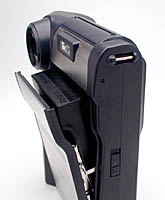
The Polaroid film pack lives inside the front of the camera, behind a large, hinged door. Type 500 film (also sometimes sold under the earlier designation of Type 95) has 10 prints per pack, and the C-211 keeps track of how many prints have been made, displaying the number still remaining in the pack whenever it's in Print mode.
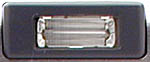
Print Mode is a separate selection on the mode dial on the camera's back. In this mode, pressing the large green Print button will print as many copies of the currently displayed picture as you selected in the print-mode setup menu. You also have the option of printing individual frames from movie files, or index prints showing the contents of your memory card. If you want, the C-211 will also print the date or time when the picture was taken along the edge of the image area, or the images filename from the memory card. To avoid inadvertent film waste, you must confirm the print operation by hitting the "OK" button after pressing the green Print button. Once you do this, the print will slowly eject from a hatch on the top of the camera, taking about 20 seconds to finish. Once ejected, the Type 500 film develops in a couple of minutes.
We confess to not being huge fans of Polaroid film's image quality, at least when compared to the best quality conventional prints from a photo lab. (Of course, we have to admit that this may not be a very fair comparison, given the constraints that Polaroid film works under, literally developing itself in broad daylight, before your very eyes.) That said, the C-211 actually offers some significant improvements over film-only Polaroid technology.
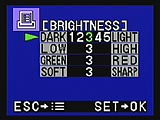 In the C-211's setup menu, there's a screen of options you can set that govern the printing process. You can adjust brightness, contrast, green/red color balance, and image sharpening, each across a range of 5 units on an arbitrary scale. Our experimentation with these settings revealed that they provided a very useful range of adjustment in their respective parameters. The one adjustment that was lacking, and that we sorely missed was a yellow/blue color correction option: Shooting under incandescent lighting, most color errors are in this dimension, rather than the red/green one offered by the C-211.
While the tone and color adjustments provided by the C-211's print engine do allow you to obtain better prints than you would be able to otherwise, we suspect they're part of a nefarious plot to sell more film: If we hadn't had the option to change anything, we probably would have been quite content with the default prints we obtained from the C-211. With all these controls at our disposal though, we quickly burned through a pack of film, just playing with the various options.
Although we bemoaned the absent yellow/blue color control, we in fact discovered that the red/green correction was a better fit for the needs of most prints from the C-211. Perhaps it is typical of Polaroid film, but we felt that the prints from our sample unit generally looked a bit better with just a little green correction dialed in.
 Another pleasant surprise is that the C-211 let us zoom in and crop out just a portion of each image, with a maximum "magnification" of about 3x. To crop into an image, push the zoom lever in the telephoto direction. Successive actuations of the zoom lever increase the magnification in steps of 1.5, 2.0, 2.5, and 3.0x. As the screenshot at right shows, when zoomed in, the printing area shows on the LCD display as a green rectangle. You can move this rectangle around the image area with the arrow buttons to select the portion of the image you want to print.
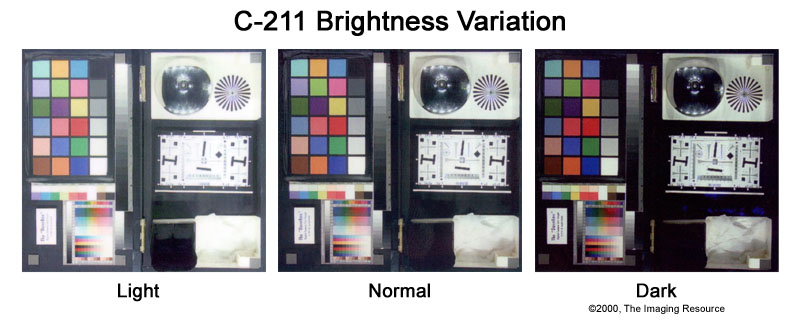
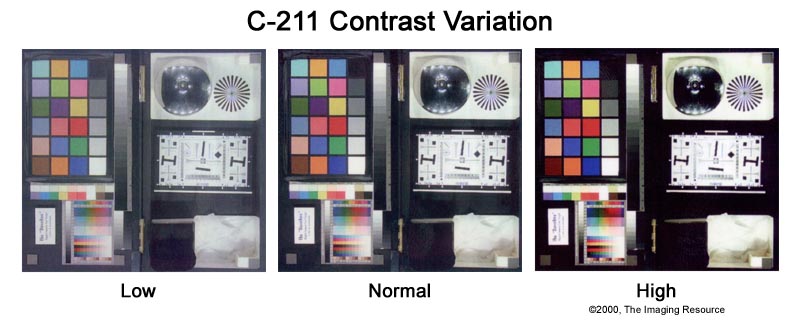
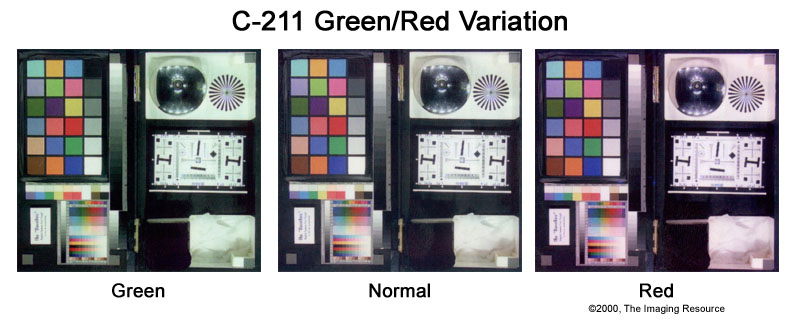
It's tough to show print quality over the Internet, thanks to the difference between a print and a computer screen, not to mention the variations between our reader's monitors, and the fact that we had to digitize the prints with a scanner in the first place. Subject to those limitations though, we wanted to show you the range of variation that the C-211 Zoom could achieve in each of its adjustment parameters. To that end, we've assembled the sets of images below. In each trio of photos, the middle one shows the results of the default setting in all parameters, while those on either end represent the extremes of the adjustment being demonstrated. You can see a larger version of each image by clicking on the photos displayed below.
Brightness
No surprises here, the brightness adjustment did exactly what you'd expect...
Contrast
A bit harder to see on the computer screen, but lowering the contrast setting decreased the dark/light range considerably.
Green/Red
As you can see here, this was one of the more pronounced adjustments. For most of the prints we made, we ended up leaving the camera set to a green/red setting of 4, or slightly toward the red side.
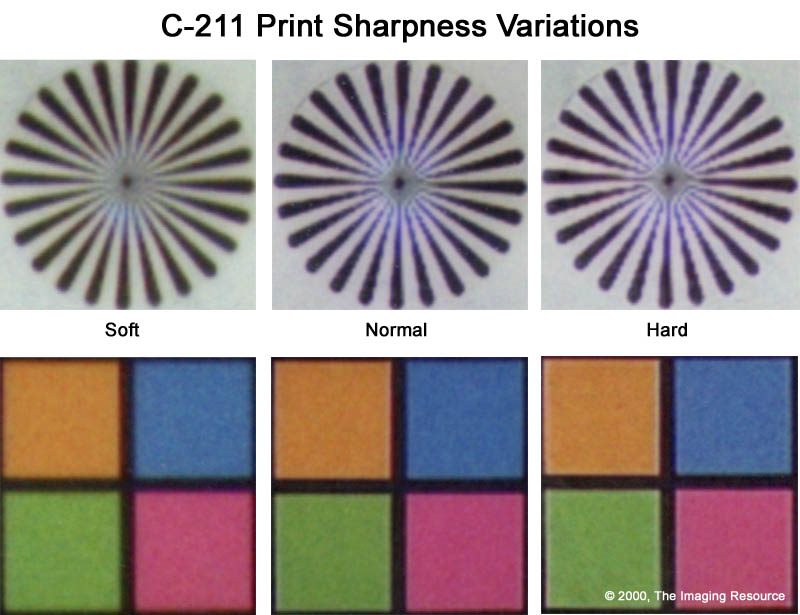
Sharpness
This is the hardest to convey a good sense of on the computer screen: When you hold a "soft" and "sharp" photo next to each other, the differences are immediately apparent, and carry a much different impression than do the highly enlarged scans we're showing here. Two things are evident even in the prints though, that are also easily seen here: First, "sharp" prints show the "halos" around high-contrast edges that are the telltale artifact of image sharpening when it's applied to the extreme. In the scanned images, you can clearly see this effect along the edges of the color chips. The second obvious difference is that there's much more "grain" in the highly sharpened prints. You can again see this in the color chips, this time in the form of a graininess in areas that should be filled with perfectly smooth color tints. Overall, we found that the default sharpening applied by the print engine was best for most subjects.
Of course, the biggest impact of digital on the image quality happens inside the camera, as the picture is being captured. With a conventional film camera, the color of the light on your subject will strongly affect the results, unless you resort to auxiliary color-correcting filters. Incandescent light in particular will produce a very strong yellowish cast in film that's been color-balanced for daylight.
With a digital camera though, the white balance system can correct for all but the most extreme color casts as the image is being acquired. All by itself, this capability dramatically extends the usefulness of the Polaroid film system.
Overall, we think the C-211 Zoom (and its likely successors) will carve out a new niche for themselves in the photography business, wherever both prints and digital files are needed. There are numerous applications where a physical print is needed either for immediate use, or to be attached to a paper file, yet where a digital image is also required for long-term archiving, or downstream usage as part of a digital workflow. Real estate, insurance, commercial applications, even law enforcement seem to be fruitful application areas. One of the more unusual uses we've heard of is for documenting makeup procedures for theatrical productions: This has long been a stronghold of conventional Polaroid film, but these days, the prints invariably end up getting scanned for permanent archiving later. The C-211 Zoom appears tailor-made for that usage, and we can easily imagine thousands of units being sold to that market alone. (A tip of the hat to John Henshall for that one!)
We'll avoid the cliché of saying the C-211's applications are "limited only by your imagination", but it does seem to offer some truly unique capabilities. By combining digital input with Polaroid output, it creates a new category of imaging device that we expect will find many uses.
Reader Comments! --> Visit our discussion forum for the Olympus C-211 Zoom!

Follow Imaging Resource: