Olympus Camedia C-60 ZoomOlympus packs a 6.1-megapixel CCD into an ultra-compact body, with a host of advanced features too.<<Operation & User Interface :(Previous) | (Next): Image Storage & Interface>> Page 9:Camera Modes & MenusReview First Posted: 06/10/2004 |
Camera Modes and Menus
![]() Movie
Mode: Accessed by turning the Mode dial to the movie camera symbol, Movie
mode lets you capture movies (without sound) for as long as the memory card
has available space. Shutter speed is set automatically from 1/8,000 to 1/30
second, depending on light levels.
Movie
Mode: Accessed by turning the Mode dial to the movie camera symbol, Movie
mode lets you capture movies (without sound) for as long as the memory card
has available space. Shutter speed is set automatically from 1/8,000 to 1/30
second, depending on light levels.
![]() My
Mode: Configures the camera based on a set of user-defined camera settings,
specific to shooting conditions. Exposure variables such as aperture, shutter
speed, white balance, etc. can all be saved. You can even save the lens zoom
position. My Mode settings are made through the Setup menu.
My
Mode: Configures the camera based on a set of user-defined camera settings,
specific to shooting conditions. Exposure variables such as aperture, shutter
speed, white balance, etc. can all be saved. You can even save the lens zoom
position. My Mode settings are made through the Setup menu.
![]() Programmed Exposure Mode: Program mode controls both aperture and shutter speed, letting you adjust other variables such as white balance, exposure compensation, etc.
Programmed Exposure Mode: Program mode controls both aperture and shutter speed, letting you adjust other variables such as white balance, exposure compensation, etc.
![]() Aperture Priority Exposure Mode: Aperture Priority exposure mode lets you set the lens aperture, and then the camera chooses the corresponding shutter speed to produce the best exposure. Available pertures range from f/2.8 to f/8, the wider end depending on the zoom setting. You can still adjust other variables such as white balance, exposure compensation, etc.
Aperture Priority Exposure Mode: Aperture Priority exposure mode lets you set the lens aperture, and then the camera chooses the corresponding shutter speed to produce the best exposure. Available pertures range from f/2.8 to f/8, the wider end depending on the zoom setting. You can still adjust other variables such as white balance, exposure compensation, etc.
![]() Shutter Priority Exposure Mode: The opposite of Aperture Priority, Shutter Priority mode lets you choose the shutter speed, while the camera picks the lens aperture that will give the best exposures. Available shutter speeds range from 1/1,000 to 4 seconds. You can still adjust other variables such as white balance, exposure compensation, etc.
Shutter Priority Exposure Mode: The opposite of Aperture Priority, Shutter Priority mode lets you choose the shutter speed, while the camera picks the lens aperture that will give the best exposures. Available shutter speeds range from 1/1,000 to 4 seconds. You can still adjust other variables such as white balance, exposure compensation, etc.
![]() Full Manual Exposure Mode: Manual mode is just that: It offers full user control over both aperture and shutter speed. Apertures range from f/2.8 to f/8, the wider end depending on the zoom setting. Shutter speeds range from 1/1,000 to 8 seconds in Manual mode. You can adjust white balance, but there's no exposure compensation, since there's no automatically-determined exposure setting to adjust away from.
Full Manual Exposure Mode: Manual mode is just that: It offers full user control over both aperture and shutter speed. Apertures range from f/2.8 to f/8, the wider end depending on the zoom setting. Shutter speeds range from 1/1,000 to 8 seconds in Manual mode. You can adjust white balance, but there's no exposure compensation, since there's no automatically-determined exposure setting to adjust away from.
![]() Auto
Mode: This mode puts the camera in charge of everything, except zoom, flash
mode, image size, and drive mode. This is a true "point & shoot"
mode, requiring almost no input from the user apart from a press of the Shutter
button.
Auto
Mode: This mode puts the camera in charge of everything, except zoom, flash
mode, image size, and drive mode. This is a true "point & shoot"
mode, requiring almost no input from the user apart from a press of the Shutter
button.
![]() Portrait
Mode: Optimizes the camera for capturing portraits. A larger aperture is
used, decreasing depth of field so that the subject is sharply focused in front
of a slightly soft background.
Portrait
Mode: Optimizes the camera for capturing portraits. A larger aperture is
used, decreasing depth of field so that the subject is sharply focused in front
of a slightly soft background.
![]() Night
Scene Mode: This mode is best for capturing night portraits or night
scenery, such as cityscapes. A slower shutter speed (maximum time of four seconds)
lets more ambient light into the image, and the white balance is fixed, preserving
color in neon signs or sunsets.
Night
Scene Mode: This mode is best for capturing night portraits or night
scenery, such as cityscapes. A slower shutter speed (maximum time of four seconds)
lets more ambient light into the image, and the white balance is fixed, preserving
color in neon signs or sunsets.
 Landscape
/ Scene Mode: Accessed in the SCENE position on the Mode dial, and
like Landscape / Portrait mode, this mode is for capturing wide views of scenery,
with both the foreground and background in focus. However, this mode also enhances
any blue or green values in the image, for more vibrant trees, water, and skies.
Landscape
/ Scene Mode: Accessed in the SCENE position on the Mode dial, and
like Landscape / Portrait mode, this mode is for capturing wide views of scenery,
with both the foreground and background in focus. However, this mode also enhances
any blue or green values in the image, for more vibrant trees, water, and skies.
 Landscape
/ Portrait Mode: Also accessed in the SCENE position on the Mode dial, this
mode is best for capturing wide views of scenery or shots of people in front
of landscapes. The camera uses a smaller aperture setting, which increases the
depth of field to capture both the foreground and background in sharp focus.
Landscape
/ Portrait Mode: Also accessed in the SCENE position on the Mode dial, this
mode is best for capturing wide views of scenery or shots of people in front
of landscapes. The camera uses a smaller aperture setting, which increases the
depth of field to capture both the foreground and background in sharp focus.
 Self-Portrait
Mode: Also accessed in the SCENE position, this mode is for handheld
self-portraits (where you hold the camera out in front of yourself and take
a picture). Focus remains fixed on you.
Self-Portrait
Mode: Also accessed in the SCENE position, this mode is for handheld
self-portraits (where you hold the camera out in front of yourself and take
a picture). Focus remains fixed on you.
 Sports
Mode: The final mode under the SCENE Mode dial position The camera's exposure
system is biased toward faster shutter speeds to freeze action with moving subjects.
Sports
Mode: The final mode under the SCENE Mode dial position The camera's exposure
system is biased toward faster shutter speeds to freeze action with moving subjects.
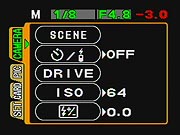
 Shortcut
Menus: In every camera mode, when you first press the OK/Menu button, a
"Shortcut" menu appears first. This offers up to four quick options,
arranged in a circle, that can be selected by pressing the corresponding arrow
key. The options presented vary depending on the mode you're in, but all are
handy for quickly accessing frequently-used functions. The Shortcut menu for
Still Capture/Programmed Exposure mode can even be edited to select two of the
functions you use the most yourself to appear. Its default configuration is
shown above right as an example.
Shortcut
Menus: In every camera mode, when you first press the OK/Menu button, a
"Shortcut" menu appears first. This offers up to four quick options,
arranged in a circle, that can be selected by pressing the corresponding arrow
key. The options presented vary depending on the mode you're in, but all are
handy for quickly accessing frequently-used functions. The Shortcut menu for
Still Capture/Programmed Exposure mode can even be edited to select two of the
functions you use the most yourself to appear. Its default configuration is
shown above right as an example.
 Still
Picture Shooting Menu: The main menu for still capture mode has four sub-menus,
accessed via a tabbed interface. You can navigate up and down the tabs with
the up/down arrow keys, and enter each sub-menu by pressing the right-arrow
key. Once in a sub-menu, you can navigate up and down with the up/down arrows
again, choosing an option you wish to set by pressing the right arrow key again.
Pressing the left arrow key backs out of the menu system to progressively higher
levels. (Note that, within the sub-menus, the available options will change
depending on capture mode you happen to be in.)
Still
Picture Shooting Menu: The main menu for still capture mode has four sub-menus,
accessed via a tabbed interface. You can navigate up and down the tabs with
the up/down arrow keys, and enter each sub-menu by pressing the right-arrow
key. Once in a sub-menu, you can navigate up and down with the up/down arrows
again, choosing an option you wish to set by pressing the right arrow key again.
Pressing the left arrow key backs out of the menu system to progressively higher
levels. (Note that, within the sub-menus, the available options will change
depending on capture mode you happen to be in.)
- Camera tab
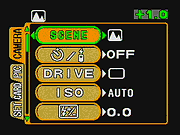 Scene:
(Available only in Scene mode) Lets you select from one of the secondary
scene options, namely Landscape, Landscape Portrait, Self-Portrait, or
Sports.
Scene:
(Available only in Scene mode) Lets you select from one of the secondary
scene options, namely Landscape, Landscape Portrait, Self-Portrait, or
Sports.
- Self-Timer / Remote: Puts the camera in Self-Timer or Remote control modes.
- Drive: Sets the camera's Drive mode to Single-Frame, Sequential Shooting, AF Sequence, or Bracket (autoexposure bracketing). The Bracket option includes +/-0.3, +/-0.7, or +/-1.0 step sizes, and x3 or x5 series lengths. (secondary screen)
- ISO: Adjusts the ISO sensitivity to Auto, 64, 100, 200, or 400.
- Flash +/-: Adjusts the intensity of the internal flash, from
-2 to +2 EV in one-third-step increments.
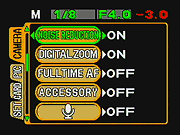 Noise
Reduction: Turns noise reduction on or off. Reduces noise in long-exposure
and high-ISO, but also increases capture time due to the need to capture
a dark frame, as well as the extra processing required.
Noise
Reduction: Turns noise reduction on or off. Reduces noise in long-exposure
and high-ISO, but also increases capture time due to the need to capture
a dark frame, as well as the extra processing required.
- Digital Zoom: Turns the digital zoom function on or off.
- Fulltime AF: Turns Fulltime AF on or off, making for quicker focus; it does drain the battery more quickly, however.
- Accessory: Turn on to tell the camera it is in an underwater housing.
- Microphone: Represented by a microphone icon, the Mic turns on
automatic recording of audio right after you click the shutter in all still
shot modes, starting about a half second after and continuing for four seconds.
 Super
Macro mode: Turns Super Macro mode on and off. (secondary
screen)
Super
Macro mode: Turns Super Macro mode on and off. (secondary
screen)
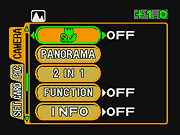
- Panorama: Activates Panorama mode, only when an Olympus-brand xD-Picture Card is in use. (secondary screen)
- 2-in-1: Activates 2-in-1 mode, which captures two images and records them side-by-side as one image.
- Function: Selects Normal, Black and White, or Sepia modes.
- Info: Turns information display on or off.
- Histogram: Turns live histogram display on or off, very helpful
for judging whether the camera will properly expose the shot or not, before
you snap the shutter .
- Picture tab
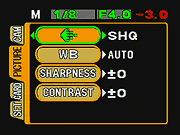 Image
Size and Quality: Sets the resolution and quality for still images.
Choices are TIFF (2,816 x 2,112, 2,560 x 1,920, 2,272 x 1,704, 2,048 x
1,536, 1,600 x 1,200, 1,280 x 960, 1,024 x 768, or 640 x 480 pixels),
SHQ (2,816 x 2,112 pixels), HQ (2,816 x 2,112 pixels, but higher JPEG
compression), SQ1 (2,560 x 1,920, 2,272 x 1,704, 2,048 x 1,536, 1,600
x 1,200), or SQ2 (1,280 x 960, 1,024 x 768, or 640 x 480 pixels). In Movie
mode, size options are HQ (320 x 240 pixels) and SQ (160 x 120 pixels).
(secondary screen)
Image
Size and Quality: Sets the resolution and quality for still images.
Choices are TIFF (2,816 x 2,112, 2,560 x 1,920, 2,272 x 1,704, 2,048 x
1,536, 1,600 x 1,200, 1,280 x 960, 1,024 x 768, or 640 x 480 pixels),
SHQ (2,816 x 2,112 pixels), HQ (2,816 x 2,112 pixels, but higher JPEG
compression), SQ1 (2,560 x 1,920, 2,272 x 1,704, 2,048 x 1,536, 1,600
x 1,200), or SQ2 (1,280 x 960, 1,024 x 768, or 640 x 480 pixels). In Movie
mode, size options are HQ (320 x 240 pixels) and SQ (160 x 120 pixels).
(secondary screen)
- White Balance: Sets white balance to Auto, Daylight, Overcast, Tungsten, or Fluorescent.
- Sharpness: Sets image sharpness in arbitrary units from -2 to +2.
- Contrast: Adjusts the amount of contrast in the image in arbitrary
units from -2 to +2.
- Card tab
 Card
Setup: Formats the xD-Picture Card.
Card
Setup: Formats the xD-Picture Card.
- Setup tab
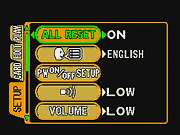
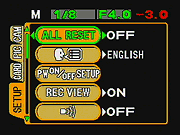 All
Reset: Resets all options to their default settings.
All
Reset: Resets all options to their default settings.
- Language: Selects from eight languages: English, French, German, Spanish, Italian, Russian, Portuguese, and Japanese. (secondary screen)
- Power on/off setup: sets screen and volume for power on. (secondary screen)
- Record View: Turns on the Quick Review function which displays the captured image on the LCD screen immediately after capture.
- Volume: Controls the camera's beep sounds.
- Shutter Sound: Selects between shutter sound and beep on shutter release, and volume level for each.
- Sleep: Designates the amount of time before the camera puts itself
to sleep. Choices are 30 seconds, or 1, 3, 5, or 10 minutes.
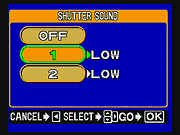 Shutter
Sound: Selects between shutter sound and beep on shutter release, and
volume level for each.
Shutter
Sound: Selects between shutter sound and beep on shutter release, and
volume level for each.
- Sleep: Designates the amount of time before the camera puts itself to sleep. Choices are 30 seconds, or 1, 3, 5, or 10 minutes.
- My Mode Setup: Customizes settings for My mode, and allows you to reset settings to their defaults. (secondary screen)
- File Name: Resets file numbers with each new memory card or continues in sequential order.
- Pixel Mapping: Checks the CCD and image processing circuit for
errors, mapping out bad pixels. (Not a frequent need, but good to do once
a year or so, or any time you see "stuck" pixels in your photos.)
L Brightness: Adjusts the brightness of the LCD monitor.
 LCD
Brightness: Adjusts the brightness of the LCD monitor.
LCD
Brightness: Adjusts the brightness of the LCD monitor.
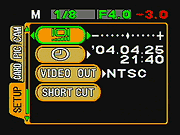
- Date/Time: Sets the camera's date and time.(secondary screen)
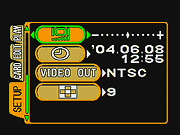
- Video Output: Specifies the camera's video-out signal as NTSC or PAL.
- Short Cut: Edits the Short Cut menu options to include any of the
options from the Camera and Picture menus. (secondary
screen)
Playback Menu
 Slide
Show Play (shortcut screen): Activates an automated slide show of previously
captured images stored on the card.
Slide
Show Play (shortcut screen): Activates an automated slide show of previously
captured images stored on the card.
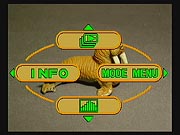
- INFO (shortcut screen): Changes the level of information displayed over a captured image. Two information modes are available, one that reports limited camera settings, and a second that reports detailed exposure information. The information display appears over the image for a few seconds, then disappears.
- Mode Menu: Takes user into the menu.
- Histogram: Displays pictures with a histogram.
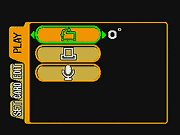 Play
Play
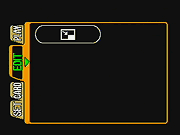
- Rotate: Rotates the displayed image 90 degrees clockwise.
- Print Order: Accesses DPOF function to allow preset printing with PictBridge-enabled printer. (secondary screen)
- Record: Indicated by a microphone icon, annotates pictures with
a 4 second voice note.
- Edit
 Resizing:
Resizes the current image to either 640 x 480 or 320 x 240 pixels.
Resizing:
Resizes the current image to either 640 x 480 or 320 x 240 pixels.
- Card
 Card
Setup: Formats the xD-Picture Card, or erases all images on the card.
Card
Setup: Formats the xD-Picture Card, or erases all images on the card.
- Setup
 All
Reset: Resets all options to their defaults.
All
Reset: Resets all options to their defaults.
- Language: Selects from eight languages: English, French, German, Spanish, Italian, Russian, Portuguese, and Japanese. (secondary screen)
- Power on/off setup: sets screen and volume for power on. (secondary screen)
- Beep Sound: Turns the camera's beep sound on or off.
- Volume: Sets volume level for audio playback.
 Brightness:
Adjusts the LCD monitor brightness.
Brightness:
Adjusts the LCD monitor brightness.
- Date/Time: Sets the camera's internal date and time setting. (secondary screen)
- Video Output: Specifies the camera's video-out signal as NTSC or PAL.
- Index Display Adjustment: Sets the number of images to be viewed
on screen in Index Display mode: 4, 9, or 16.

Follow Imaging Resource: