Nikon CoolPix 990Nikon updates the hugely successful Coolpix 950, with 3.34 megapixels and numerous enhancements<<Optics :(Previous) | (Next): Shutter Lag & Cycle Time Tests>> Page 6:Exposure & FlashReview First Posted: 3/1/2000 |
Exposure
Sophisticated, accurate exposure control has been a hallmark of Nikon cameras, both in the film-based and digital realms. The Coolpix 990's exposure system incorporates several enhancements over that of previous models, through the addition of a 7-blade lens aperture, and a 256-element matrix white balance system. Losing no ground in the process, the 256-element matrix exposure metering system of the Coolpix 950 has been retained.
The 990 offers very flexible exposure control, with Program, Flexible Program, Aperture Priority, Shutter Priority and full Manual modes to choose from when set to the Manual exposure mode on the Power/Mode dial. Although it took a little figuring out at first (due in part to the fact that our evaluation model was a prototype and without a manual), we eventually discovered that changing modes and exposure features could be done quickly and painlessly without having to rely on the LCD monitor. The combination of the command dial and the control buttons gave complete access to most of the normal exposure functions. We also enjoyed the variety of Manual exposure mode settings. The main difference between the Auto and Manual exposure options on the Power/Mode dial is the availability of certain functions. For example, in Auto exposure mode, the camera completely controls the exposure, from shutter speed to white balance. The Manual setting provides the full range of options mentioned above, giving you as much or as little control as you need. We'll explain the various modes here.
Program mode gives the camera control over shutter speed and aperture but lets you set the white balance, exposure compensation, etc. The Flexible Program option goes a step further by letting you select from a range of shutter speed and aperture combinations. (The camera determines the required exposure, but you can choose whether it achieves that exposure with a shorter shutter speed and wider aperture, or a longer shutter speed and smaller aperture. This strikes us as a very nice option, achieving much of what people want from Shutter or Aperture priority modes, but without limiting the camera's ability to respond to widely varying light conditions.) Shutter Priority lets you select from eight to 1/750 second shutter speeds while the camera selects the appropriate corresponding aperture. Likewise, under Aperture Priority, you can select apertures from F/3.5 to F/9.8 while the camera selects the best shutter speed. However, in Full Manual mode, the camera increases the shutter options to include a bulb setting for long exposures and a quick shutter of 1/1000 seconds, with the same aperture range as in Aperture Priority. In any mode, if the camera disagrees with your exposure choices, the shutter and aperture values will flash in the display to indicate that this may not be the best exposure option.
Exposure compensation is adjustable from -2 to +2 in 1/3 EV increments by pressing the +/- button and turning the command dial. Additionally, under the Image Adjustment option on the settings menu, you can increase or decrease contrast, lighten or darken the entire image or switch into black and white mode, giving you a few more exposure adjustment options. These tonal compensation adjustments are quite a bit more sophisticated than simple exposure compensation found in most digital cameras. Conventional exposure compensation adjustments simply allow you to adjust overall exposure up or down relative to that selected by the camera's exposure system. By contrast (no pun intended), the "lighten" and "darken" adjustments on the Coolpix 990 preferentially adjust the midtone values of the image, without affecting the white and black values of the image. (That is, "lighten" will brighten the middle brightness values in the image, without blowing-out white areas, or lightening black ones.) There are also options to adjust contrast, and capture images in black and white.
The Coolpix 990's default ISO rating is 80 but is variable when shooting in Manual exposure mode. ISO values of dEF(default), 100, 200, 400, and Auto are available by pressing the ISO button and rotating the command dial. When shooting in the Auto exposure mode, the ISO value is left at its default setting of 80. In addition to the exposure value settings, you can adjust the in-camera sharpening to Auto, High, Normal, Low or Off under the Sharpening option of the settings menu. This is a useful feature, especially in situations where digicams tend to oversharpen such as high contrast boundaries within images. Also, we generally find that post-exposure sharpening in Photoshop(tm) or other image-manipulation program generally gives better results than the in-camera sharpening functions provided by most cameras. Thus, you may find it best to leave the in-camera image sharpening in the Coolpix 990 off for critical images, and apply unsharp masking in the computer later.
Histogram-based exposure confirmation.
We showed examples of the Coolpix 990's histogram display earlier, under our discussion of the viewfinder functions. Given that prior coverage, we'll make only brief mention here, but do want to underscore the significance of this feature. Shooters moving from the color-negative world will be accustomed to routinely favoring overexposure in their pictures, to insure optimum shadow detail. Digital cameras are quite different though, and need to be exposed more like slide film, with an eye to retaining detail in the highlights: Once the sensor hits an exposure value of 255 (in a system with 8-bit brightness values), any additional illumination has no effect, and all highlight detail is lost. It's thus very important to be able to recognize when parts of the image are being "blown out", as opposed to merely being very bright. LCD viewscreens aren't accurate enough to be trusted for this evaluation, so an explicit graph of brightness values (the histogram display) is exceptionally useful. We don't expect most casual users to routinely use the histogram exposure confirmation display on the 990, but for pros or others working with critical exposure requirements, it's indispensable.
 White Balance
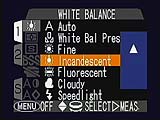
The Coolpix 990 offers a lot of flexibility in its white balance settings, with a matrix-based Auto setting as well as Fine (Outdoors), Incandescent, Fluorescent, Cloudy, Speedlight (flash balanced) and Preset (or Manual). We were able to get reliable results with the Auto and Fine settings, although we attempted Preset and had varying results (it's highly possible that this feature was not yet functional on our prototype test unit). Particularly interesting is the ability to "fine tune" the white balance setting in all modes except Auto or Preset. We've frequently found the various white balance options on digital cameras to produce images with an overall warm or cool color cast, depending on the manufacturer's biases, the current lighting conditions, etc. On the 990, Nikon gives you the option of tweaking the white balance to your own preferences. When you access the white balance sub-menu and select a white balance option, rotating the command dial will adjust the white balance up or down over a range of +/- 3 arbitrary units. Positive adjustments shift the color toward bluish hues, while negative adjustments move it toward warmer tones. (In the screen shot above, we've adjusted the incandescent white balance up by 2 units.)
Metering Options
The Coolpix 990 also offers several metering options, with 256 segment Matrix metering (intelligently examining 256 segments across the entire image), Center-Weighted, Spot and Spot AF Area. This last is another option that's entirely unique to the Coolpix 990 (February 2000). Taking advantage of the multi-spot autofocus capability, Spot AF Area exposure setting determines exposure based on a spot reading centered on the location designated as the autofocus target under the Focus Options menu.
Other Features
We liked the fact that you can save up to three sets of user settings for focus, exposure, and other camera options, which can be a real time saver in rapidly switching between widely different sets of options. We also greatly appreciated the programmable Function buttons, which were designed to allow one handed operation of the camera. (These normally control exposure mode and exposure compensation, but can be reprogrammed to control macro/manual focus, flash settings, white balance, or metering options.) An Auto Bracketing feature brackets five steps (two above and two below) the set exposure value while the (amazing) Best Shot Select (BSS) takes several images and allows the camera to choose only the sharpest (least blurred) to be saved. Best Shot Select makes it feasible to hand-hold the camera for surprisingly long exposures. You can also check your own work immediately as the camera gives you a quick preview of the captured image (when shooting with the LCD monitor) and gives you an option to delete or save the image (this function can be turned off through the Setup menu, under Monitor Options).
Flash
 The
Coolpix 990's built-in five mode flash (Auto, On, Off, Red-Eye Reduction and Slow-Sync
settings) gives you a lot of flexibility: Through the settings menu, you can adjust
the flash power from -2 to +2 EV units (!), as well as completely deactivate it.
The Slow-Sync option is useful when shooting subjects with dark backgrounds (such
as night scenes) because the camera actually leaves the shutter open longer and
then fires the flash before the shutter closes. This lets a good amount of ambient
light in and can be used to get a nice motion-blur effect. The "Red-Eye Reduction"
mode fires a pre-flash before the main exposure, to try to get people's eyes to
"stop down", reducing the internal reflection from the back of their
eyeballs. Unfortunately, this is one of the real weaknesses of the 990's flash
system (and the 950 too): The flash tube is so close to the lens (as seen
in the photo above) that there's essentially no way you aren't going to end up
getting red-eye, regardless of how much you get people's pupils to constrict.
While an external flash will avoid this, it's a shame to need one to achieve good
results on basic people-pictures. Keep in mind that the flash is automatically
switched off when shooting in the Infinity focus mode; the Continuous, 16 Shots
or VGA Sequence modes; when using the Best Shot Selector; using a lens converter;
or when the AE Lock option is on. An external sync socket means you can connect
a more powerful external flash, and the camera allows both external and internal
flashes to work together. (The socket connects to Nikon Speedlight models SB-28,
28DX, 26, 25, 24 and 22.) If the 990's internal flash is anything like that of
its predecessors', we should be extremely pleased with its performance. One puzzling
note: The preliminary documentation we received from Nikon was self-contradictory,
in it stated the flash's range as 2 meters (6.6 feet) in telephoto mode, but also
gave it a guide number rating of 9/30 (m/ft). In our own tests, the flash worked
fine out to a distance of 14 feet, the limit imposed by the dimensions of our
test studio.
The
Coolpix 990's built-in five mode flash (Auto, On, Off, Red-Eye Reduction and Slow-Sync
settings) gives you a lot of flexibility: Through the settings menu, you can adjust
the flash power from -2 to +2 EV units (!), as well as completely deactivate it.
The Slow-Sync option is useful when shooting subjects with dark backgrounds (such
as night scenes) because the camera actually leaves the shutter open longer and
then fires the flash before the shutter closes. This lets a good amount of ambient
light in and can be used to get a nice motion-blur effect. The "Red-Eye Reduction"
mode fires a pre-flash before the main exposure, to try to get people's eyes to
"stop down", reducing the internal reflection from the back of their
eyeballs. Unfortunately, this is one of the real weaknesses of the 990's flash
system (and the 950 too): The flash tube is so close to the lens (as seen
in the photo above) that there's essentially no way you aren't going to end up
getting red-eye, regardless of how much you get people's pupils to constrict.
While an external flash will avoid this, it's a shame to need one to achieve good
results on basic people-pictures. Keep in mind that the flash is automatically
switched off when shooting in the Infinity focus mode; the Continuous, 16 Shots
or VGA Sequence modes; when using the Best Shot Selector; using a lens converter;
or when the AE Lock option is on. An external sync socket means you can connect
a more powerful external flash, and the camera allows both external and internal
flashes to work together. (The socket connects to Nikon Speedlight models SB-28,
28DX, 26, 25, 24 and 22.) If the 990's internal flash is anything like that of
its predecessors', we should be extremely pleased with its performance. One puzzling
note: The preliminary documentation we received from Nikon was self-contradictory,
in it stated the flash's range as 2 meters (6.6 feet) in telephoto mode, but also
gave it a guide number rating of 9/30 (m/ft). In our own tests, the flash worked
fine out to a distance of 14 feet, the limit imposed by the dimensions of our
test studio. Continuous Shooting Mode
The Coolpix 990 offers several "motor drive" rapid-exposure modes for capturing quick sequences of images. Our information here is a little sketchy, as the modes on the prototype unit we tested didn't match those in the (equally prototype) documentation we received. Production cameras may behave quite differently than our prototype unit did. Our understanding of the production features is listed in the table at the end of this review section. The documentation showed five modes (Continuous, Multi-Shot 16, Ultra High-Speed Continuous, VGA Sequence and Movie), all selectable under the Continuous option of the settings menu. Our test unit didn't have the Ultra High-Speed setting, but had instead an option named "9 Shot Frame". (We're told that the 9 Shot Frame function may not be on the production cameras.) Several of the Continuous-mode options on our test unit appeared to be mis-labeled, so we'll just describe them using the names from the documentation, ignoring the spurious "9 Shot Frame" label.
The Continuous mode captures frames very quickly, at whatever resolution and image quality the user has selected. We measured continuous-mode frame rates at approximately 1.0 frames per second at full resolution (3 frames maximum in a sequence), 1.62 frames per second for a maximum of 8 frames at XGA resolution, and 1.72 frames per second for a maximum of 21 frames in VGA mode. We're not sure where the 9 Shot Frame mode's name came from: Probably due to a firmware bug, it actually did what we expected the Multi-Shot 16 mode to do: It subdivided the image area into 16 sections and captured a "mini-movie" of small images (400 x 300 resolution), which filled-in a 4x4 array within a single high-resolution image as the shooting progressed, at a rate of 2.0 frames per second on our prototype unit. The mode labeled "Multi-Shot 16" on our test unit actually captured a long series of VGA-resolution images at 1.76 frames per second. Depending on the subject characteristics (e.g., how well it would JPEG-compress), it captured 40-50 pictures at a time. (We imagine this will be the production "VGA Sequence" mode.)
The VGA Sequence captures a sequence of VGA-resolution frames, stored as separate files on the CF card, also at a very quick rate. (Maximum sequence length and capture speed are dependent on image information and available CF card space.) New to the 990 is the Ultra High-Speed Continuous mode, which captures approximately 30 frames per second, totaling about 80 QVGA-sized images (320x240 pixels). Finally, the Movie mode is another new feature for the 990 model. Movie mode captures up to 40 seconds of moving images without sound at approximately 15 frames per second (QVGA size). Movie mode worked quite well on our prototype model, especially when combined with the swiveling lens design (we could run the camera and swivel the lens back on ourselves to get into the picture).
Reader Comments! --> Visit our discussion forum for the Nikon CoolPix 990!

Follow Imaging Resource: