Sony MVC-CD500Sony further expands its CD-equipped camera line, adding a five megapixel CCD and a host of other features to last year's top-of-the-line CD Mavica model.<<Viewfinder :(Previous) | (Next): Exposure & Flash>> Page 5:OpticsReview First Posted: 06/09/2003 |
Optics
| Free Photo Lessons | |
|
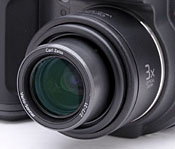
The CD500 is equipped with the same 3x, f/2-2.5, 7-21mm Carl Zeiss Vario-Sonnar
lens (equivalent to a 34-102mm lens on a 35mm camera) included on the earlier
CD400 and CD300 models (and the S75 and S85 Cyber-shot models before that, as
far as I can tell). This lens produces unusually sharp images from corner to
corner, noticeably crisper than what I've seen from many other digicams. The
lens is protected by a removable, spring-lock lens cap, which comes with an
easy-to-thread lens-strap opening and a small tether strap to keep it from getting
lost.
In Aperture Priority and Manual modes, the aperture is manually adjustable from
f/2.0 to f/8.0, in nine steps. Shutter speed is adjustable from 1/1,000 to eight
seconds, with 40 available settings. Macro mode is engaged by pressing the right
Arrow button, which changes the focus range to 1.62 to 8 inches (4 to 20 centimeters),
when the lens is set at its shortest (wide-angle) focal length.
 Focus
can be controlled either automatically or manually, with a normal focal range
from 19.7 inches (50 centimeters) to infinity, and a macro range extending
down to 1.6 inches (4 cm). Pressing the Focus button under the LCD screen
cycles between Manual and Auto Focus control, and manual focus point selection.
In Auto focus mode, a central focus bracket appears in the center of the LCD
display to help you line up shots. When Manual control is selected, you make
adjustments by turning the same Command wheel used for aperture and shutter
speed selection. As you turn the wheel, the focus distance is displayed (in
metric units) on the LCD monitor next to the Command wheel arrow, which is
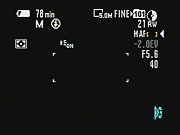
a great help when shooting in low-light conditions. The current crop of Sony
digicams employ a multipoint autofocus system, that can focus on subjects
at multiple locations within the frame. The CD500 has a total of five autofocus
areas. The CD500's autofocus system normally selects the most appropriate
AF point automatically from the that are arranged horizontally across the
middle of the frame. (Left, right, and center.) If you like though, you can
select which of the five AF areas the camera uses manually, the manual choices
expanding to include AF areas above and below the center of the frame.. You
do this by pressing the Focus button under the LCD repeatedly until the little
focus bracket icon appears in the LCD's upper righthand corner. Once it does,
rotating the Command wheel cycles between the normal central-area autofocus
region, a new spot-AF point in the exact center, and five discrete, normal-sized
AF areas. All five normal AF areas are clustered fairly closely around the
center of the frame, but there's still enough separation to be useful in some
situations with off-center subjects. The screen shot above right shows the
position of the AF points within the viewfinder frame, captured with the lens
blocked to produce a black background that would show the AF markers more
clearly.
Focus
can be controlled either automatically or manually, with a normal focal range
from 19.7 inches (50 centimeters) to infinity, and a macro range extending
down to 1.6 inches (4 cm). Pressing the Focus button under the LCD screen
cycles between Manual and Auto Focus control, and manual focus point selection.
In Auto focus mode, a central focus bracket appears in the center of the LCD
display to help you line up shots. When Manual control is selected, you make
adjustments by turning the same Command wheel used for aperture and shutter
speed selection. As you turn the wheel, the focus distance is displayed (in
metric units) on the LCD monitor next to the Command wheel arrow, which is
a great help when shooting in low-light conditions. The current crop of Sony
digicams employ a multipoint autofocus system, that can focus on subjects
at multiple locations within the frame. The CD500 has a total of five autofocus
areas. The CD500's autofocus system normally selects the most appropriate
AF point automatically from the that are arranged horizontally across the
middle of the frame. (Left, right, and center.) If you like though, you can
select which of the five AF areas the camera uses manually, the manual choices
expanding to include AF areas above and below the center of the frame.. You
do this by pressing the Focus button under the LCD repeatedly until the little
focus bracket icon appears in the LCD's upper righthand corner. Once it does,
rotating the Command wheel cycles between the normal central-area autofocus
region, a new spot-AF point in the exact center, and five discrete, normal-sized
AF areas. All five normal AF areas are clustered fairly closely around the
center of the frame, but there's still enough separation to be useful in some
situations with off-center subjects. The screen shot above right shows the
position of the AF points within the viewfinder frame, captured with the lens
blocked to produce a black background that would show the AF markers more
clearly.
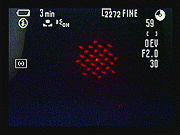 Also useful in limited lighting is the Hologram AF assist light, selected
via the Setup menu, which helps the camera make adjustments in Auto Focus
mode. I first saw Sony's Hologram AF system on the Cyber-shot DSC-F707, and
was again impressed by it here. It uses a laser diode and tiny holographic
diffraction grating to project a crosshatched pattern of bright red lines
on the subject, allowing the camera to focus in total darkness. The nifty
thing about the hologram is that the projected pattern stays crisply defined
at almost any subject distance, so there's always a sharp pattern for the
camera to focus on. Hologram AF isn't only for low light, you'll sometimes
see the camera use it in fairly normal lighting as well, if there's not enough
contrast in the subject to use the normal contrast-detect AF system. Try pointing
the camera at a blank wall in normal home / office lighting, and you'll see
the pattern. The screen shot above right shows a camera's eye view of the
Hologram AF pattern, as the lens zooms from wide to telephoto. (This particular
screeenshot is borrowed from my review of the F707. - The laser pattern on
the CD500 looks just the same.)
Also useful in limited lighting is the Hologram AF assist light, selected
via the Setup menu, which helps the camera make adjustments in Auto Focus
mode. I first saw Sony's Hologram AF system on the Cyber-shot DSC-F707, and
was again impressed by it here. It uses a laser diode and tiny holographic
diffraction grating to project a crosshatched pattern of bright red lines
on the subject, allowing the camera to focus in total darkness. The nifty
thing about the hologram is that the projected pattern stays crisply defined
at almost any subject distance, so there's always a sharp pattern for the
camera to focus on. Hologram AF isn't only for low light, you'll sometimes
see the camera use it in fairly normal lighting as well, if there's not enough
contrast in the subject to use the normal contrast-detect AF system. Try pointing
the camera at a blank wall in normal home / office lighting, and you'll see
the pattern. The screen shot above right shows a camera's eye view of the
Hologram AF pattern, as the lens zooms from wide to telephoto. (This particular
screeenshot is borrowed from my review of the F707. - The laser pattern on
the CD500 looks just the same.)
The lens also features filter threads to accommodate a variety of Sony lens
conversion kits. These kits rely on a barrel adapter that screws onto the
camera's body threads, providing a set of fixed filter threads beyond the
furthest extension of the telescoping lens assembly. The adapter by itself
can also be used to attach non-Sony accessory lenses, such as macro adapters,
etc. When working with a Sony lens conversion kit, you have to inform the
camera (via the Setup menu) that the lens is attached, so the camera's autofocus
can allow for the additional optical element. (I don't have a thread size
spec from Sony for this camera, so check with your dealer to insure lens-kit
compatibility between other Sony models.)
The Smart Zoom function is enabled through the camera's Setup menu, effectively
increasing the CD500's zoom capabilities from 3.8x to 6x depending on the
image size you are capturing. Unlike most other digital zoom functions, Sony's
Smart Zoom does not resample the image, so no image deterioration occurs as
a result: Pixels are simply excised from the central portion of the sensor's
image, and packaged as a separate file. When the optical zoom reaches 3x,
Smart Zoom takes over, if enabled in the Setup menu. The maximum zoom scale
for 3.1M images is 3.8x, 1.M is 6.1x and VGA is 12x. The AF range finder frame
is not shown when Smart Zoom is active, but the central AF area is given priority.
Reader Comments! --> Visit our discussion forum for the Sony MVC-CD500!

Follow Imaging Resource: