Nikon D1xNikon ups the ante with 5.33 million pixels (5.9 megapixel file size), improved color, and exceptional noise performance!<<Optics :(Previous) | (Next): Shutter Lag & Cycle Time Tests>> Page 6:Exposure & FlashReview First Posted: 6/16/2001 |
Exposure
Just like the original D1, the D1x gives you a tremendous amount of exposure control and multiple options that can get quite involved. First of all, the D1x gives you a choice between Program AE, Manual, Aperture Priority, and Shutter Priority exposure modes with shutter speeds from 1/16,000 to 30 seconds available, as well as a Bulb setting for longer exposures. A very nice touch is that, while in Program AE mode, you can rotate the Command dial to select different combinations of aperture and shutter speed settings than those normally chosen by the autoexposure system. (That is, if the automatic program would have chosen 1/125 second and f/5.6, you could instead direct the camera to use 1/60 at f/8 or 1/30 at f/11, to get greater depth of field.) This is a very handy option for those times when you need some measure of increased control, but still want the camera to do most of the work for you.
An interesting feature when using Manual exposure mode is the electronic analog exposure display visible in both the optical viewfinder and the top-panel data readout. This shows the amount an image will be over- or underexposed, based on the settings you have selected, and helps you find the best exposure for the subject. We also liked the Command Lock feature (activated through the Command Lock option of the Shooting menu) which locks the shutter speed and/or aperture setting so that it is not accidentally changed when using the Command dial for another purpose. (If you set either the shutter speed or aperture before activating the Command Lock function, a "lock" icon will appear next to the corresponding setting in both the viewfinder and data readout displays, and that setting can't be changed until you change the Command Lock option.) You can also assign the Command Lock function to the Function button.
ISO can be set to a range of values from 125 to 800 via the ISO button on the back panel, and to values of 1,600 or 3,200 by using the "ISO Boost" option on the Custom Settings menu (option 20). White balance can be set to Auto (useful from 4,200K to 7,000K), Incandescent (set to about 3,000K), Fluorescent (4,200K), Direct Sunlight (5,200K), Flash (5,400K), Overcast (6,000K), Shade(8,000K), and Preset (which allows you to manually adjust the white value by using a white card or object as a reference point). All white balance settings can be adjusted from -3 to +3 units on an arbitrary scale by turning the Subcommand dial (on the front of the hand grip) while holding down the White Balance button (with the exception of the Preset option, which is not adjustable). Higher values correspond to a decrease in the camera's white point, in degrees Kelvin (meaning the images become "cooler" in appearance). This is a very nice feature, as we often wish we could use one of a camera's standard white-balance settings, though just a bit warmer or cooler. To be sure, some experimentation would be required to familiarize yourself with the impact of these "tweaked" white balance settings, but having them available is a definite plus. The table below shows approximate white point temperatures in degrees Kelvin for the various adjustments in each of the major white balance settings.
| Camera Display--> | -3 | -2 | -1 | 0 | 1 | 2 | 3 |
| Direct Sunlight | 5600 | 5400 | 5300 | 5200 | 5000 | 4900 | 4800 |
| Shade | 9200 | 8800 | 8400 | 8000 | 7500 | 7100 | 6700 |
| Overcast | 6600 | 6400 | 6200 | 6000 | 5800 | 5600 | 5400 |
| Incandescent | 3250 | 3150 | 3100 | 3000 | 2900 | 2800 | 2700 |
| Fluorescent | 7200 | 6500 | 5000 | 4200 | 3700 | 3000 | 2700 |
| Flash | 6000 | 5800 | 5600 | 5400 | 5200 | 5000 | 4800 |
A note to the Nikon engineers: We'd like to see a fine-tuning adjustment capability
added to the Custom white balance option as well. We've often found that we'd
like to adjust a camera's custom white balance setting a little, and a fine-tuning
option like the D1x provides for its other settings would be an excellent way
to accomplish this. (We've sometimes resorted to carrying slightly different
"colors" of white paper to adjust manual white balances to our liking.
An on-camera control would be infinitely easier.)
Three metering options are available on the D1x: 3D Color Matrix, Center-Weighted,
and Spot. The 3D Color Matrix setting uses a 1,005-pixel CCD sensor (separate
from the main image sensor) to meter exposure based on several areas in the
frame (useful when brightly colored or very dark subjects occupy a significant
portion of the frame). This is the same 3D Color Matrix metering system used
on the Nikon F5 and the previous D1 model. Center-Weighted metering measures
light from the entire frame but places the greatest emphasis on a circular area
in the center (which you can determine the size of via the Custom Settings menu
option 14). Spot metering is pretty self-explanatory, taking a reading from
the dead center of the image (best when using the AE Lock function). The D1x
has a nifty trick with spot focus though. With D-type lenses, and in the proper
focus-area mode, the spot metering actually centers on the focus area selected,
giving you the option for off-center spot metering!
![]() Exposure compensation on the D1x is adjustable from -5 to +5 exposure equivalents
(EV) in one-third step increments, and is controllable in all exposure modes.
The Auto Bracketing feature takes three shots of the same subject with varying
exposure values determined by either the photographer in Manual mode or by the
camera in all other modes. Exposure settings for bracketing can vary from -2
to +2 EV (values are added to the already chosen exposure compensation value),
with step sizes of one-third, one-half, or one EV unit, and the bracketing biased
toward either underexposure, overexposure, or centered around the main exposure
value.
Exposure compensation on the D1x is adjustable from -5 to +5 exposure equivalents
(EV) in one-third step increments, and is controllable in all exposure modes.
The Auto Bracketing feature takes three shots of the same subject with varying
exposure values determined by either the photographer in Manual mode or by the
camera in all other modes. Exposure settings for bracketing can vary from -2
to +2 EV (values are added to the already chosen exposure compensation value),
with step sizes of one-third, one-half, or one EV unit, and the bracketing biased
toward either underexposure, overexposure, or centered around the main exposure
value.
On a more mundane level, the D1x has a self-timer feature that allows you to
set the time interval anywhere from two to 20 seconds, activated by fully pressing
the Shutter button.
Another interesting feature is the Anti-Mirror-Shock Mode, which delays the
exposure until after the mirror shock has subsided and is available through
the Custom Settings Menu (option 5). (Obviously meant for times when the camera
is on a tripod.) The default setting allows for the image to be exposed as soon
as the shutter is released. By activating this function, the image isn't captured
until a fraction of a second after the shutter is released, giving time for
vibrations from the mirror actuation to damp out before the shutter is opened.
Also through the Custom Settings menu, you can adjust the image Sharpness, Tone
Compensation (Contrast), and Hue. We were impressed with the Tone Compensation
option’s Custom setting, which allows you to download a custom tone curve
from your computer. (If no curve is downloaded, the Custom setting defaults
to the Normal setting.) The Hue adjustment offers arbitrary adjustments from
zero to six, with "three" being the default setting. Raising the Hue
setting above three results in a stronger yellow cast in the image, causing
reds to become orange. Alternatively, lowering the Hue setting below three introduces
a blue cast, which consequently changes red to purple. The D1x also features
a Color Mode option in the Custom Settings menu, which allows you to capture
images in sRGB or Adobe RGB color. A Color option under the Image Quality setting
of the Shooting menu offers a black and white monochrome setting.
When reviewing images on the LCD monitor, you can pull up a histogram and a
highlight function to give you a complete readout on the exposure. This is a
useful tool to examine your exposure in the camera instead of waiting to download
images and then deciding to reshoot.
Continuous Shooting Mode
The D1x offers a Continuous Shooting mode that shoots up to approximately three
frames per second (as many as nine consecutive shots), depending on the amount
of image information and available CompactFlash space. Once the nine frame limit
is reached, the camera is unable to record any more photographs until at least
one of the images is transferred from the buffer memory to the memory card.
As the photos are being transferred, the number of available consecutive photographs
is displayed in the viewfinder and on the status display panel when the Shutter
button is halfway pressed. Through the Custom Settings menu, you can select
frame rates of 1, 2, or 3 frames per second. You can also change the maximum
number of exposures, from one to nine (no more than six RAW files can be stored
in the buffer memory though).
| What's up with RAW? | |
|
Amazing Flash Unit!
Like most professional SLRs, the D1x doesn't carry a built-in flash of its own,
but rather is designed to work with external strobe systems, or "Speedlights,"
as Nikon is fond of calling them. As with our testing of the D1, we were fortunate
to have a SB-28DX speedlight to play with while we had the D1x, and felt the
results & flexibility we found were impressive enough to justify a completely
separate section of the review to discuss them. Herewith the story of the D1x
& SB-28DX:
 Flash
Flash
The D1x carries a standard Nikon hot shoe, compatible with a wide range of Nikon
speedlights, as well as many third-party flash units, albeit with a lower level
of integration with the camera. The manual includes a full list of compatible
Nikon flash units, and details the capabilities provided by each. (Note though,
that the special SB-28DX speedlight model is required for TTL metering with
the D1x.) There's also a sync terminal for attaching another flash via a sync
cable, giving you even greater options. With Nikon speedlight models SB-25,
26, or 28, the flash will sync at shutter speeds as high as 1/500 of a second(!).
 Five flash sync modes are available by pressing the flash button on top of the
camera. Front-Curtain Sync fires the flash in sync with the opening of the front
curtain of the focal plane shutter, at the beginning of the exposure. Slow-Sync
uses a slower shutter speed in Program AE and Aperture Priority modes to bring
out background details by letting in more ambient light. Rear-Curtain Sync creates
a motion effect firing the flash just before the shutter closes. On longer exposures,
this results in a sharp image of the object, trailed by a blur caused by its
motion before the flash fired. (When used with Program AE or Aperture Priority,
this slows the shutter speed to achieve the same effect as Slow-Sync). Red-Eye
Reduction emits a small pre-flash before firing the full flash to reduce the
red-eye effect. Finally, Red-Eye Reduction with Slow-Sync combines the two sync
modes and is available only with Program AE and Aperture Priority exposure modes.
Five flash sync modes are available by pressing the flash button on top of the
camera. Front-Curtain Sync fires the flash in sync with the opening of the front
curtain of the focal plane shutter, at the beginning of the exposure. Slow-Sync
uses a slower shutter speed in Program AE and Aperture Priority modes to bring
out background details by letting in more ambient light. Rear-Curtain Sync creates
a motion effect firing the flash just before the shutter closes. On longer exposures,
this results in a sharp image of the object, trailed by a blur caused by its
motion before the flash fired. (When used with Program AE or Aperture Priority,
this slows the shutter speed to achieve the same effect as Slow-Sync). Red-Eye
Reduction emits a small pre-flash before firing the full flash to reduce the
red-eye effect. Finally, Red-Eye Reduction with Slow-Sync combines the two sync
modes and is available only with Program AE and Aperture Priority exposure modes.
When using the external Speedlight, Nikon recommends setting the camera to any
metering method except Spot. After setting exposure and the flash sync mode,
set the Speedlight to TTL so that it meters through the lens. ("DX"
version of the SB-28 only.) You can also select the flash's appropriate range
for the subject and the ISO setting to match the camera's. Because each Speedlight
varies, you'll want to check the accompanying manual to verify settings and
proper usage.
Important Note: The SB-28DX is a special model of Nikon's flagship SB-28, specifically designed to interface to the D1 and D1x. It will work like a conventional SB-28 (as far as we know) on cameras other than the D1x, but its special characteristics are critical to accurate TTL metering with the D1x. (A standard SB-28 won't work accurately.) The reason is that current Nikon film SLRs offering TTL metering do so by using a flash sensor that reads the light reflected from the film itself, during the actual exposure. In the case of the D1x, the optical characteristics of the CCD prevented such an approach. Instead, the D1x's flash-metering circuitry measures the flash output that is reflected from the shutter curtain immediately before the exposure itself, and uses that information to determine the exposure. (We're told that the SB-28DX emits a special metering pulse immediately before the main flash, but we confess to being unable to detect it - it must be *awfully* quick! The possibility of a pre-flash from the SB-28DX though, suggests that it might require special "smart" slave triggers to fire non-SB28 flash slave units properly.) The D1x's flash exposure system is apparently improved over that of the original D1. Some readers wrote us to report having rather uneven exposure results with the original D1 in TTL flash mode, although we didn't have any problems while we were testing the camera ourselves. Thus, since we again had no flash exposure problems with the D1x, we can't say whether the flash exposure is improved or not - both cameras worked fine in our use.
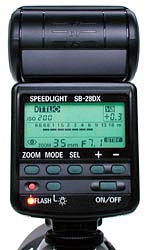 The SB-28DX really deserves an Imaging-Resource level review all its own: It has more modes and functions than you can shake the proverbial stick at (as hinted at by its control panel display, shown at right), and integrates beautifully with the D1x. One indication of its complexity is its 96-page instruction book! Used in its simplest mode, an SB-28DX mounted atop the D1x's hot shoe takes advantage of subject distance information obtained from the chips inside D-series Nikkor lenses to implement what Nikon calls "3D Matrix Metering." The result is that the basic flash, operating in its simplest full-auto mode seems nearly incapable of making a bad exposure. Straight-on, bounced from any direction, off-camera via an extension cable, it doesn't matter. You can certainly use it to take unattractive pictures, but just about all of them will be well-exposed!
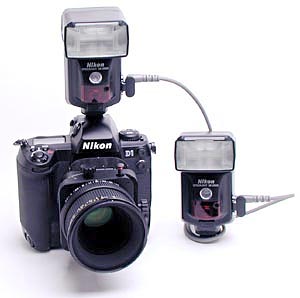
Used in conjunction with one or more additional SB-28DX units, you can adjust the output of each unit to achieve a balanced exposure, with separate output levels for main, fill, and sweep (background) lights. While we had only a single SB-28DX for use while we were testing the D1x, we'd previously experimented with using multiple SB-28DX's together. Given that many D1x readers will be interested in such usage, we've included the following section in this review, largely copied from our previous D1 review.
Our evaluation of the SB-28DX in multi-flash mode was admittedly limited to some rather crude tests of setting relative flash intensities on the main and remote unit to achieve different light balances between the two units: We really didn't have time (either with the unit, or in our overloaded schedule) to conduct extensive "live" studio tests. We did see enough though, to convince ourselves that multiple-flash studio photography with multiple SB-28DX strobe units would be quite practical. There are a few pieces of hardware that are key to getting the whole assemblage to work. We'll share a couple of these here, to help anyone interested in pursuing such application further.
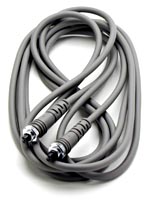
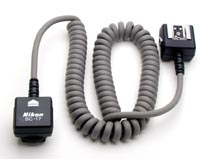 SC-17 Remote TTL cord
In an SB-28DX system, one flash must serve as the "master," with the others essentially daisy-chained off of it via SC-18 or SC-19 extension cables. The only catch is that all the signals from the D1x's hot shoe must be connected to the master SB-28DX. This is trivial if you want the main light to come from the vicinity of the camera, but what if that's not what you're looking for? The answer is the SC-17 remote TTL cord, which gives you a few feet of extension from the hot shoe contact to the flash itself. (Nikon doesn't officially support it, but you can wire together multiple SC-17 units, or cut & extend the wires yourself. This obviously voids all warrantees, etc., but we know photographers who routinely use 10-foot extension cables cobbled together from butchered SC-17s.)
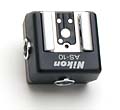 AS-10 Multi-Flash Adapter
The SB-28DX itself has a three-prong sync connector on its side, allowing you to directly strap together two of them into a multi-flash setup, with one mounted on the camera, and the other held off to the side. Once you've made that connection though, all the available connector sockets are full. To combine more than two SB-28DXs together, you need one or more AS-10 multi-flash adapter units. These are little gadgets that fit on the hot shoe of the flash, and offer three sync sockets to chain additional speedlights off of. What we found most useful about the AS-10 though (not needing the additional sync sockets in our 2-flash setup) was the 1/4-inch threaded tripod socket on its bottom. This let us mount the remote flash securely on a spare tripod, leaving our hands free without requiring an assistant.
 SC-18 and SC-19 extension cables
These are rather pedestrian, simply consisting of 3-prong extension sync cables. Useful to know what they are though: The SC-18 is a 1.5 meter unit, while the SC-19 is a 3.0 meter unit. Use these to carry sync signals between flash units in a multi-strobe setup. (Maximum official cable length is 10 meters or 33 feet. Again, we know photographers who use longer homebrew cables, but such lengths aren't supported by Nikon and may not work reliably.)
In our test shooting, we had a bit of a finicky time balancing light output between strobe units properly: The SB-28DXs are complex beasts, more so than most cameras we're accustomed to testing. We were able to get the multi-flash strapup working though, and achieved a variety of very "different" (my wife's term for something ugly but interesting) lighting effects with the combination. We had the clear sense that a day's experimentation in the studio with the flash units tucked inside our softbox and mounted on a tripod or two would result in a very flexible and powerful lighting system. Clearly *way* beyond the capabilities of any shoe-mount flash system we've ever seen before!
Other SB-28DX tricks
While we've focused on the SB-28's multi-unit sync capabilities, it has a host of other features, some vital, others whimsical. In the former category is its ability to automatically zoom to match its coverage area to lenses ranging from 24 to 85mm. Flip down a built-in diffuser, and the range extends to 18mm at the wide angle end. The obvious advantage of this zooming capability is that its flash power is concentrated into a tighter beam for telephoto use, extending its range: It has an ISO 200 guide number of 33.6m or 107 feet. At f/2.8, this translating to a maximum range of 38 feet at ISO 200, and the 85mm zoom setting. Another nifty addition is a fairly powerful autofocus illuminator lamp on the front of the unit, permitting accurate autofocus operation in total darkness. Finally, in the whimsical category, the SB-28 has a stroboscope setting, in which it emits a stream of flashes, at repetition rates of anywhere from 1 to 50 flashes per second. The number of flashes that can be emitted in this mode depends on both the intensity of each flash, as well as the repetition rate. Values range from 4 flashes at 20-50 fps (flashes per second) and 1/8 power to 90 flashes at 1/64 power and 1-2 fps. (Fun for humans, but our cat hates it.)
Reader Comments! --> Visit our discussion forum for the Nikon D1x!

Follow Imaging Resource: