Nikon D1xNikon ups the ante with 5.33 million pixels (5.9 megapixel file size), improved color, and exceptional noise performance!<<Operation & User Interface :(Previous) | (Next): Image Storage & Interface>> Page 9:Camera Modes & MenusReview First Posted: 6/16/2001 |
Camera Modes and Menus
PC Mode: Accessed by turning the Mode dial to the PC position, this mode allows the camera to download images while connected to a computer.
Playback Mode: Noted on the Mode dial as "Play," this mode allows you to review captured images, as well as delete or protect them and set them up for printing.
Single-Frame Shooting Mode: Turning the mode dial to the "S" position allows you to capture single images by pressing the Shutter button. The following exposure modes are available here (accessed by pressing the Mode button and turning the main Command dial):
- Program AE: Puts the camera in charge of the shutter speed and aperture settings, although you can vary its choices by turning the Command dial. (That is, you can increase or decrease the aperture the camera has chosen, and the camera will vary the shutter speed to maintain the same overall exposure value. Once you've chosen an offset in the aperture/shutter combination, the camera will continue to control the exposure automatically, while maintaining the aperture/shutter bias you've selected.) This ability to select a persistent bias for the exposure system strikes us as very useful, in many cases more so than conventional Aperture or Shutter Priority metering (see below). This is because the "tweaked" Program AE will track even radical changes in subject lighting, not being constrained to a single aperture or shutter speed.

- Aperture Priority: Allows you to set the aperture value while the camera automatically selects the appropriate shutter speed.
- Shutter Speed Priority: Allows you to set the shutter speed value while the camera automatically selects the appropriate aperture.
- Manual: Lets you select both the aperture value and shutter speed.
Continuous Shooting Mode: Accessed by turning the mode dial to the "C" position, this mode allows you to take up to nine consecutive shots as fast as three frames per second. (Maximum number of shots and frame rate can be adjusted through the Custom Settings menu, and also varies somewhat depending on image content and how well they compress. For whatever reason, our test unit never took more than six shots in continuous mode.) Exposure is set with the first shot.
Self-Timer Mode: activates the Self-Timer mode, which is triggered by the Shutter button. The time interval is variable through the Custom Settings menu from two to 20 seconds.
LCD Menu System: The following menus are available in any camera mode, and are called up by pressing the Menu button.
Playback Menu:
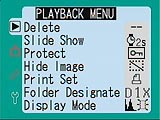 Delete: Displays the Delete submenu:
- Selected: Deletes selected images from the memory card.
- All: Deletes all images on the memory card.
- Print Set: Deletes the print order files created using the Print option.
- Selected: Deletes selected images from the memory card.
- Slideshow: Accesses the Slide Show submenu which allows you to view all captured images in a slide show format. Options are:
- Start: Starts the show.
- Frame Interval: Sets the time interval between each image (two, three, five, or 10 seconds).
- Start: Starts the show.
- Protect: Protects selected images from accidental deletion (but not from card formatting).
- Hide Image: Allows selected images to be hidden or revealed during Playback mode operations.
- Print Set: Allows images to be set up for printing using the DPOF (Digital Print Order Format). Options are:
- Done: Confirms the print order and exits the menu.
- Copies: Selects the number of copies to be printed.
- Imprint Date: Overlays the date the image was captured on the printed image.
- Done: Confirms the print order and exits the menu.
- Folder Select: Creates new folders for storing images, or allows the user to select the folder in which to save images.
- Display Mode: Determines whether a histogram and/or highlight display appears in the Playback display choices. Options are:
- Normal: Does not show the histogram or highlight display.
- Histogram: Activates the histogram display as part of the series of Playback display modes.
- Highlights: Enables the highlight display page as part of the series of Playback display modes.
- Both: Activates both the histogram and highlight displays, adding two additional display pages to the Playback display.
- Normal: Does not show the histogram or highlight display.
Shooting Menu:
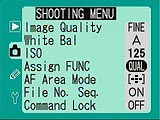 Image Quality: Displays a sub-menu of image quality and resolution choices:
- Quality: Sets the JPEG compression level to Fine, Normal, or Basic. Also offers a High setting, with choices of YcbCr, RGB, and NEF (RAW).
- Color: Establishes whether images are recorded in color or black and white.
- Resolution: Sets the image resolution size to Large (3,008 x 1,960 pixels) or Medium (2,000 x 1,313 pixels).
- White Balance: Adjusts the camera's color balance to match a variety of light sources. Choices are Auto, Incandescent, Fluorescent, Direct Sunlight, Flash, Cloudy, Shade, and Preset (manual setting).
- ISO: Changes the camera's sensitivity setting, with options of 125, 160, 200, 250, 320, 400, 500, 640, and 800. (Additional ISO settings are available, depending on the amount variation selected in the Custom Settings menu.)
- Assign Function: Assigns one of several functions to the Function button, which serves as a shortcut to specific menu options. Available functions are Quality, CSM (allows the button to access all of the Custom Settings menu options), AF Area, and Command Lock (locks shutter speed or aperture).
- AF Area Mode: Places the autofocus mechanism into Single Area or Dynamic AF mode.
- File Number Sequence: Turns on Continuous Sequential File Numbering, which continues the numbering from one memory card to the next, or resets file numbering.
- Command Lock: Locks either the shutter speed or aperture (or both). Options are Off, Shutter Speed, Aperture, and Both.
Custom Settings Menu: These functions can also be accessed via the Function button, once programmed to do so. The option numbers are reported with each setting (thus, you would select option 0-1, or 32-3).
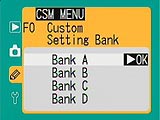 0 - Bank Select: The D1x can store custom settings in up to four "banks" of settings, allowing you to save a series of adjustments to be recalled at any time. Options are A, B, C, and D. (Displayed as 0-A, 0-B, etc.)
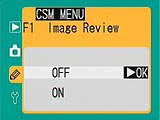 1 - Image Review: Activates or deactivates the Image Review option, which automatically displays the captured image on the LCD screen as it’s being recorded.
- Option 0: Turns Image Review off.
- Option 2: Activates Image Review.
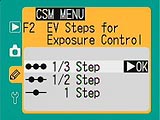 2 - EV Steps for Exposure Control: Specifies the amount of variation between exposure settings (shutter speed, aperture, Exposure Compensation, and Auto Bracketing).
- Option 1: Adjustments are made in one step increments.
- Option 2: Adjustments are made in one-half step increments.
- Option 3: Adjustments are made in one-third step increments.
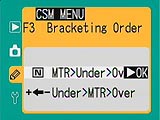 3 - Bracketing Order: Sets the order of the Auto Bracketing exposure series.
- Option 0: Records the metered image first, then the underexposed, and finally, the overexposed.
- Option 1: Records the underexposed image, then the metered image, followed by the overexposed image.
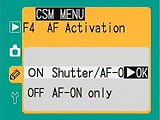 4 - AF Activation: Designates how focus is set.
- Option 0: Focus is set by either halfway pressing the Shutter button or by pressing the AF-On button.
- Option 1: Focus is set with the AF-On button only.
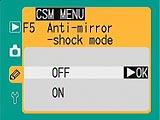 5 - Anti-Mirror-Shock Mode: Enables or disables the Anti-Mirror-Shock mode, which prevents any vibration from shutter movement in long exposures.
- Option 0: Turns Anti-Mirror-Shock mode off.
- Option 1: Activates Anti-Mirror Shock.
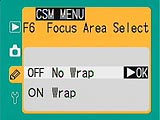 6 - Focus Area Select: Determines whether or not the autofocus area selector tool "wraps" from top to bottom or left to right when selecting the autofocus area.
- Option 0: Does not wrap the selector tool when selecting the focus area.
- Option 1: Wraps the selector tool as it selects the focus area.
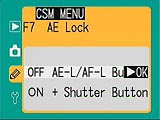 7 - AE Lock: Sets whether the AE / AF Lock button locks exposure or the Shutter button.
- Option 0: Locks exposure with the AE / AF Lock button only.
- Option 1: Locks exposure with the Shutter button only.
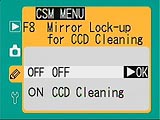 8 - Mirror Lock-Up for CCD Cleaning: Locks the mirror in the up position, so that the CCD can be cleaned. (Only available when using the EH-4 AC adapter, to ensure there is enough power to lower the mirror after cleaning.
- Option 0: Turns off Mirror Lock-Up (default setting).
- Option 1: Activates Mirror Lock-Up.
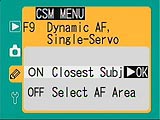 9 - Dynamic AF, Single-Servo: Determines whether the autofocus bases focus on the closest subject or if the user selects the focus area.
- Option 0: Closest Subject.
- Option 1: Select AF Area.
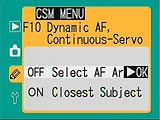 10 - Dynamic AF, Continuous Servo: Just like the previous menu option, this determines whether focus is based on the closest subject or an area chosen by the user, for the Continuous Servo focus mode.
- Option 0: Select AF Area.
- Option 1: Closest Subject.
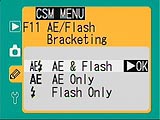 11 - AE / Flash Bracketing: Specifies whether the autoexposure and flash exposure change with each shot taken in Auto Bracketing mode.
- Option AS: AE and flash change with each exposure.
- Option AE: Only autoexposure changes with each exposure.
- Option Sb: Only the flash changes with each exposure.
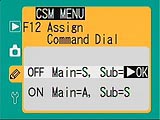 12 - Assign Command Dial: Assigns the Command dial function.
- Option 0: Main Command dial controls shutter speed, and Subcommand dial controls aperture.
- Option 1: Main Command dial controls aperture, Subcommand dial controls shutter speed.
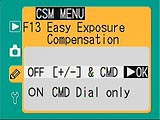 13 - Easy Exposure Compensation: Specifies how Exposure Compensation is adjusted. Options are to use the Exposure Compensation button with the Command dial, or the Command dial only.
- Option 0: Exposure Compensation is set by pressing the Exposure Compensation button and turning the Command dial.
- Option 1: Exposure Compensation is adjusted by turning one either the Command dial or Subcommand dial (a chart in the user guide shows which dial is used in which exposure mode).
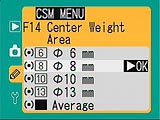 14 - Center Weight Area: Sets the size of the area metered in Center-Weighted Metering mode.
- Option 6: Greatest weight is assigned to a six millimeter circle.
- Option 8: Greatest weight is assigned to an eight millimeter circle.
- Option 10: Greatest weight is assigned to a 10 millimeter circle.
- Option 13: Greatest weight is assigned to a 13 millimeter circle.
- Option A: Exposure is based on the average for the entire frame.
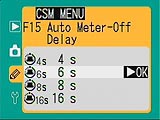 15 - Auto Meter-Off Delay: Sets the amount of time that the exposure information is displayed in the control panel on top of the camera.
- Option 4: Information displays for four seconds.
- Option 6: Information displays for six seconds.
- Option 8: Information displays for eight seconds.
- Option 16: Information displays for 16 seconds.
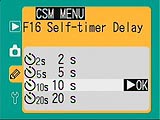 16 - Self-Timer Delay: Sets the countdown time for the self-timer.
- Option 2: Counts down from two seconds.
- Option 5: Counts down from five seconds.
- Option 10: Counts down from 10 seconds.
- Option 20: Counts down from 20 seconds.
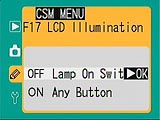 17 - LCD Illumination: Determines whether the LCD illumination activates with the Lamp On switch (the light bulb setting of the Power switch) or when any button is pressed.
- Option 0: Control panels illuminated with Lamp On (Power) switch.
- Option 1: Control panels illuminated with any button.
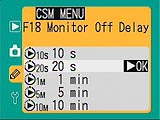 18 - Monitor Off Delay: Controls the length of time that the LCD monitor remains activated during a period of inactivity.
- Option 0: 10 seconds.
- Option 1: 20 seconds.
- Option 2: One minute.
- Option 3: Five minutes.
- Option 4: 10 minutes.
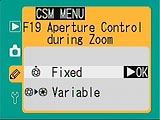 19 - Aperture Control During Zoom: Establishes whether the aperture remains fixed as the lens zooms, or varies with the focal length.
- Option 0: Aperture fixed during zoom.
- Option 1: Aperture varies with focal length.
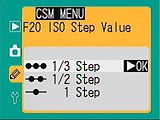 20 - ISO Step Value: Determines the amount of variation between ISO settings.
- Option 1: ISO varies in one step increments.
- Option 2: ISO varies in one-half step increments.
- Option 3: ISO varies in one third step increments.
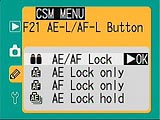 21 - AE / AF Lock Button: Specifies the function of the AE / AF Lock button.
- Option 0: Locks focus and exposure simultaneously.
- Option 1: Locks exposure only.
- Option 2: Locks focus only.
- Option 3: Locks exposure and keeps the setting until the AE / AF Lock button is pressed a second time.
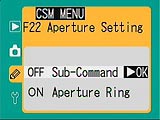 22 - Aperture Setting: Designates whether aperture is adjusted with the Subcommand dial or the aperture ring on the lens.
- Option 0: Aperture determined with Subcommand dial.
- Option 1: Aperture determined with the aperture ring on the lens.
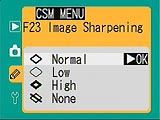 23 - Image Sharpening: Adjusts the in-camera sharpening.
- Option 0: Normal (default setting).
- Option 1: Low.
- Option 2: High.
- Option 3: None.
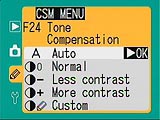 24 - Tone Compensation: Adjusts the overall image contrast, based on a tone curve.
- Option 0: Auto setting, which automatically assesses the image and determines the proper tone curve.
- Option 1: Normal setting, which applies a standard tone curve.
- Option 2: Less Contrast.
- Option 3: More Contrast.
- Option 4: Custom setting, which applies a tone curve downloaded from a computer.
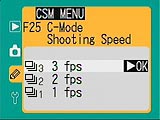 25 - C-Mode Shooting Speed: Specifies the frame rate used in Continuous Shooting mode.
- Option 1: One frame per second.
- Option 2: Two frames per second.
- Option 3: Three frames per second.
 26 - C-Mode Max Shots: Specifies the maximum number of shots taken in a Continuous Shooting Mode series, from one to nine. (Displayed as 26-1, etc.)
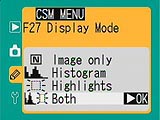 27 - Display Mode: Determines whether the histogram and highlights pages are displayed on the LCD monitor (also adjustable through the Playback menu).
- Option 0: Displays the image only.
- Option 1: Displays the histogram.
- Option 2: Displays the highlight distribution.
- Option 3: Displays both histogram and highlight distribution.
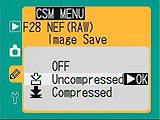 28 - NEF (RAW) Image Save: Saves NEF (RAW) format images as Compressed or Uncompressed.
- Option 0: Saves High quality files as TIFF files.
- Option 1: Uncompressed RAW format.
- Option 2: Compressed RAW format.
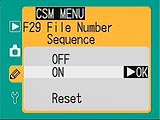 29 - File Number Sequence: Turns file numbering sequencing on or off. Sequenced file numbering continues from one memory card to the next, instead of resetting with each new card.
- Option 0: Turns off File Number Sequencing.
- Option 1: Turns on File Number Sequencing.
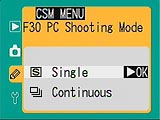 30 - PC Shooting Mode: Sets the camera in Continuous Advance or Single Advance shooting mode, for capturing images while connected to a computer.
- Option S: Single Advance mode.
- Option C: Continuous Advance mode.
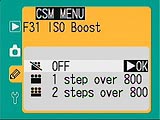 31 - ISO Boost: Turns on the ISO Boost feature, which raises the camera’s sensitivity to one or two steps over 800.
- Option 0: Turns ISO Boost off.
- Option 1: Sensitivity is raised by one step (1,600 ISO).
- Option 2: Sensitivity raised by two steps (3,200 ISO).
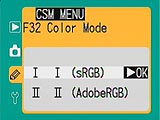 32 - Color Mode: Records color in sRGB or Adobe RGB.
- Option 0: sRGB.
- Option 1: Adobe RGB.
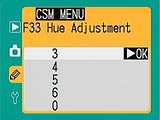 33 - Hue Adjustment: Adjusts the color saturation of the image, in arbitrary units from zero to six. Three is the default setting. Adjustments above three increase a yellow cast, while adjustments below three increase a blue cast.
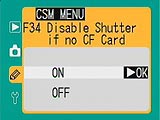 34 - Disable Shutter if no CF Card: Locks the Shutter button when no memory card is in the camera.
- Option 0: Shutter button locked when no memory card is inserted.
- Option 1: Shutter button is enabled at all times.
 35 - Rear Control Panel Display: Designates whether the rear control panel displays the current ISO setting or number of available exposures.
- Option 0: ISO.
- Option 1: Frame count.
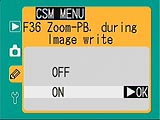 36 - Zoom-PB During Image Write:
- Option 0: Playback zoom disabled during image recording.
- Option 1: Playback zoom enabled.
Setup Menu:
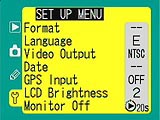 Format: Formats the memory card, erasing all images on the card, even write-protected ones.
- Language: Sets the LCD menu language to German, English, French, or Japanese.
- Video Output: Assigns the Video Out signal to PAL or NTSC.
- Date: Sets the camera’s internal calendar and clock.
- GPS Input: Activates the serial port for connection to a Global Positioning System (GPS).
- LCD Brightness: Controls the brightness of the LCD display.
- Auto Off: Establishes how long the LCD monitor remains active when no operations are performed. Options are 10 or 20 seconds, or 1, 5, or 10 minutes.
Reader Comments! --> Visit our discussion forum for the Nikon D1x!

Follow Imaging Resource: