| Basic Specifications | |
|---|---|
| Full model name: | Nikon D3 |
| Resolution: | 12.10 Megapixels |
| Sensor size: | 35mm (36.0mm x 23.9mm) |
| Kit Lens: | n/a |
| Viewfinder: | Optical / LCD |
| Native ISO: | 200 - 6400 |
| Extended ISO: | 100 - 25,600 |
| Shutter: | 1/8000 - 30 sec |
| Dimensions: |
6.3 x 6.2 x 3.4 in. (160 x 157 x 88 mm) |
| Weight: |
49.9 oz
(1,414 g)
includes batteries |
| MSRP: | $5,000 |
| Availability: | 11/2007 |
| Manufacturer: | Nikon |
| Full specs: | Nikon D3 specifications |
Your purchases support this site
Buy the Nikon D3
|
12.10
Megapixels |
Nikon F |
35mm size sensor |
|---|---|---|
|
||

|

|
|

|

|
5.0 out of 5.0
Nikon D3 Overview
by Shawn Barnett, Dave Etchells, Siegfried Weidelich, and Mike Pasini
Hands-on Preview: 12/04/07
Full Review: 01/21/09
Pro photographers last year got a new option for full-frame digital photography: the Nikon D3 digital SLR camera. Not only did it make their old Nikon glass fully usable again, but it's the fastest digital SLR on the market -- with some limitations.
The big news was that Canon finally had a rival in the full-35mm space. It had been a long time coming. As they did with the D2x, Nikon struck a very fine balance with the D3. It's not 16 or 21.1 megapixels like the Canon 1Ds line, it's 12.1. And it's not a full 10 frames per second, like the 1D Mark III, it's 9; but you can get to 11 frames per second if you don't need full resolution and focusing tracking. It's an interesting and effective strategy. While they've surrounded Canon's models at the low end, they're still wisely splitting the difference at the pro end, and the resulting cameras are more versatile than the competition.
 But resolution and frame rate aren't the only important aspects to this new professional digital SLR camera. The Nikon D3 has 14-bit A/D conversion, just like the D300 that was introduced at the same time, plus the option of stepping back into 12-bit A/D conversion if you desire. The Nikon D3's new Scene Recognition System merges data from the AF system with data from the 1,005-point metering system for greater accuracy and better tracking. A new 51-point AF system includes 15 cross-type sensors and a wide range of modes to take best advantage of them. And the 920,000 pixel, 3-inch LCD rivals the Nikon D3's own optical viewfinder for clarity; both offer 100% viewfinder coverage.
In-camera Lateral Chromatic Aberration Correction, optic-by-optic autofocus fine-tuning, a wide ISO range of 200 to 6,400, plus extension to Lo-1 (100) and Hi-2 (25,600!), really round out the package.
As if to underscore how Nikon has split the difference between the Canon 1Ds and 1D Mark III offerings, the price of the Nikon D3 digital SLR is $4,999.95.
Nikon D3 User Report
by Mike Pasini
During a break at my adventure at Dogpatch Studios, the inevitable question was raised. We'd been shooting with D300s all day and found them to be up to every task we tried. So what, we wondered, is the big deal about the D3?
A few of us had actually held a D3 in our hands and the same answer occurred to each of us: It's just the most responsive camera we've ever used. Touch the Shutter button and the camera fires before you've finished pushing it down. If you don't immediately release the Shutter button, you've got a series of images. But that light touch grows on you instantly. You begin to wonder why every camera can't be so responsive. It's how your mind works, after all.
And then everything else you need is right at your fingertips, from ISO and White Balance settings to shooting modes and Aperture and Shutter speed dials. If you've shot with a Nikon digital SLR before, you'll feel right at home.
We all agreed that the one thing we did not like about the D3 is its weight. At 2.73 pounds without a lens, it's not going to go everywhere with you even if it won't fit in a drawer. It means business and it isn't shy about it.
One thing we didn't all agree on was the importance of its 35mm frame size. Nikon calls this FX (to distinguish it from both the DX of its APS-C sensors and the implications of "full" frame). While it's nice to have your focal lengths behave normally, modern fast autofocusing lenses (many with image stabilization) are hefty in their own right. The question left on everyone's mind -- especially after falling in love with the D300 -- was whether or not anybody really needs an FX system.
 |
 |
| DX. D300 with 35mm lens at f/2.8 and 1/3,200 second and ISO 200. | FX. D3 with 50mm lens at f/2.8 and 1/2,500 second and ISO 200. |
Here we mounted a Nikkor 35mm f/2.8 on a D300 whose 1.5 focal length multiplier equates to a 52.5mm equivalent and a Nikkor 50mm f/1.4 on a D3 in FX mode. Both cameras were set to ISO 200 and f/2.8 and Aperture priority mode.
While the images are close equivalents, there are differences in the amount of background blur and overall contrast. Some of that is no doubt due to the difference between the two prime lenses. But in the real world, you would be considering the composition two different lenses would provide. There is no standard prime 35mm and prime 50mm lens. The key point here is how similar the compositions are.
There's only one compositional issue to consider. The smaller DX format does handicap you if you want to shoot wider than an 18mm equivalent (but not fish-eye wide), whereas the D3 gets down to 14mm without a problem.
We discuss the FX factor in more depth below, but except for that wide angle issue, the DX format is not handicapped when it comes to composing your images.
Look and Feel. Much like the Nikon D300, the Nikon D3 body design features mostly evolutionary design changes, which is better for existing D2x users.
The pentaprism housing is notably larger, and the ambient light sensor is no longer a part of the design (on the D2x, the white window perched over the Nikon logo is the ambient light sensor). The red accent on the grip has been restyled as well. The new cover over the Flash and Remote Terminal has a new one-piece design. Also note the gold FX logo in the lower right corner, denoting Nikon's new designation for Full Frame.

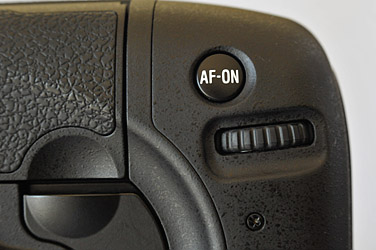
Fewer changes are made to the Nikon D3's control arrangement than were done to the D300, but there are a few. The Enter button is now an OK button. The speaker below this button has been moved closer to the rear Status LCD. The LCD is larger, going from 2.5 inches to 3 inches. The more significant improvement is in the LCD's resolution: now 640x480. It's hard to appreciate this improvement until you see an image on the screen. The AE/AF Lock button has gotten smaller and dropped down a bit, making it easier to distinguish from the AF-ON button, which used to be right next to it. The two rear Command dials are set at a slight angle to match the orientation of the thumb's pivot point when holding the Nikon D3; a nice ergonomic change. The vertical, or secondary AF-ON button in the lower right corner has been moved from below the Command dial to above it. Without holding the camera, it's tough to know which will be preferable. The old location did make it easier to press the button accidentally.
There is no plastic screen cover for the Nikon D3.
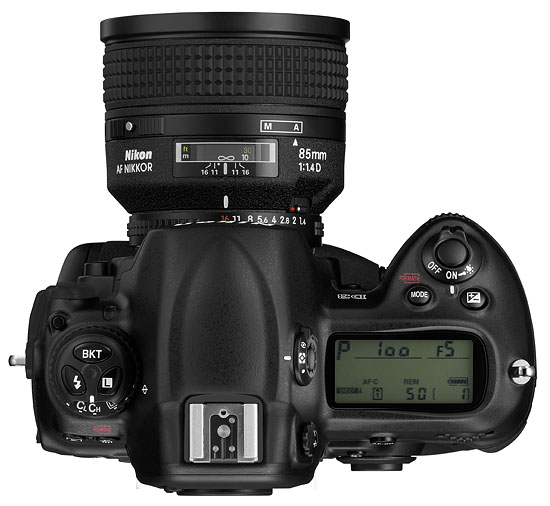
Here on top, the Metering selector dial has moved back a bit, and the Mode and EV compensation buttons have changed shape. The hot shoe design has changed a bit.
Body. Size and weight has increased on the Nikon D3 when compared to the Nikon D2x. The D3 weighs 2.7 pounds (1,240g) without battery or cards, while the D2x was 2.4 pounds (1,070g). Along with the sensor size increase come necessary increases in size for the mirror, mirror box, shutter, and probably the motors needed to activate these mechanisms. The larger pentaprism and LCD would also affect weight and size. Dimensions are now 6.2 x 6.2 x 3.4 inches (159.5 x 157 x 87.5mm).
The exterior shell of the Nikon D3 is made of magnesium alloy, and sealed against dust and water.
Nikon D3 Setup
The D3 we tested came from our lab so I didn't go through all the setup changes I normally do.
But I did follow my usual routine for setting up the camera to behave the way I expect, skipping just a few of the more personal touches. Among the things I didn't do, for example, was set up a copyright notice using the Comment feature and personalize the folder name with my initials.
The essential setup involves adjusting the diopter, setting the viewfinder display and going through the Menu system item by item.
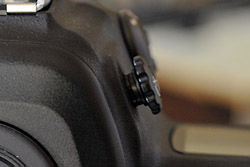
Diopter. Pull it out, click to set and push it back in.
Diopter Adjustment. The diopter knob pulls out so you can twist through the settings. Once you've found the sweet spot where the focus screen is sharp, you lock in your setting by pushing the diopter knob back in.
I actually had to resort to the manual to figure out that you pull the diopter knob out. I could not figure out with trial and error how the diopter knob worked. Pulling it out was the last thing I'd have thought to do. Which suggests how secure the setting is once you've made it.
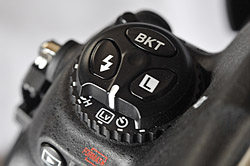
Mode Dial. Single, Continuous Low, Continuous High, Self-Timer, Mirror Up, and here set to Live View.
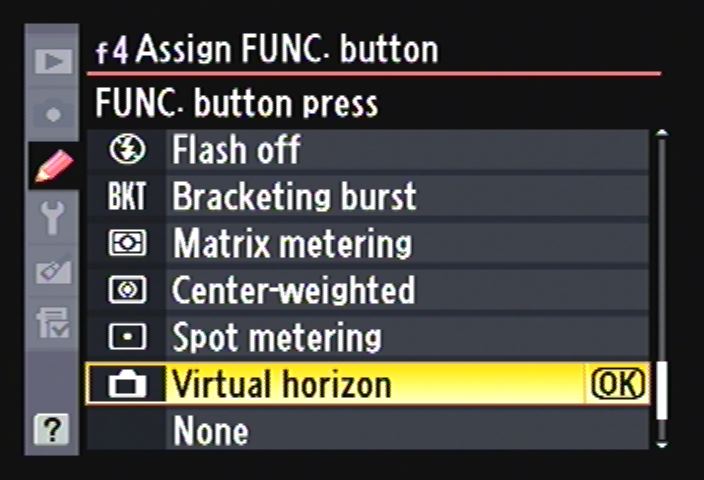
Viewfinder. The D300 viewfinder options were, well, missing. Unlike the D300, I couldn't enable a grid display in the Nikon D3 viewfinder, one of my survival tactics. Instead, I had to learn how to use the D3's Virtual Horizon feature. That's a bit more than a simple setup option, so I've detailed it below.
A Strap. It didn't take very much time handling the Nikon D3 before I decided it wasn't safe to do so without a shoulder strap. Nikon does supply one with the camera, but I had just received some UPstraps (http://www.upstrap-pro.com) for review and though they were heavy duty, I snugged the quick release version to the D3. The strap's non-slip grip (which really does not slip) was reassuring.

Ports. USB connector on top, DC In, AV out, and HDMI connectors on bottom.
The Nikon D3, like any digital SLR with a vertical grip, is really too big for a wrist strap. But with the quick release Upstrap, I found it easy to shoot in either the horizontal or vertical orientation.
Nikon D3 Menu Items
There are a lot of menu items on the Nikon D3 but don't let them confuse you. The Menu system features a context-sensitive Help feature accessible by pressing the ? button (third down on the left of the LCD). If you find an option unclear, just hold down the ? button to see a text explanation.
Another source of help is the Nikonians, a Nikon user group, which has developed a D3 setting spreadsheet for keeping track of menu item settings. There are a number of alternatives available as well, all worth checking out at least as starting points for your own setup.
Among the Menu system items I found some of my old favorites and essential settings for my work habits.
Auto Image Rotation. I like this on even though the data itself isn't rotated. But it does write the correct orientation to the orientation tags in the Exif header so I can see the image normally during slide shows. And slide shows with the D3's HDMI output are not to be missed.
Color Space. My workflow uses AdobeRGB as the color space, so I changed the Nikon D3 from sRGB to AdobeRGB. I start wide and normal down everything here myself, but if you like to use a service for prints, you might prefer to leave the camera set to sRGB.
Focus Mode. Having been impressed with the D300's 51-point autofocus at Dogpatch, I quickly started from there on the Nikon D3. You can stick with single-point autofocus (which is how we all learned to focus) but there's 9-point and 21-point autofocus available, too. You can even select one point from a set of 11.
But more importantly with 51-point autofocus you can do 3D tracking of moving objects. And you can do this in Live Mode. It takes some coordination (which doesn't come easily to some of us) but you can do it.
Release Mode. The Nikon D3 fires so quickly, I really wasn't comfortable at first with release mode set to anything over than either Single or Live View. I did, however, eventually develop the touch so I could indulge in a little Continuous shooting. Just to hear that sweet shutter do the tremola was worth it. But Single mode acts like Continuous on most other digital SLRs.

Continuous High Speed. FX image size, Raw+JPEG to two CF cards. (Click to listen.)
Picture Controls. The Nikon D3 offers Picture Control settings of Standard, Neutral, Vivid, and Monochrome. You can also adjust each of these to your liking. They resemble Canon's Picture Styles (discussed in the April 27 and May 11 newsletters last year).
My personal preference is not to manipulate the image data in the camera (start wide). There are certainly occasions that call for it, but my default setting is Standard.
D-Lighting. Where I make an exception to that is with the Nikon D3's D-Lighting option. Linear capture tends to dote on the highlights, devoting to them far more data than the shadows get. D-Lighting compensates for that, making it a lot more feasible to shoot JPEG rather than Raw -- a boon to photojournalists.
When you enable Nikon's Active D-Lighting feature, it salvages detail in the shadows and highlights of JPEG captures. There are four options: Off, Normal, Low, or High. D-Lighting is still available in Playback mode as an Edit option, but in the D3 it can be activated immediately after capture. In fact look for it in the index as Active D-Lighting, rather than D-Lighting (which will take you to the Playback enhancement).
With D-Lighting set to Normal, I got very nice histograms on my JPEGs and never worried about underexposure. It's more digicam-like behavior, certainly, but that isn't always a bad thing. Especially if you've got a deadline you're tracking with a watch instead of a calendar.
Non-CPU Lens Data. An FX sensor is what your old 35mm glass has been waiting for. And the Nikon D3 can store up to nine settings for them. You simply enter the widest aperture and the focal length of the lens and use the index number to activate that setting. I found it a particularly intelligent touch that the options you scroll through are actual Nikkor possibilities and not some programmer's list of every fraction.
My first entry (Number One) was a 50mm f/1.4 lens. My 43-88mm zoom went in as 43mm f/3.5. And so on. Then you just use Manual or Aperture Priority mode (letting the camera set the Shutter speed), meter the scene through the camera and shoot away. The old glass never really had it so good.
NEF Bit Depth. The default bit-depth setting for NEF or Raw captures is 12-bit, like the D200 and D300. But the Nikon D3 (and D300) can also record 14-bit channels. When I shoot NEF it's because I really do want to fiddle with the tone and color later. Might as well have lots of bits to fiddle with. So I set it to 14-bit.
Function Button. Not right away, but after shooting a while, I decided I had to assign an important function to the Function button that sits under the Depth of Field Preview button. But more about this later.
Auto DX Crop. With an FX sensor, you might think mounting a DX lens would be a big mistake. But not on the Nikon D3. The D3 is smart enough to know what kind of lens is mounted, and it lets you choose how to handle it. More on this below but if you have DX lenses, this is one setting worth getting to know.
Voice Memo. When you're stuck without a notebook or a pen, recording audio captions for images can save your bacon. There's a number of voice memo options on the Nikon D3, which has a microphone (unlike the D300). You can record audio notes automatically or manually and even change the Record button behavior (hold to record or press to start/stop recording).
That covers enough Record menu options to get going, but there are also some Playback options to consider.
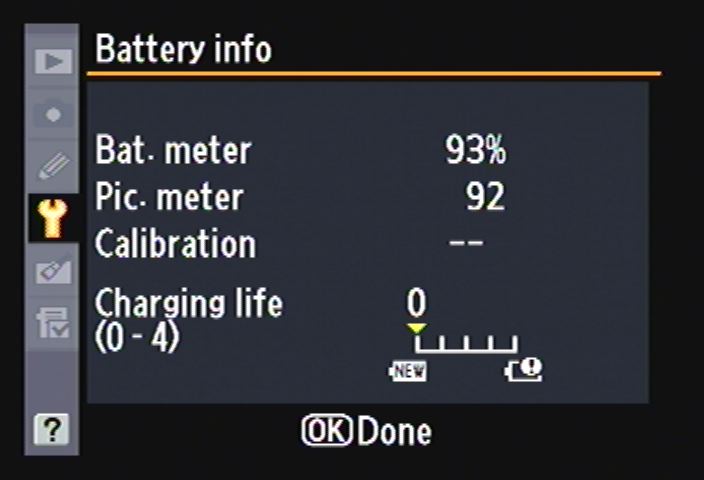
Battery Info. Calibration and charging life, too.
Image Review. Battery life on the Nikon D3 is so long that there's no excuse not to indulge in a little image review. After all, the only way to really judge exposure (even with the gorgeous 3.0-inch LCD on the D3) is to study the histogram displayed with Image Review.
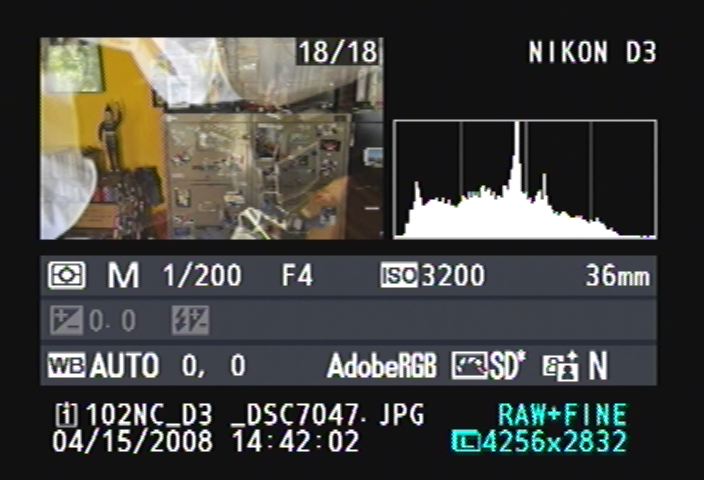
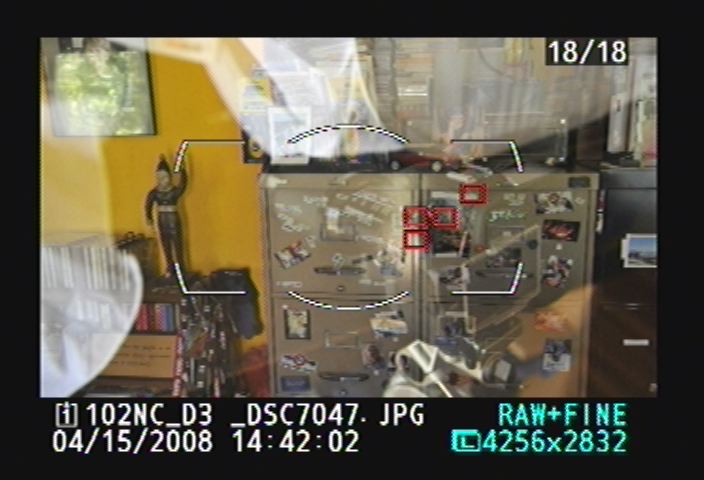
Image Review. Only one of many pages, this summarizes exposure settings and shows a histogram along with a thumbnail. The bottom shot shows another review display with red autofocus indicators.
Rotate Tall. If you want to see all your images in the correct orientation without rotating the camera, enable Rotate Tall. This has the disadvantage of making portrait oriented images only as tall as the LCD is, rather than full frame.
But if you plan to display your images on your HDTV through the D3's HDMI port (which works very well, BTW), you'll want Rotate Tall on.

Center Button. You can set a command for both Record and Playback modes.
Navigator Center Button. A number of the camera's buttons can be reassigned or set with custom functions. Remember that if you find yourself often digging through the menus for the same function. The one button I like to assign first is the center button on the multi-selector.

Navigator. A bit stiff but quite capable.
In Playback mode, I like to press that button to zoom in to a 100 percent view of the image to check focus or examine the effects of a sensor cleaning. You can also just press the magnifier button to zoom in bit by bit. But with the center button, you can select low, medium, or high magnification and get there in a jump. Other options include Thumbnail on/off, View histogram, and Choose folder. And yes, you can assign a function for shooting mode, too (Select center focus point).
Much as I like Nikon's Menu system (particularly the color scheme), the Nikon D3 seems to have cracked it a bit. There are so many options that it's hard to find some of them.
Nikon has a couple of solutions to this, but I didn't find either of them sufficient. Oddly enough, this didn't bother me on the D300. That was just about the limit, though.
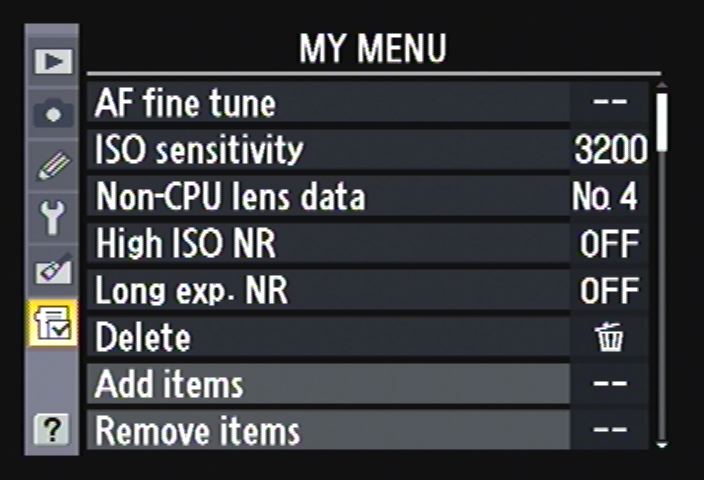
My Menu. You can build your own menu of frequently accessed settings, even reordering them.
My Menu. Like the D300, the Nikon D3 offers a My Menu option rather than the Recent Settings option of the D200. I found I missed Recent Settings but My Menu lets me add, delete, and rearrange frequently accessed menu items.
The trouble is that with a camera like the Nikon D3, a half dozen lines for favorite menu items is a little truncated. Sure, the menu scrolls, but you want to see at a glance what you've been doing or just done. Why, after all, can't we have both a My Menu and Recent Settings?
Manage Settings. Again like the D300, you can save your settings to the memory card so you can reload them or share them. This is a binary file stored in the root directory of your CompactFlash. As a binary file you can't edit it.
Nikon D3 Heft
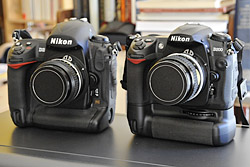
Front. The D3 (left) isn't much bigger than a D200 outfitted with the vertical grip.
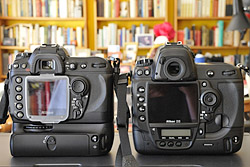
Back. The controls are laid out the same, too.
Heft hardly covers it when discussing the D3. It's not so much that it's a heavy body, but it includes a vertical grip and, having an FX sensor, you'll no doubt mount some heavy glass on it. The two together do add up to a load.
But interestingly, a D200 with the optional vertical grip and a large lens isn't much lighter.
And the Nikon D3's grip makes it a comfortable package once you've got it in your hand. You're never stretching too far for a command or control, making it quite comfortable to actually use.
I wouldn't carry a D200 outfitted that way with a mere wrist strap and you won't carry the Nikon D3 that way either. The UPstrap here for review that I used held the camera securely both on my shoulder and around my neck. When the weight became uncomfortable (which happens sooner around your neck), I found myself holding the lens up with a free hand to lessen the burden.
I made something of a wide load walking down the sidewalk with the Nikon D3 on my shoulder. So I usually put the strap around my neck where I could see the lens hood and safely navigate obstacles like lamp poles and baby carriages.
The Nikon D3 didn't fit in my compact Domke bag or my digital SLR holster, so I wasn't able to conceal it on my various excursions. In some ways, I felt it demanded as much attention as a view camera.
But the D3 is professional gear intended for venues where no one is surprised to see a camera -- and quite a few may even be looking for one. If your shooting is more discreet, the D300 is more your style.
Nikon D3 Details
Besides the pull-out diopter adjustment, the Nikon D3 has a few other physical attributes worth noting.
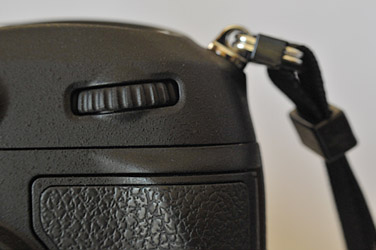
Subcommand Dials. Both horizontal (top) and vertical subcommand dials are off axis, making them easier to control.
Battery latches. The battery latch system is a big one. To open the battery compartment in the vertical grip, you lift out a small handle and turn it a quarter turn to unlock the latch. The battery, attached to the body piece with the small handle, slips right out.


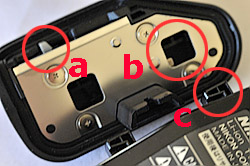
Battery Latch. Another crazy Nikon latch system. The top shows cover lock. The middle shows small gray release button. The bottom image shows (a) small gray release, (b) ports for (c) fingers.
To remove the battery from the body piece, you have to unlatch it by pressing a small gray level in the direction of the arrow next to it. Two fingers on the battery are then released and you can plug the battery into the elaborate two-battery charger.
The charger itself has set of LEDs showing 50, 80, and 100 percent charge states. It can also be used to calibrate the battery. Unlike other Nikon battery chargers, this one is both 120 and 240 volt. You just need the right cable or adapter to use it internationally.
Nikon D3 Flash
Unlike the D300, but not so strange in the pro SLR world, the Nikon D3 doesn't include a popup flash. It does have both a hot shoe and a PC sync terminal, and it does support i-TTL metering of external flash and support for Nikon's Creative Lighting System.
This turned out to be quite a disadvantage for me. I wasn't able to use my SB-800 flash wirelessly. With no strobe on the Nikon D3, I had no way to signal the SB-800. But there are a couple of ways around this.
First, I could use the SB-800 mounted to the hot shoe. But that wasn't where I wanted the light. Mounted to the hot shoe, however, it would be able to command a second SB-800 without firing itself, much like the popup flash on the D300.
A more economical solution, though, is to use an SU-800, a wireless flash commander that mounts on the camera's hot shoe. It doesn't itself have a flash but it can communicate with the SB-800. And the $250 SU-800 is less expensive than a second $400 SB-800. Another option is to use an SU-800 or SB-800 as the commander, and a less expensive SB-600 as a slave.
Nikon's Creative Lighting System is not to be missed, so either of those solutions should be on your starter accessories list.
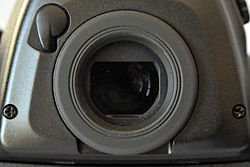
Viewfinder Cover. Open (top) and closed. Note the position of the small lever in the upper left.
It's a list that's sure to grow as you become comfortable with this easy-to-use wireless flash system. Either an SB-800 or SU-800 on the D3 and a bevy of SB-600 strobes can solve quite a few lighting problems.
Eyepiece. Most Nikon digital SLRs ship with a tiny plastic eyepiece cover. If you're shooting in Live View mode or otherwise have not shaded the eyepiece, the stray light entering the camera can affect exposure. Hence the cover.
But on the Nikon D3, there's a built-in shutter. A small lever on the left of the eyepiece shuts and opens the shutter. Nice touch.
Virtual Horizon. This is how it's displayed on the top LCD, and a simple vertical scale is displayed in the viewfinder.
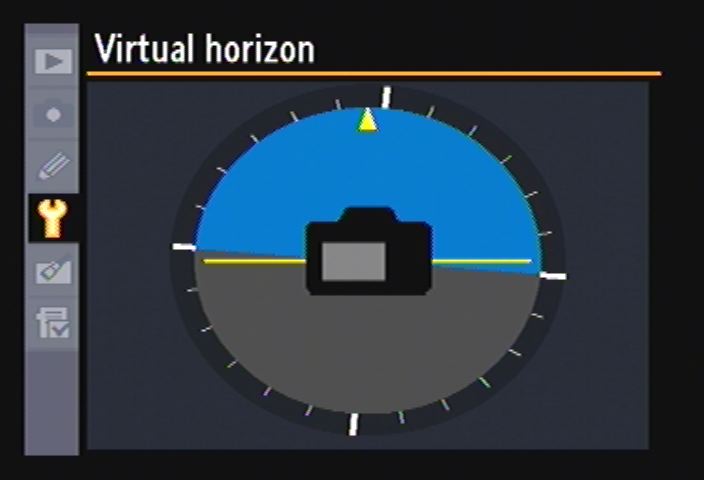
Virtual Horizon. This is how it's displayed on the main LCD.
Virtual Horizon. Holding a camera (or anything else) level is not one of my strengths. On a digicam, I always enable the grid overlay before I start taking pictures. I did that with the D300, too, but I was stymied with the D3. No grid overlay.
Nikon sells an optional Type E focusing screen for the D3 with an etched grid. It replaces the simpler Type B screen installed at the factory.
But I didn't have to fiddle with that. Instead, the D3 offers a Virtual Horizon feature. Virtual Horizon reads the D3's orientation sensor to indicate level as long as you aren't pointing the camera up or down too far.
You can enable this from the menu system and it will display on the LCD, which is probably the preferred method for tripod-mounted shots.
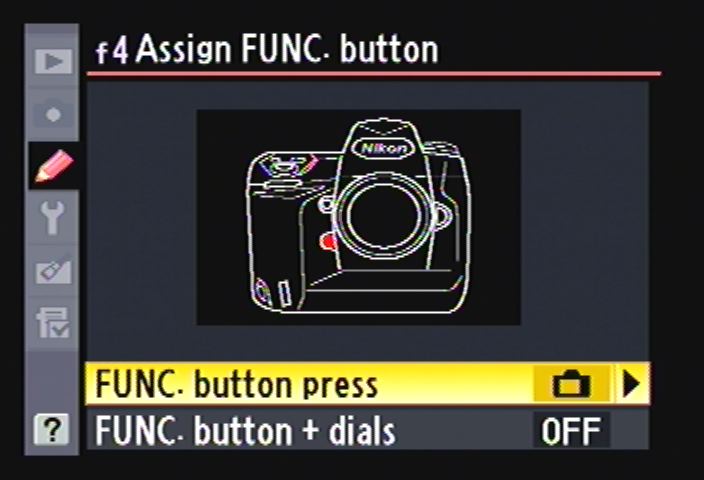
Function Button. You can assign a specific function to this button below the DOF Preview button.
But for handheld shots, the best way to tap into it is to assign the Function button to Virtual Horizon. Then when you press the Function button, a vertical scale appears on the right side of the viewfinder and, at the same time, a horizontal scale appears on the control panel. So whether you are looking through the eyepiece or standing over the camera, you can tell if it's level.
You might think that would take care of my problem, but it didn't quite. Using the vertical scale through the viewfinder, I found it difficult to find and hold level. The bars were going up or down while I was twisting the camera body clockwise or counterclockwise. You get used to that, but sometimes it's just more direct (and quicker) to line up a vertical or horizontal with a grid line. I really missed my grid.
Oddly enough, though, when I did find the button to check my orientation, I was always very close. That says more about the Nikon D3 and its balance than me and mine.
And the viewfinder itself is quite accommodating. I was able to wear glasses and get a full view without touching the eyepiece.
Nikon D3 LCD
While the 3.0-inch, 921,600 dot LCD (1,920 columns and 480 rows) is the same gorgeous screen as the one in the D300, the Nikon D3 protects it with tempered glass so no LCD cover is required. I was very careful not to scratch it any way (no buttons rubbing against it when I carried it strapped over my neck) but it did seem particularly tough.
With a very wide viewing angle of 170 degrees, you can hold the camera away from your face and still get a glimpse of your composition.
The new LCD distinguishes itself from its competitors in a couple of other ways as well. It maintains the same RGB sequence for each row rather than alternating between RGB/BRG schemes. And it has a much finer, nearly seamless gap between pixels than the typical 230K LCD.
It is, in a word, beautiful.
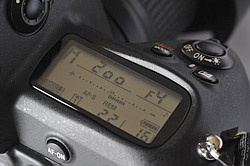
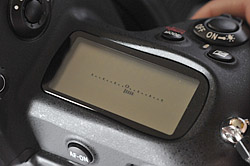
Top LCD. Mode, shutter speed, f-stop, and more.

Lower LCD. ISO, Quality, and White Balance settings.
For all that, the Nikon D3 requires a couple more LCDs, which is about one more than I like. The top LCD, a large black and white LCD, performs much the same functions as its cousins on the D200 and D300, with the addition of the Virtual Horizon function.
The other LCD, unique to the Nikon D3, is just below the color LCD. It reports ISO, Quality, and White Balance settings.
FX & DX
Nikon prefers to refer to the D3 as an FX format camera rather than a full-frame 35mm camera. The company dislikes the implication that a camera that isn't "full-frame" is somehow "subframe." As far as Nikon is concerned, both the FX and DX formats are legitimate digital formats with long lives ahead of them.
The advantage of the smaller DX format is primarily weight. The glass can be smaller and hence, less heavy. But the focal length multiplier means your standard 35mm lenses are going to crop closer than you remember. A 50mm lens will crop like a 75mm lens.

12-Mp Detail. Examine the detail around the ball. FX at 24mm.
The advantage of the larger FX format is that focal lengths crop the way you remember. That 35mm lens that crops like a normal lens on a DX camera is once again a wide-angle lens on an FX camera. So go get your wide angle lenses back.
What's particularly interesting about Nikon's FX and DX formats is that the FX image size isn't huge. At 4,256 x 2,832 pixels at its largest, it's just a 12-megapixel image. That's a bit smaller (pixel-wise) than the D300, in fact. With a DX image area, though, the Nikon D3 captures, at its largest size, just 2,784 x 1,848 pixels (only a 5-megapixel image).
So you get full-frame functionality without the overhead (processing power demands, storage requirements, etc.) of, say, a 25-megapixel image. That was a big relief to me. I could shoot full-frame without paying an image size penalty.
You might think you give up too much resolution that way, but take a look at my image of the softball on the base path and tell me you need more resolution.
And with larger pixels, you also gain the added advantage of better light gathering capability in low light. The Nikon D3 does some extraordinary things in low light and this sensor is the key to that.
Auto DX Crop
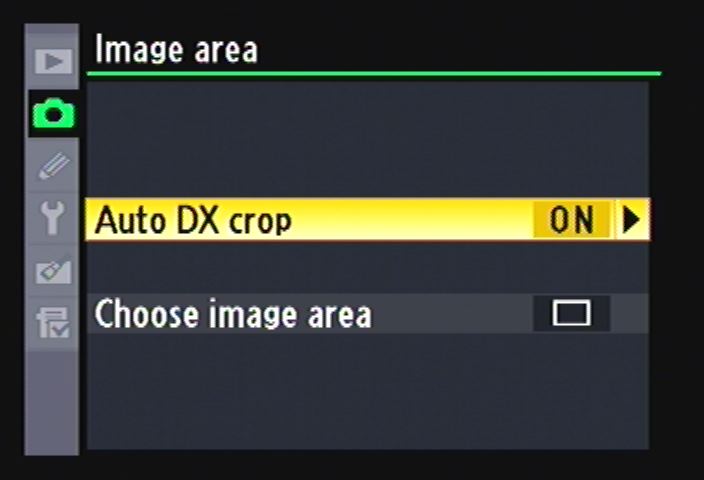
Image Area. This is where you'll find the Auto DX crop option, as well as the image-area selections.
Hidden in the Image Area menu is an option that will make the FX Nikon D3 behave like a DX camera, although not with the same resolution as the D300. When you enable the Auto DX Crop option, the D3 will automatically crop the image area to the DX size when it senses a DX lens.
So instead of seeing an image in a circle in the Nikon D3 viewfinder, you see a dim mask framing the live DX image area (which is only 5 megapixels). I liked being able to monitor outside the capture area while viewing through the viewfinder. But I also liked being able to use DX lenses on the Nikon D3 without a penalty.
You do get more resolution using that DX lens on a D300, but that's the only penalty.
Image Areas
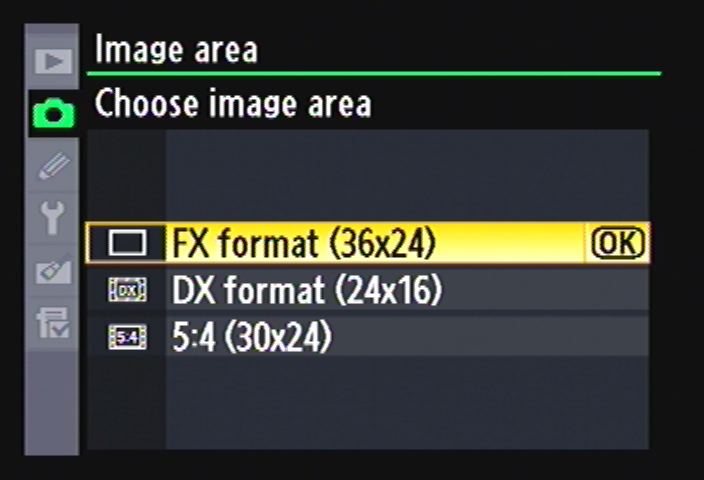
Image Areas. Three options.
Now that we've said that, we should list the whole menu of image-area sizes:
In FX-format (36 x 24mm): (L) 4,256 x 2,832, (M) 3,184 x 2,120 and (S) 2,128 x 1,416
In 5:4 format (30 x 24mm): (L) 3,552 x 2,832, (M) 2,656 x 2,120 and (S) 1,776 x 1,416
In DX-format (24 x 16mm): (L) 2,784 x 1,848, (M) 2,080 x 1,384 and (S) 1,392 x 920
Nikon D3 High ISO

ISO Settings. You can manually set ISO to 3,200 then bump it up to 6,400, 12,800 (H1.0) and even 25,600 (H2.0) in 1/2 or 1/3 step increments. You can also let the camera shift ISO up if an auto exposure setting would drop the shutter speed below a minimum value you set.
The Nikon D3 indulges my preference for natural light photography, especially when coupled with a Vibration Reduction lens. But it took me into a whole other world with its high ISO options.
Auto ISO ranges from ISO 200 to 6,400. You can step 200 down to ISO 100 (not terribly satisfying) but you can also kick it up as high as ISO 25,600. Yes, you get noise up there, but so what? You're seeing in the dark.

ISO L1.0. See also the L0.7, L0.3 and ISO 200 shots in the gallery for comparison.
ISO settings lower than 200 correspond to ISO sensitivities of 160 and 100 equivalent, indicated as L0.3 to L1.0 on the LCD, respectively. Contrast at these settings is slightly lower than at normal ISO settings.
ISO settings higher than 6,400 correspond to ISO sensitivities 0.3 to 2 EV over ISO 6,400, or ISO 8,000 to 25,600 equivalent indicated as X0.3, X0.7, H1.0 and H2.0 on the LCD. Compared to ISO 6,400, these settings show more noise and color distortion.
 ISO 6400 |
 ISO 12,800 |
 ISO 25,600 |
So how real are these high ISO settings?
The first qualifier is color capture. At ISO 25,600, you'd think you'd be smart to restrict capture to black and white. But I got quite decent color at X0.3 levels and color captures up to ISO 6,400 were perfectly acceptable. The Nikon D3 really separates itself from the pack around ISO 1,600, capturing a range of images with low noise at ISO settings that other cameras can't match.
I took two kinds of low-light shots. I tried night shots of objects illuminated by street lights at H2.0 and I shot typical night scenes (like neon lights).

Night Shot. Aperture Priority and ISO 25,600.
I had the feeling I could see in the dark with some of the street light scenes. But as fast as ISO 25,600 may be, I still found it necessary to shoot in Aperture Priority mode, using a hand-holdable 1/25 second with non-VR lenses. Shooting in Program mode, for example, resulted in shots blurred by camera movement by virtue of the very slow shutter speed required.
At first, I thought I was having focus problems (it's hard to tell what's going on in the dark), so I switched to manual focus. But I couldn't see well enough to focus (none of my subjects were particularly bright). Going back to autofocus resolved that issue.
Composing in the dark is a problem, too. The hydrant image background could not be distinguished from the framing mat of the viewfinder so it was very difficult to tell if the hydrant was straight or not. I should have used the Virtual Horizon feature to guide my composition, but I didn't think I needed it.

Low Light. Aperture Priority and ISO 25,600.
The second kind of low light shot I took was the dolls awaiting repair in the dimmest corner of the garage. The light falling on them measures four footcandles at best and the Shirley Temple doll is always in shadow. I set the D3 to shutter priority with the shutter at 1/25 second (which I can hand hold at this weight) and took portraits of the dolls. There is some noise, but there's more than adequate color (given the original scene, which is less vibrant than the images) and detail is very sharp (the lips and eyebrows, not to mention the cracks).

Handheld Macro. A reversing ring, Auto ISO (set to 635 here), f/11 and 1/200 second.
You have to visit the Exif page for these shots to see the actual ISO, rather than the base ISO. They are, in fact, ISO 3,200 shots as our captions on the gallery page show, but at a higher EV setting. So look in the Makernotes for the ISOSetting tag where you'll see the ISO equivalent of 25,600 listed.
On all these shots, by the way, High ISO Noise Reduction was Off.
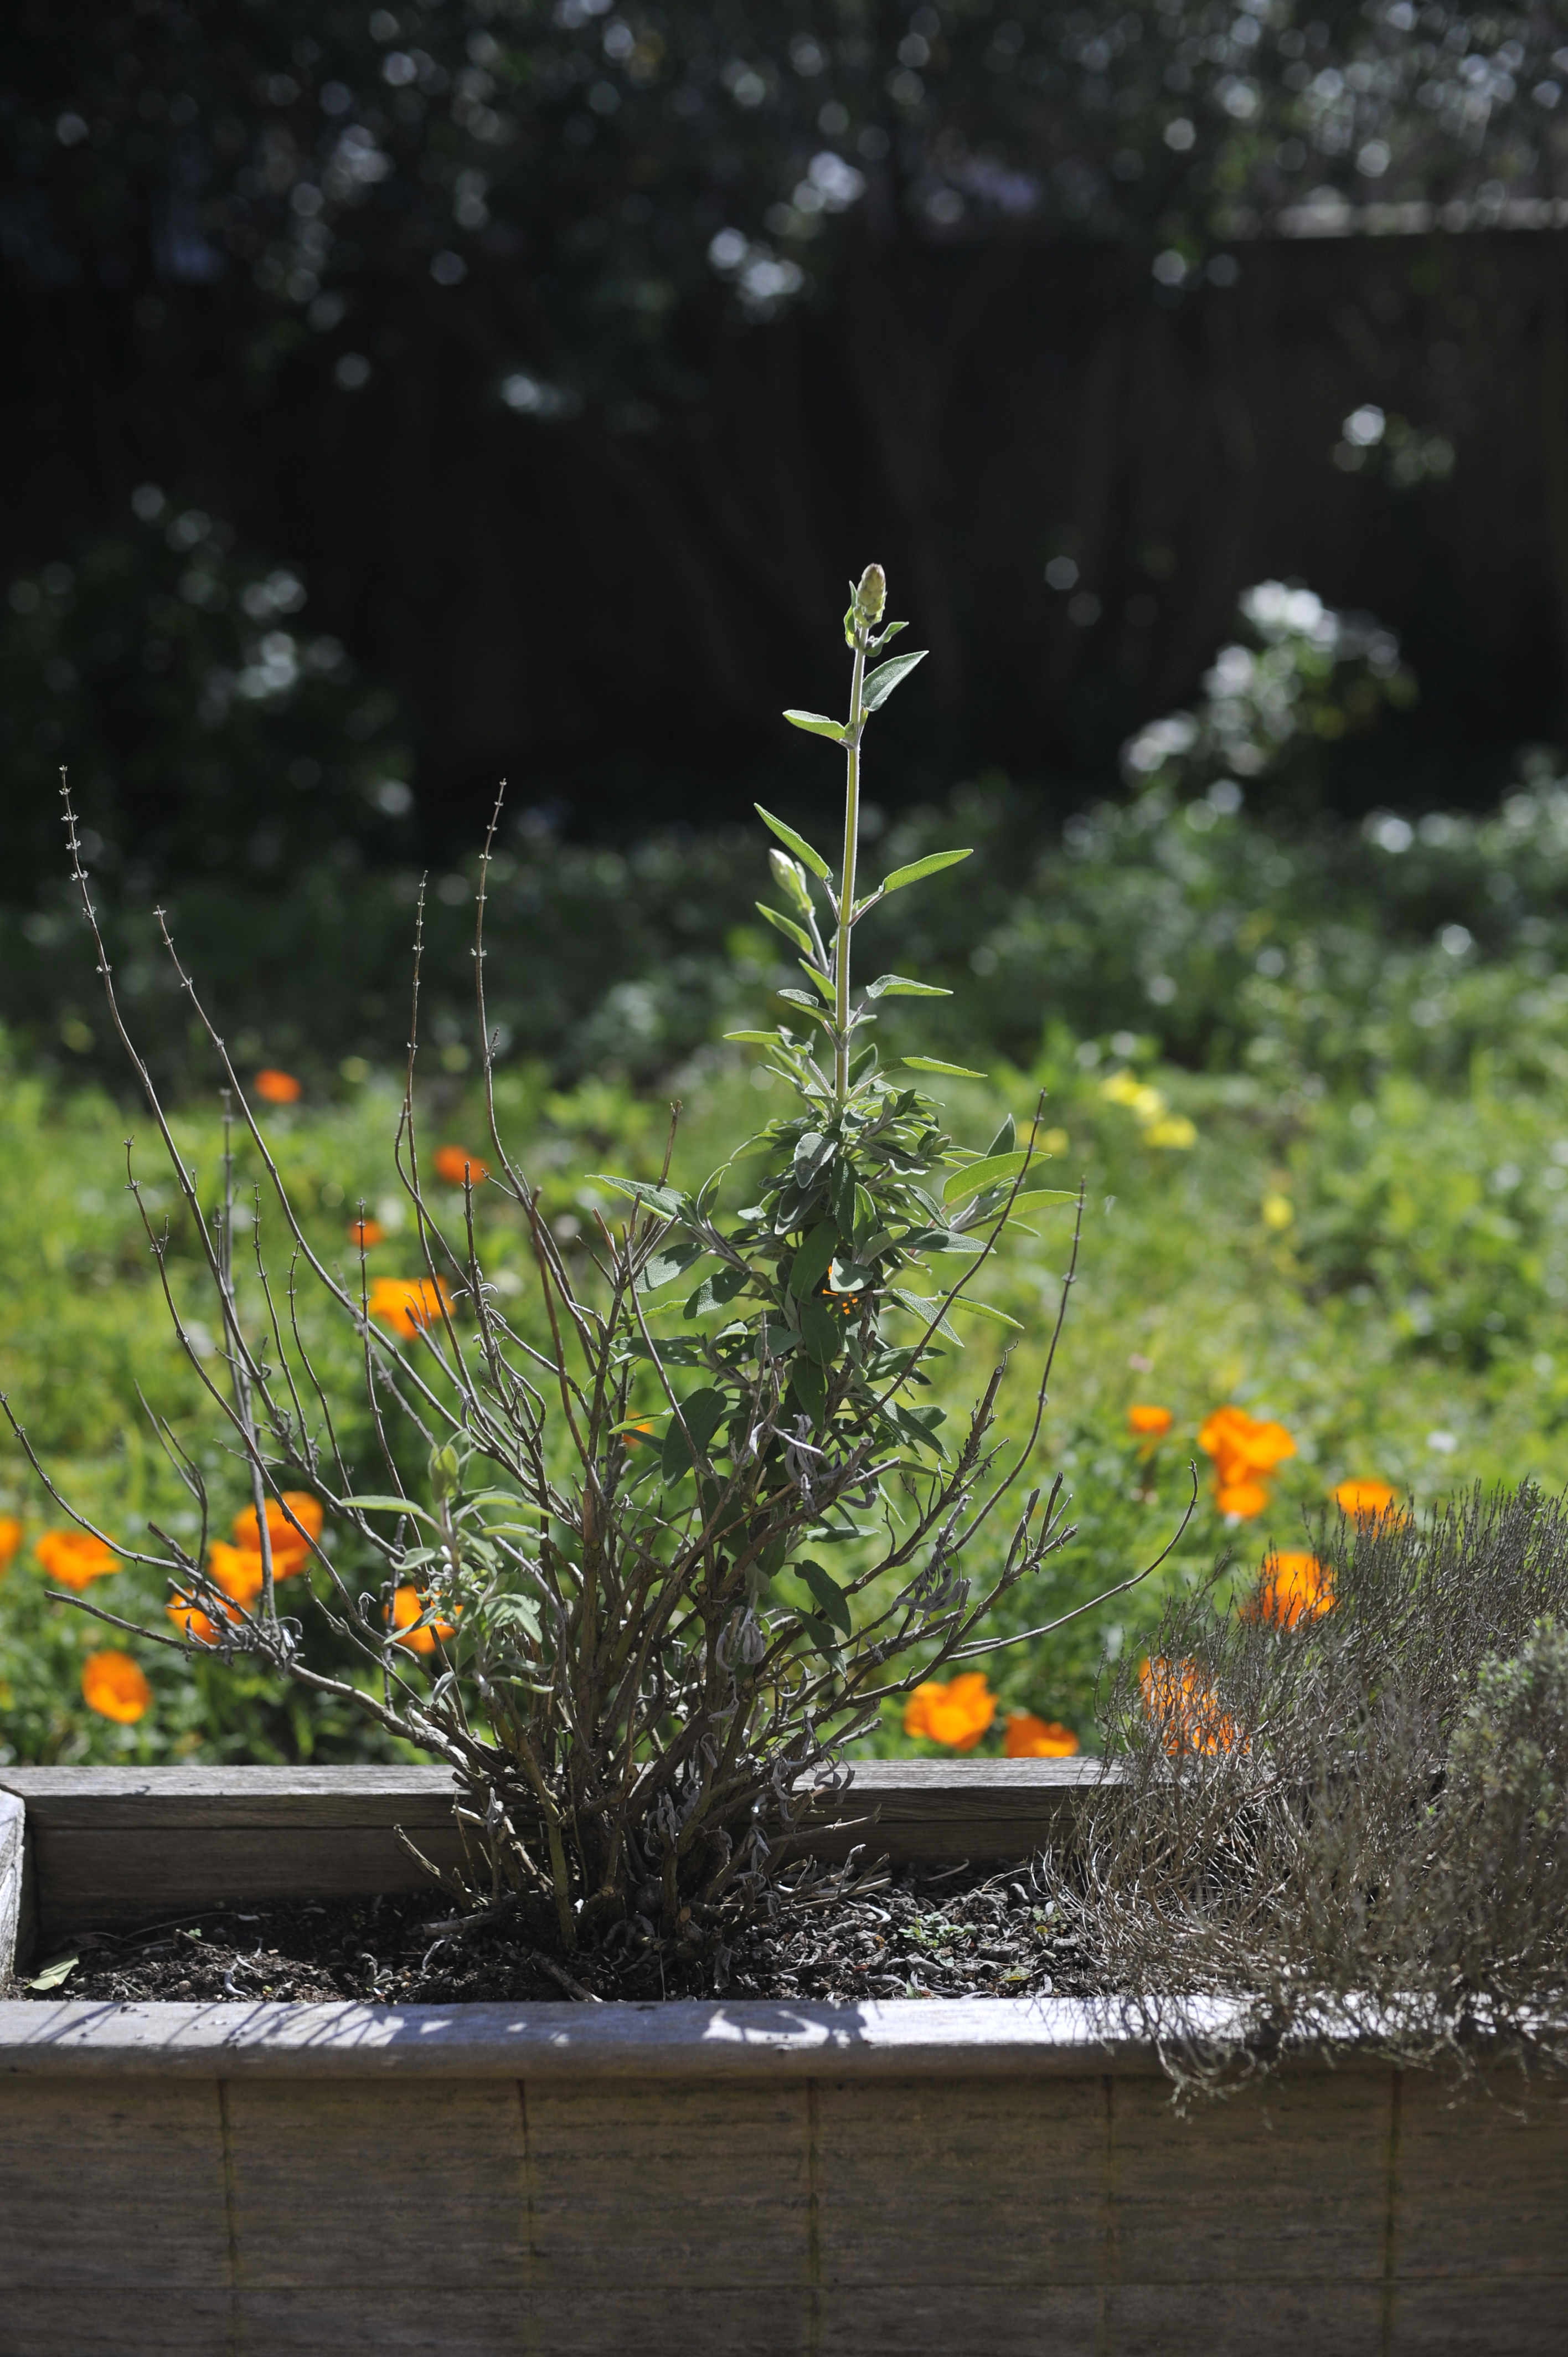
But the Nikon D3's usable high ISO means it can also see in bright sunlight. That was a real pleasure, I found out. I like to shoot macro but the old problem of getting enough depth of field at a handheld shutter speed can take a lot of subjects (like poppies in the wind) out of play. Not with the D3. I cranked up the ISO, set the aperture to f/11 and the shutter speed to 1/60 second and shot away. Handheld macro at f/11!
Double CF Slot
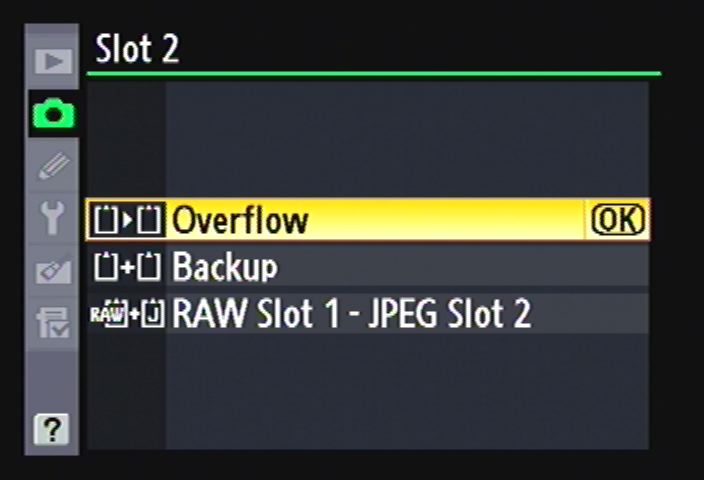
Double Card Slot. Three useful options.
I found the memory card door awkward to open, but that's not surprising. Nikon has a special gift when it comes to designing awkward doors and latches.
A small door opens opposite the memory card door on the back panel to reveal a tiny button that begs to be opened by a finger sneaking in from the open right side. Unfortunately that's the side the memory card door opens on, so you are effectively blocking the door from unlatching if you do that. The trick is to come at it from the bottom. No matter how funny this makes you look.

Door Release. Hard to get to unless you come from below.
Once you get in there, you'll find two CompactFlash memory cards slots. Slot 2, which is closer to the grip and labeled "2" on the big gray push button above it) can be used for overflow, backup storage, or separate storage. A truly brilliant idea.
If you only have one card, you'd put it in Slot 1. You could save Slot 2 for overflow, recording images only when the card in Slot 1 is full. But you can also use a Shooting menu option to change that behavior into something a bit more useful.
If you designate Slot 2 as Backup, each image is recorded on both cards. If you set it for Raw Slot 1-JPEG Slot 2 and have NEF (Raw) + JPEG set for the image quality, the NEF will be recorded on the card in Slot 1 and the JPEG in the card in Slot 2. If you have any other image quality setting, Slot 2 reverts to its default backup behavior.

Double Card Slot. Note the gray numbered push-button releases above.
That's a real boon because you can backup in camera. If you're shooting a wedding or sports event, you'll want two large UDMA-class cards in your D3 all the time.
Nikon's decision to provide two CompactFlash slots rather than a CompactFlash slot with an SD slot means there's no speed penalty using fast cards. You can populate both slots with high speed cards. Canon's decision to use an SD slot for the second card in the 1D-series limits that slot to half the speed of a CompactFlash card in the primary slot.
Firmware updates are done by copying the A and B firmware files to the root directory of a memory card. The memory card must be inserted in Slot 1 for the update to function. Slot 2 won't work.
Nikon D3 Image Buffer
The D3 can capture 9 to 11 fps in DX format and up to 9 fps in FX format when set to Continuous High Speed release mode. That's quite a few frames per second but it does have its price. It fills up the memory buffer quickly.
The Canon's competing full-frame digital SLR, the 21.1-megapixel 1Ds, for example, shoots 12 Raw or 56 large/fine JPEGs at 5 fps before its buffer fills. So you can shoot up at 5 fps for about 10 seconds if you're shooting JPEGs.
On the D3, I was able to shoot 16 large/fine JPEGs before the buffer filled, but they only spanned two seconds.
Still, this qualifies as a large buffer with room for 130 images, according to Nikon. What size or compression level the images are, the company does not specify.
Multiple Exposure
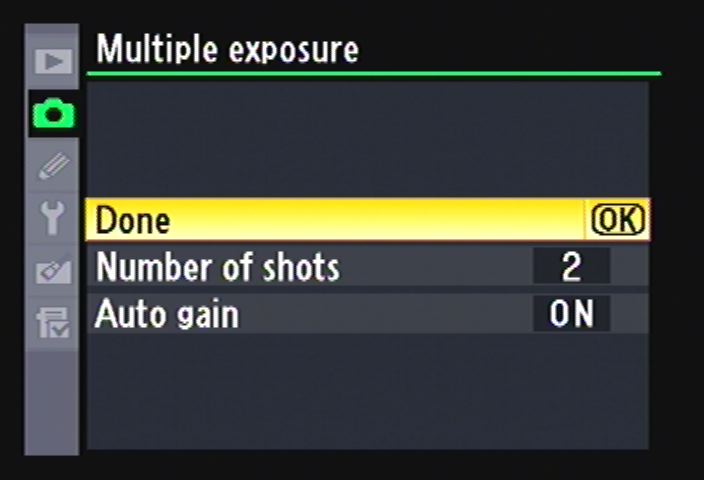
Multiple Exposure. Set the number of shots and auto gain.
Under the Shooting menu, the Multiple Exposure options lets you compose images in the camera that usually require layering in an image editor. The Nikon D3 lets you shoot up to 10 images to combine into a single file.
It also includes an option to set Auto Gain on to reduce gain in each image. If you're taking two shots, for example, gain would be set to 1/2 for each shot. If three, 1/3. If your background is dark, you can turn it off.
Once you enable the multiexposure option and optionally set the number of exposures (two is the default) and Auto Gain, you're ready to go. The release mode determines the shutter's behavior, however. If you want to compose two quite different shots, set the release mode to Single to give yourself time to recompose the second shot. But if you want to build the image with the same background, set the release mode to one of the Continuous modes. A single press of the shutter will take the whole set of shots.
The function resets itself after the full sequence.
Interval Timer
You can also set the D3 for interval shooting. It can take a set number of shots over a set period of time after a certain start time. The captured images are stored in a single file.

Street Shot. Natural color at f/7.1 and 1/800 second at ISO 200.
Nikon warns that even though you can set the interval shorter than the shutter speed, it won't work. Otherwise the maximum number of intervals is 999 multiplied by the number of shots (up to 9) for a total of 8,991 images. Intervals can be set by the hour:minute:second.
HDMI Output
In addition to the usual USB and AV connections, the Nikon D3 has an HDMI port. Connecting a standard type A HDMI cable to the camera and an HDTV, you can run your slide shows directly from the camera in high definition.
The D3 supports 480p (640x480 progressive), 576p (720x576 progressive), 720p (1,280 x 720 progressive) and 1080i (1,920 x 1,080 interlaced) formats. You an also set it to automatically select the appropriate format for your output device. In fact, Auto is the default setting for the HDMI port.

Wide Angle. One advantage of an FX sensor is being able to shoot 14mm wide-angle shots.
I tried this on a couple of HDTVs and was pleased to see my images displayed at the TV's highest resolution directly from the camera. It was a nice change to skip the intermediary of an Apple TV just to see the day's shoot. And it's also a nice change to see a large screen display instead of squinting at your monitor.
Nikon D3 Live View
Like the D300, the Nikon D3 has two ways of using Live View: hand-held and tripod. A menu option determines which is active when you move the Release mode dial to Live View. The two modes are quite different.
Hand-held is for the Hail Mary shot. You're in a crowd, holding the Nikon D3 up over your head, hoping to get the shot. With a traditional SLR, you zoom out to wide-angle to make sure you cast a wide enough net to capture your subject, aim down and press the shutter.
But with Live View in hand-held mode on the Nikon D3, you press the shutter button all the way down to raise the mirror and display the live scene on the LCD. With a very wide 170-degree angle of view on the gorgeous 3.0-inch LCD, you can hold the camera over your head and still see what's going on. In fact, if you're using 51-point 3D-tracking autofocus, the camera will track an erratically moving subject within the autofocus area.

Blossoms. Natural color at f/11 and 1/200 second at ISO 200.
To prefocus (which is really optional in Hail Mary mode), you half-press the shutter button or press the AF-On button. The mirror will flip down, the camera will focus and when you release the shutter button, and you can check focus.
Once you've said your prayers, you simply press the shutter button all the way down to take the picture. And thanks to that LCD again, you can evaluate the results instantly.
I used Live View on a D300 extensively while covering trade shows earlier this year. Working quickly on the show floor, I switched to Live View mode on demand, pressed the shutter button down before I hoisted the camera up, half-pressed to focus on the scene so I could see it sharply in the LCD, and waited for the right moment to depress the shutter button fully again. There wasn't really much shutter lag, although it wasn't as fast as Single or Continuous mode. But it did the trick. I never hesitated to use it when I needed to compose with the camera at arm's length.
Tripod mode, on the other hand, uses a different focusing method: contrast detect. So it can focus with the mirror up. While you are viewing the scene, in other words.
The big difference in tripod mode, though, is that the contrast-detect method only tells the camera the subject is out of focus. It doesn't explain by how much and in what direction, as do phase-detect AF systems. So the lens steps in or out very slowly, stopping every step of the way to re-check focus. The delay isn't too bad if the focal distance is already close to the right setting, but it can be glacial if the lens has to go very far.
You can get a head start on focusing by framing your shot in the viewfinder and pressing the AF-On button. But you press the shutter button all the way to lift the mirror and see the scene on the LCD. You can then focus with the AF-On button. As long as you hold it down, the Nikon D3 will focus using contrast detection. Press the magnifier button to see an enlargement up to 13x of the focus area (the OK button cancels it).
And you can move that focus point anywhere you want in the scene.
To take the shot, press the shutter button all the way down. The mirror will drop and the shutter will trip.
Using this mode for macro shooting, you get two benefits. You can see the actual depth of field without pressing the DOF button to stop down the lens so you can see what's in focus. And you can see what you're focusing on.
There's also a second setting in the Live View menu option for the Release mode. You can select Single, Continuous low-speed, or Continuous high-speed. With one of the continuous modes you can actually follow your subject as they move through the scene. And if you have 51-point autofocus in gear, all the better.
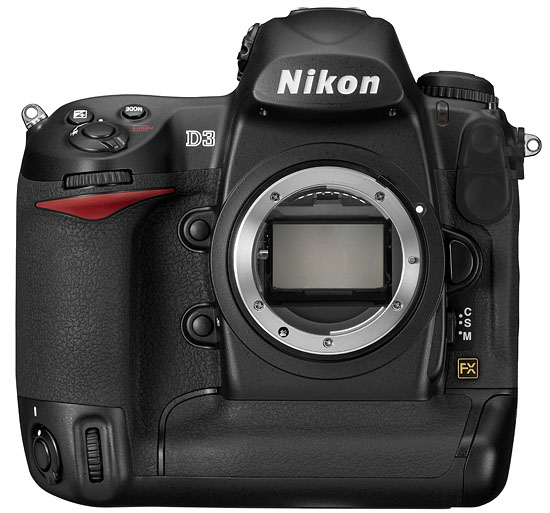
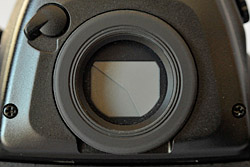
Sensor Cleaning

FX Sensor. The D3's CMOS FX sensor.
Unlike the D300, the Nikon D3 with its larger FX sensor does not provide an automated sensor cleaning operation. But I didn't find that particularly significant. Automated systems only shake off dust that somehow finds its way into the mirror chamber. They don't do anything about the stickier stuff that can form on the filter surface.
It's true that a camera intended for professionals is going to see a lot of lens changes, but those changes will likely be in less hazardous conditions than lower-level consumer digital SLRs might be subjected to, if only because pros tend to have another body for every lens they plan to use at an event. And sensor cleaning won't be foreign to the pro or advanced amateur. It will be routine.
But there are a couple of things to know about the Nikon D3's low-pass filter before you try to clean it.
The Nikon D3's low-pass filter has an Indium Tin Oxide coating which is optically transparent and electrically conductive, helping to dissipate static charges that attract dust.
But the ITO coating on the low-pass filter is sensitive to some cleaning chemicals, particularly the methanol used in the popular Eclipse cleaning fluid. In response, Photographic Solutions has developed E2, a cleaning fluid that is safe for ITO coatings.
Also different on the Nikon D3 is the way the low-pass filter is attached to the sensor. According to Ross Wordhouse at Dust-Aid, "Nikon is now permanently bolting the piezo electric sensor filter to the sensor housing." Using a Dust-Aid Classic cleaning pad on the D3 filter won't damage the surface of the filter itself but may dislodge the filter from its housing. Dust-Aid recommends using its lower-tack Canon cleaner tapes on the Classic pads to clean the D3.
It's worth noting that the only way to detect dust on the filter is by examining an image -- and not just any image.
To look for dust, stop down your lens to at least f/11 (f/22 is preferred) where the spots can easily be observed. At wide-open apertures, they blur significantly. Then focus at infinity while shooting at a brightly lit light background (like the daylight sky or a sheet of well-illuminated white paper) just a few inches from the lens. The dark dust spots should easily stand out.
If you're using Nikon's Capture NX, you can use the D3 to take a Dust Off Reference Photo. Use a lens with at least a 50mm focal length, focus at infinity and set the lens just four inches from the brightly lit background. Capture NX can use the reference photo to remove dust from your captures, but you should only rely on it as a last resort, repairing damaged images. It isn't a long-term solution. Only cleaning is a long-term solution.
Nikon recommends using a blower to dislodge dust from the filter. But in some cases blowers may not have sufficient force to remove what's on the sensor. Nikon recommends returning the D3 for service if the blower doesn't do the job.
That's the point most seasoned digital SLR users turn to a wet cleaning method, like the one the Imaging-Resource.com lab uses from Copper Hill, which uses the E2 cleaner. I had the Nikon D3 so long that I had more than one occasion to do a wet cleaning of the D3 and very much appreciated Copper Hill's angled wand, explicit instructions, standard PEC Pads, appropriate solutions and the new $14 SensorView illuminated magnifier which let me see how well I'd done without putting on a lens and taking a shot.
Updating Nikon D3 Firmware
In April 2008 Nikon released firmware update 1.1.0 for the D3. The update added four features:
- In the Playback menu, the Display mode option was changed, moving the Highlights option to the Detailed photo info section. Highlights adds a page to the photo info display showing highlights for all channels and the red, green, and blue channels.
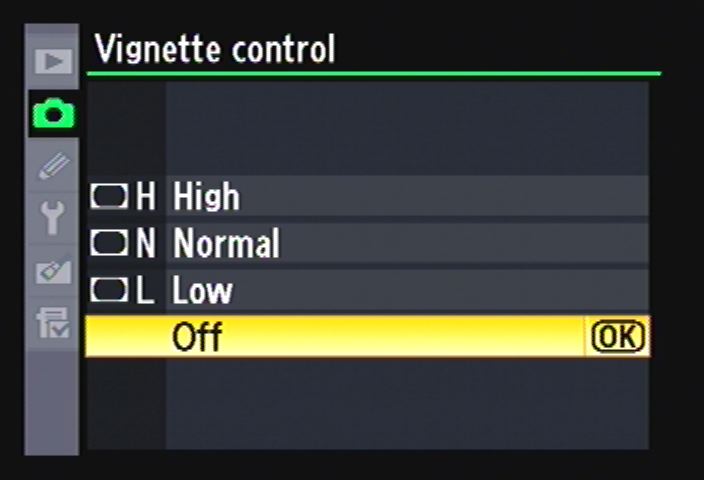
- In the Shooting menu, a Vignette Control option was added to reduce vignetting for type G and D lenses (excluding DX, PC, AF 14mm f/2.8 ED, AF Fisheye 16mm f/2.8D, AF 20-35mm f/2.8D and AF 24-85mm f/2.8mm-4d lenses). Options include High, Normal (default), Low, and Off.
- Also in the Shooting menu, the Auto ISO Sensitivity Control menu changes the Minimum Shutter Speed value from 1/250 second to 1/4,000 second.
- In the Custom Settings Menu, the a6: Focus Point Illumination option now includes a Focus point illumination option to set the brightness of the focus point display. Options include Extra high, High, Normal (default), and Low.
Multiple Exposure. Set the number of shots and auto gain.
Nikon withdrew the update on April 18 when it was discovered that a combination of settings would cause file corruption in an image. The combination of settings is:
- Release mode: Continuous high speed (CH), or Continuous low speed (CL) with Custom Setting d2 set to 9 fps
- Image area: FX format (36x24) or 5:4 (30x24)
- Image quality: NEF (RAW) or NEF (RAW) + JPEG fine/normal/basic
- NEF (RAW) recording>NEF (RAW) bit depth: 14-bit
The company did release an updated version of the firmware update at the end of April 2008. It affected only the B version of the firmware, however.
Analysis. The Nikon D3 has received a great deal of praise at a time when many other high-end products are stumbling out of the gate. My experience tells me that the D3 has earned every accolade. It is the first Nikon that can stand with its film brethren, using the Nikon system the way it was designed. I was never penalized for twisting an old piece of Nikkor glass on the D3 body. In fact, the D3 seemed to give it new life.
But it goes far beyond the film cameras, not only with its stunning capture rates but especially with the one feature everyone who has used a D3 can't avoid praising. It is simply the most responsive camera we've all ever used.
Despite its weight, it seems to disappear between the photographer and the subject, gracefully providing whatever is needed to render the scene the way it was visualized, like an assistant who knows how to get out of the way.
The Nikon D3 isn't just the flagship of the Nikon digital SLR line. It's state of the art.
New/upgraded features on the Nikon D3 compared to the D2Xs:
- First Nikon DSLR to offer full-frame (36.0mm x 23.9mm) sensor
- 12.1 megapixel FX-format CMOS sensor (compared to 12.4 megapixel DX-format CMOS sensor)
- 9 fps continuous-mode speed at full resolution (up from 5.3 fps)
- Up to 11 fps in 5.1MP DX crop mode (up from 8 fps in 6.9MP High-Speed crop mode)
- 64 JPEG / 20 RAW (12-bit) buffer size (up from 22 JPEG / 17 RAW frames)
- ISO from 200 to 6,400 with extensions to 100 and up to 25,600 (up from 3,200)
- 51-point AF with 3D Focus Tracking, utilizing 15 cross-type and 36 line-type sensors (up from 11-points, 9 cross-type)
- Fine-tune adjustment for front/back focus with memory for 20 lenses
- 0.70x magnification viewfinder (down from 86%, but full-frame)
- 3-inch, 920K pixel LCD with 170 degree viewing angle (up from 2.5-inch, 230K pixels)
- Two LCD "LiveView" modes:
- "Handheld" LV mode drops mirror to focus with TTL phase detection AF module
- "Tripod" LV mode uses contrast detection on sensor image, allowing any point on the image sensor to be focused on
- Selectable 14- or 12-bit digitization (up from 12-bit)
- Scene Recognition System links 1,005 pixel RGB metering sensor and AF sensor to enhance the accuracy of auto exposure, auto white balance detection and autofocus
- Picture Control System to fine-tune rendering options, with settings consistent and portable to other compatible models such as the D3
- Active D-Lighting providing real-time highlight and shadow correction
- Optional shooting info display on main LCD
- Expanded Retouch menu
- Automatic in-camera Lateral Chromatic Aberration correction
- Automatically switches to DX crop mode with viewfinder mask when DX lens mounted
- Parameters for up to 9 non-CPU lenses can be registered (up from one)
- World's first virtual horizon level indicator displayed in viewfinder and LCD
- Shutter tested to 300K actuations (up from ~150K)
- Self Diagnostic Shutter Monitor that ensures the accuracy and precision of the shutter at all times
- HDMI high definition video out (added to composite video out)
- Dual CompactFlash slots with UDMA support
- Compatible with new WT-4A Wireless Transmitter capable of LiveView transmission and continuous shooting
In the Box
Efficiently packaged in the Nikon D3's rather substantial bronze box are:
- Nikon D3 body
- EN-EL4a Rechargeable lithium-ion battery
- MH-22 Quick Charger
- UC-E4 USB Cable
- EG-D2 Audio Video Cable
- AN-D3 Camera Strap
- BF-1A Body Cap
- BS-2 Accessory Shoe Cap
- DK-17 Eyepiece
- BL-4 Battery Chamber Cover
- USB Cable Clip
- Software Suite CD-ROM
Recommended Accessories
- Large capacity CompactFlash memory card. But with the D3, you should consider a couple of high speed UDMA cards to take full advantage of the camera's UDMA capability, offering transfer speeds as high as 45MB/second.
- SB-900 or SB-600 Speedlight Flash
- WT-4a Wireless Transmitter
- Type E Focusing Screen
- DK-17M Magnifying Eyepiece
- EH-6 AC Adapter
- Capture NX 2 Software
- Camera Control Pro 2 Software
- Image Authentication Software
Nikon D3 Conclusion
| Pro: | Con: |
|---|---|
|
|
Though it has been supplanted at the top of the heap by Nikon's 24.5-megapixel D3x, the 12.1-megapixel Nikon D3 still stands strong in the area of overall full-frame image quality, especially as light levels drop. Nikon now has two professional cameras to match Canon's two: one built for speed, the other built for high resolution. The Nikon D3's superb build and intelligent interface make it an excellent tool for the professional photographer. It is responsive and easy to manipulate. Frequent users will find it easy to make the Nikon D3 serve whatever situation they encounter, bending it to their will with familiar controls and well-considered design.
Speed is indeed the best way to describe the Nikon D3: from ISO to frame rate, the D3's speed impresses. ISO ranges from 200 to 25,600, and its maximum frame rate is 11 frames per second, with all focus tracking stripped out of the way and the resolution cut down to APS-C. The Nikon D3 is an amazing machine, built to handle all kinds of photography. Until the advent of the Canon 1Ds Mark III and the Sony A900, we'd also have said, "including high resolution photography." But honestly, 12.1 megapixels is plenty to work with for almost any circumstance.
Dual CompactFlash slots mean that you'll have the capacity to shoot plenty of RAW frames and even backup on the fly when you set the camera to write to both cards simultaneously, guarding against one card's failure.
Naturally, the Nikon D3 is only for the serious photographer, as its construction and size should indicate. It's not for the casual snapshooter, so don't even consider the D3 just because it's "the best one." You'll be frustrated. Better to look at the Nikon D700, a full frame digital SLR camera that's a little more suited to the casual shooter (though just like the D300, you still have to be pretty serious about your photography to delve into one of these high quality cameras). But if you're intent on shooting a lot and getting paid for it, as more and more photographers are, the Nikon D3 is the natural choice. Indeed, I think it's the best choice as a first pro camera, because it offers the best of all worlds. High speed, high resolution, and high customizability. The D2x was great, the D3 is better. The D3x is for the one who wants high resolution, but doesn't need high speed, and it serves better as a second camera to the D3. The Nikon D3 is the bread-and-butter professional digital SLR camera, whose features stack up quite well against both of Canon's high-end digital SLRs. Add the excellent Nikkor glass that keeps rolling out of the Nikon factories, and you're looking at one sweet photographic system.
The Nikon D3 is a five-star Dave's Pick, and one hot digital SLR camera.

 Fujifilm GFX 50S Review
 Fujifilm X-T3 Review
 Olympus E-M5 III Review

Follow Imaging Resource