




Overview
Nikon D3 Overview
by Shawn Barnett, Dave Etchells, Siegfried Weidelich, and Mike Pasini
Hands-on Preview: 12/04/07
Full Review: 01/21/09
Pro photographers last year got a new option for full-frame digital photography: the Nikon D3 digital SLR camera. Not only did it make their old Nikon glass fully usable again, but it's the fastest digital SLR on the market -- with some limitations.
The big news was that Canon finally had a rival in the full-35mm space. It had been a long time coming. As they did with the D2x, Nikon struck a very fine balance with the D3. It's not 16 or 21.1 megapixels like the Canon 1Ds line, it's 12.1. And it's not a full 10 frames per second, like the 1D Mark III, it's 9; but you can get to 11 frames per second if you don't need full resolution and focusing tracking. It's an interesting and effective strategy. While they've surrounded Canon's models at the low end, they're still wisely splitting the difference at the pro end, and the resulting cameras are more versatile than the competition.
 But resolution and frame rate aren't the only important aspects to this new professional digital SLR camera. The Nikon D3 has 14-bit A/D conversion, just like the D300 that was introduced at the same time, plus the option of stepping back into 12-bit A/D conversion if you desire. The Nikon D3's new Scene Recognition System merges data from the AF system with data from the 1,005-point metering system for greater accuracy and better tracking. A new 51-point AF system includes 15 cross-type sensors and a wide range of modes to take best advantage of them. And the 920,000 pixel, 3-inch LCD rivals the Nikon D3's own optical viewfinder for clarity; both offer 100% viewfinder coverage.
In-camera Lateral Chromatic Aberration Correction, optic-by-optic autofocus fine-tuning, a wide ISO range of 200 to 6,400, plus extension to Lo-1 (100) and Hi-2 (25,600!), really round out the package.
As if to underscore how Nikon has split the difference between the Canon 1Ds and 1D Mark III offerings, the price of the Nikon D3 digital SLR is $4,999.95.
Nikon D3 User Report
by Mike Pasini
During a break at my adventure at Dogpatch Studios, the inevitable question was raised. We'd been shooting with D300s all day and found them to be up to every task we tried. So what, we wondered, is the big deal about the D3?
A few of us had actually held a D3 in our hands and the same answer occurred to each of us: It's just the most responsive camera we've ever used. Touch the Shutter button and the camera fires before you've finished pushing it down. If you don't immediately release the Shutter button, you've got a series of images. But that light touch grows on you instantly. You begin to wonder why every camera can't be so responsive. It's how your mind works, after all.
And then everything else you need is right at your fingertips, from ISO and White Balance settings to shooting modes and Aperture and Shutter speed dials. If you've shot with a Nikon digital SLR before, you'll feel right at home.
We all agreed that the one thing we did not like about the D3 is its weight. At 2.73 pounds without a lens, it's not going to go everywhere with you even if it won't fit in a drawer. It means business and it isn't shy about it.
One thing we didn't all agree on was the importance of its 35mm frame size. Nikon calls this FX (to distinguish it from both the DX of its APS-C sensors and the implications of "full" frame). While it's nice to have your focal lengths behave normally, modern fast autofocusing lenses (many with image stabilization) are hefty in their own right. The question left on everyone's mind -- especially after falling in love with the D300 -- was whether or not anybody really needs an FX system.


Here we mounted a Nikkor 35mm f/2.8 on a D300 whose 1.5 focal length multiplier equates to a 52.5mm equivalent and a Nikkor 50mm f/1.4 on a D3 in FX mode. Both cameras were set to ISO 200 and f/2.8 and Aperture priority mode.
While the images are close equivalents, there are differences in the amount of background blur and overall contrast. Some of that is no doubt due to the difference between the two prime lenses. But in the real world, you would be considering the composition two different lenses would provide. There is no standard prime 35mm and prime 50mm lens. The key point here is how similar the compositions are.
There's only one compositional issue to consider. The smaller DX format does handicap you if you want to shoot wider than an 18mm equivalent (but not fish-eye wide), whereas the D3 gets down to 14mm without a problem.
We discuss the FX factor in more depth below, but except for that wide angle issue, the DX format is not handicapped when it comes to composing your images.
Look and Feel. Much like the Nikon D300, the Nikon D3 body design features mostly evolutionary design changes, which is better for existing D2x users.

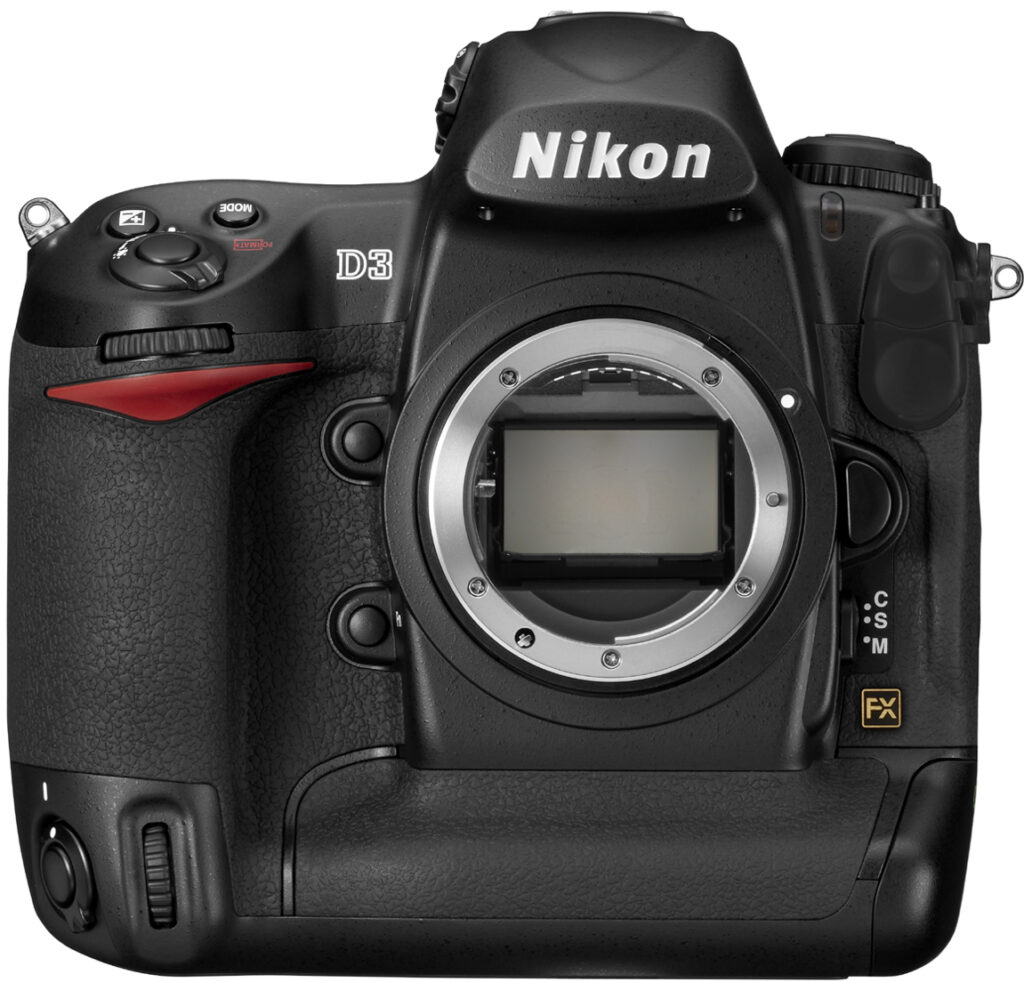
The pentaprism housing is notably larger, and the ambient light sensor is no longer a part of the design (on the D2x, the white window perched over the Nikon logo is the ambient light sensor). The red accent on the grip has been restyled as well. The new cover over the Flash and Remote Terminal has a new one-piece design. Also note the gold FX logo in the lower right corner, denoting Nikon's new designation for Full Frame.

Fewer changes are made to the Nikon D3's control arrangement than were done to the D300, but there are a few. The Enter button is now an OK button. The speaker below this button has been moved closer to the rear Status LCD. The LCD is larger, going from 2.5 inches to 3 inches. The more significant improvement is in the LCD's resolution: now 640x480. It's hard to appreciate this improvement until you see an image on the screen. The AE/AF Lock button has gotten smaller and dropped down a bit, making it easier to distinguish from the AF-ON button, which used to be right next to it. The two rear Command dials are set at a slight angle to match the orientation of the thumb's pivot point when holding the Nikon D3; a nice ergonomic change. The vertical, or secondary AF-ON button in the lower right corner has been moved from below the Command dial to above it. Without holding the camera, it's tough to know which will be preferable. The old location did make it easier to press the button accidentally.
There is no plastic screen cover for the Nikon D3.

Here on top, the Metering selector dial has moved back a bit, and the Mode and EV compensation buttons have changed shape. The hot shoe design has changed a bit.
Body. Size and weight has increased on the Nikon D3 when compared to the Nikon D2x. The D3 weighs 2.7 pounds (1,240g) without battery or cards, while the D2x was 2.4 pounds (1,070g). Along with the sensor size increase come necessary increases in size for the mirror, mirror box, shutter, and probably the motors needed to activate these mechanisms. The larger pentaprism and LCD would also affect weight and size. Dimensions are now 6.2 x 6.2 x 3.4 inches (159.5 x 157 x 87.5mm).
The exterior shell of the Nikon D3 is made of magnesium alloy, and sealed against dust and water.
Nikon D3 Setup
The D3 we tested came from our lab so I didn't go through all the setup changes I normally do.
But I did follow my usual routine for setting up the camera to behave the way I expect, skipping just a few of the more personal touches. Among the things I didn't do, for example, was set up a copyright notice using the Comment feature and personalize the folder name with my initials.
The essential setup involves adjusting the diopter, setting the viewfinder display and going through the Menu system item by item.

Diopter. Pull it out, click to set and push it back in.
Diopter Adjustment. The diopter knob pulls out so you can twist through the settings. Once you've found the sweet spot where the focus screen is sharp, you lock in your setting by pushing the diopter knob back in.
I actually had to resort to the manual to figure out that you pull the diopter knob out. I could not figure out with trial and error how the diopter knob worked. Pulling it out was the last thing I'd have thought to do. Which suggests how secure the setting is once you've made it.

Mode Dial. Single, Continuous Low, Continuous High, Self-Timer, Mirror Up, and here set to Live View.
Viewfinder. The D300 viewfinder options were, well, missing. Unlike the D300, I couldn't enable a grid display in the Nikon D3 viewfinder, one of my survival tactics. Instead, I had to learn how to use the D3's Virtual Horizon feature. That's a bit more than a simple setup option, so I've detailed it below.
A Strap. It didn't take very much time handling the Nikon D3 before I decided it wasn't safe to do so without a shoulder strap. Nikon does supply one with the camera, but I had just received some UPstraps (http://www.upstrap-pro.com) for review and though they were heavy duty, I snugged the quick release version to the D3. The strap's non-slip grip (which really does not slip) was reassuring.

Ports. USB connector on top, DC In, AV out, and HDMI connectors on bottom.
The Nikon D3, like any digital SLR with a vertical grip, is really too big for a wrist strap. But with the quick release Upstrap, I found it easy to shoot in either the horizontal or vertical orientation.
Nikon D3 Menu Items
There are a lot of menu items on the Nikon D3 but don't let them confuse you. The Menu system features a context-sensitive Help feature accessible by pressing the ? button (third down on the left of the LCD). If you find an option unclear, just hold down the ? button to see a text explanation.
Another source of help is the Nikonians, a Nikon user group, which has developed a D3 setting spreadsheet for keeping track of menu item settings. There are a number of alternatives available as well, all worth checking out at least as starting points for your own setup.
Among the Menu system items I found some of my old favorites and essential settings for my work habits.
Auto Image Rotation. I like this on even though the data itself isn't rotated. But it does write the correct orientation to the orientation tags in the Exif header so I can see the image normally during slide shows. And slide shows with the D3's HDMI output are not to be missed.
Color Space. My workflow uses AdobeRGB as the color space, so I changed the Nikon D3 from sRGB to AdobeRGB. I start wide and normal down everything here myself, but if you like to use a service for prints, you might prefer to leave the camera set to sRGB.
Focus Mode. Having been impressed with the D300's 51-point autofocus at Dogpatch, I quickly started from there on the Nikon D3. You can stick with single-point autofocus (which is how we all learned to focus) but there's 9-point and 21-point autofocus available, too. You can even select one point from a set of 11.
But more importantly with 51-point autofocus you can do 3D tracking of moving objects. And you can do this in Live Mode. It takes some coordination (which doesn't come easily to some of us) but you can do it.
Release Mode. The Nikon D3 fires so quickly, I really wasn't comfortable at first with release mode set to anything over than either Single or Live View. I did, however, eventually develop the touch so I could indulge in a little Continuous shooting. Just to hear that sweet shutter do the tremola was worth it. But Single mode acts like Continuous on most other digital SLRs.

Continuous High Speed. FX image size, Raw+JPEG to two CF cards. (Click to listen.)
Picture Controls. The Nikon D3 offers Picture Control settings of Standard, Neutral, Vivid, and Monochrome. You can also adjust each of these to your liking. They resemble Canon's Picture Styles (discussed in the April 27 and May 11 newsletters last year).
My personal preference is not to manipulate the image data in the camera (start wide). There are certainly occasions that call for it, but my default setting is Standard.
D-Lighting. Where I make an exception to that is with the Nikon D3's D-Lighting option. Linear capture tends to dote on the highlights, devoting to them far more data than the shadows get. D-Lighting compensates for that, making it a lot more feasible to shoot JPEG rather than Raw -- a boon to photojournalists.
When you enable Nikon's Active D-Lighting feature, it salvages detail in the shadows and highlights of JPEG captures. There are four options: Off, Normal, Low, or High. D-Lighting is still available in Playback mode as an Edit option, but in the D3 it can be activated immediately after capture. In fact look for it in the index as Active D-Lighting, rather than D-Lighting (which will take you to the Playback enhancement).
With D-Lighting set to Normal, I got very nice histograms on my JPEGs and never worried about underexposure. It's more digicam-like behavior, certainly, but that isn't always a bad thing. Especially if you've got a deadline you're tracking with a watch instead of a calendar.
Non-CPU Lens Data. An FX sensor is what your old 35mm glass has been waiting for. And the Nikon D3 can store up to nine settings for them. You simply enter the widest aperture and the focal length of the lens and use the index number to activate that setting. I found it a particularly intelligent touch that the options you scroll through are actual Nikkor possibilities and not some programmer's list of every fraction.
My first entry (Number One) was a 50mm f/1.4 lens. My 43-88mm zoom went in as 43mm f/3.5. And so on. Then you just use Manual or Aperture Priority mode (letting the camera set the Shutter speed), meter the scene through the camera and shoot away. The old glass never really had it so good.
NEF Bit Depth. The default bit-depth setting for NEF or Raw captures is 12-bit, like the D200 and D300. But the Nikon D3 (and D300) can also record 14-bit channels. When I shoot NEF it's because I really do want to fiddle with the tone and color later. Might as well have lots of bits to fiddle with. So I set it to 14-bit.
Function Button. Not right away, but after shooting a while, I decided I had to assign an important function to the Function button that sits under the Depth of Field Preview button. But more about this later.
Auto DX Crop. With an FX sensor, you might think mounting a DX lens would be a big mistake. But not on the Nikon D3. The D3 is smart enough to know what kind of lens is mounted, and it lets you choose how to handle it. More on this below but if you have DX lenses, this is one setting worth getting to know.
Voice Memo. When you're stuck without a notebook or a pen, recording audio captions for images can save your bacon. There's a number of voice memo options on the Nikon D3, which has a microphone (unlike the D300). You can record audio notes automatically or manually and even change the Record button behavior (hold to record or press to start/stop recording).
That covers enough Record menu options to get going, but there are also some Playback options to consider.

Battery Info. Calibration and charging life, too.
Image Review. Battery life on the Nikon D3 is so long that there's no excuse not to indulge in a little image review. After all, the only way to really judge exposure (even with the gorgeous 3.0-inch LCD on the D3) is to study the histogram displayed with Image Review.


Image Review. Only one of many pages, this summarizes exposure settings and shows a histogram along with a thumbnail. The bottom shot shows another review display with red autofocus indicators.
Rotate Tall. If you want to see all your images in the correct orientation without rotating the camera, enable Rotate Tall. This has the disadvantage of making portrait oriented images only as tall as the LCD is, rather than full frame.
But if you plan to display your images on your HDTV through the D3's HDMI port (which works very well, BTW), you'll want Rotate Tall on.

Center Button. You can set a command for both Record and Playback modes.
Navigator Center Button. A number of the camera's buttons can be reassigned or set with custom functions. Remember that if you find yourself often digging through the menus for the same function. The one button I like to assign first is the center button on the multi-selector.

Navigator. A bit stiff but quite capable.
In Playback mode, I like to press that button to zoom in to a 100 percent view of the image to check focus or examine the effects of a sensor cleaning. You can also just press the magnifier button to zoom in bit by bit. But with the center button, you can select low, medium, or high magnification and get there in a jump. Other options include Thumbnail on/off, View histogram, and Choose folder. And yes, you can assign a function for shooting mode, too (Select center focus point).
Much as I like Nikon's Menu system (particularly the color scheme), the Nikon D3 seems to have cracked it a bit. There are so many options that it's hard to find some of them.
Nikon has a couple of solutions to this, but I didn't find either of them sufficient. Oddly enough, this didn't bother me on the D300. That was just about the limit, though.

My Menu. You can build your own menu of frequently accessed settings, even reordering them.
My Menu. Like the D300, the Nikon D3 offers a My Menu option rather than the Recent Settings option of the D200. I found I missed Recent Settings but My Menu lets me add, delete, and rearrange frequently accessed menu items.
The trouble is that with a camera like the Nikon D3, a half dozen lines for favorite menu items is a little truncated. Sure, the menu scrolls, but you want to see at a glance what you've been doing or just done. Why, after all, can't we have both a My Menu and Recent Settings?
Manage Settings. Again like the D300, you can save your settings to the memory card so you can reload them or share them. This is a binary file stored in the root directory of your CompactFlash. As a binary file you can't edit it.
Nikon D3 Heft
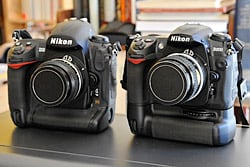
Front. The D3 (left) isn't much bigger than a D200 outfitted with the vertical grip.

Back. The controls are laid out the same, too.
Heft hardly covers it when discussing the D3. It's not so much that it's a heavy body, but it includes a vertical grip and, having an FX sensor, you'll no doubt mount some heavy glass on it. The two together do add up to a load.
But interestingly, a D200 with the optional vertical grip and a large lens isn't much lighter.
And the Nikon D3's grip makes it a comfortable package once you've got it in your hand. You're never stretching too far for a command or control, making it quite comfortable to actually use.
I wouldn't carry a D200 outfitted that way with a mere wrist strap and you won't carry the Nikon D3 that way either. The UPstrap here for review that I used held the camera securely both on my shoulder and around my neck. When the weight became uncomfortable (which happens sooner around your neck), I found myself holding the lens up with a free hand to lessen the burden.
I made something of a wide load walking down the sidewalk with the Nikon D3 on my shoulder. So I usually put the strap around my neck where I could see the lens hood and safely navigate obstacles like lamp poles and baby carriages.
The Nikon D3 didn't fit in my compact Domke bag or my digital SLR holster, so I wasn't able to conceal it on my various excursions. In some ways, I felt it demanded as much attention as a view camera.
But the D3 is professional gear intended for venues where no one is surprised to see a camera -- and quite a few may even be looking for one. If your shooting is more discreet, the D300 is more your style.
Nikon D3 Details
Besides the pull-out diopter adjustment, the Nikon D3 has a few other physical attributes worth noting.
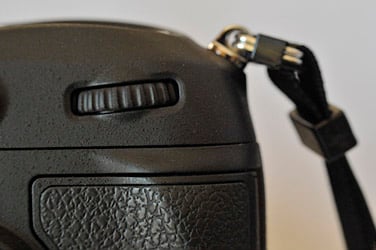

Subcommand Dials. Both horizontal (top) and vertical subcommand dials are off axis, making them easier to control.
Battery latches. The battery latch system is a big one. To open the battery compartment in the vertical grip, you lift out a small handle and turn it a quarter turn to unlock the latch. The battery, attached to the body piece with the small handle, slips right out.

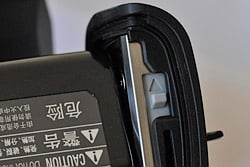

Battery Latch. Another crazy Nikon latch system. The top shows cover lock. The middle shows small gray release button. The bottom image shows (a) small gray release, (b) ports for (c) fingers.
To remove the battery from the body piece, you have to unlatch it by pressing a small gray level in the direction of the arrow next to it. Two fingers on the battery are then released and you can plug the battery into the elaborate two-battery charger.
The charger itself has set of LEDs showing 50, 80, and 100 percent charge states. It can also be used to calibrate the battery. Unlike other Nikon battery chargers, this one is both 120 and 240 volt. You just need the right cable or adapter to use it internationally.
Nikon D3 Flash
Unlike the D300, but not so strange in the pro SLR world, the Nikon D3 doesn't include a popup flash. It does have both a hot shoe and a PC sync terminal, and it does support i-TTL metering of external flash and support for Nikon's Creative Lighting System.
This turned out to be quite a disadvantage for me. I wasn't able to use my SB-800 flash wirelessly. With no strobe on the Nikon D3, I had no way to signal the SB-800. But there are a couple of ways around this.
First, I could use the SB-800 mounted to the hot shoe. But that wasn't where I wanted the light. Mounted to the hot shoe, however, it would be able to command a second SB-800 without firing itself, much like the popup flash on the D300.
A more economical solution, though, is to use an SU-800, a wireless flash commander that mounts on the camera's hot shoe. It doesn't itself have a flash but it can communicate with the SB-800. And the $250 SU-800 is less expensive than a second $400 SB-800. Another option is to use an SU-800 or SB-800 as the commander, and a less expensive SB-600 as a slave.
Nikon's Creative Lighting System is not to be missed, so either of those solutions should be on your starter accessories list.
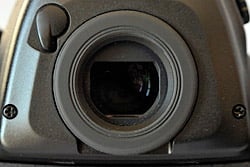

Viewfinder Cover. Open (top) and closed. Note the position of the small lever in the upper left.
It's a list that's sure to grow as you become comfortable with this easy-to-use wireless flash system. Either an SB-800 or SU-800 on the D3 and a bevy of SB-600 strobes can solve quite a few lighting problems.
Eyepiece. Most Nikon digital SLRs ship with a tiny plastic eyepiece cover. If you're shooting in Live View mode or otherwise have not shaded the eyepiece, the stray light entering the camera can affect exposure. Hence the cover.
But on the Nikon D3, there's a built-in shutter. A small lever on the left of the eyepiece shuts and opens the shutter. Nice touch.

Virtual Horizon. This is how it's displayed on the top LCD, and a simple vertical scale is displayed in the viewfinder.

Virtual Horizon. This is how it's displayed on the main LCD.
Virtual Horizon. Holding a camera (or anything else) level is not one of my strengths. On a digicam, I always enable the grid overlay before I start taking pictures. I did that with the D300, too, but I was stymied with the D3. No grid overlay.
Nikon sells an optional Type E focusing screen for the D3 with an etched grid. It replaces the simpler Type B screen installed at the factory.
But I didn't have to fiddle with that. Instead, the D3 offers a Virtual Horizon feature. Virtual Horizon reads the D3's orientation sensor to indicate level as long as you aren't pointing the camera up or down too far.
You can enable this from the menu system and it will display on the LCD, which is probably the preferred method for tripod-mounted shots.


Function Button. You can assign a specific function to this button below the DOF Preview button.
But for handheld shots, the best way to tap into it is to assign the Function button to Virtual Horizon. Then when you press the Function button, a vertical scale appears on the right side of the viewfinder and, at the same time, a horizontal scale appears on the control panel. So whether you are looking through the eyepiece or standing over the camera, you can tell if it's level.
You might think that would take care of my problem, but it didn't quite. Using the vertical scale through the viewfinder, I found it difficult to find and hold level. The bars were going up or down while I was twisting the camera body clockwise or counterclockwise. You get used to that, but sometimes it's just more direct (and quicker) to line up a vertical or horizontal with a grid line. I really missed my grid.
Oddly enough, though, when I did find the button to check my orientation, I was always very close. That says more about the Nikon D3 and its balance than me and mine.
And the viewfinder itself is quite accommodating. I was able to wear glasses and get a full view without touching the eyepiece.
Nikon D3 LCD
While the 3.0-inch, 921,600 dot LCD (1,920 columns and 480 rows) is the same gorgeous screen as the one in the D300, the Nikon D3 protects it with tempered glass so no LCD cover is required. I was very careful not to scratch it any way (no buttons rubbing against it when I carried it strapped over my neck) but it did seem particularly tough.
With a very wide viewing angle of 170 degrees, you can hold the camera away from your face and still get a glimpse of your composition.
The new LCD distinguishes itself from its competitors in a couple of other ways as well. It maintains the same RGB sequence for each row rather than alternating between RGB/BRG schemes. And it has a much finer, nearly seamless gap between pixels than the typical 230K LCD.
It is, in a word, beautiful.

Top LCD. Mode, shutter speed, f-stop, and more.

Lower LCD. ISO, Quality, and White Balance settings.
For all that, the Nikon D3 requires a couple more LCDs, which is about one more than I like. The top LCD, a large black and white LCD, performs much the same functions as its cousins on the D200 and D300, with the addition of the Virtual Horizon function.
The other LCD, unique to the Nikon D3, is just below the color LCD. It reports ISO, Quality, and White Balance settings.
FX & DX
Nikon prefers to refer to the D3 as an FX format camera rather than a full-frame 35mm camera. The company dislikes the implication that a camera that isn't "full-frame" is somehow "subframe." As far as Nikon is concerned, both the FX and DX formats are legitimate digital formats with long lives ahead of them.
The advantage of the smaller DX format is primarily weight. The glass can be smaller and hence, less heavy. But the focal length multiplier means your standard 35mm lenses are going to crop closer than you remember. A 50mm lens will crop like a 75mm lens.

12-Mp Detail. Examine the detail around the ball. FX at 24mm.
The advantage of the larger FX format is that focal lengths crop the way you remember. That 35mm lens that crops like a normal lens on a DX camera is once again a wide-angle lens on an FX camera. So go get your wide angle lenses back.
What's particularly interesting about Nikon's FX and DX formats is that the FX image size isn't huge. At 4,256 x 2,832 pixels at its largest, it's just a 12-megapixel image. That's a bit smaller (pixel-wise) than the D300, in fact. With a DX image area, though, the Nikon D3 captures, at its largest size, just 2,784 x 1,848 pixels (only a 5-megapixel image).
So you get full-frame functionality without the overhead (processing power demands, storage requirements, etc.) of, say, a 25-megapixel image. That was a big relief to me. I could shoot full-frame without paying an image size penalty.
You might think you give up too much resolution that way, but take a look at my image of the softball on the base path and tell me you need more resolution.
And with larger pixels, you also gain the added advantage of better light gathering capability in low light. The Nikon D3 does some extraordinary things in low light and this sensor is the key to that.
Auto DX Crop

Image Area. This is where you'll find the Auto DX crop option, as well as the image-area selections.
Hidden in the Image Area menu is an option that will make the FX Nikon D3 behave like a DX camera, although not with the same resolution as the D300. When you enable the Auto DX Crop option, the D3 will automatically crop the image area to the DX size when it senses a DX lens.
So instead of seeing an image in a circle in the Nikon D3 viewfinder, you see a dim mask framing the live DX image area (which is only 5 megapixels). I liked being able to monitor outside the capture area while viewing through the viewfinder. But I also liked being able to use DX lenses on the Nikon D3 without a penalty.
You do get more resolution using that DX lens on a D300, but that's the only penalty.
Image Areas

Image Areas. Three options.
Now that we've said that, we should list the whole menu of image-area sizes:
In FX-format (36 x 24mm): (L) 4,256 x 2,832, (M) 3,184 x 2,120 and (S) 2,128 x 1,416
In 5:4 format (30 x 24mm): (L) 3,552 x 2,832, (M) 2,656 x 2,120 and (S) 1,776 x 1,416
In DX-format (24 x 16mm): (L) 2,784 x 1,848, (M) 2,080 x 1,384 and (S) 1,392 x 920
Nikon D3 High ISO

ISO Settings. You can manually set ISO to 3,200 then bump it up to 6,400, 12,800 (H1.0) and even 25,600 (H2.0) in 1/2 or 1/3 step increments. You can also let the camera shift ISO up if an auto exposure setting would drop the shutter speed below a minimum value you set.
The Nikon D3 indulges my preference for natural light photography, especially when coupled with a Vibration Reduction lens. But it took me into a whole other world with its high ISO options.
Auto ISO ranges from ISO 200 to 6,400. You can step 200 down to ISO 100 (not terribly satisfying) but you can also kick it up as high as ISO 25,600. Yes, you get noise up there, but so what? You're seeing in the dark.

ISO L1.0. See also the L0.7, L0.3 and ISO 200 shots in the gallery for comparison.
ISO settings lower than 200 correspond to ISO sensitivities of 160 and 100 equivalent, indicated as L0.3 to L1.0 on the LCD, respectively. Contrast at these settings is slightly lower than at normal ISO settings.
ISO settings higher than 6,400 correspond to ISO sensitivities 0.3 to 2 EV over ISO 6,400, or ISO 8,000 to 25,600 equivalent indicated as X0.3, X0.7, H1.0 and H2.0 on the LCD. Compared to ISO 6,400, these settings show more noise and color distortion.


So how real are these high ISO settings?
The first qualifier is color capture. At ISO 25,600, you'd think you'd be smart to restrict capture to black and white. But I got quite decent color at X0.3 levels and color captures up to ISO 6,400 were perfectly acceptable. The Nikon D3 really separates itself from the pack around ISO 1,600, capturing a range of images with low noise at ISO settings that other cameras can't match.
I took two kinds of low-light shots. I tried night shots of objects illuminated by street lights at H2.0 and I shot typical night scenes (like neon lights).

Night Shot. Aperture Priority and ISO 25,600.
I had the feeling I could see in the dark with some of the street light scenes. But as fast as ISO 25,600 may be, I still found it necessary to shoot in Aperture Priority mode, using a hand-holdable 1/25 second with non-VR lenses. Shooting in Program mode, for example, resulted in shots blurred by camera movement by virtue of the very slow shutter speed required.
At first, I thought I was having focus problems (it's hard to tell what's going on in the dark), so I switched to manual focus. But I couldn't see well enough to focus (none of my subjects were particularly bright). Going back to autofocus resolved that issue.
Composing in the dark is a problem, too. The hydrant image background could not be distinguished from the framing mat of the viewfinder so it was very difficult to tell if the hydrant was straight or not. I should have used the Virtual Horizon feature to guide my composition, but I didn't think I needed it.

Low Light. Aperture Priority and ISO 25,600.
The second kind of low light shot I took was the dolls awaiting repair in the dimmest corner of the garage. The light falling on them measures four footcandles at best and the Shirley Temple doll is always in shadow. I set the D3 to shutter priority with the shutter at 1/25 second (which I can hand hold at this weight) and took portraits of the dolls. There is some noise, but there's more than adequate color (given the original scene, which is less vibrant than the images) and detail is very sharp (the lips and eyebrows, not to mention the cracks).

Handheld Macro. A reversing ring, Auto ISO (set to 635 here), f/11 and 1/200 second.
You have to visit the Exif page for these shots to see the actual ISO, rather than the base ISO. They are, in fact, ISO 3,200 shots as our captions on the gallery page show, but at a higher EV setting. So look in the Makernotes for the ISOSetting tag where you'll see the ISO equivalent of 25,600 listed.
On all these shots, by the way, High ISO Noise Reduction was Off.
But the Nikon D3's usable high ISO means it can also see in bright sunlight. That was a real pleasure, I found out. I like to shoot macro but the old problem of getting enough depth of field at a handheld shutter speed can take a lot of subjects (like poppies in the wind) out of play. Not with the D3. I cranked up the ISO, set the aperture to f/11 and the shutter speed to 1/60 second and shot away. Handheld macro at f/11!
Double CF Slot

Double Card Slot. Three useful options.
I found the memory card door awkward to open, but that's not surprising. Nikon has a special gift when it comes to designing awkward doors and latches.
A small door opens opposite the memory card door on the back panel to reveal a tiny button that begs to be opened by a finger sneaking in from the open right side. Unfortunately that's the side the memory card door opens on, so you are effectively blocking the door from unlatching if you do that. The trick is to come at it from the bottom. No matter how funny this makes you look.

Door Release. Hard to get to unless you come from below.
Once you get in there, you'll find two CompactFlash memory cards slots. Slot 2, which is closer to the grip and labeled "2" on the big gray push button above it) can be used for overflow, backup storage, or separate storage. A truly brilliant idea.
If you only have one card, you'd put it in Slot 1. You could save Slot 2 for overflow, recording images only when the card in Slot 1 is full. But you can also use a Shooting menu option to change that behavior into something a bit more useful.
If you designate Slot 2 as Backup, each image is recorded on both cards. If you set it for Raw Slot 1-JPEG Slot 2 and have NEF (Raw) + JPEG set for the image quality, the NEF will be recorded on the card in Slot 1 and the JPEG in the card in Slot 2. If you have any other image quality setting, Slot 2 reverts to its default backup behavior.

Double Card Slot. Note the gray numbered push-button releases above.
That's a real boon because you can backup in camera. If you're shooting a wedding or sports event, you'll want two large UDMA-class cards in your D3 all the time.
Nikon's decision to provide two CompactFlash slots rather than a CompactFlash slot with an SD slot means there's no speed penalty using fast cards. You can populate both slots with high speed cards. Canon's decision to use an SD slot for the second card in the 1D-series limits that slot to half the speed of a CompactFlash card in the primary slot.
Firmware updates are done by copying the A and B firmware files to the root directory of a memory card. The memory card must be inserted in Slot 1 for the update to function. Slot 2 won't work.
Nikon D3 Image Buffer
The D3 can capture 9 to 11 fps in DX format and up to 9 fps in FX format when set to Continuous High Speed release mode. That's quite a few frames per second but it does have its price. It fills up the memory buffer quickly.
The Canon's competing full-frame digital SLR, the 21.1-megapixel 1Ds, for example, shoots 12 Raw or 56 large/fine JPEGs at 5 fps before its buffer fills. So you can shoot up at 5 fps for about 10 seconds if you're shooting JPEGs.
On the D3, I was able to shoot 16 large/fine JPEGs before the buffer filled, but they only spanned two seconds.
Still, this qualifies as a large buffer with room for 130 images, according to Nikon. What size or compression level the images are, the company does not specify.
Multiple Exposure

Multiple Exposure. Set the number of shots and auto gain.
Under the Shooting menu, the Multiple Exposure options lets you compose images in the camera that usually require layering in an image editor. The Nikon D3 lets you shoot up to 10 images to combine into a single file.
It also includes an option to set Auto Gain on to reduce gain in each image. If you're taking two shots, for example, gain would be set to 1/2 for each shot. If three, 1/3. If your background is dark, you can turn it off.
Once you enable the multiexposure option and optionally set the number of exposures (two is the default) and Auto Gain, you're ready to go. The release mode determines the shutter's behavior, however. If you want to compose two quite different shots, set the release mode to Single to give yourself time to recompose the second shot. But if you want to build the image with the same background, set the release mode to one of the Continuous modes. A single press of the shutter will take the whole set of shots.
The function resets itself after the full sequence.
Interval Timer
You can also set the D3 for interval shooting. It can take a set number of shots over a set period of time after a certain start time. The captured images are stored in a single file.

Street Shot. Natural color at f/7.1 and 1/800 second at ISO 200.
Nikon warns that even though you can set the interval shorter than the shutter speed, it won't work. Otherwise the maximum number of intervals is 999 multiplied by the number of shots (up to 9) for a total of 8,991 images. Intervals can be set by the hour:minute:second.
HDMI Output
In addition to the usual USB and AV connections, the Nikon D3 has an HDMI port. Connecting a standard type A HDMI cable to the camera and an HDTV, you can run your slide shows directly from the camera in high definition.
The D3 supports 480p (640x480 progressive), 576p (720x576 progressive), 720p (1,280 x 720 progressive) and 1080i (1,920 x 1,080 interlaced) formats. You an also set it to automatically select the appropriate format for your output device. In fact, Auto is the default setting for the HDMI port.

Wide Angle. One advantage of an FX sensor is being able to shoot 14mm wide-angle shots.
I tried this on a couple of HDTVs and was pleased to see my images displayed at the TV's highest resolution directly from the camera. It was a nice change to skip the intermediary of an Apple TV just to see the day's shoot. And it's also a nice change to see a large screen display instead of squinting at your monitor.
Nikon D3 Live View
Like the D300, the Nikon D3 has two ways of using Live View: hand-held and tripod. A menu option determines which is active when you move the Release mode dial to Live View. The two modes are quite different.
Hand-held is for the Hail Mary shot. You're in a crowd, holding the Nikon D3 up over your head, hoping to get the shot. With a traditional SLR, you zoom out to wide-angle to make sure you cast a wide enough net to capture your subject, aim down and press the shutter.
But with Live View in hand-held mode on the Nikon D3, you press the shutter button all the way down to raise the mirror and display the live scene on the LCD. With a very wide 170-degree angle of view on the gorgeous 3.0-inch LCD, you can hold the camera over your head and still see what's going on. In fact, if you're using 51-point 3D-tracking autofocus, the camera will track an erratically moving subject within the autofocus area.

Blossoms. Natural color at f/11 and 1/200 second at ISO 200.
To prefocus (which is really optional in Hail Mary mode), you half-press the shutter button or press the AF-On button. The mirror will flip down, the camera will focus and when you release the shutter button, and you can check focus.
Once you've said your prayers, you simply press the shutter button all the way down to take the picture. And thanks to that LCD again, you can evaluate the results instantly.
I used Live View on a D300 extensively while covering trade shows earlier this year. Working quickly on the show floor, I switched to Live View mode on demand, pressed the shutter button down before I hoisted the camera up, half-pressed to focus on the scene so I could see it sharply in the LCD, and waited for the right moment to depress the shutter button fully again. There wasn't really much shutter lag, although it wasn't as fast as Single or Continuous mode. But it did the trick. I never hesitated to use it when I needed to compose with the camera at arm's length.
Tripod mode, on the other hand, uses a different focusing method: contrast detect. So it can focus with the mirror up. While you are viewing the scene, in other words.
The big difference in tripod mode, though, is that the contrast-detect method only tells the camera the subject is out of focus. It doesn't explain by how much and in what direction, as do phase-detect AF systems. So the lens steps in or out very slowly, stopping every step of the way to re-check focus. The delay isn't too bad if the focal distance is already close to the right setting, but it can be glacial if the lens has to go very far.
You can get a head start on focusing by framing your shot in the viewfinder and pressing the AF-On button. But you press the shutter button all the way to lift the mirror and see the scene on the LCD. You can then focus with the AF-On button. As long as you hold it down, the Nikon D3 will focus using contrast detection. Press the magnifier button to see an enlargement up to 13x of the focus area (the OK button cancels it).
And you can move that focus point anywhere you want in the scene.
To take the shot, press the shutter button all the way down. The mirror will drop and the shutter will trip.
Using this mode for macro shooting, you get two benefits. You can see the actual depth of field without pressing the DOF button to stop down the lens so you can see what's in focus. And you can see what you're focusing on.
There's also a second setting in the Live View menu option for the Release mode. You can select Single, Continuous low-speed, or Continuous high-speed. With one of the continuous modes you can actually follow your subject as they move through the scene. And if you have 51-point autofocus in gear, all the better.
Sensor Cleaning

FX Sensor. The D3's CMOS FX sensor.
Unlike the D300, the Nikon D3 with its larger FX sensor does not provide an automated sensor cleaning operation. But I didn't find that particularly significant. Automated systems only shake off dust that somehow finds its way into the mirror chamber. They don't do anything about the stickier stuff that can form on the filter surface.
It's true that a camera intended for professionals is going to see a lot of lens changes, but those changes will likely be in less hazardous conditions than lower-level consumer digital SLRs might be subjected to, if only because pros tend to have another body for every lens they plan to use at an event. And sensor cleaning won't be foreign to the pro or advanced amateur. It will be routine.
But there are a couple of things to know about the Nikon D3's low-pass filter before you try to clean it.
The Nikon D3's low-pass filter has an Indium Tin Oxide coating which is optically transparent and electrically conductive, helping to dissipate static charges that attract dust.
But the ITO coating on the low-pass filter is sensitive to some cleaning chemicals, particularly the methanol used in the popular Eclipse cleaning fluid. In response, Photographic Solutions has developed E2, a cleaning fluid that is safe for ITO coatings.
Also different on the Nikon D3 is the way the low-pass filter is attached to the sensor. According to Ross Wordhouse at Dust-Aid, "Nikon is now permanently bolting the piezo electric sensor filter to the sensor housing." Using a Dust-Aid Classic cleaning pad on the D3 filter won't damage the surface of the filter itself but may dislodge the filter from its housing. Dust-Aid recommends using its lower-tack Canon cleaner tapes on the Classic pads to clean the D3.
It's worth noting that the only way to detect dust on the filter is by examining an image -- and not just any image.
To look for dust, stop down your lens to at least f/11 (f/22 is preferred) where the spots can easily be observed. At wide-open apertures, they blur significantly. Then focus at infinity while shooting at a brightly lit light background (like the daylight sky or a sheet of well-illuminated white paper) just a few inches from the lens. The dark dust spots should easily stand out.
If you're using Nikon's Capture NX, you can use the D3 to take a Dust Off Reference Photo. Use a lens with at least a 50mm focal length, focus at infinity and set the lens just four inches from the brightly lit background. Capture NX can use the reference photo to remove dust from your captures, but you should only rely on it as a last resort, repairing damaged images. It isn't a long-term solution. Only cleaning is a long-term solution.
Nikon recommends using a blower to dislodge dust from the filter. But in some cases blowers may not have sufficient force to remove what's on the sensor. Nikon recommends returning the D3 for service if the blower doesn't do the job.
That's the point most seasoned digital SLR users turn to a wet cleaning method, like the one the Imaging-Resource.com lab uses from Copper Hill, which uses the E2 cleaner. I had the Nikon D3 so long that I had more than one occasion to do a wet cleaning of the D3 and very much appreciated Copper Hill's angled wand, explicit instructions, standard PEC Pads, appropriate solutions and the new $14 SensorView illuminated magnifier which let me see how well I'd done without putting on a lens and taking a shot.
Updating Nikon D3 Firmware
In April 2008 Nikon released firmware update 1.1.0 for the D3. The update added four features:
- In the Playback menu, the Display mode option was changed, moving the Highlights option to the Detailed photo info section. Highlights adds a page to the photo info display showing highlights for all channels and the red, green, and blue channels.
- In the Shooting menu, a Vignette Control option was added to reduce vignetting for type G and D lenses (excluding DX, PC, AF 14mm f/2.8 ED, AF Fisheye 16mm f/2.8D, AF 20-35mm f/2.8D and AF 24-85mm f/2.8mm-4d lenses). Options include High, Normal (default), Low, and Off.
- Also in the Shooting menu, the Auto ISO Sensitivity Control menu changes the Minimum Shutter Speed value from 1/250 second to 1/4,000 second.
- In the Custom Settings Menu, the a6: Focus Point Illumination option now includes a Focus point illumination option to set the brightness of the focus point display. Options include Extra high, High, Normal (default), and Low.

Multiple Exposure. Set the number of shots and auto gain.
Nikon withdrew the update on April 18 when it was discovered that a combination of settings would cause file corruption in an image. The combination of settings is:
- Release mode: Continuous high speed (CH), or Continuous low speed (CL) with Custom Setting d2 set to 9 fps
- Image area: FX format (36x24) or 5:4 (30x24)
- Image quality: NEF (RAW) or NEF (RAW) + JPEG fine/normal/basic
- NEF (RAW) recording>NEF (RAW) bit depth: 14-bit
The company did release an updated version of the firmware update at the end of April 2008. It affected only the B version of the firmware, however.
Analysis. The Nikon D3 has received a great deal of praise at a time when many other high-end products are stumbling out of the gate. My experience tells me that the D3 has earned every accolade. It is the first Nikon that can stand with its film brethren, using the Nikon system the way it was designed. I was never penalized for twisting an old piece of Nikkor glass on the D3 body. In fact, the D3 seemed to give it new life.
But it goes far beyond the film cameras, not only with its stunning capture rates but especially with the one feature everyone who has used a D3 can't avoid praising. It is simply the most responsive camera we've all ever used.
Despite its weight, it seems to disappear between the photographer and the subject, gracefully providing whatever is needed to render the scene the way it was visualized, like an assistant who knows how to get out of the way.
The Nikon D3 isn't just the flagship of the Nikon digital SLR line. It's state of the art.
New/upgraded features on the Nikon D3 compared to the D2Xs:
- First Nikon DSLR to offer full-frame (36.0mm x 23.9mm) sensor
- 12.1 megapixel FX-format CMOS sensor (compared to 12.4 megapixel DX-format CMOS sensor)
- 9 fps continuous-mode speed at full resolution (up from 5.3 fps)
- Up to 11 fps in 5.1MP DX crop mode (up from 8 fps in 6.9MP High-Speed crop mode)
- 64 JPEG / 20 RAW (12-bit) buffer size (up from 22 JPEG / 17 RAW frames)
- ISO from 200 to 6,400 with extensions to 100 and up to 25,600 (up from 3,200)
- 51-point AF with 3D Focus Tracking, utilizing 15 cross-type and 36 line-type sensors (up from 11-points, 9 cross-type)
- Fine-tune adjustment for front/back focus with memory for 20 lenses
- 0.70x magnification viewfinder (down from 86%, but full-frame)
- 3-inch, 920K pixel LCD with 170 degree viewing angle (up from 2.5-inch, 230K pixels)
- Two LCD "LiveView" modes:
- "Handheld" LV mode drops mirror to focus with TTL phase detection AF module
- "Tripod" LV mode uses contrast detection on sensor image, allowing any point on the image sensor to be focused on
- Selectable 14- or 12-bit digitization (up from 12-bit)
- Scene Recognition System links 1,005 pixel RGB metering sensor and AF sensor to enhance the accuracy of auto exposure, auto white balance detection and autofocus
- Picture Control System to fine-tune rendering options, with settings consistent and portable to other compatible models such as the D3
- Active D-Lighting providing real-time highlight and shadow correction
- Optional shooting info display on main LCD
- Expanded Retouch menu
- Automatic in-camera Lateral Chromatic Aberration correction
- Automatically switches to DX crop mode with viewfinder mask when DX lens mounted
- Parameters for up to 9 non-CPU lenses can be registered (up from one)
- World's first virtual horizon level indicator displayed in viewfinder and LCD
- Shutter tested to 300K actuations (up from ~150K)
- Self Diagnostic Shutter Monitor that ensures the accuracy and precision of the shutter at all times
- HDMI high definition video out (added to composite video out)
- Dual CompactFlash slots with UDMA support
- Compatible with new WT-4A Wireless Transmitter capable of LiveView transmission and continuous shooting
In the Box
Efficiently packaged in the Nikon D3's rather substantial bronze box are:
- Nikon D3 body
- EN-EL4a Rechargeable lithium-ion battery
- MH-22 Quick Charger
- UC-E4 USB Cable
- EG-D2 Audio Video Cable
- AN-D3 Camera Strap
- BF-1A Body Cap
- BS-2 Accessory Shoe Cap
- DK-17 Eyepiece
- BL-4 Battery Chamber Cover
- USB Cable Clip
- Software Suite CD-ROM
Recommended Accessories
- Large capacity CompactFlash memory card. But with the D3, you should consider a couple of high speed UDMA cards to take full advantage of the camera's UDMA capability, offering transfer speeds as high as 45MB/second.
- SB-900 or SB-600 Speedlight Flash
- WT-4a Wireless Transmitter
- Type E Focusing Screen
- DK-17M Magnifying Eyepiece
- EH-6 AC Adapter
- Capture NX 2 Software
- Camera Control Pro 2 Software
- Image Authentication Software
Nikon D3 Conclusion
| Pro: | Con: |
|---|---|
|
|
Though it has been supplanted at the top of the heap by Nikon's 24.5-megapixel D3x, the 12.1-megapixel Nikon D3 still stands strong in the area of overall full-frame image quality, especially as light levels drop. Nikon now has two professional cameras to match Canon's two: one built for speed, the other built for high resolution. The Nikon D3's superb build and intelligent interface make it an excellent tool for the professional photographer. It is responsive and easy to manipulate. Frequent users will find it easy to make the Nikon D3 serve whatever situation they encounter, bending it to their will with familiar controls and well-considered design.
Speed is indeed the best way to describe the Nikon D3: from ISO to frame rate, the D3's speed impresses. ISO ranges from 200 to 25,600, and its maximum frame rate is 11 frames per second, with all focus tracking stripped out of the way and the resolution cut down to APS-C. The Nikon D3 is an amazing machine, built to handle all kinds of photography. Until the advent of the Canon 1Ds Mark III and the Sony A900, we'd also have said, "including high resolution photography." But honestly, 12.1 megapixels is plenty to work with for almost any circumstance.
Dual CompactFlash slots mean that you'll have the capacity to shoot plenty of RAW frames and even backup on the fly when you set the camera to write to both cards simultaneously, guarding against one card's failure.
Naturally, the Nikon D3 is only for the serious photographer, as its construction and size should indicate. It's not for the casual snapshooter, so don't even consider the D3 just because it's "the best one." You'll be frustrated. Better to look at the Nikon D700, a full frame digital SLR camera that's a little more suited to the casual shooter (though just like the D300, you still have to be pretty serious about your photography to delve into one of these high quality cameras). But if you're intent on shooting a lot and getting paid for it, as more and more photographers are, the Nikon D3 is the natural choice. Indeed, I think it's the best choice as a first pro camera, because it offers the best of all worlds. High speed, high resolution, and high customizability. The D2x was great, the D3 is better. The D3x is for the one who wants high resolution, but doesn't need high speed, and it serves better as a second camera to the D3. The Nikon D3 is the bread-and-butter professional digital SLR camera, whose features stack up quite well against both of Canon's high-end digital SLRs. Add the excellent Nikkor glass that keeps rolling out of the Nikon factories, and you're looking at one sweet photographic system.
The Nikon D3 is a five-star Dave's Pick, and one hot digital SLR camera.

Design
Nikon D3 Design
Roll-over the various controls and features with your mouse for a brief description. Note: Rollovers are best viewed with the latest versions Firefox, Safari, or Opera browsers, or Internet Explorer 6 or earlier.

Nikon D3 Front View. The standard Nikon F-mount once again surrounds a full-size mirror, and the pentaprism is larger than that of the Nikon D2x. Note the cant to the front Sub-command dial, making for easier activation. The FX logo in the lower right corner denotes Full Frame.

Nikon D3 Left View. The battery unlocks with a twist and pull to the left. Rubber flaps cover the camera's electrical ports, and a metal strap ring hangs from a steel lug just off the Nikon D3's left shoulder.

Nikon D3 Right View. The dioptric adjustment knob and AF area selector dial can be seen in this view, as well as the battery door and vertical shutter release. A locking ring around the button prevents accidental activation.

Nikon D3 Top View. Buttons are reshaped and nudged around a bit when compared to the D2x, but overall placement is the same.

Nikon D3 Back View. More changes have come to the rear of the Nikon D3, but controls should still be familiar. A major change is a fairly simple one: the introduction of a button in the center of the navigation disk now has a button, making it easier to press. The AE/AF Lock button has been moved down some, as well, making it easier to distinguish from the AF-ON button, yet still accessible.

Nikon D3 Bottom View. The bottom features only the metal tripod mount and a rubberized surface.
Operation
Nikon D3 Operation
Like other Nikon DSLRs, the user interface on the Nikon D3 is straightforward and simple to use. The LCD menu is a six-tab system that divides up functions between Playback, Shooting, Custom Settings, Setup, Retouch and My Menu. While many of the camera's options can be accessed via the excellent "plain English" menu system, all the most common shooting controls are available via the camera's external buttons and knobs. You can also program the operation of some of the buttons, to configure the camera for your particular shooting requirements. Nikon makes a big deal of their digital SLR's "cameraness," defined as how well/easily they function as cameras, and the D3 embodies that philosophy.
Nikon D3 Top Panel LCD
 As with most higher-end Nikon DSLRs, the D3's top-panel data readout LCD communicates a lot of information about current camera settings, and provides an interface for setting many camera functions, when used in conjunction with the various buttons and Command Dials. You can also use the main LCD to adjust many of the same settings, but using the top LCD saves power and can be more convenient when the camera is below eye level. The illustrations below show the meaning of the various icons and readouts in this display.

1 |
Shutter speed
|
13
|
Battery indicator
|
|
Exposure compensation value
|
14
|
Frame count
|
|
|
Number of shots in exposure and flash bracketing sequence
|
Preset white balance recording indicator
|
||
|
Number of shots in WB bracketing sequence
|
Manual lens number
|
||
|
Number of intervals for interval timer
|
15
|
"K" appears when memory remains for over 1000 shots
|
|
|
Focal length (non-CPU lens)
|
16
|
Flash value (FV) lock indicator
|
|
|
ISO sensitivity
|
17
|
Flash sync indicator
|
|
|
2
|
Shutter-speed lock icon
|
18
|
Clock battery indicator
|
| 33 |
Flexible program indicator
|
19
|
GPS connection indicator
|
4 |
Exposure mode
|
20
|
Focus mode indicator
|
5 |
Flash mode
|
21
|
Interval timer indicator
|
6 |
Shooting menu bank
|
22
|
Multiple exposure indictor
|
7 |
Custom settings bank
|
23
|
Aperture lock icon
|
8 |
Memory card indicator (slot 1)
|
24
|
Image comment indicator
|
| 29 |
Memory card indicator (slot 2)
|
25
|
"Beep" indicator
|
|
10
|
Number of exposures remaining
|
26
|
Exposure compensation indicator
|
|
Number of shots remaining before buffer fills
|
27
|
Exposure and flash bracketing indicator
|
|
|
Capture mode indicator
|
28
|
White-balance bracketing indicator
|
|
11 |
Aperture stop indicator
|
29
|
Electronic analog exposure display
|
12 |
Aperture (f-number)
|
Exposure compensation
|
|
|
Aperture (number of stops)
|
Exposure and flash bracketing progress indicator
|
||
|
Exposure and flash bracketing increment
|
WB bracketing progress indicator
|
||
|
WB bracketing increment
|
PC connection indicator
|
||
|
Number of shots per internal
|
Tilt indicator
|
||
|
Maximum aperture (non-CPU lenses)
|
|||
|
PC mode indicator
|
Nikon D3 Rear Control Panel LCD
 Like other professional models, the Nikon D3 also has a rear Control Panel LCD. The illustrations below show the meaning of the various icons and readouts in this display mode.

1 |
Image quality (JPEGs)
|
6
|
"K" appears when memory remains for over 1,000 shots
|
2 |
"Remaining" indicator
|
Color temperature indicator
|
|
3 |
Image size
|
7
|
Memory card slot indicators
|
4 |
ISO sensitivity indicator
|
Image quality
|
|
|
Auto ISO sensitivity indicator
|
8
|
White balance bracketing indicator
|
|
5 |
ISO sensitivity
|
9
|
Voice memo recording indicator (shooting mode)
|
|
ISO sensitivity (high/low gain)
|
10
|
Voice memo status indicator
|
|
|
Number of exposures remaining
|
11
|
Voice memo recording mode
|
|
|
Length of voice memo
|
12
|
White balance
|
|
|
White balance fine-tuning
|
White balance fine-tuning indicator
|
||
|
White balance preset number
|
|||
|
Color temperature
|
|||
|
PC mode indicator
|
Nikon D3 Main LCD
 Shooting Information
Like other more recent Nikon digital SLRs, the D3 has the ability to display shooting info and settings on the rear LCD. The rear LCD is larger and in color, so some prefer to use it over the top LCD, at the expense of battery life. It's nice that Nikon gives you the choice. The illustrations below show the meaning of the various icons and readouts in this display mode.

|
1
|
Exposure mode
|
17
|
Flash mode
|
|
2
|
Flexible program indicator
|
18
|
Clock battery indicator
|
3 |
Shutter speed lock icon
|
19
|
FV lock indicator
|
|
4
|
Shutter speed
|
20
|
Interval timer indicator
|
|
Exposure compensation value
|
21
|
Image comment indicator
|
|
|
Number of shots in exposure and flash bracketing sequence
|
22
|
"Beep" indicator
|
|
|
Number of shots in WB bracketing sequence
|
23
|
Exposure compensation indicator
|
|
|
Focal length (non-CPU lens)
|
24
|
Battery indicator
|
|
5 |
Multiple exposure indicator
|
25
|
Exposure and flash bracketing indicator
|
6 |
Aperture lock icon
|
WB bracketing indicator
|
|
7 |
Aperture (f-number)
|
26
|
Focus mode indicator
|
|
Aperture (number of stops)
|
27
|
Long exposure noise reduction indicator
|
|
|
Exposure and flash bracketing increment
|
28
|
Color space indicator
|
|
|
WB bracketing increment
|
29
|
Picture Control indicator
|
|
|
Maximum aperture (non-CPU lenses)
|
30
|
Active D-Lighting indicator
|
|
|
8
|
Aperture stop indicator
|
31
|
High ISO noise reduction indicator
|
|
9
|
Number of exposures remaining
|
32
|
Image area indicator
|
|
10
|
"K" (memory remains for over 1000 exposures)
|
33
|
Release mode (single frame/continuous) indicator
|
|
11
|
Frame count
|
Continuous shooting speed
|
|
|
Manual lens number
|
34
|
Auto-area AF indicator
|
|
|
12
|
Memory card indicator (slot 2)
|
Focus points indicator
|
|
|
13
|
Memory card indicator (slot 1)
|
AF-area mode indicator
|
|
|
14
|
Custom settings bank
|
3D-tracking indicator
|
|
|
15
|
Shooting menu bank
|
35
|
GPS connection indicator
|
|
16
|
Flash sync indicator
|
36
|
Electronic analog exposure display
|
Nikon D3 Virtual Horizon
 A really neat feature of the D3 (and D700) is the virtual horizon gauge. It uses sensors in the body to detect the orientation of the camera and display a virtual horizon, similar to an aircraft instrument. This is useful for critical alignment of subjects such as buildings, the horizon, etc. With the use of the FUNC button, the electronic analog scales in the viewfinder can also display the amount of tilt, so that you don't need to take your eye off the subject to check the camera angle. Updating the Nikon D3 with the 2.00 firmware even allows you to overlay the virtual horizon during Live View with a push of the "info" button. I find it interesting that they've added this feature, despite the fact there is no in-body stabilization feature, which would have probably allowed them to use the anti-shake sensors already there. Instead, the Nikon D3 probably has a more sophisticated orientation sensor than what is typically used for automatically rotating images for playback.
Nikon D3 Playback mode
 Playback mode is entered by pressing the playback button. The D3's playback mode provides a great deal of information about your pictures after you've shot them. A variety of playback displays can be cycled through using the up/down arrows on the multi-selector, including image with file information with optional highlight warning and focus point display, RGB histogram, three screens with overlaid shooting and image parameter information (an additional GPS info screen is available when a GPS device was used when the image was captured), and an overview display with basic shooting data and luminance histogram. The screenshot animation at right shows the sequence when the down arrow is used. And if you find this amount of information overwhelming, you can add or remove the displays as you see fit.
 As you'd expect, the Nikon D3 offers a comprehensive RGB histogram display mode. Histogram displays are common on professional digital cameras (and many amateur models now), regarded as almost mandatory by many pros for evaluating exposure levels. A histogram is simply a graph of how many pixels there are in the image at each brightness level. The brightness is the horizontal axis, running from black at the left to white at the right. The height of the graph shows the relative number of pixels having each brightness level. This sort of display is very handy for determining under- or overexposure. Ideally, the histogram would stretch across the entire width of the display, using the full range of brightness values available. An underexposed image will have a histogram with all the data lumped on the left-hand side, with nothing reaching all the way to the right. Likewise, an overexposed image will have all the data lumped on the right hand side. Clipped highlights are shown by blinking any highlights that are saturated in any of the color channels. It does this by taking the nearly-white areas on the LCD and toggling them between white and black. Highlights can also be displayed separately for each color channel by selecting R, G, or B in this display.
 Of course the Nikon D3 also lets you zoom out to quickly find and select images, or magnify them for closer inspection on its gorgeous 3-inch, 922K pixel LCD. You have the normal 4- or 9-image thumbnail displays available by pressing the thumbnail/zoom out button, and you can magnify them up to approximately 27x for large, 20x for medium and 13x for small images, using the zoom in button. Once magnified, you can scroll around the image using the multi-selector to examine critical detail and framing. You can also program the multi-selector center button to automatically zoom in on the active focus point with a preset the initial zoom setting (low, medium, or high), to make focus verification faster and more convenient.
To return the Nikon D3 to shooting mode, simply press the playback button again, or half-press the shutter button.
Optics
Nikon D3 Optics
The Nikon D3 is compatible with a wide variety of Nikkor (and third-party) lenses, some dating back to the 1970's. There are some exceptions however. See the table below (provided courtesy of Nikon USA) for details.


In a digital SLR camera, the Optics heading would seem to have more to do with the attached lens than the camera itself. The camera body is responsible for autofocus, though, so it makes sense to talk about autofocus technology here on the "Optics" tab of this review. In the case of the Nikon D3 it turns out that the camera-side of the equation has a lot more to do with image quality than is generally the case.
Nikon D3 Autofocus
Autofocus is an area where Nikon has often been perceived as lagging behind their primary competitor, Canon. Whether they actually have or not, in terms of actual autofocus performance is a matter of fierce debate between loyalists of the respective systems, but there has been no question that Canon's high-end models at least had more AF points than competing designs from Nikon.
With the advent of the Nikon D3 (and D300), Nikon has finally pulled ahead in the AF-point derby, and possibly in the AF-performance race as a whole. We doubt that sheer number of AF-points is so critical, but having a high number opens new opportunities.
The most obvious difference is that the Nikon D3 and D300 now sport no fewer than 51 "precision focus" AF points spread across the frame. (More on that "precision" designation below.) That's just the tip of the iceberg, though, as there are a lot of other changes in the inner workings of the new Multi-CAM 3500FX AF system.
The new AF system also raises the number of cross-type sensors, with a total of 15 AF points sensitive to both horizontal and vertical detail.
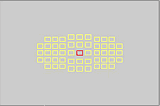
| Nikon D3/D300 AF Point Selection Options | ||
 |
 |
 |
| 51-point | 21-point | 9-point |
The Multi-CAM 3500 AF system offers 9-area, 21-area, 51-area, and 51-area with 3D tracking modes. There's also an option that lets you choose a single active point from a selection of 11, as an aid to users transitioning from the D200's system, or those using both D200 the newer bodies simultaneously.
The reference to "3D tracking" above alludes to the most unusual feature of the Nikon D3's AF system, namely the use of the 1,005-pixel RGB exposure sensor to assist in tracking moving subjects. This is one of those innovations that make you wonder why someone didn't think of it earlier. It's evident that only Nikon was poised to make a move like this, as they're the only SLR maker using such a high resolution sensor in their evaluative AE system. As far as we know, they're also the only ones using an RGB sensor for evaluative metering, something with adds to its usefulness for object recognition.
Tracking autofocus systems are surprisingly adept at interpreting the rather limited data from a handful of AF sensors, and using it to intelligently track moving objects. If you think about it, the amount of information the AF system has at its disposal is very limited: All it has to work with are approximate subject distances at a handful of AF points across the frame. By interpreting changes in the data coming from each, the AF system attempts to pick a subject from the background, then determine the subject's direction and speed.
In fact, AF systems lack almost all the things that our own visual systems use to discriminate objects with: Color, tone, shape and subject size. It's really amazing that AF tracking works as well as it does.

Metering sensor. Nikon brings its venerable 1,005-area metering sensor to bear on an old problem: AF tracking.
This is where Nikon's innovation in the Multi-CAM 3500 AF system comes in. Nikon has for a long time had a 1,005-pixel RGB sensor in their camera bodies, used by their excellent 3D Matrix Metering system. In matrix metering, patterns of tone and color are used as an index into a large database of "reference scenes" stored in the camera's memory. The camera doesn't directly understand it's snapping a portrait shot, but when it sees a human-shaped blob against a different color background, its scene indexing tells it that it should try to get the exposure of the blob correct, even if it means the overall scene brightness would come out low.
With the D3 and D300, the Nikon engineers have used the data from the 1,005 pixel RGB exposure sensor to help guide the camera's autofocus decisions. We'll have to see how this pans out in actual shooting situations, but the potential is huge. While the RGB sensor provides no distance information, it has much more resolution than even the greatly expanded array of AF points on the new AF sensor. As discussed in the section of this report that covers the AE system, the D3/D300's AE system also incorporates a new Diffractive Optical Element (DOE) designed to improve the effective resolution of the RGB sensor. The 1,005 element AE sensor also captures both tone and color information, which should make it easier to discern where objects are in the field of view and how they're moving.
The net result should be more sure-footed and accurate tracking of subjects as they move about the frame. The relatively high resolution of the RGB sensor should let the camera determine the subject's location more precisely, and therefore develop more accurate measurements and predictions of its motion.
In our discussions with Nikon staff, it also appears that the RGB sensor is contributing some tracking information even when the subject has moved outside the area covered by the AF sensors. At first this didn't seem to make sense. What good would it do to know where the subject is if there aren't any AF sensors there to tell the camera how far away it is, or how fast it's going? It turns out that there are a number of ways the AE sensor could help the AF system outside the active AF area; in my discussions with Nikon engineers, though, I learned that the primary purpose for out-of-area tracking is to reduce the time required by the AF system to re-acquire the subject.

As the diagram above shows, the 1,005 element RGB sensor covers a somewhat greater portion of the frame than do the 51 active AF points. (When I asked the engineers just what portion of the frame area the RGB AE sensor covered, however, they politely but firmly declined to say.) The wandering red line drawn on the figure shows the path followed by a hypothetical subject during a continuous burst of exposures. Note that a portion of the subject's path (the part between the two blue "X" marks) is outside the active AF area, yet still within the area covered by the 1,005 pixel sensor. In previous Nikon AF systems, and those of competing manufacturers, the AF system would have no idea where the subject was once it passed beyond the active AF area. As a result, it would take more time to re-acquire the subject when it re-entered the active AF area near the bottom of the frame. In the Nikon D3 and D300, though, the AF system will remain aware of the position of the subject, even if it doesn't know its range while it's outside the AF area. When it re-enters the AF area, the camera can quickly determine its range, and doesn't need to spend any processing cycles figuring out which AF point is covering it.
It's easy to imagine how this capability could help in the tracking of difficult subjects: While I'm sure it's less of a problem for pro shooters, I myself have often encountered situations in sports or wildlife shooting where it was a challenge to keep a rapidly- or erratically-moving subject framed within the AF area. If the camera were able to track such subjects when they wandered slightly outside the AF area, I'd expect I'd have had more "keepers" when I came back from the shooting sessions.
This edge-of-frame tracking ability isn't a panacea though. While the engineers declined to say just how much of the frame the RGB sensor covered (and I did press them on this point), it seems that it doesn't extend too far beyond the edges of the AF array. In our discussions, they were clear that the D3/D300 could only track objects a small distance outside the AF area. They seemed much more emphatic about the impact of improved tracking accuracy within the active AF area than outside it. Still, the ability to reduce re-acquisition time, even in a limited percentage of cases, is a very worthwhile feature. In the case of the D300, the Matrix metering sensor is likely to cover almost the entire frame, so the D300 has a slight advantage.
One question of course, is why Nikon waited until now to develop such an AF system. After all, the 1,005 element RGB sensor has been in use in Nikon SLRs for something like 10 years now. When I asked the engineers about this, they said that a key factor was the speed of the CPU used for camera management, the chip that handles autofocus, autoexposure, and user interface operation, as opposed to image processing. The control processor used in the D3 and D300 is considerably faster than similar processors in earlier models, and now has sufficient throughput to do meaningful image processing with the 1,005 element sensor data in real-time, where earlier units did not. Secondarily, the newly-added Diffractive Optical Element brings greater imaging precision to the 1,005-element sensor, permitting more accurate discrimination and localization of objects within the AE area.
These days, most improvements in camera functionality are incremental, basically taking what had been done before, only now doing it a bit faster, a little more precisely, etc. In contrast, Nikon's use of RGB exposure sensor data to assist AF operation stands out as a more radical innovation, bringing an entirely new approach to the problem of AF tracking, different from any we've seen before. It's an exciting development, and one that we'll be watching eagerly as the first production samples hit the market: It's a very clever idea, but we won't know how successful it is until we hear the experience of practicing photographers using the new system in the field.
Nikon D3 AF "Fine Tuning"
The microscopic pixel dimensions of modern digital sensors have placed more extreme demands on autofocus accuracy than was ever the case in the film era. This has revealed a lot of shortcomings in autofocus systems, not the least of which have been the frequent "near-miss" mismatches between particular lens/camera combinations. A lens that focuses fine on one body may front-focus on another and back-focus on a third. Change bodies and the problem may move to another lens.
Solving this sort of mismatch problem has often meant shipping your entire complement of lenses and bodies to the manufacturer to have them all fine-tuned to match each other. This was and is a costly and time-consuming process, and if any of the lenses in question were made by someone other than the camera manufacturer, you were simply out of luck: If you returned them to the lens maker, chances are you'd hear back that they were in perfect working order. (And well they might be: Attached to a different body, they might focus just fine.)
Ideally, there'd be a way to tell the camera to tweak its focus forward or back just a tad, depending on the lens you were using. In fact, this is just what the Nikon D3 provides: You can register up to 20 different lens "types" with the camera (more on "types" in a moment), and make micro-adjustments to the AF system for each.
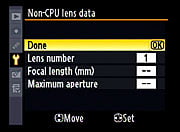
Non-CPU lens data: Non-CPU lens data handling has gotten more sophisticated, with the camera being able to register data for up to 9 lens types. And, you can make micro-focus adjustments for 20 lenses!
This is an area where Nikon has followed Canon's lead. The Canon EOS-1D Mark III first introduced the idea of AF micro-adjustment when it was introduced back in late February 2007. Both can keep track of 20 different "registered" lenses.
What does lens "type" mean here? Basically, a lens "type" is a lens model. For instance, if you have a 70-200mm f/2.8 and a 100mm f/2.8 Micro, the camera would recognize each lens when it was attached to the camera, and automatically load the appropriate fine-tuning setting. If you had two 70-200mm f/2.8s though, the camera would have no way to distinguish between them, and would load the same fine-tuning settings for either one.
While there may be some photgraphers (particularly pros) who have more than 20 lenses in their kits, the 20-lens "fine-tuning library" will cover the needs of the vast majority of shooters. And while we'll need to test it with third-party lenses, it seems likely that the Nikon D3 and D300's fine-tuning systems should be able to recognize lens types, regardless of who manufactured them. This is a huge step forward in focus accuracy, giving photographers the tools they need to maintain and calibrate their own equipment.
Autofocus differences between the D3 and the Nikon D300?
The Nikon D3 and D300 both use the same Multi-CAM 3500 AF engine, but there's been a little confusion over the implementation in the two cameras. For the record, the two systems are identical, but there's one unavoidable difference: The smaller image sensor in the D300 means that the AF area covers a rather larger portion of the overall frame area. This strikes us as an entirely good thing, it'd actually be nice if the D3's AF sensor array were larger, to give the same frame coverage as on the D300.
Other than this one difference resulting from the different frame sizes of the two cameras, the AF systems in both are identical, though the D3 has much quicker autofocus according to our tests. Nikon has also limited the number of lenses registered for AF micro-adjustment on the D300 to 12, while the D3 supports 20 lenses.
&nsbp;
Nikon D3 Chromatic Aberration Correction
One of the more unusual aspects of the Nikon D3 is its ability to correct image artifacts arising from lateral chromatic aberration (CA) in the lenses used with it. This isn't strictly the first time we've seen a camera able to correct for optical shortcomings in the lenses used with it. That distinction goes to Olympus, whose E-1 SLR offered the capability to correct for a range of lens distortion and artifacts.
In the case of the Olympus E-1, though, the distortion correction was preprogrammed, based on information communicated from the Olympus Zuiko "digital-specific" lenses to the camera. That is, each lens carried information regarding its distortion characteristics, which it communicated to the camera when it was attached. Based on what we've been told though, the D3 appears to be able to figure out how much lateral CA a lens is creating at each focal length and correct accordingly.
Chromatic Aberration. This crop from the extreme corner of one of our test images shows lateral chromatic aberration in the form of magenta and green borders around the target elements.
Lateral CA correction is something that's relatively easy to do digitally, at least to a reasonable degree of approximation. CA arises from the varying refraction of light of different wavelengths (colors) as it passes through an optical system. Some colors are refracted (bent) more than others, so light of different colors coming from a single point may not fall on the same spot on the sensor. This produces the red, purple, blue or green fringes you see around contrasting objects, particularly at the edges of the field of view.
Given that digital cameras naturally separate light into red, green, and blue color components, it's possible to do some color-based processing to make at least approximate corrections for the effects of chromatic aberration. This is what the Olympus E-1 did, and what DxO Optics Pro and other software programs do, including the Lens Correction filter in Adobe Photoshop CS3.
What's unusual in the D3 though, is that the camera is figuring out on its own what correction is needed, rather than being told what to do by the lens (as with the Olympus E-1), applying a precalculated correction (as with DxO Optics Pro), or having a user dial it in interactively (as in Photoshop). When pressed, Nikon said that best results would be obtained with Nikon lenses, but that the system would work with third-party lenses as well. We specifically asked a panel of Nikon engineers whether there was any database of Nikon lens characteristics involved, and they replied that there was not -- the camera figures out what lateral CA is present and corrects for it all on its own, irrespective of the lens involved. We've confirmed that the D3's CA correction works in-camera for non-Nikon lenses, although it's hard to say how well or poorly: We'd need examples of a Nikon and third-party lens with the same CA behavior to say whether the correction is equal or not. That said, it certainly appears to be as effective, as far as we can tell.
One place where there may be a difference between Nikon and third-party optics is in the area of RAW file processing. In keeping with the philosophy of a RAW file representing exactly what the sensor captured, the Nikon D3 only applies the chromatic aberration correction to JPEG images, not to the RAW files themselves. Using Nikon Capture NX software (an added-cost, optional software package), the user can then choose to apply the same correction the camera would have. Nikon said that this post-capture correction would be made in Nikon Capture using the same algorithms as employed by the camera in adjusting the JPEG data, but we haven't tried Capture NX with third-party lenses yet.
Lens
No "kit" lens, but the D3's automatic chromatic aberration correction in its JPEG files is very effective, improves any lens you use with the camera.
The Nikon D3 is sold body-only, so this section would normally be left blank intentionally. Like it's smaller sibling the D300, the Nikon D3 automatically corrects for chromatic aberration from the lens, right in-camera. The correction is only applied to its JPEGs, its NEF RAW files are very properly left untouched, faithful recordings of what the sensor saw. Here's an example of one of our test targets, shot with the Nikon 14-24mm f/2.8 lens on the D3.


As we found on the D300, the Nikon D3's in-camera correction for chromatic aberration worked very well, as seen in the crops above. The image on the left is from a RAW file, converted through Adobe Camera Raw, with no lens correction applied, and just enough sharpening to approximate the look of the D3's JPEGs, shot with the default sharpness setting. The crop is taken from the upper right hand corner of an image captured with the Nikon 12-24mm f/2.8 lens, at 24mm. It's an excellent lens, but there's still some CA in the corners on a full-frame camera like the D3, as can be seen clearly here.
The image on the right is from the same area of an in-camera JPEG image. (The images were captured as a JPEG+RAW pair, so the pixel alignment between the two is exact.) You can still see just a smidgen of coloration along the vertical edges of the bold black bar, but that's really splitting hairs: For all intents and purposes, the CA is gone. (Note that the anti-CA processing is only applied to the in-camera JPEGs; the camera very rightly leaves the RAW files untouched.)
It's important to note that this CA correction isn't dependent on your using a Nikon lens: The camera figures out how much CA there is in each area of the image, and shifts the planes of red and blue pixel data to compensate for it. Note though, that this only works for lateral CA. Longitudinal CA isn't corrected out. (Happily though, with most good quality lenses, lateral CA is much more common than longitudinal.)
How great: A camera that makes your lenses look better than they are! (Now, if they could just make a camera that'd make me look like a better photographer than I am, they'd really have something! ;-)
(For another example of Nikon's Chromatic Aberration technology, check out our review of the D300. That camera uses the same technology as is in the D3: See the Nikon D300 Optics section. Scroll down a bit when you get there to the Chromatic Aberration section for full details.)
The images above were taken from our standardized test shots. For a collection of more pictorial photos, see our Nikon D3 Photo Gallery .
Exposure
Nikon D3 Exposure
Nikon D3 Matrix Metering Improvements
While the 1,005 pixel RGB sensor used for Nikon's 3D Matrix Metering has a new function in the D3 and D300 (assisting with autofocus tracking), the 3D Matrix Metering system itself has been enhanced in both cameras.
3D Matrix Metering is a Nikon innovation that's been a feature of Nikon cameras for some time. In describing technical features of digital cameras, we often find ourselves saying "the basic concept is simple." Not so with Matrix Metering: The underlying concept is anything but simple, so much so that it amazes us that it can be made to work at all.

Metering sensor. Nikon's unique 1,005 element RGB autoexposure sensor benefits from improved optics in the D3 and D300.
The basic idea behind Matrix Metering is that the camera holds an extensive database of "scene types" that it uses to guide its exposure determination. To develop the system, Nikon's engineers began with a library of thousands of different photographs, representing the most common types of images people might be interested in capturing. (What the reference images were, how they were originally selected and even the exact number of scene types themselves are closely-guarded Nikon secrets.)
Taking this library of thousands of representative scenes, the engineers ran them past a metering sensor and looked at the numbers that came out the other end. With appropriate manipulation (more Secret Sauce), the arrays of numbers from the exposure sensors became an index into the database of scene types. That is, when a camera using Matrix Metering sees a light blob here and dark areas there and there, that information tells it that the scene is similar to Reference Scene #13,257, which might be a portrait shot against a dark background. Following that example, the camera would know that it should place more emphasis on the exposure of the light blob (a Caucasian person's face, perhaps) than that of the darker background. Beyond the patterns of light and dark, Nikon's current version of 3D Color Matrix Metering takes into account distance information fed back to the camera by the lens and autofocus system, and color information from the RGB exposure sensor.
With the foregoing as background, we can talk a bit about the enhancements to the D3 and D300's exposure system. Most of the following is based on a conversation I (Dave) had with Mr. Tadao Kai, while in Tokyo attending the August 2007 press tour for the D3/D300. Mr. Kai is a Development Manager and senior engineer involved in the design of the autoexposure system used in both cameras, and so was able to discuss its operation in some detail. I apologize in advance for any errors I may have made in interpreting what Mr. Kai told me.
There were two important changes made in the D3/D300 autoexposure system, one involving the optical chain leading to the 1,005 element sensor, the other in the underlying scene database. To understand the changes in the AE optics, refer to the illustration below:
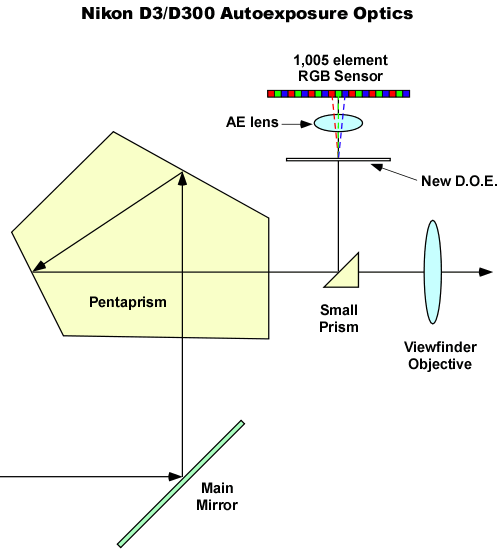
The first change relates to how subject images are resolved onto the 1,005 element RGB AE sensor. Let's start by taking a look at how the AE sensor is placed within the camera's optical system. The diagram above shows a schematic look at the viewfinder optics of a Nikon digital SLR. Light enters from the lens below left, is reflected by the main mirror, bounces around the pentaprism, and exits toward the rear through the viewfinder objective. A small prism between the pentaprism and the viewfinder eyepiece refracts a portion of the light upward, where it passes through a small lens and then falls onto the RGB autoexposure sensor.
The purpose of the small lens positioned below the RGB sensor is to bring the subject into focus on the surface of the sensor. It does so just as you'd expect, but that's not the end of the story. It turns out that the RGB sensor is a striped array, with successive columns of red, green, and blue elements. This means that the red, green, and blue images of the subject captured by the sensor aren't in precise spatial alignment, but rather are offset from each other by plus or minus the width of a pixel column. In the past, this has limited the ability of the array to accurately resolve objects.
The new innovation in the D3/D300 autoexposure system is the introduction of a small diffraction grating or Diffractive Optical Element (DOE for short) in front of the autoexposure lens. The DOE bends the light passing through it by an amount proportional to its wavelength, or color. The amount of this bending is precisely controlled, such that the red, green, and blue wavelengths are shifted by an amount equal to the spacing of the columns of pixels in the RGB sensor. The net result is that the position of colored objects can be much more precisely determined from the data captured by the 1,005 element RGB sensor.
In my conversations with the designers, they didn't (or wouldn't) say exactly how the improved resolution would help the AE system, but it's possible to speculate a little. Specifically, with better resolution, it's not hard to imagine the new AE system being able to find and respond to smaller objects in a scene -- A face that occupies a smaller part of the frame, for instance.
Along with the increased resolution (and perhaps in large part enabled by it), the underlying scene database has been greatly expanded. As always, Nikon is a little coy with the exact numbers, but one engineer said that the total database size has been nearly doubled. Given that the approximate size they've given in the past was 30,000 reference images, this suggests that the new reference scene database is now on the order of 60,000 images.
Obviously, the proof of all this is how the camera performs in real-world shooting situations. We can certainly say that the D3's exposure accuracy seemed better than average in our testing of it: It seemed less prone to being fooled by contrasty or backlit subjects than most cameras we test. Ultimately though the subtleties of an exposure system like this can only be appreciated through long experience shooting with the cameras, rather than in the immediate outcomes of laboratory tests. The Nikon engineers I spoke with were quite enthusiastic over what they'd achieved with the new exposure system. Our own (limited) laboratory and real-world shooting with the D3 suggested that they had indeed achieved better exposure accuracy than we'd seen in prior cameras. At the end of the day though, it's our readers who'll ultimately be best positioned to determine the value of this new AE system.
Active D-Lighting
Nikon's "D-Lighting" has been around for quite a while, having first appeared on the Coolpix 7900 back in 2005. It's a dynamic-range enhancement approach that lightens the shadows without blowing out the highlights, while leaving the overall image contrast looking more or less normal. It's been a feature of most Nikon cameras since, and has been further refined with each passing generation.
| D-Lighting Examples | |
 |
 |
| With | Without (as-shot) |
In the Nikon D3 and D300, D-Lighting has been taken to a new level, with the camera now able to make D-Lighting corrections on the fly, while you're shooting. Called Active D-Lighting, this is still an optional setting, made via the menu system, so you can turn it on and off and adjust the strength of the effect as desired. It also affects only JPEG images: if you're shooting RAW + JPEG, the RAW file will be undisturbed, in keeping with the overriding philosophy RAW files as "digital negatives." As with the chromatic aberration correction we discuss on the optics page of this review, D-Lighting can be applied to data from RAW files in Nikon Capture, an optional (added-cost) software package.
Noise is always an issue with any sort of shadow-enhancement technology like D-Lighting: When you brighten the shadows, the noise gets brightened right along with the subject detail you're looking for. This is where the D3's (and to a lesser extent the D300's) excellent image noise performance and 14-bit A/D conversion come in. With less noise to begin with, and very high-resolution digitization, the camera has much better shadow information to work with, and much finer control over how it applies gradation adjustments. Here again, we won't be able to judge the effectiveness of the new cameras' dynamic D-Lighting until we can test production samples, but the underlying hardware capability and increasing sophistication of the D-Lighting algorithms are encouraging.
Expanded Retouch Menu

This is a feature that's been brought over from Nikon's consumer cameras, and one that has been the subject of ongoing enhancement. The items on this menu all represent image modifications that can be done after capture, while in Playback mode, and without the use of a computer. In all cases, applying any of the modifications to an image results in the creation of a new image; your original is always left untouched.
Practicing professionals using the D3 or D300 will be more likely to rely on workstation-based software than in-camera one-at-a-time image tweaks like these, but it's conceivable that things like red-eye correction and D-Lighting might be useful to apply on a one-off basis. So this probably isn't a big feature for most users of these cameras, but given the negligible incremental expense of adding this menu to the camera, there's no reason not to provide this toolset.
The images above were taken from our standardized test shots. For a collection of more pictorial photos, see our Nikon D3 Photo Gallery .
Not sure which camera to buy? Let your eyes be the ultimate judge! Visit our Comparometer(tm) to compare images from the Nikon D3 with those from other cameras you may be considering. The proof is in the pictures, so let your own eyes decide which you like best!
Performance
Nikon D3 Performance
The Nikon D3 is noteworthy because it's Nikon's first digital SLR camera with a full-frame sensor, but it's remarkable for the amazing speed it delivers in a full-frame body. Not only is the Nikon D3 the fastest full-frame DSLR, but it's the fastest digital SLR camera of any type, with a top continuous shooting speed of 11 frames/second, just edging the Canon EOS-1D Mark III for that honor.
That said though, there's no free lunch, and you have to give up something to reach the highest speeds the Nikon D3 is capable of, including full-frame capability at the very highest frame rate. To understand, let's take a look at the D3's performance in different configurations and with different settings.
The baseline for the D3's continuous-mode performance is 9 frames/second. At this pace, you get full performance in any mode, with no limitations other than those potentially imposed by the lens aperture. (All high-speed digital SLR cameras can be limited by the ability of the lens to open and close its aperture quickly enough. In general, you'll only get the highest speeds with pro-level lenses, and then only when the lens is operating within two or three stops of its maximum aperture. This is because the exposure systems meter with the lens wide open, so the aperture has to open for metering, close for the exposure, and then open again to meter the next shot. If the lens is slow or just has to stop down too far, the time required for aperture operation can limit the maximum frame rate.)
At 10 frames/second, the camera locks the exposure before the first shot, so the exposure will not track any changes in scene brightness that might occur. This won't likely be a problem for short bursts, but could be an issue if you're following a fast-moving subject that transitions from sun to shade or vice versa.
Only in its 5.1 megapixel cropped-frame "DX" mode can the D3 hit its all-out maximum frame rate of 11 frames per second, but at that rate it also locks both focus and exposure before the first frame. That these restrictions result from the shooting speed, not the DX cropping mode. At rates below 10 fps, you'll get full performance in any exposure mode with DX cropping active.
So, while the Nikon D3 is the fastest digital SLR on the planet, it has to cut a few corners to get there. Fully functional at 9 frames per second though, it's only 10 percent slower than the fastest sub-frame camera, and fully 80 percent faster than the next closest full-frame model, the just-announced, 21.1 megapixel Canon EOS-1Ds Mark III.
 |
|
A more robust shutter. In keeping with its greatly increased speed, the Nikon D3's shutter unit has also been upgraded for greater reliability. Several components that had previously been made of Kevlar are now fabricated with carbon fiber to reduce moving mass and increase rigidity and longevity. |
Shutter Lag & Mirror Blackout
Speed isn't only about continuous shooting, though: shutter response and mirror blackout are also critical parameters. Happily, the Nikon D3 really shines in both these areas as well, with the fastest shutter response of any Nikon digital SLR camera to date, a scant 37 milliseconds. Viewfinder blackout is also very brief, at only 74 milliseconds, thanks to a new active mirror-damping system.
Credit for both the increased shooting speed and reduced mirror blackout goes to the all-new shutter mechanism in the D3, which has also been upgraded for significantly greater reliability: The new shutter mechanism is now rated for 300,000 cycles, up from the 150,000 cycle rating of the shutter in the D2Xs.
 |
Dual CF Cards. A number of digital SLRs sport dual card slots these days, but in the Nikon D3, they're both CF slots, allowing maximum capacity and transfer rates. The D3 and D300 both support the latest UDMA CF cards for the highest transfer rates. With CF cards as large as 16 GB on the market as of the D3's release, you can carry up to 32GB of onboard memory. (The fact that the D3 uses the CF format for both cards means that performance is identical, regardless of which card you use.)
Card operation is also unusually flexible, including:
|
Fast Memory System
A fast camera is no good without a fast memory subsystem to keep up with it. Both the Nikon D3 and D300 support the new generation of UDMA CompactFlash cards, which offer the highest throughput. Also, where competitor Canon went with a split-type CompactFlash/SD card arrangement in their EOS-1D Mark III, Nikon chose to give the D3 dual CF card slots. At the press briefing, the Nikon engineers said that the reason for this choice was to insure that there'd be no performance limitation, regardless of which card slot was in use. This makes a lot of sense to us, after using the EOS 1D Mark III with both CF and SD cards: Seemingly any use of the SD card greatly slows buffer clearing, even if we only use it for storing JPEG files in RAW + JPEG mode.
We like the flexibility the dual cards offer, particularly the "backup" mode, where data is written to both memory cards simultaneously. This means that the failure of a single card can't wipe out hundreds or thousands of shots, a particularly important consideration with card sizes hitting 16GB, and no end in sight.
Timing and Performance
Excellent speed for a pro SLR these days, all the more impressive for a full-frame one.
|
Startup/Shutdown
|
||
|
Power on
to first shot |
0.3 second
|
Time it takes for camera to turn on. (Very fast, difficult to measure.)
|
|
Shutdown
|
0.8 second
|
How long it takes camera to turn off before you can remove the memory card. (Odd, slightly slow, even though no dust-reduction feature on D3 to stretch shutdown process.)
|
|
Single-Shot clearing times
|
||
|
Buffer clearing time
Large Fine JPEG |
12 seconds
(after 30 LF JPEGs) |
Worst case buffer clearing time. -- This is the delay after a set of shots before you can remove the card. Some cameras won't shut down until the buffer is cleared. (*See note about memory card speeds at bottom of table below.)
|
|
Buffer clearing time
Small Basic JPEG |
1 second
(after 20 SB JPEGs - Essentially infinite buffer capacity for smallest/lowest quality images) |
|
|
14-bit RAW buffer capacity/clearing times
|
||
|
Buffer clearing time
14-bit RAW (uncompressed) |
28 seconds
(after 16 RAW FX frames) 15 seconds (after 21 RAW DX frames) |
Worst case buffer clearing time. (*See note about card speeds below.)
|
|
Buffer clearing time
14-bit RAW (Lossless compressed) |
19 seconds
(after 16 RAW frames) 13 seconds (after 21 RAW DX frames) |
|
|
Buffer clearing time
14-bit RAW (Lossy compressed) |
18 seconds
(after 16 RAW frames) 15 seconds (after 20 RAW DX frames) |
|
|
12-bit RAW buffer capacity/clearing times
|
||
|
Buffer clearing time
12-bit RAW (uncompressed) |
28 seconds
(after 16 RAW frames) 15 seconds (after 22 RAW DX frames) |
Worst case buffer clearing time. (*See note about card speeds below.)
|
|
Buffer clearing time
12-bit RAW (Lossless compressed) |
19 seconds
(after 16 RAW frames) 12 seconds (after 23 RAW DX frames) |
|
|
Buffer clearing time
12-bit RAW (Lossy compressed) |
18 seconds
(after 16 RAW frames) 11 seconds (after 26 RAW DX frames) |
|
|
TIFF buffer clearing times
|
||
|
Buffer clearing time
TIFF |
45 seconds
(after 15 TIFF frames) |
Worst case buffer clearing time. (*See note about card speeds below.)
|
|
*Note: Buffer clearing times measured with a Kingston 266x Ultimate CompactFlash card. Slower cards will produce correspondingly slower clearing times. Slow cards may also limit length of bursts in continuous mode. ISO sensitivity and noise reduction settings can also affect cycle times and burst mode performance.
|
||
Startup time is average for an pro SLR. Buffer clearing time depends on the image size and quality, burst length and the speed of memory card used.
|
Mode switching
|
||
|
Play to Record,
first shot |
0.5 second
|
Time until first shot is captured.
|
|
Record to play
|
0.6 second
|
Time to display a large/fine file immediately after capture.
|
|
Display
recorded image |
0.5 second
|
Time to display a large/fine file already on the memory card.
|
Mode switching is quite fast, difficult to measure.
|
Shutter response (Lag Time), Multi-Point AF
|
||
|
Full Autofocus
Wide angle Optical Viewfinder |
0.085 second
|
Time from fully pressing shutter button to image capture using optical viewfinder, with Nikkor 24-70mm f/2.8G ED lens at full wide angle.
|
|
Full Autofocus
Telephoto Optical Viewfinder |
0.088 second
|
Time from fully pressing shutter button to image capture using optical viewfinder, with Nikkor 24-70mm f/2.8G ED lens at full telephoto.
|
|
Full Autofocus
Live View Hand-Held Mode |
0.440 second
|
Time from fully pressing shutter button to image capture, using Live View "Hand-Held" (phase-detect) mode.
|
|
Full Autofocus
Live View Tripod Mode |
n/a
|
When using Live View "Tripod" (contrast-detect) mode, autofocus is performed using the AF-On button.
|
|
Prefocused
Optical Viewfinder |
0.043 second
|
Time to capture, after half-pressing and holding shutter button.
|
|
Prefocused
Live View Hand-Held Mode |
0.045 second
|
Time to capture, after half-pressing and holding shutter button, using Live View Hand-Held (phase-detect) mode.
|
|
Prefocused
Live View Tripod Mode |
0.447 second
|
Time from fully pressing shutter button to image capture, using Live View "Tripod" (contrast-detect) mode. Autofocus is performed using the AF-On button, and is not included in this number.
|
|
Continuous AF
Release Priority Optical Viewfinder |
0.049 second
|
This mode usually shows no speed increase with our static subject; we have no way to measure performance with moving subjects.
|
|
Manual focus
Optical Viewfinder |
0.047 second
|
For most cameras, shutter lag is less in manual focus than autofocus, but usually not as fast as when the camera is "prefocused".
|
In terms of the D3's ability to determine that it's properly focused when shooting the same target multiple times (with no between iterations, to remove the impact of lens AF speed), its speed is about typical of a professional model, but this is very fast compared to prosumer and consumer models. The D3 required only 85 millisecond for full AF at wide angle and 88 milliseconds at telephoto setting. When prefocused, in release priority continuous mode or manually focused, shutter lag was even faster, at only 43, 49 and 47 milliseconds respectively.
The D3's two Live View modes add considerable delay, but the "Hand-Held" mode is faster than some other implementations we've tested recently. The "Hand-Held" mode which uses the same "mirror-down" phase difference AF method employed when using the optical viewfinder has full AF shutter lag of 0.44 seconds, roughly five times the optical viewfinder lag.
The "Tripod" Live View mode lag was about the same, at 0.447 seconds, but focusing is performed separately using the AF-On button, so focusing time is not included in that figure. It's easy to see why Nikon chose to call this "Tripod" mode: It's really only going to be useful for still-life subjects, with the camera pretty immobile. The time it takes to achieve focus depends heavily on how far the lens elements have to travel, but even when it's simply refocusing on a previously-acquired subject, it takes about 1.2 seconds with a fast-operating lens. When a slower lens has to rack from infinity to close focus, the AF time in Tripod mode can easily stretch to 3 seconds or more.
Once prefocused, "Hand-Held" mode shutter lag is a very fast 45 milliseconds. Depending on the lens in use though, it can take a long time to find focus, if the optics have to move a significant distance.
|
Cycle time (shot to shot)
|
||
|
Single Shot mode
Large Fine JPEG |
0.28 second
|
Time per shot, averaged over 20 shots.
|
|
Single Shot mode
Small Basic JPEG |
0.20 second
|
Time per shot, averaged over 20 shots.
|
|
Single Shot mode
12-bit RAW |
0.32 second
|
Time per shot, averaged over 20 shots.
|
|
Single Shot mode
14-bit RAW |
0.31 second
|
Time per shot, averaged over 20 shots.
(0.01 second time difference between 14- and 12-bit RAW isn't statistically significant, is less than the standard deviation from shot to shot - which was about 10%) |
|
Early shutter
penalty? |
No
|
Some cameras refuse to snap another shot if you release and press the shutter too quickly in Single Shot mode, making "No" the preferred answer.
|
|
Continuous Hi mode
Large Fine JPEG Size Priority |
0.11 second
(9.03 frames/sec); 30 frames total; 12 seconds to clear* |
Time per shot, averaged over 30 shots.
|
|
Continuous Hi mode
Small Basic JPEG Size Priority |
0.11 second
(9.05 frames/sec); >20 frames total; 1 second to clear* |
Time per shot, averaged over 20 shots, or buffer depth, whichever came first.
|
|
Continuous Hi mode, DX MODE
14-bit RAW Lossless compressed |
0.090 second
(11.11 frames/sec); 21 frames total; 13 seconds to clear* |
Time per shot, averaged over 21 shots.
|
|
Continuous Hi mode
12-bit RAW Lossless Compressed |
0.11 second
(9.04 frames/sec); 17 frames total; 16 seconds to clear* |
(Compression doesn't affect frame rate. Lossless compression helped buffer capacity slightly over uncompressed (at least with the hard-to-compress target we use for timing measurements.))
Time per shot, averaged over 17 shots. |
|
Continuous Hi mode
12-bit RAW Compressed |
0.11 second
(9.04 frames/sec); 17 frames total; 15 seconds to clear* |
(Lossy RAW compression helped buffer capacity slightly over uncompressed.)
Time per shot, averaged over 17 shots. |
|
Continuous Hi mode
12-bit RAW Uncompressed |
0.11 second
(9.04 frames/sec); 16 frames total; 22 seconds to clear* |
Time per shot, averaged over 16 shots.
|
|
Continuous Hi mode
12-bit RAW (Lossless) + LF JPEG |
0.11 second
(9.03 frames/sec); 15 frames total; 28 seconds to clear* |
Time per shot, averaged over 15 shots.
|
|
Continuous Hi mode
14-bit RAW Lossless compressed |
0.11 second
(9.04 frames/sec); 16 frames total; 19 seconds to clear* |
(Unlike the D300, 14-bit RAW does not slow the continuous-mode frame rate.)
Time per shot, averaged over 16 shots. |
|
Continuous Hi mode
14-bit RAW Compressed |
0.11 second
(9.04 frames/sec); 16 frames total; 18 seconds to clear* |
(In our tests at least, compression didn't help buffer capacity in 14-bit mode.)
Time per shot, averaged over 16 shots. |
|
Continuous Hi mode
14-bit RAW Uncompressed |
0.11 second
(9.04 frames/sec); 16 frames total; 28 seconds to clear* |
Time per shot, averaged over 16 shots.
|
|
Continuous Hi mode
14-bit RAW (Lossless) + LF JPEG |
0.12 second
(8.39 frames/sec); 14 frames total; 30 seconds to clear* |
Time per shot, averaged over 15 shots.
|
|
Continuous Hi mode
TIFF |
0.11 second (9.03 frames/sec); 15 frames total; 45 seconds to clear* |
Time per shot, averaged over 15 shots. |
|
Flash recycling
|
n/a
|
Flash at maximum output.
|
|
*Note: Buffer clearing times measured with a Kingston 266x Ultimate CompactFlash card. Slower cards will produce correspondingly slower clearing times. Slow cards may also limit length of bursts in continuous mode. ISO sensitivity and noise reduction settings can also affect cycle times and burst mode performance.
|
||
Single-shot cycle time performance is very good for a pro SLR model, at about 0.28 second between shots in any large/fine JPEG mode, insignificantly slower in any RAW mode. (We measured the RAW single-shot cycle times at ~0.31 second, but the 0.03 difference was within the ~10% variation from shot to shot, so isn't statistically significant.)
Continuous mode is very fast when in any mode including 14-bit uncompressed RAW, at just over 9 frames per second. Unlike the D300, the D3 did not slow down at all when shooting 14-bit vs 12-bit RAW files. Buffer depth in large/fine JPEG mode was 30 frames, and varied between 15 and 17 frames in RAW mode, depending on what bit depth and compression was used for the NEF files.
For really blazing speed with the D3, you can shoot in "DX" mode, where the sensor area is cropped to match the "DX" size sensors in Nikon's sub-frame DSLRs. In this mode, the D3 easily met the 11 frame/second spec that Nikon gives it. This drops the resolution down to 2,784 x 1,848 (5.1 megapixels), but that's still a very usable resolution level, and the speed in this mode is unparalleled.
JPEG buffer depth shooting "normal" subjects is likely to be a good bit greater than we measure with our deliberately difficult-to-compress test target, so your mileage (buffer capacity) may vary, but should generally be better than our measurements.
With the very difficult-to-compress target we use for measuring buffer capacity, lossy and lossless RAW compression increased the buffer depth by just one over uncompressed in 12-bit node, so best to choose lossless compressed. Compression mode didn't seen to impact buffer depth in 14-bit mode at all.
Like other recent pro-level SLRs, the Nikon D3 makes good use of very fast memory cards. We don't have specific numbers to publish here, but did note that slower cards definitely led to longer buffer-clearing times.
|
Download speed
|
||
|
Windows Computer, USB 2.0
|
2,292 KBytes/sec
|
Typical Values:
Less than 600=USB 1.1; 600-770=USB 2.0 Low; More than 770=USB 2.0 High |
Download speeds were fast (but not as fast as some), though fast enough that you probably won't feel the need for a separate card reader. (Measured in Mass Storage mode.)
Battery and Storage Capacity
Battery
Outstanding battery life for an SLR lithium-ion design.
| Test Conditions | Number of Shots |
|
Lithium-ion rechargeable battery,
|
4,300 |
|
Lithium-ion rechargeable battery,
Live View |
n/a |
The Nikon D3 uses a custom rechargeable lithium-ion battery pack for power, and comes with both a single battery and charger. The rated 4,300 shots per charge using the optical viewfinder is well above average for a pro SLR, (but keep in mind the D3 does not have a built-in flash, so that's one reason why the number is so high). Unfortunately, Nikon does not seem to publish battery life results for when Live View mode is used, but it's a safe bet that it's considerably shorter. (Again, we don't have specific measurements, but did notice that the battery seemed to use up its charge much more rapidly when we were shooting in Live View mode. - And the remaining-capacity indicator would often dip noticeably when we switched Live View mode.)
The table above shows the number of shots the camera is capable of on fully-charged battery, based on CIPA battery-life and/or manufacturer standard test conditions.
(Interested readers can find an English translation of the CIPA DC-002 standards document here. (180K PDF document))
Storage
The Nikon D3 stores its photos on CompactFlash memory cards (dual slots are provided), and no card is included with the camera. The chart below shows how many images can be stored on a 2GB card at each size/quality setting. Notes: JPEG compression set to Size Priority, C = compressed, LLC = lossless compressed. (Yes, 14-bit RAW files will be slightly larger, we didn't think it worthwhile to blow out the table size to accommodate those figures: They're pretty proportional to the difference between 12 and 14 bits.)
|
Image Capacity vs Resolution/Quality 2GB Memory Card |
Fine | Normal | Basic |
12-bit
RAW (C) |
12-bit
RAW (LLC) |
12-bit
RAW (LLC) + LF JPEG |
TIFF
|
|
| 4,256 x 2,832 |
Images
(Avg size) |
271 7.6 MB |
543 3.8 MB |
1,096 1.8 MB |
134 15 MB |
98 21 MB |
89 23 MB |
52 39 MB |
|
Approx.
Comp. |
5:1 | 9:1 | 19:1 | 1.2:1 | 0.9:1 | 0.8:1 | 0.9:1 | |
| 3,184 x 2,120 |
Images
(Avg size) |
483 4.2 MB |
951 2.1 MB |
1,836 1.1 MB |
- | - | - | - |
|
Approx.
Comp. |
5:1 | 9:1 | 18:1 | - | - | - | - | |
| 2,128 x 1,416 |
Images
(Avg size) |
1,076 1.9 MB |
2,084 983 KB |
3,904 525 KB |
- | - | - | - |
|
Approx.
Comp. |
5:1 | 9:1 | 17:1 | - | - | - | - | |
We strongly recommend buying a large capacity CompactFlash. You should probably consider at least a 2GB card, if not a 4GB one, to give yourself extra space for extended outings, especially if you plan on doing a lot of RAW shooting. (Check the shopping link above, cards are cheap these days, so there's no reason to skimp -- But do consider faster cards for this camera, to reduce buffer clearing times.)
Imaging
Nikon D3 Image Quality
Color
Saturation & Hue Accuracy
Slight oversaturation of strong red and blue tones and some greens, but better than average accuracy and pleasing color overall.
 |
| In the diagram above, the squares show the original color, and the circles show the color that the camera captured. More saturated colors are located towards the periphery of the graph. Hue changes as you travel around the center. Thus, hue-accurate, highly saturated colors appear as lines radiating from the center. Click for a larger image. |
Saturation. The Nikon D3 oversaturates reds, blues and some greens a little. It also undersaturates some green-cyan colors very slightly, but results are still pleasing. Some may find its default saturation a little high for a professional SLR (10.3% oversaturation, compared to only 5.2% for the Nikon D2Xs), but this seems to be the trend for Nikon these days, away from the technically more accurate but slightly dull looking saturation levels of the past. A firmware upgrade is available to mimic the D2Xs' color response, and as you'll see below, the D3's saturation adjustment gives good control, if you'd like a bit more subdued or even brighter color. Most consumer digital cameras produce color that's more highly saturated (more intense) than found in the original subjects. This is simply because most people like their color a bit brighter than life. Professional cameras tend more toward technically accurate color rendering.
Skin tones. In this case, the D3 did render skin tones slightly on the pink side in most cases. Still, results are quite reasonable, well within an acceptable range. (And here again, many people prefer a slightly ruddy rendering of Caucasian skin tones, often reacting to technically neutral renderings as being "washed out." Here again also, the Nikon D3's saturation adjustment can knock down this mild over-saturation quite effectively.) Where oversaturation is most problematic is on Caucasian skin tones, as it's very easy for these "memory colors" to be seen as too bright, too pink, too yellow, etc.
Hue. Overall results here are pretty accurate, though some reds are pushed slightly toward orange, oranges towards yellow and cyan towards blue. Still, overall color is quite good, with an average hue error after correction for saturation variation of only 5.2 delta-C units. This is closer to technically accurate than many DSLRs on the market. The other important part of color rendition is hue accuracy. Hue is "what color" the color is.


Saturation Adjustment
The Nikon D3 lets you adjust the image saturation, contrast, and sharpness in seven steps each. As can be seen below, the saturation adjustment worked very well, providing a reasonably fine-grained adjustment over a useful range of control. (Although, personally, we'd like to see slightly smaller steps: For our own tastes, we find only the first couple of steps below the default and perhaps only the first step above default saturation photographically useful. It'd be nice to have more steps of adjustment covering that range, to provide finer control.) The saturation adjustment also has almost no impact on contrast. That's how it should work, but we've often found interactions between saturation and contrast (and vice versa) on the cameras we test.
| Saturation Adjustment Examples | ||
 -3 |
 -2 |
 -1 |
 Default |
||
 +1 |
 +2 |
 +3 |
Sensor
Exposure and White Balance
Indoors, incandescent lighting
Auto and Incandescent white balance settings were quite warm under our household incandescent bulbs, but Manual white balance setting produced very good color; slightly less than average positive exposure compensation required.


Color balance indoors under incandescent lighting was very warm with the Auto white balance setting, with a strong yellow cast. - A little disappointing that a $5,000 camera can't do a better job with auto white balance, but it's unfortunately fairly common. The Incandescent setting was a bit better, but still quite warm, which is to be expected on a professional SLR in this setting: Pro studio lighting is color-balanced to 3,200K, while the household incandescents used here are much warmer-hued, typically falling in the range of 2,600 - 2,800K. The 2,700 Kelvin setting produced a very slight magenta cast, which some might actually prefer as being more evocative of the mood of the original lighting. I was a little torn between the 2,700K and Manual results, but ultimately found the Manual setting a bit more pleasing overall. The Nikon D3 required slightly less than the average amount of positive exposure compensation here, at +0.7 EV. Overall color is quite good, Marti's white shirt is almost perfectly neutral, although her face is a little pink, and the blue flowers looked purplish as they often do with this shot. Our test lighting for this shot is a mixture of 60 and 100 watt household incandescent bulbs, a very yellow light source, but a very common one in typical home settings here in the U.S.
Outdoors, daylight
Good color overall, though a tendency toward a slight warm cast. Slightly high contrast under harsh lighting, but really excellent highlight/shadow detail preservation. Slightly better than average exposure accuracy outdoors.
In the "Sunlit" test shot above, the Nikon D3 required less than the normal amount of exposure compensation, and did a really excellent job of preserving detail in both the strong highlights of Marti's shirt and the deep shadows under the bouquet. The image is a little contrasty with the default settings, making the shadows very dark, but the D3 did better with this shot than the vast majority of cameras we've tested.
The outdoor house shot is just slightly overexposed at default exposure, but with natural looking color. The harsh glare from the white paint here, combined with the low sun angle (this shot was captured in mid-winter) are a bit too much for it to handle, but see the "Extremes" section of this report below, for more detail on highlight and shadow detail handling, including the D3's very effective Contrast adjustment, and its Active D-Lighting feature.
See full set of test images with explanations
See thumbnails of all test and gallery images
Resolution
Very high resolution, 1,700 lines of strong detail.


Our laboratory resolution chart revealed sharp, distinct line patterns down to about 1,700 lines per picture height in both the horizontal and vertical directions, with extinction past 2,000.
Important note: We've recently begun shooting all our DSLR resolution and laboratory test target shots with Sigma 70mm f/2.8 macro lenses. These lenses come in flavors for all major lens mounts except the FourThirds system, and are arguably the sharpest lenses we've tested to date over on SLRgear. In the case of the D3 however, the Sigma 70mm f/2.8 Macro inexplicably produced incorrect exposures, leaving us uncertain what aperture the lens was actually using on any given shot. This was very strange, as we've never found any exposure issues with this (or any other Sigma lens) before, and the same lens performed flawlessly in our testing of the D300. To avoid these exposure problems, we used our Nikon 105mm f/2.8 Macro lens for the D3's test shots. The 105mm f/2.8 Nikkor is also an exceptionally sharp, low-distortion lens, so its results here should be all but indistinguishable from those we might have obtained with the Sigma 70mm. (Particularly shooting at the f/8 aperture we're using in the shots above.) We call attention to the lens used only because it differs from our current standard.
Use these numbers to compare with other cameras of similar resolution, or use them to see just what higher resolution can mean in terms of potential detail. Our interpretation of this standard is somewhat conservative. We watch for artifacts and color fringing then move back to the nearest pure part of the scale. In our opinion, detail with artifacts shouldn't be considered detail. You may see other numbers quoted elsewhere, but across the site, our reviews judge this parameter by the same conservative standard.
See full set of test images with explanations
See thumbnails of all test and gallery images
Sharpness & Detail
Sharp images overall, with excellent detail. Minimal noise suppression visible in the deep shadows at low ISOs.


Sharpness. The Nikon D3 captured fairly sharp images, though the very conservative default in-camera sharpening leaves details in camera-rendered JPEGs shot with the default settings looking just slightly soft overall. The good part of this is that there's very little in the way of sharpening artifacts left to interfere with subsequent sharpening on the computer. In the high contrast shot above, there's only a hint of edge enhancement artifact visible along the edges of the white house trim and roof, as well as some of the larger branches. There are some minor artifacts from the in-camera sharpening though: Sharpening on the computer does tend to bring out the very slight halos that are present in the original images, but generally not noticeable unless additional sharpening is applied. (Edge enhancement creates the illusion of sharpness by enhancing colors and tones right at the edge of a rapid transition in color or tone.)
Detail & Noise suppression. The crop above right shows very little evidence of noise suppression in the shadows, with quite a bit of fine detail in the strands of hair visible. Noise-suppression systems in digital cameras tend to flatten-out detail in areas of subtle contrast. The effects can often be seen in shots of human hair, where the individual strands are lost and an almost "watercolor" look appears.
JPEG vs RAW
JPEG vs RAW Comparison |
||
Mouse over the links in the box above to compare the difference in sharpness and detail from camera JPEG versus a 14-bit RAW file processed with Nikon's Capture NX version 1.3.0 and Adobe Camera Raw 4.3. Camera settings for the JPEG settings were the defaults.
In our testing of many DSLRs, we're finding that there is often more detail locked up a the camera's RAW files than makes it out in the camera-produced JPEGs. This once again seems to be the case for the D3. It's in-camera JPEG processing is actually pretty competent, but you can nonetheless produce a much sharper, more finely-rendered image by manipulating the RAW files in a good third-party RAW converter.
The camera's own JPEG processing and that of Nikon's Capture NX software produce very similar-looking images (no surprise there), although Capture NX gives you more control over image-sharpening parameters. The size of the sharpening operator in Capture NX seems to be somewhat constrained though, preventing you from using as tight an operator as you might like. As a result, finer detail can be revealed by processing in Photoshop, importing via Camera Raw with its sharpening turned off and then applying ~250% unsharp masking with a radius of 0.3 pixels once the image has been imported. (We've generally found that careful unsharp masking delivers better results than we can achieve using the sharpening built into Camera Raw.)
ISO & Noise Performance
Very low noise up to ISO 1,600 (!) sensitivity, moderate noise at ISOs 3,200 and 6,400, high (but fine-grained) noise and strong blurring at ISOs 12,800 and 25,600.
 |
 |
 |
| ISO 100 (Lo -1) | ISO 200 | ISO 400 |
 |
 |
 |
| ISO 800 | ISO 1,600 | ISO 3,200 |
 |
 |
 |
| ISO 6,400 | ISO 12,800 (Hi +1) | ISO 25,600 (Hi +2) |
| These crops taken from shots with High ISO NR set to "Normal", the default. |
||
Noise levels are remarkably low at the Nikon D3's lower sensitivity settings, with buttery smooth images up to ISO 800, where there is only a slight hint of "grain" visible in darker shadows. At ISO 1600, noise is still very low with very little loss in fine detail. We start to see some minor loss of detail at ISO 3,200 where high ISO noise reduction is smoothing away fine detail along with noisy pixels. Noise and the effects of noise reduction becomes obvious at 6,400, with stronger blurring, and increased "grain", but chroma noise is kept in check and overall results are still excellent for a 12 megapixel sensor at such a high sensitivity setting. (The D3's big pixels really help with light sensitivity and low noise, and Nikon's sensor technology and noise reduction appear to be top notch as well.) ISOs 12,800 and especially 25,600 are quite noisy and soft looking, with blotches of chroma noise and little fine detail remaining after default high ISO noise reduction is applied. That said though, even ISO 12,800 images look surprisingly usable when printed as large as 8x10 inches, and ISO 25,600 ones looked surprisingly good at 5x7.
Bottom line, the D3 has by far the best high-ISO noise performance of any DSLR we've tested to date.
See the High ISO Noise Reduction page though, to see how the D3's various high ISO NR settings impact image quality.
Single-Pixel Faults?
Eagle-eyed IR staffer Zig Weidelich sniffed these out: There appear to be at least a few single-pixel defects in our D3's sensor. They seem most apparent in higher-ISO shots, but some can be found even at relatively low ISO settings. Here's an example of what one looks like, cropped from Marti's hand in the Indoor Portrait ISO 400 shot, enlarged 400%. It looks like it's probably a single hot pixel, affecting the interpolated data of its four nearest-neighbor pixels. This particular artifact showed up at all ISO settings above 100.
Having spotted it in the Indoor Portrait shot, it was easy to find it in many of our other shots as well, at pixel coordinate x=2,108, y=2,726. For whatever reason though, it didn't always appear as the cross-shaped artifact seen above: In some of our lowlight shots, it appears as only a short horizontal line. Whatever the cause of this sort of defect, they can be hard to find (which is to say that they don't seem to affect images too much), as it seems to take just the right combination of subject and exposure to reveal them. (As witness how much less evident the defect above is when seen against the background of the DaveBox in the low-light shots.)
We only found a couple of these in our shots, but there could be more we haven't found yet: As noted, they're hard to find, and for whatever reason don't seem to correlate well with the typical "hot pixel" errors in long exposures: These artifacts do show up as hot pixels in very long exposures (a couple of minutes, say), but other pixels that appear "hot" under long-exposure conditions don't show up in shorter exposure they way these do. Having brought this to light, I'm sure the online community will sniff out more examples of them, so we'll perhaps be able to characterize better how and when they appear.
High-ISO comparison: Nikon D3 vs Canon 1Ds Mark III
Based on reader emails and various forum posts, this seems to be a comparison many people are interested in making. It strikes us as a little bit of comparing apples and oranges though: The two cameras are made to very different design specifications, the D3 being optimized for high-ISO work, the 1Ds Mark III for high resolution at lower ISOs. Nonetheless, there seems to be great interest in comparing images from the two cameras, so we'll accommodate that interest here.
In the crops below, we've chosen to not resample the images, despite the very different resolution levels of the two cameras. Resampling either the 1Ds Mark III image down or the D3 image up introduces another variable, namely the type of resampling done, and what type of sharpening is applied to either image after the resampling. (Note that some sharpening is required in that situation, just to keep the comparison as fair as possible: Even downsampled images will require sharpening, as the downsampling will partially or fully negate the effect of any sharpening that has been done in-camera.)
So, we present the results below with the caveat that there's inherently a large component of apples vs oranges present here. That said, the results aren't too surprising: The D3's larger pixels show lower noise but also lower resolution than the smaller sensor elements of the 1Ds Mark III.
| 1Ds Mark III vs D3 High ISO Noise Reduction | ||||
| 1Ds Mk3 NR Off | 1Ds Mk3 NR On | D3 NR Off | D3 NR Normal | Incandescent Light |
| I S O 1 6 0 0 |
 |
 |
 |
D3 does not perform High ISO NR at ISO 1600 |
| I S O 3 2 0 0 |
 |
 |
 |
 |
| Simulated Daylight | ||||
| I S O 1 6 0 0 |
 |
 |
 |
D3 does not perform High ISO NR at ISO 1600 |
 |
 |
 |
D3 does not perform High ISO NR at ISO 1600 |  |
 |
 |
D3 does not perform High ISO NR at ISO 1600 |
| I S O 3 2 0 0 |
 |
 |
 |
 |
 |
 |
 |
 |
 |
 |
 |
 |
The comparison table above shows crops from the Canon EOS 1Ds Mark III next to some from the D3, comparing the Off and On settings of the 1Ds Mark III to the NR Off and Normal settings on the D3. Apart from the obvious differences in resolution, saturation and tone curves, we can see the D3 exhibits less noise even with NR off than the 1Ds Mark III has with its high ISO NR on (which does a good job at removing chroma noise, but does very little to remove luminance noise). No real surprise here, since the Mark III's sensor has nearly twice as many pixels as the D3's.
High-ISO comparison: Nikon D3 vs Nikon D2Xs
This is perhaps a bit more fair comparison, in that both cameras at least have the same pixel count, and the D3 outperforms the D2Xs in terms of shooting speed. (So, other than the different crop factors, the D3 could easily substitute for most any application the D2Xs could have been used in.)
| D2Xs vs D3 High ISO Noise Reduction | |||
| D2Xs NR Normal | D3 NR Off | D3 NR Normal | Incandescent Light |
| I S O 1 6 0 0 |
 |
|
D3 does not perform High ISO NR at ISO 1600 |
| I S O 3 2 0 0 |
 |
|
|
| Simulated Daylight | |||
| I S O 1 6 0 0 |
 |
|
D3 does not perform High ISO NR at ISO 1600 |
 |
|
D3 does not perform High ISO NR at ISO 1600 |  |
|
D3 does not perform High ISO NR at ISO 1600 |
| I S O 3 2 0 0 |
 |
|
|
 |
|
|
 |
|
|
The comparison table above shows crops from the Nikon D2Xs next to some from the D3, comparing the Normal high ISO NR setting of the D2Xs (sorry, we didn't shoot any with high ISO NR off), to the Off and Normal settings on the D3. Here we see again, apart from the differences in color and saturation, just how much cleaner the D3 is at higher ISOs. Keep in mind the D3 has a full-frame 36 x 24mm sensor, while the D2Xs packs a similar number of pixels into a DX format (23.7 x 15.7mm) sensor, which is less than half of the area of the D3's. As noted above though, the very fast shooting speeds of the D3 make it an even better choice than the D2Xs for sports and other fast-paced applications, the only downside being that you won't get quite the reach out of your long teles as you would with the D2Xs.
Extremes: Sunlit and low light tests
High resolution with excellent detail in both the highlights and shadows.
This camera sees better in the dark than you do! - Excellent low-light performance, capable of capturing bright images under average city street lighting and much darker conditions.


Sunlight. The Nikon D3 performed well under the deliberately harsh lighting in the test above, and captured bright midtones without sacrificing too much detail in the highlights or shadows. Though Marti's face still looks a little dark at +0.3 EV, I preferred it to the image at +0.7 EV, which had too many blown highlights for my preference. That said though, even the +0.7 EV example did an excellent job of preserving highlight detail, in that only a few areas were completely blown out. Shadow detail was also really excellent, there's very good detail there, surprisingly far into the deep shadows. (In "real life" though, be sure to use fill flash in situations like the one shown above; it's better to shoot in the shade when possible.)
| Contrast Adjustment Examples | ||
 -3 |
 -2 |
 -1 |
 Default |
||
 +1 |
 +2 |
 +3 |
The series of shots above show the results of the different contrast settings, all shots captured at an exposure setting of +0.7 EV. While it can be difficult to evaluate small differences in contrast on small thumbnails like these, it's pretty easy to see the impact of the Contrast adjustment in the images above. At its lower settings, the D3 did a really excellent job of handling the deliberately horrific lighting of this shot.
With the contrast dialed down to its lowest setting, even the +0.7EV base exposure used above results in almost no loss of highlight detail (only a spot on Marti's collar and the red channel in a few spots on the red flowers are blown out), and the shadows are unusually open. Color saturation is also almost entirely unaffected by the contrast adjustments, as it should be.
| Active D-Lighting Examples | ||
 Off |
||
 Low |
 Normal |
 High |
The series of shots above show the results of the available Active D-Lighting settings (once again, using a nominal exposure compensation of +0.7 EV), used to preserve highlight and shadow detail in high contrast images. This is different than the touch-up menu's D-Lighting, as it is performed during image capture instead of after. (It does affect only JPEG images though, Nikon very properly leaves RAW file data strictly as it comes from the sensor.) The camera's default setting is to have Active D-Lighting applied at the Normal level.
The results here are very interesting: At the highest D-Lighting setting, highlight and shadow detail is as about as well preserved as with the lowest contrast setting, but midtone values are richer, not as flattened-out looking as they are when the overall contrast is dialed down. See the images below for a closer comparison between the effect of low contrast and Active D-Lighting. When you really look at the photos here, the difference in highlight detail in Marti's shirt here, from Active D-Lighting off to the High setting is pretty dramatic, it's a feature that seems to work very well.
We had some discussion around the office about the advisability of leaving a feature like Active D-Lighting enabled by default. This is something that's going to be very much a matter of personal preference: Some will love it, others may just dismiss it out of hand. I (Dave) confess to having had some uneasiness about a camera mucking with exposure characteristics to this extent by default. That was before I shot with the D3 (and D300, which has the same feature) though. In practice, I always preferred the shots with Active D-Lighting enabled to those with it off. Unless I were deliberately trying for a high-contrast image (a silhouette, say), I don't think I'd ever have cause to disable it. I wouldn't have said this about Nikons first implementations of D-Lighting in its earlier SLRs, but I'm very impressed with how well it seems to work in this latest incarnation. (And of course, the RAW files are always untouched, so as long as I shoot RAW+JPEG, I always have the option of going back and extracting a JPEG from the RAW with D-Lighting turned off.)
| Low Contrast vs Active D-Lighting Outdoor Portrait (Same exposure setting in both images, +0.7 EV) |
|
 Lowest Contrast Setting |
 Active D-Lighting, High Setting |
| Far-Field House (Same exposure setting in both images, default exposure) |
|
 Lowest Contrast Setting |
 Active D-Lighting, High Setting |
Here's a couple of side by side examples showing the effects of Active D-Lighting vs using the contrast adjustment to handle high dynamic range situations. The lowest contrast setting typically pulls the highlights and shadows further in that does Active D-Lighting, but the result is a much flatter-looking image overall. Active D-Lighting manages to concentrate its action in just the strongest highlight and shadow areas, leaving the midtones more or less alone. The result is generally a more vibrant, natural-looking image.
Note: Because digital cameras are more like slide film than negative film (in that they tend to have a more limited tonal range), we test them in the harshest situations to see how they handle scenes with bright highlights and dark shadows, as well as what kind of sensitivity they have in low light. The shot above is designed to mimic the very harsh, contrasty effect of direct noonday sunlight, a very tough challenge for most digital cameras. (You can read details of this test here.)
| 1 fc 11 lux |
1/2 fc 5.5 lux |
1/4 fc 2.7 lux |
1/8 fc 1.3 lux |
1/16 fc 0.67 lux |
1/16fc No NR |
ISO 100 |
 1.6 sec f2.8 |
 4 sec f2.8 |
 8 sec f2.8 |
 20 sec f2.8 |
 25 sec f2.8 |
 25 sec f2.8 |
|---|---|---|---|---|---|---|
| ISO 200 |
 0.8 sec f2.8 |
 2 sec f2.8 |
 4 sec f2.8 |
 10 sec f2.8 |
 13 sec f2.8 |
 13 sec f2.8 |
| ISO 400 |
 0.4 sec f2.8 |
 1 sec f2.8 |
 2 sec f2.8 |
 5 sec f2.8 |
 6 sec f2.8 |
 6 sec f2.8 |
| ISO 800 |
 1/5 sec f2.8 |
 0.5 sec f2.8 |
 1 sec f2.8 |
 2.5 sec f2.8 |
 3 sec f2.8 |
 3 sec f2.8 |
| ISO 1600 |
 1/10 sec f2.8 |
 1/4 sec f2.8 |
 0.6 sec f2.8 |
 1.3 sec f2.8 |
 1.6 sec f2.8 |
 1.6 sec f2.8 |
| ISO 3200 |
 1/20 sec f2.8 |
 1/10 sec f2.8 |
 0.3 sec f2.8 |
 0.6 sec f2.8 |
 0.8 sec f2.8 |
 0.8 sec f2.8 |
| ISO 6400 |
 1/40 sec f2.8 |
 1/15 sec f2.8 |
 1/6 sec f2.8 |
 1/4 sec f2.8 |
 0.4 sec f2.8 |
 0.4 sec f2.8 |
| ISO 12800 |
 1/80 sec f2.8 |
 1/30 sec f2.8 |
 1/15 sec f2.8 |
 1/6 sec f2.8 |
 1/5 sec f2.8 |
 1/5 sec f2.8 |
| ISO 25600 |
 1/160s f2.8 |
 1/60 sec f2.8 |
 1/25 sec f2.8 |
 1/13 sec f2.8 |
 1/10 sec f2.8 |
 1/10 sec f2.8 |
Low light. The Nikon D3 performed extremely well here, able to capture usable images down to the 1/16 foot-candle light level (about 1/16 as bright as average city street lighting at night), at all ISO settings. As seen above, color was very good with the D3's custom white balance setting, but its auto white balance setting unaccountably struggled with this shot, producing pronounced blue tints.
Noise is almost nonexistent up to ISO 800, and remains very low at ISO 1,600, and 3,200. Noise levels are moderate at ISO 6,400, but there's still plenty of detail to work with, especially when high ISO NR is set to "Off" (which still applies some minimal filtering to JPEGs at ISOs over 2,000 -- RAW files are always left untouched). As you would expect, noise is much higher at ISOs 12,800 and 25,600.
The D3 gives you 4 options for high ISO noise reduction: Off, Low, Normal and High, so you have some flexibility in deciding how much noise to trade for detail. Except for the "No NR" shots, these were all shot using the Normal NR setting, and Long Exposure NR was enabled, so was applied to exposures longer than one second. There are a few hot pixels visible at ISOs 12,800, but hundreds visible at ISO 25,600, and Long Exposure NR did not come into play, because the shutter speed was still relatively high. (Only 1/10 second at the lowest light level we test at!) With these ultra-high ISOs, Nikon should perhaps consider offering a way to adjust the Long Exposure NR shutter speed threshold in a future firmware revision.
The D3's autofocus system also performed well here, able to focus on the subject down to below the 1/16 foot-candle light level with its AF assist light turned off, and in total darkness with it enabled.
Bottom line, the Nikon D3 is clearly the best low-light performer we've seen to date, and by a significant margin. If you need to maintain high shutter speeds under dim lighting, the Nikon D3 is head and shoulders above the rest of the field in this respect.
(Note: Focusing -- These shots were taken with the Nikkor 24-70mm f/2.8 lens at 70mm and f/2.8. The depth of field was thus very shallow, so not all parts of the test box will be in focus at the same time.)
How bright is a foot-candle? The one foot-candle light level that this test begins at roughly corresponds to the brightness of typical city street-lighting at night. Cameras performing well at that should be able to snap good-looking photos of street-lit scenes.
NOTE: This low light test is conducted with a stationary subject, and the camera mounted on a sturdy tripod. Most digital cameras will fail miserably when faced with a moving subject in dim lighting.
Flash
Like most professional SLRs, the D3 does not have a built-in flash, so this section left blank intentionally.
Output Quality
Print Quality
Excellent print quality, great color, good 20x30 inch prints, excellent 13x19 inch ones. ISO 6,400 images are surprisingly good at 8x10, even better at 5x7.
 Output from the Nikon D3 was good enough to produce good-looking 20x30 inch prints, and sharp 13x19 inch prints. At 20x30, its images were a little softer looking, but would be more than OK when seen at the viewing distances typical for such large prints. As noted elsewhere in this review, the D3 rewards RAW shooters with really excellent detail when its NEF files are processed through a good RAW converter. The difference between camera JPEGs and those from RAW isn't as dramatic as with some cameras we've tested lately, but the results are well worth the effort if you care about extracting every last bit of information from your images.
High ISO images were phenomenal, the D3 clearly leads the field in high-ISO performance, thanks to its large pixels, CMOS sensor technology, and Nikon's excellent noise-reduction processing. D3 images shot under incandescent lighting (always the tougher test) looked great when printed at 8x10 inches, all the way up to ISO 6400. At ISO 6400 and that size, there was just a little noise present, but we had to look close to see it (closer than you'd normally view a print of that size), and it was very fine-grained. - There's also almost no chroma component to the D3's noise at ISO 6400, making it even less apparent than similarly-grained noise patterns from many other cameras. Shot under daylight-balanced lighting and printed at 13x19 inches, the D3's ISO 6,400 shots were softer and somewhat noisier, but the results were still little short of amazing.
As you might expect, the Nikon D3's noise processing at high ISOs varies quite a bit, depending on the setting you're using. At the low setting (our personal preference), a little fine-grained noise creeps in at ISO 3,200, but it's pretty minimal, and fine subject detail is preserved very well. The Normal noise reduction setting almost entirely eliminates the noise (even at ISO 3,200), but loses a little fine detail in the process. The High setting leaves images very clean, but also very soft, with much more detail lost. That said though, the underlying images are so clean to begin with that the amount of detail loss from any given level of noise reduction is much less than we're accustomed to seeing. (In practice, for print sizes 8x10 or smaller, leaving high-ISO NR turned entirely off produces prints with excellent detail and surprisingly little noise up to ISO 6,400.) As noted, the Low setting was our favorite, it produced surprisingly clean images that still contained loads of fine detail.
Color-wise, the Nikon D3 did very well. At its default settings, its color (particularly reds) was a bit more saturated looking than that of the last generation of Nikon DSLRs, but we think it'd be in an acceptable range for most shooters. Some orange, and some blue/purple shades in particular were brighter than the D2Xs' handling of those colors, but the overall effect was pretty pleasing. (If you like less-saturated color, just take the saturation adjustment down a notch.) Hue accuracy was good, almost identical to that of the D2Xs. A very good performance overall. (Note that since the color error plots for the D2Xs were generated, Imatest has incorporated new, more accurate reference values for the color coordinates of the Gretag MacBeth ColorChecker. You'll thus see a lower mean color error in the Imatest plot for the D2Xs than for the D3, but in actuality, the two cameras saturation-corrected hue error is virtually identical.)
Testing hundreds of digital cameras, we've found that you can only tell just so much about a camera's image quality by viewing its images on-screen. Ultimately, there's no substitute for printing a lot of images and examining them closely. For this reason, we now routinely print sample images from the cameras we test on our Canon Pro9000 studio printer, and on the Canon iP5200 here in the office. (See the Canon Pro9000 review for details on that model.)
Viewfinder
Nikon D3 Viewfinder
 The D3's
optical viewfinder is big, bright, and beautiful. The pentaprism design
features 100% frame coverage, 0.7x magnification at 50mm and -1
diopter, an 18 mm eyepoint, and diopter adjustment range of -3 to +1.
If you just look at the specs, you might think that the D3's optical VF
is a step backward from that of the D2Xs. After all, the D3's
viewfinder is rated at only 0.7x magnification factor, vs. the 0.86x of
earlier models. You have to stop and take into account the fact that
that's 0.7x relative to a full-frame sensor though, so the net effect
is something like a 70% bigger view of the world. This is immediately
apparent when you look through the D3's viewfinder: The view is very
wide, and if you wear eyeglasses, you'll likely find that you need to
press your lenses against the eyecup in order to take in the entire
frame at once.
The D3's
optical viewfinder is big, bright, and beautiful. The pentaprism design
features 100% frame coverage, 0.7x magnification at 50mm and -1
diopter, an 18 mm eyepoint, and diopter adjustment range of -3 to +1.
If you just look at the specs, you might think that the D3's optical VF
is a step backward from that of the D2Xs. After all, the D3's
viewfinder is rated at only 0.7x magnification factor, vs. the 0.86x of
earlier models. You have to stop and take into account the fact that
that's 0.7x relative to a full-frame sensor though, so the net effect
is something like a 70% bigger view of the world. This is immediately
apparent when you look through the D3's viewfinder: The view is very
wide, and if you wear eyeglasses, you'll likely find that you need to
press your lenses against the eyecup in order to take in the entire
frame at once.
A built-in eye-piece shutter is provided for self-timer or live view mode. The Nikon D3 ships with a Type B BriteView Clear Matte VI focusing screen, but also accepts a Type E screen with etched grid-lines. (There's no provision for grid lines to be projected onto the viewfinder screen, as with some earlier Nikon SLRs.)
The graphic and table below shows what information is displayed in D3's viewfinder.

|
1
|
12-mm reference circle for center-weighted
metering
|
15
|
"K" (appears when memory remains for over 1000
frames)
|
|
2
|
AF area brackets
|
16
|
Flash ready indicator
|
|
3
|
Focus points
|
17
|
FV lock indicator
|
|
Spot metering targets
|
18
|
Flash sync indicator
|
|
|
4
|
Focus indicator
|
19
|
Aperture stop indicator
|
|
5
|
Metering
|
20
|
Battery indicator
|
| 6 |
Autoexposure (AE) lock
|
21
|
Electronic analog exposure display
|
|
7
|
Exposure mode
|
Exposure compensation display
|
|
|
8
|
Shutter speed lock icon
|
Tilt indicator
|
|
|
9
|
Shutter speed
|
22
|
Exposure compensation indicator
|
|
10
|
Aperture lock icon
|
23
|
Exposure and flash bracketing indicator
|
|
11
|
Aperture (f-number)
|
||
|
Aperture (number of stops)
|
|||
|
12
|
ISO sensitivity indicator
|
||
|
Auto ISO sensitivity indicator
|
|||
| 13 |
ISO sensitivity
|
||
|
14
|
Frame count
|
||
|
Number of exposures remaining
|
|||
|
Number of shots remaining before buffer fills
|
|||
|
Preset white balance recording indicator
|
|||
|
Exposure compensation value
|
|||
|
PC mode indicator
|
Image Areas
The Nikon D3 is unusual in that you can not only use it as a full-frame
SLR, but also as a reduced-frame one. In fact, there are two
cropped-frame modes available, one with a 5:4 aspect ratio
(corresponding to an area on the sensor of 30.0 x 23.9 mm), the other a
3:2 aspect ratio, but with the frame size reduced to match that of
Nikon's DX-format cameras. (A 23.5 x 15.6 mm frame, vs the full "FX"
format size of 36.0 x 23.9 mm.) While we wouldn't personally find the
5:4 ratio useful, it's quite possible that photographers working on
specific assignments calling for a more square format would want to
take advantage of that aspect ratio. The "DX" frame size is handy for
taking advantage of Nikon's many excellent DX-format lenses. In fact,
the camera can be set to automatically switch to DX mode when a
DX-format lens is attached to it. You can rapidly select between crop
modes by pressing and holding the Fn button on the front of the camera
while simultaneously turning the main command dial on the rear.
When the D3 is shooting in a format other than full-frame FX mode, a
translucent LCD in the viewfinder partially masks the inactive portions
of the frame. The illustrations below show the viewfinder display in
5:4 and DX modes.


AF Areas
Like its sibling the D300, the Nikon D3 features a new 51-point AF
system, but on the D3, the AF array covers a smaller portion of the
larger frame than it does on the D300's DX-format sensor. The new AF
system also includes some notable improvements in the AF points
themselves. In the past, cross-type AF sensors were generally only
effective with large-aperture lenses: At apertures smaller than f/2.8,
they reverted to ordinary line-sensors. On the D3, the fifteen points
in the center of the frame (3 columns x 5 rows) act as cross-type
sensors at apertures of f/5.6 and larger. This is quite a benefit for
photographers needing to shoot with slower zoom lenses, or large teles
on teleconverters. (Something that will more likely be required, given
the lack of a crop factor when using the D3 in FX mode. Strapping on
Nikon's 1.4x teleconverter won't quite get you back to the same field
of view as you'd have with the same lens on a D300. - Many sports and
nature photographers accustomed to the longer reach of their lenses on
DX-format bodies are going to find themselves reaching for their
teleconverters much more frequently with the D3.)
The Nikon D3 doesn't force you to use all 51 AF points if you don't
want to though: Custom Menu option A8 lets you select between the full
51-point array and an 11-point arrangement that mimics the layout of
the D2x's AF system. On the D300, this ability to select fewer AF
points had performance implications, as we found the shutter lag on
that camera to be somewhat longer when all 51 AF points were operating.
Perhaps thanks to the D3's dual EXPEED processors though, it suffers no
such degradation in performance. Shooters acquainted with the D2x may
elect to use the 11-point AF layout out of familiarity, but we think
most users will just stick with the full 51-point array. The
illustrations below show the two AF arrays in the full FX-format
viewfinder window.


One last point about the D3's AF system: The AF point display is provided by the same "overlay" LCD that does the frame masking. Points illuminate only when they're active, rather than always being present, as is the case when they're engraved onto the focusing screen. The advantage of the LCD-based approach is that there's nothing to obscure your view of the subject when the points aren't lit up. (A definite consideration with such a large number of AF points.) Initially, the AF point illumination was a little subtle, hard to see in a bright setting with large-aperture lenses. The camera's first firmware upgrade fixed that issue though, by providing a setting to adjust AF point brightness. The result was a big improvement in visibility over the original setting.
Viewfinder Test Results
Coverage
Excellent accuracy with both the optical viewfinder and LCD monitor's Live View mode.


The Nikon D3's optical viewfinder and Live View LCD mode proved extremely accurate, with essentially 100% coverage when measured with our Nikkor 105mm f/2.8 macro test lens. The coverage in Live View mode is also 100%. Excellent performance.
Live View
Nikon D3 Live View Mode
Perhaps triggered by Olympus and Panasonic in the consumer SLR space, "Live View" on DSLRs is becoming more common as a feature. In the professional space, it's probably less driven by the convenience of framing on an LCD than it is by the need for a viewfinder display when the camera is operated remotely. (Although Live View features that provide for highly magnified displays can be a considerable help in checking depth of field and focus accuracy.)
We first saw a Live View mode on Canon's 1D Mark III model, where the mirror can be flipped up and a full-color image from the camera's CMOS sensor fed in real time to Canon's remote control software via USB, Ethernet or even WiFi. Canon's EOS-40D and 1Ds Mark III also both sport Live View modes, with a few enhancements beyond the capabilities of the 1D Mark III.
With the advent of its CMOS sensor (MOS sensors appear to be a requirement for Live View in DSLRs; data clocking off a large CCD is too inefficient and power-hungry), the Nikon D3 and D300 both now feature Live View modes of their own. Here again though, Nikon has gone the competition one better, by providing what's to our eyes the most useful and usable DSLR Live View mode yet.

In Live View (Handheld mode) the LCD display echoes the optical viewfinder. You can move the AF point around the screen in Single point or Dynamic AF area modes, but the 51-point AF does not reveal chosen AF points.
What makes Nikon's Live View mode so uniquely effective are the two options it provides for autofocus operation. With the mirror raised and shutter open, the light path to the usual SLR phase-detect AF sensor is interrupted, so normal AF can't be used. As in the Canon 40D and 1Ds Mark III, the Nikon D3 and D300 address this problem via a focus mode that drops the mirror to determine focus, and then opens it again to restore the Live View display. All four cameras behave similarly in this mode of operation.
The real trick comes in Nikon's second Live View autofocus option. In this mode, the camera performs contrast-detect autofocus, just like any point & shoot digicam. That is, it simply reads data off the CMOS image sensor and evaluates how abruptly light to dark (or dark to light) transitions happen on the image plane. Contrast-detect AF isn't nearly as fast as phase-detect (this is why the shutter response of most digicams is so much slower than that of most DSLRs), but the camera can focus without interrupting the Live View display. As an added benefit, because it's working with data coming from the main image sensor, you can move the AF point anywhere you want within the frame area, right out to the extreme edges. You're also guaranteed that the selected focus point will be in focus: Because the focus determination is made with data from the main image sensor, there's no possibility of front- or back-focus, as could be encountered with conventional phase-detect AF systems.

In Live View (Tripod mode) you can move the AF point around the screen in small increments...
In the screen shot to the right, the green rectangle shows the area being examined to determine focus. As noted, this area can be move to any part of the frame, right up against the top, bottom, left or right sides of the image area.
In all their discussion of it, Nikon has consistently emphasized that this mode was only for use with stationary objects, and with the camera on a tripod. Our lab testing of the D3's performance showed why Nikon takes this position: With most lenses, Live View mode stretches shutter lag to 1.5 seconds or beyond. If the lens has to slew a long ways from near to far or far to near, the lag time can be as long as several seconds.
This is another situation where a solution seems obvious once someone's mastered it. One has to wonder why Canon didn't provide a contrast-detect AF option as part of the Live View mode on EOS-40D and EOS-1Ds Mark III. (The original text here was written back in August of 2007. Since then, Canon has implemented contrast-detect AF in the EOS 50D, Rebel XSi and XS. Olympus has also implemented a contrast-detect AF mode on their E-series SLRs, but only with certain lenses, which have focus motors that are quick enough to give reasonable shutter lag results. Expect to see more cameras implementing contrast-detect AF in their Live View modes in the future.)
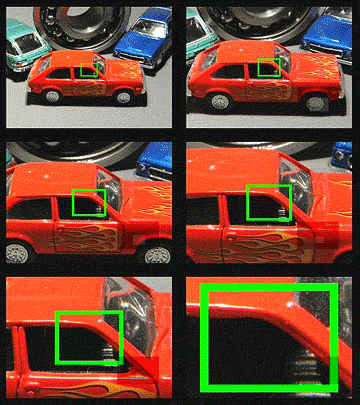
...and you can use the zoom buttons on the back of the camera to move in up to 13x to focus.
The D3 also provides up to a 13x display zoom in Live View mode, providing excellent focus discrimination when focusing manually. This is pretty key: Less than about 10x magnification really doesn't do the trick for getting the focus set right, but in playing with the camera at 13x, we felt we could pretty well nail the focus every time. What's particularly neat is that you can continue doing Contrast-Detect AF when you're zoomed: As you can see in the animation left, the green AF rectangle simply expands to cover the same area of the subject, and you can instantly confirm whether it's being successful or not.
With Live View mode comes the ability to control all aspects of the camera's functioning from a PC remotely, including focusing. Both the new Nikons and Canons include the ability to control the camera from a computer remotely, and that includes receiving a Live View image from the camera. You can focus, adjust settings, and fire, all from a computer. What's more, you can do it via cable or WiFi connection, with the optional WiFi adapters.
The new Nikons require optional Camera Control Pro software to enable this feature. Software for this feature is bundled with Canon cameras.
Flash
Nikon D3 Flash
 Like most professional SLRs, the Nikon D3 doesn't have a built-in flash, but rather is designed to work with external strobe systems, or Nikon Speedlights. The camera features an external flash hot-shoe mounted on top of its pentaprism housing, as well as a secondary PC Sync socket on the front-right of the camera, under a protective cover.
  The Flash mode button on top left of the camera, together with the main (rear) command dial is used to access the five sync modes, which include Front Curtain Sync, Slow Sync, Rear Curtain Sync / Slow Rear Curtain Sync (Aperture Priority and Program modes), Red-Eye Reduction, and Red-Eye Reduction with Slow Sync. Just as these modes sound, the Nikon D3 times the flash exposure with either the opening or closing of the shutter. Red-Eye Reduction simply means that a small pre-flash fires before the full-strength flash to eliminate the effects of Red-Eye in portraits. The Slow Sync setting times the flash with a slower shutter speed (as slow as 30s), which in turn allows more ambient light into the frame. The Nikon D3's maximum X-sync speed is 1/250s, though shutter speeds as fast as 1/8,000s are possible in FP High-Speed sync mode with flash units that support that mode.
The SB-900 Speedlight
By far the most advanced flash unit announced by Nikon (or anyone else, for that matter) to date, the SB-900 offers a number of new features and enhancements compared to its predecessor, the SB-800. These include an expanded zoom coverage, auto-switching between FX and DX formats, user-uploadable firmware and improved user interface. See the complete list below.

The Nikon SB-900 offers a range of advanced features, including an advanced wireless control system by which multiple SB-900, SB-800 and SB-600 Speedlights can be controlled from a single master unit, with full wireless control over relative exposure levels between units, and full "i-TTL" through-the-lens metering. Other features include Auto FP high-speed sync, flash color information communication for improved color accuracy, a flash value ("FV") exposure lock, and modelling flash.

As with the SB-800, one of the most technologically impressive aspects of the SB-900 is its use of Nikon's Advanced Data Communication system, which uses rapid pulses of the flash units during the pre-flash metering period to pass setup and exposure information between multiple units. With this system, you can control four independent sets of compatible Speedlights wirelessly from the camera itself. The four groups consist of the Speedlight attached to the camera (the master), and three separate sets of remote units, each of which can consist of any number of SB-900, SB-800 and SB-600 units for the ultimate in lighting flexibility. Settings for each group of Speedlights are made via the control panel and large LCD panel on the Master unit attached to the camera. It deserves repeating that all Speedlights in all groups can operate in i-TTL mode for completely automatic flash exposures, including relative exposure differences dialed-in for each group from the Master controller. (You can also run different groups in different flash modes if you'd like, setting two groups to i-TTL, and another to Manual mode, for instance.)
When you press the shutter button, the Master fires each group of Speedlights in turn, collecting exposure information via the camera's TTL metering system. This exposure information is then integrated by the Nikon D3, power levels are set for all groups, and the shutter and Speedlights are fired for the exposure itself. If it sounds like there's a lot going on, it's because there is, but the whole process takes only as much time as does the normal pre-exposure metering flash from a conventional "smart" strobe unit.
It's hard to overstate how effortless the SB-900 makes multi-flash setups. If you've ever had to climb up and down a ladder or crawl behind a set a few dozen times to get flash levels set properly, you'll immediately understand the benefit of being able to set the exposure levels for up to 3 groups of remote strobes, without leaving the camera.
Wireless TTL multi-flash functionality is only part of the story though, as the SB-900 offers a range of new features as well. Here's a list, compiled from Nikon's marketing materials:
- Streamlined Controls and Menus: The Rotary Select Dial sets key flash functions quickly -- a prominent Master and Remote control switch simplifies wireless operation. A larger LCD screen is easy to read, even in direct sunlight, and photographers can assign "My Menu" hotkeys for quicker access to commonly used functions.
- FX/DX Format Identification: Automatic FX/DX switching optimizes light distribution angle.
- Expanded Auto Power Zoom Coverage: The Nikon SB-900 provides zoom coverage from 17-200mm in the FX-format and 12-200mm coverage in the DX-format.
- Choose from 3 Light Distribution Patterns: Improve light quality by selecting Standard for general illumination, Center-weighted for portraits, or Even for groups or interiors.
- User-friendly Firmware Updating: Allows uploading of performance enhancement developments to the SB-900 with select Nikon digital SLR cameras.
- Color Gel Filter Identification: The SB-900 automatically identifies mounted color gel filters and adjusts the camera's auto white-balance setting with select Nikon digital SLR cameras.
- Faster Recycle Times: The Nikon SB-900 offers a quick recycle time of 4.0 seconds (at full power) with four Alkaline AA batteries which drops to a mere 2.3 seconds (at full power) while using four rechargeable NiMH batteries -- about 25 percent faster than the SB-800 with its fifth battery attachment. The optional SD9 Battery Pack boosts flash recycle time to a mere one second (at full power). For faster recycling or all-day shooting it accepts up to eight AA batteries.
- Improved AF Assist Beam: The Nikon SB-900 aids auto focus with a broader AF assist beam that covers a wide 20-105mm that is matched to all of the Nikon D3, D3X, D700 and D300's 51 focus points.
- Enhanced Bounce and Swivel Range: The bounce and swivel capability of the Nikon SB-900 has been expanded to include: tilt up to 90 degrees, down minus 11 degrees, and a full 180-degree swivel left or right, allowing more creativity for on or off camera use, or as a remote Speedlight.
- Flash Tube Overheat Protection: An added measure of safety is provided for sustained high-speed bursts.
- Drip-proof Mounting Foot Cover (Water Guard): for enhanced moisture protection (optional).
It's no stretch to say that the Nikon SB-900 is by far the most impressive flash system we've seen to date. It makes wireless, TTL-metered, multi-flash photography easy.
A full treatment of the Nikon wireless flash system's capabilities is beyond the scope of this review (which after all, is meant to be about the Nikon D3), but you can read more about it in our Nikon Creative Lighting System review, which also contains a video describing how we used Nikon SB-800 and SB-600 flashes in combination with a pair of portable light boxes for on-the-scene product photography at PMA 2005.
High ISO Noise Reduction
Nikon D3 High ISO Noise Reduction
As noted elsewhere in this review, the Nikon D3 delivers a noticeable advance in high-ISO image quality over all other Nikons. Its different noise-reduction settings also allow you quite a bit of flexibility in choosing how you want to make the trade-off between subject detail and noise levels. It's not clear that the "off" setting truly eliminates the noise processing altogether, but it is true that it leaves a lot of fine/subtle subject detail there for you to work with. The combination of shooting with NR turned off and using a good noise-filtering program after the fact can produce very clean images with lots of fine detail in them. (And of course, the D3's NEF files have no noise-reduction processing applied to them at all, adhering to the true philosophy of RAW shooting.)
See for yourself how the noise reduction works under both daylight and tungsten-balanced lighting. Click on any of the crops below to see the corresponding full-sized image. Note that noise levels are so low, that the D3 only starts to apply high ISO NR at ISO 2,000 and above. Also note that "Off" isn't truly off for ISOs above 6,400 as the D3 still does some minimal NR at those very high ISOs when set to "Off".
| High ISO Noise Reduction Comparison Simulated Daylight |
||||
|
Off
|
Low
|
Normal
|
High
|
|
| I S O 3 2 0 0 |
|
 |
|
 |
|
 |
|
 |
|
|
 |
|
 |
|
|
Off
|
Low
|
Normal
|
High
|
|
| I S O 6 4 0 0 |
 |
 |
 |
 |
 |
 |
 |
 |
|
 |
 |
 |
 |
|
|
Off
|
Low
|
Normal
|
High
|
|
| I S O 1 2 8 0 0 |
 |
 |
 |
 |
 |
 |
 |
 |
|
 |
 |
 |
 |
|
|
Off
|
Low
|
Normal
|
High
|
|
| I S O 2 5 6 0 0 |
 |
 |
 |
 |
 |
 |
 |
 |
|
 |
 |
 |
 |
The above crops show the effects of the 4 levels of high ISO noise reduction, under the HMI lighting we use to simulate standard daylight. Note that some minimal NR is still performed at ISO 6,400 and above when High ISO NR set to "Off".
| High ISO Noise Reduction Comparison Incandescent Light |
||||
|
Off
|
Low
|
Normal
|
High
|
|
| I S O 3 2 0 0 |
 |
 |
 |
 |
| I S O 6 4 0 0 |
 |
 |
 |
 |
| I S O 1 2 8 0 0 |
 |
 |
 |
 |
| I S O 2 5 6 0 0 |
 |
 |
 |
 |
The above crops show the effects of the 4 levels of high ISO noise reduction the D3 offers, under difficult household incandescent lighting. (Image noise is much more of an issue under tungsten lighting, because the strong yellow cast requires the blue channel to be boosted considerably to achieve proper white balance. That boost increases noise along with the image data, so noise levels will generally be higher under tungsten lighting than daylight.)
Imatest Results
Nikon D3 Imatest Results
We routinely use Norman Koren's excellent "Imatest" analysis program for quantitative, thoroughly objective analysis of digicam test images. I highly recommend it to our technically-oriented readers, as it's far and away the best, most comprehensive analysis program I've found to date.
My comments below are just brief observations of what we see in the Imatest results. A full discussion of all the data Imatest produces is really beyond the scope of this review: Visit the Imatest web site for a full discussion of what the program measures, how it performs its computations, and how to interpret its output.
Here's some of the results produced by Imatest for the Nikon D3:
| sRGB Accuracy Comparison |
||||
The Nikon D3 showed good color accuracy, though with saturation levels a little higher than we're accustomed to finding in professional SLRs. Hue accuracy was quite good, with most of the hue shift occurring in the cyans, sky blues, reds and oranges. Average saturation was 110.3% (oversaturated by 10.3%, mostly in the blues, reds and greens). Average "delta-C" color error was only 5.2 after correction for saturation, which is quite low, albeit very slightly higher than most of the competition. All in all, a very good color response for an SLR. Mouse over the links below the illustration above to compare results with competing models.
Adobe RGB Accuracy Comparison |
||||
Using the Adobe RGB color space (which provides a much wider gamut, or range of colors that can be expressed), the Nikon D3 delivers more highly saturated color, with an average saturation of 115.8% and average saturation-corrected hue error of 5.52 "delta-C" units, which in this case is a smidgen more accurate than most of the competition. Again, mouse over the links below the illustration above to compare results with competing models.
Color Analysis

This image shows how the Nikon D3 actually rendered the colors of the MacBeth chart, compared to a numerically ideal treatment. In each color swatch, the outer perimeter shows the color as actually captured by the camera, the inner square shows the numerically ideal color, after correcting for the luminance of the photographed chart (as determined by a second-order curve fit to the values of the gray swatches), and the small rectangle inside the inner square shows the numerically ideal color, without any luminance correction. This image shows the D3's excellent hue accuracy, as well as a gamma curve that results in an overexposure of some colors, notably blues, reds, and some greens. (We've seen this in most cameras, increasing the "punch" of images by lightening bright colors a little, while actually keeping both the hue and saturation level very close to technically accurate values.)
Noise Analysis
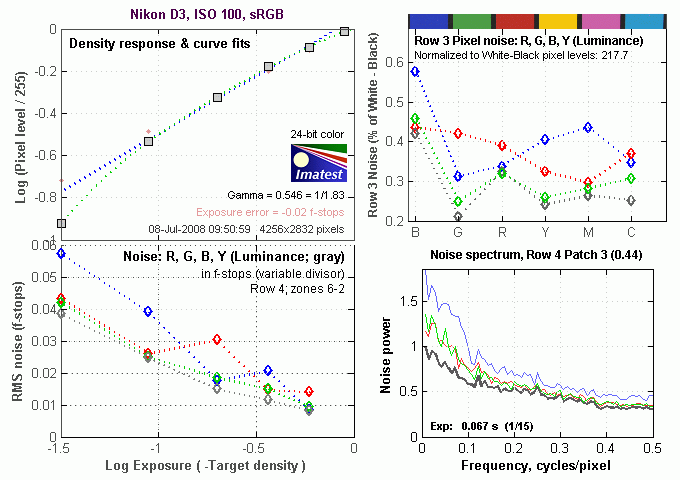
There's a lot in this particular graph, a lot more than we have room to go into here. (This set of plots has also changed a little in the more recent versions of Imatest. Some of the plots that were shown here previously are now shown in other Imatest output. Since we largely focus on the Noise Spectrum plot, we'll only show the graphic above, which includes that plot.)
In comparing these graphs with those from competing cameras, I've found that the Noise Spectrum graph at lower right is the most important. Cameras that manage to shift their noise spectrum to higher frequencies have much finer-grained noise structures, making their noise less visually objectionable. In the graph above, this would show up as a noise spectrum curve that remained higher on the right side, representing higher noise frequencies. The champion at this was (and still is) the Canon EOS-1Ds Mark II, which produced remarkably fine-grained image noise, even at very high ISOs.
Here, we can see why ISO 100 is treated as a "LO" extension of the normal ISO range for the D3, as noise is a bit higher than ISO 200, particularly in the blue channel. Below is the plot for ISO 200, the D3's normal base sensitivity.

The D3's noise performance at ISO 200 doesn't quite rise to the level of the 1Ds Mark II, but it nonetheless does a good job of keeping plenty of the noise energy at high frequencies, at least in the blue channel and in the luminance values. The red and green channels oddly show a lot of low-frequency energy, which would translate into blotchiness in the final images. The good news though, is that overall noise levels at ISO 200 are quite low, so the blotchiness isn't visible without considerable tone-curve tweaking. Bottom line, the Nikon D3 noise levels are low at low ISO, with a frequency spectrum that has more energy on the higher frequency (right-hand) side of the curve than do most cameras in the blue and luminance signals, but less so in red and green.

Here's the same set of noise data at ISO 3,200. Here, the Noise Spectrum graph is shifted a bit more toward the left-hand, lower-frequency side than it was at ISO 200, coarsening the "grain" of the image noise patterns somewhat, but the spike in the color channels has been reduced somewhat. (And it's now the blue and red channels that are blotchy, with green behaving itself better. Odd/interesting...) Once again, very good performance.

Here's the same set of noise data at ISO 6,400. A surprisingly flat curve, indicating noise is well controlled and fine grained even at this high ISO, but again with more low-frequency energy present in the red and blue channels.
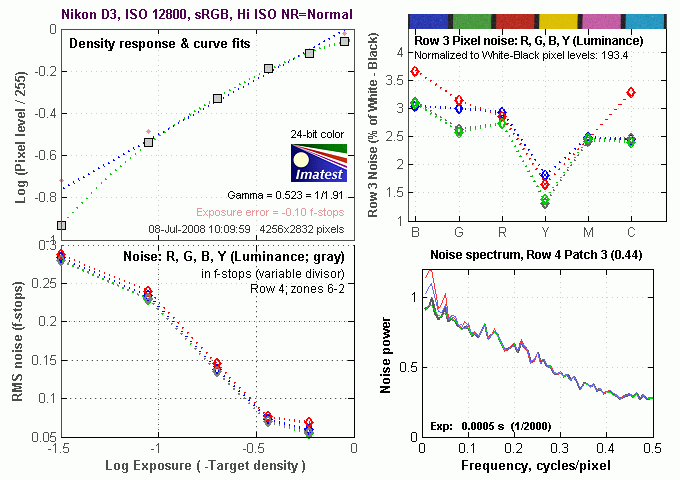
Here's the same set of noise data at ISO 12,800. It a little hard to tell because of the change in scale, but there is a dramatic shift towards the left, lower-frequency region.
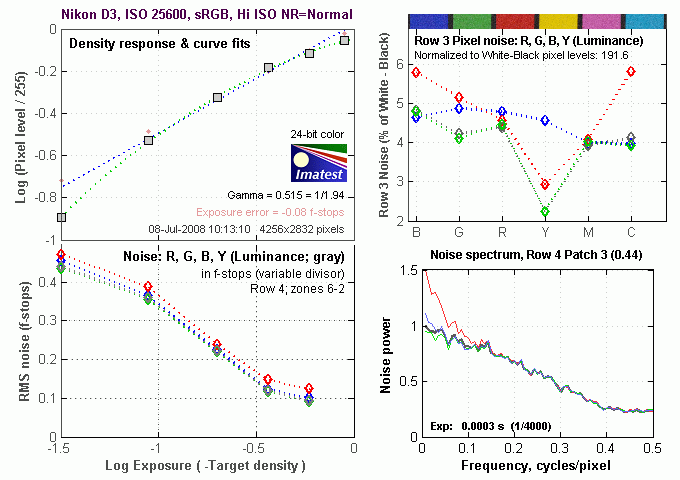
The trend of increasing the coarsening the "grain" of the image noise patterns continues at ISO 25,600.

This chart compares the Nikon D3's noise performance over a range of ISOs against that of other cameras, using default settings. While we continue to show noise plots of this sort because readers ask for them, we each time point out that the noise magnitude is only a small part of the story, the grain pattern being much more important. In the case of the Nikon D3, the magnitude of the image noise starts out slightly below most of the competition at ISO 100, and remains lower for all ISOs in common, other than 1,600, where it's just slightly above that of the Canon EOS 1D Mark III. A really excellent performance, and a major benefit of Nikon not succumbing to the temptation of cramming more pixels into the full-frame sensor of the D3. Keep in mind these are at default settings, so the shape and positions of the curves will be influenced by your settings.
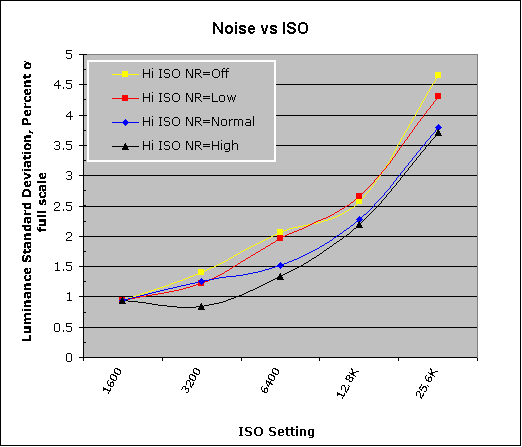
Here's a plot comparing results using the D3's four High ISO noise reduction settings. Note that Hi ISO NR does not apply under ISO 2,000, so the graph starts at ISO 1,600, where the results of the different settings are the same. Also note that above ISO 6400, the "Off" setting still applies "minimal" noise reduction, explaining why the "Off" and "Low" curves are so close to each other at the highest ISOs. The bump in the "Low" curve at ISO 12,800 is doubtless because of the very slight difference in exposure levels between the Off and Low cases. Imatest reported an underexposure of 0.14 EV for the Low NR shot, but an underexposure of only 0.06 EV for the NR Off image. It seems that tiny shift in exposure was enough to boost one curve above the other. (Ditto for the Low and Normal curves at ISO 3,200.)
Nikon D3 Dynamic Range Analysis
A key parameter in a digital camera is its Dynamic Range, the range of brightness that can be faithfully recorded. At the upper end of the tonal scale, dynamic range is dictated by the point at which the RGB data "saturates" at values of 255, 255, 255. At the lower end of the tonal scale, dynamic range is determined by the point at which there ceases to be any useful difference between adjacent tonal steps. Note the use of the qualifier "useful" in there: While it's tempting to evaluate dynamic range as the maximum number of tonal steps that can be discerned at all, that measure of dynamic range has very little relevance to real-world photography. What we care about as photographers is how much detail we can pull out of the shadows before image noise becomes too objectionable. This, of course, is a very subjective matter, and will vary with the application and even the subject matter in question. (Noise will be much more visible in subjects with large areas of flat tints and subtle shading than it would in subjects with strong, highly contrasting surface texture.)
What makes most sense then, is to specify useful dynamic range in terms of the point at which image noise reaches some agreed-upon threshold. To this end, Imatest computes a number of different dynamic range measurements, based on a variety of image noise thresholds. The noise thresholds are specified in terms of f-stops of equivalent luminance variation in the final image file, and dynamic range is computed for noise thresholds of 1.0 (low image quality), 0.5 (medium image quality), 0.25 (medium-high image quality) and 0.1 (high image quality). For most photographers and most applications, the noise thresholds of 0.5 and 0.25 f-stops are probably the most relevant to the production of acceptable-quality finished images, but many noise-sensitive shooters will insist on the 0.1 f-stop limit for their most critical work.
The image below shows the test results from Imatest for an in-camera JPEG file from the Nikon D3 with a nominally-exposed density step target (Stouffer 4110), and the D3's Active D-Lighting and contrast settings at their default positions.

These are excellent results for in-camera JPEGs, near the top of the SLRs we've tested. The tone curve shows excellent gradation in highlights, but the shadow end trails off more abruptly. A sharp tail-off at the shadow end usually signals plugged shadows and lost detail in images, but the D3 showed no such behavior. There's clearly more gradation at the highlight end of the tonal scale, but examining deep shadows on the D3's test images showed excellent detail, in all but the very darkest shadows. - In the darkest shadows though, there was indeed some plugging, rather than a smooth trailing-off. (We're not sure why Imatest sometimes doesn't report DR for the lower quality thresholds like this. We've called it to the attention of the program's author; will try to come back and re-do these graphs if/when he develops a fix.)
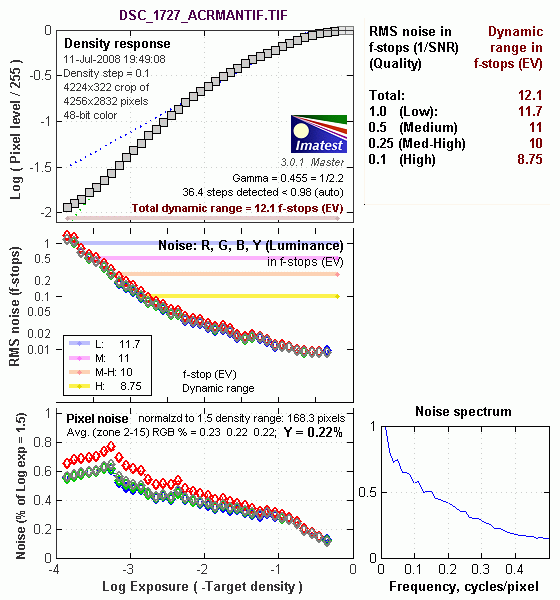
Processing the D3's RAW (NEF) files through Adobe Camera Raw (ACR) version 4.5 beta improved dynamic range by over 3/4 stop at the best quality level, and by more than 3 stops total. ACR's automatic settings were used, then manually tweaked for slightly better results. Worth noting here is that ACR's default noise reduction settings reduced the average noise relative to the levels in the in-camera JPEG. ACR also shifted slightly more of the noise energy into lower spatial frequencies.
Active D-Lighting. The charts below show the effect of the Nikon D3's three Active D-Lighting settings: Low, Normal and High.
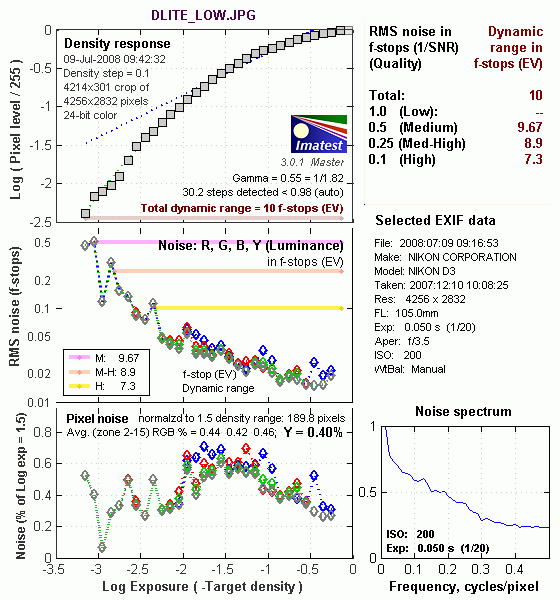


These plots show that most of the D3's Active D-Lighting impact occurs at the highlight end of the tone curve, at least when confronted with an artificial image like the greyscale step-wedge used for our dynamic range measurements. What's a little hard to see with the plots arranged vertically like this though, is that the shadow end of the curve is lifted somewhat as well: Imatest adjusts the vertical axis to show the most detail in the curves, but the result is that the vertical scale can change somewhat between plots. Looking closely, you'll see that the bottom end of the Density Response curve is a fair bit higher on the "High" plot than on the "Low" one. The major impact though, is the way Active D-Lighting flattens-off the very top of the tone curve. This translates into excellent preservation of detail in strong highlights, something the D3 does a better job at than most cameras we've tested.
One thing you soon learn when playing with tone curves though: There's no free lunch. Ultimately, there's only so much dynamic range to work with, you just get to choose whether you "spend" it on the highlights or shadows. Because Active D-Lighting (with the step-chart image, at least) is choosing to pay a lot of attention to the highlights, it should come as no surprise that the deepest shadows suffer as a result. In fact, because the camera is compressing the tone curve the way it is, the noise levels in the shadows limit the calculated dynamic range a fair bit, relative to the camera's performance using its default settings. Still, for images with very strong highlight detail, Dynamic D-Lighting really works very well. Equally important, the resulting images look very natural, not appearing as though they'd had their tone curves massaged to any great extent.
Dynamic Range, the bottom line:
The net result was that the D3 came in ahead most other DSLR models we've tested, bested only by the Canon 1Ds Mark III, Nikon D40x, Canon Rebel XSi (which has it's Advanced Lighting Option enabled by default) and Canon EOS-1D Mark III in its JPEG file performance. (These cameras are shown in dark yellow highlight in the table below.) When it comes to images processed from RAW files, only the S3 Pro, D40x and 1Ds Mark II beat it, and even then, by a quarter-stop or less.
To get some perspective, here's a summary of the Nikon D3's dynamic range performance, and how it compares to other digital SLRs that we also have Imatest dynamic range data for. (Results are arranged in order of decreasing dynamic range at the "High" quality level.):
| Dynamic Range (in f-stops) vs Image Quality (At camera's base ISO) |
||||
| Model | 1.0 (Low) |
0.5 (Medium) |
0.25 (Med-High) |
0.1 (High) |
| Fujifilm S3 Pro (Adobe Camera Raw 2) |
12.1 | 11.7 | 10.7 | 9.0 |
| Nikon D40x (Adobe Camera Raw 4.1) |
12.0 | 10.9 | 10.3 | 8.9 |
| Canon EOS-1Ds Mark III (Adobe Camera Raw 4.5) |
11.5 | 10.7 | 9.96 | 8.84 |
| Nikon D3 (Adobe Camera Raw 4.5) |
11.7 | 11.0 | 10.0 | 8.75 |
| Canon EOS-1D Mark III (Adobe Camera Raw 4.5) |
11.7 | 10.7 | 9.99 | 8.73 |
| Nikon D300 (Adobe Camera Raw 4.3.1) |
11.4 | 10.9 | 9.87 | 8.45 |
| Sony A200 (Adobe Camera Raw 4.3.1) |
11.6 | 10.4 | 9.82 | 8.43 |
| Nikon D60 (Adobe Camera Raw 4.4.1) |
11.6 | 10.5 | 9.74 | 8.31 |
| Nikon D40 (Adobe Camera Raw 4.1) |
11.9 | 10.9 | 9.89 | 8.3 |
| Canon EOS-1Ds Mark III (Camera JPEG) |
10.9 | 10.2 | 9.71 | 8.23 |
| Pentax K100D (Adobe Camera Raw 3.6) |
11.3 | 10.3 | 9.51 | 8.23 |
| Pentax K200D (Adobe Camera Raw 4.4.1) |
-- | 10.5 | 9.54 | 8.19 |
| Pentax K10D (Adobe Camera Raw 3.7) |
10.6 | 10.0 | 9.29 | 8.19 |
| Sony A100 (Adobe Camera Raw 3.4) |
11.3 | 10.5 | 9.69 | 8.16 |
| Canon EOS-1Ds Mark II (Adobe Camera Raw 3) |
11.2 | 10.3 | 9.4 | 8.14 |
| Nikon D40x (Camera JPEG) |
10.8 | 10.0 | 9.42 | 8.04 |
| Canon Rebel XSi (Camera JPEG) (ALO on by default) |
11.3 | 10.1 | 9.34 | 8.01 |
| Fujifilm S3 Pro (Camera JPEG) |
-- | 9.9 | 9.4 | 7.94 |
| Sony A350 (Adobe Camera Raw 4.4) |
11.6 | 10.5 | 9.61 | 7.89 |
| Canon EOS-1D Mark III (Camera JPEG) |
-- | 10.2 | 9.7 | 7.88 |
| Nikon D3 (Camera JPEG) |
-- | -- | -- | 7.87 |
| Canon Digital Rebel XTi (Adobe Camera Raw 3.6) |
10.8 | 9.88 | 9.18 | 7.84 |
| Canon EOS-5D (Adobe Camera Raw 3) |
11.0 | 10.4 | 9.21 | 7.83 |
| Canon EOS-40D (Adobe Camera Raw 4.2) |
11.2 | 10.1 | 9.26 | 7.72 |
| Canon Rebel XSi (Adobe Camera Raw 4.4.1) |
10.6 | 9.95 | 9.1 | 7.68 |
| Canon EOS-5D (Camera JPEG) |
10.2 | 9.68 | 8.82 | 7.65 |
| Olympus E-3 (Adobe Camera Raw 4.3) |
10.3 | 10.1 | 9.29 | 7.64 |
| Nikon D60 (Camera JPEG) |
10.5 | 9.62 | 8.89 | 7.62 |
| Nikon D200 (Adobe Camera Raw 3) |
10.6 | 9.65 | 8.96 | 7.61 |
| Nikon D80 (Adobe Camera Raw 3.6) |
11.1 | 10.4 | 9.42 | 7.51 |
| Olympus E-500 (Adobe Camera Raw 3) |
10.7 | 9.97 | 8.90 | 7.46 |
| Olympus E-510 (Adobe Camera Raw 4.1) |
10.0 | 9.43 | 8.64 | 7.46 |
| Pentax K10D (Camera JPEG) |
-- | 9.49 | 8.88 | 7.44 |
| Nikon D300 (Camera JPEG) |
-- | -- | 8.70 | 7.44 |
| Nikon D2Xs (Adobe Camera Raw 3.6) |
10.6 | 9.9 | 8.93 | 7.42 |
| Canon EOS-40D (Camera JPEG) |
10.6 | 9.52 | 8.78 | 7.42 |
| Nikon D50 (Camera JPEG) |
10.7 | 9.93 | 8.70 | 7.36 |
| Sony A200 (Camera JPEG) (DRO on by default) |
10.4 | 9.43 | 8.91 | 7.29 |
| Canon EOS 20D (Camera JPEG) |
10.3 | 9.66 | 8.85 | 7.29 |
| Canon EOS 30D (Camera JPEG) |
10.3 | 9.5 | 8.57 | 7.29 |
| Nikon D40 (Camera JPEG) |
10.4 | 9.8 | 8.89 | 7.28 |
| Sony A350 (Camera JPEG) (DRO on by default) |
10.3 | 9.55 | 8.85 | 7.19 |
| Nikon D80 (Camera JPEG) |
10.1 | 9.43 | 8.48 | 7.12 |
| Canon Digital Rebel XT (Camera JPEG) |
10.3 | 9.51 | 8.61 | 7.11 |
| Nikon D200 (Camera JPEG) |
-- | 9.07 | 8.36 | 7.11 |
| Olympus E-300 (Camera JPEG) |
10.8 | 9.26 | 8.48 | 7.07 |
| Olympus E-410 (Adobe Camera Raw 4.1) |
10.2 | 9.4 | 8.24 | 7.05 |
| Olympus E-500 (Camera JPEG) |
10 | 9.14 | 8.16 | 7.05 |
| Canon Digital Rebel XTi (Camera JPEG) |
9.83 | 9.10 | 8.27 | 7.04 |
| Canon EOS-1Ds Mark II (Camera JPEG) |
10.3 | 9.38 | 8.6 | 7.04 |
| Pentax K200D (Camera JPEG) |
-- | 9.5 | 8.3 | 7.01 |
| Canon Digital Rebel (Camera JPEG) |
10.1 | 9.11 | 8.47 | 6.97 |
| Nikon D2Xs (Camera JPEG) |
9.82 | 8.98 | 8.23 | 6.97 |
| Panasonic DMC-L10 (Adobe Camera Raw 4.2) |
10.4 | 9.34 | 8.48 | 6.91 |
| Sigma DP1 (Camera JPEG) |
-- | 8.95 | 8.13 | 6.91 |
| Pentax *istDs (Camera JPEG) |
10.2 | 10 | 8.87 | 6.9 |
| Sony A100 (Camera JPEG) |
10.2 | 9.24 | 8.39 | 6.89 |
| Pentax K100D (Camera JPEG) |
10.3 | 9.3 | 8.39 | 6.73 |
| Nikon D2x (Camera JPEG) |
-- | 8.93 | 7.75 | 6.43 |
| Olympus E-3 (Camera JPEG) |
9.32 | 9.06 | 8.5 | 6.42 |
| Panasonic DMC-L10 (Camera JPEG) |
-- | 8.94 | 8.00 | 6.38 |
| Olympus E-420 (Camera JPEG) |
9.18 | 8.82 | 7.93 | 6.37 |
| Olympus E-410 (Camera JPEG) |
-- | -- | 7.60 | 5.99 |
| Nikon D70s (Camera JPEG) |
9.84 | 8.69 | 7.46 | 5.85 |
| Nikon D70 (Camera JPEG) |
9.81 | 8.76 | 7.58 | 5.84 |
| Olympus E-510 (Camera JPEG) |
7.70 | 7.16 | 5.87 | 3.55 |
The results shown in the table are interesting. One of the first things that struck me when I initially looked at test data for a wide range of d-SLRs, was that here again, purely analytical measurements don't necessarily correlate all that well with actual photographic experience. There's no question that the Fuji S3 Pro deserves its place atop the list, as its unique "SR" technology does indeed deliver a very obvious improvement in tonal range in the highlight portion of the tonal scale. I was surprised to see the analytical results place the Olympus E-300 as highly as they did, given that our sense of that camera's images was that they were in fact noisier than those of many other d-SLRs that we looked at. In the other direction, I was quite surprised to see the Nikon D2x place as low on the listings as it did, given that we found that camera's shadow detail to be little short of amazing.
One thing that's going on here though, is that we tested each camera at its lowest (base) ISO setting, which should produce best-case noise levels. This is in fact what many photographers will be most interested in, but it does perhaps place some of the Nikons (like the D40) at a disadvantage, as their lowest ISO setting is 200, as compared to the ISO 100 settings available on most other models.
Nikon D3 Resolution Chart Test Results

The chart above shows consolidated results from spatial frequency response measurements in both the horizontal and vertical axes. The "MTF 50" numbers tend to correlate best with visual perceptions of sharpness, so those are what I focus on here. The uncorrected resolution figures are 1,422 line widths per picture height in the horizontal direction (corresponding to the vertically-oriented edge), and 1,330 lines along the vertical axis (corresponding to the horizontally-oriented edge), for a combined average of 1,376 LW/PH. Correcting to a "standardized" sharpening with a one-pixel radius increased both vertical and horizontal resolution rather significantly, resulting in an average of 2,421 LW/PH.
(Note: We normally shoot DSLR resolution tests with Sigma 70mm f/2.8 macro lenses, one of the sharpest lenses we've tested to date over on SLRgear.com. With the D3 though, the Sigma 70mm produced exposure errors, so we weren't confident just what aperture the images were actually being shot at. To avoid this uncertainty, we reverted to the Nikon 105mm f/2.8 macro (the original, not the newer VR model, which is softer), also an exceptionally sharp lens. At f/8, there should be little or no difference in the performance of the two lenses, so results here should compare very well with those shot on other cameras with the Sigma 70mm.)
To see what's going on, refer to the plots below, which show the actual edge profiles for both horizontal and vertical edges, in both their original and corrected forms. Here, you can see that there is very conservative in-camera sharpening applied (no noticeable bump at the top and bottom ends of the black edge profile curves). Imatest reports that the horizontal direction (vertical edge) is "undersharpened" by 23.6% while the vertical direction (horizontal edge) is undersharpened by 26.7%. Professionals and serious amateurs prefer this to oversharpening, and the D3's images respond very well to the use of strong/tight sharpening post-exposure in Photoshop or some other image editor. (That said, you can still extract more fine detail if you begin with a RAW file, rather than a JPEG.)
.
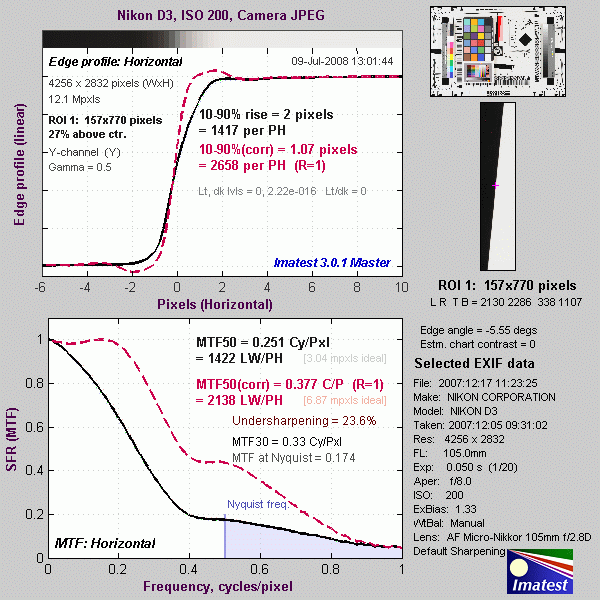

Menus
Nikon D3 Modes and Menus
Capture Modes
 The Nikon D3 doesn't have a mode dial, but instead has a mode button. The current exposure mode is displayed on the LCD and viewfinder and can be changed by pressing this button and rotating the main (rear) command dial. Available exposure modes are: P (Programmed Auto), S (Shutter Priority), A (Aperture Priority) or M (Manual). Like all pro Nikons, the D3 doesn't offer any scene modes.
Programmed Auto: Lets the camera control the shutter speed and aperture settings, although you can vary its choices by turning the Command dial (that is, you can increase or decrease the aperture the camera has chosen, and the camera will vary the shutter speed to maintain the same overall exposure value. Once you've chosen an offset in the aperture/shutter combination, the camera will continue to control the exposure automatically, while maintaining the aperture/shutter bias you've selected.) This ability to select a persistent bias for the exposure system is very useful, in many cases more so than conventional Aperture or Shutter Priority metering (see below). This is because the "tweaked" Program AE will track even radical changes in subject lighting, not being constrained to a single aperture or shutter speed.
Aperture Priority: Allows you to set the aperture value while the camera automatically selects the appropriate shutter speed. Available apertures will vary with the lens in use.
Shutter Speed Priority: Allows you to set the shutter speed value while the camera automatically selects the appropriate aperture. Shutter speeds range from 1/8,000 to 30 seconds in this mode.
Manual: Lets you select both the aperture value and shutter speed, and increases the shutter speed range to include a Bulb setting for exposures longer than 30 seconds. The currently selected flash sync speed can also be selected as the shutter speed in this setting.
Menus
Pressing the Menu button provides access to the camera's full menu system. In the tables below, we've highlighted cells in green for entirely new options and in yellow for changed options after upgrading to firmware version v2.00.
Playback Menu

(Click to view the complete Playback Menu matrix (v1.00).)
| Playback Menu Options | |||
|
Top-Level
Selection |
Second-Level
|
Third-Level
|
Notes
|
|
Delete
|
- Selected
|
- Selected Image
|
Deletes pictures from the camera memory card. Hidden and protected images will not be deleted.
|
|
- All
|
- Slot 1
- Slot 2 |
||
|
Playback Folder
|
- NCD3
- All - Current |
|
Select a folder for playback.
|
|
Hide Image
|
- Select/set
|
- Selection screen
|
Reveal or hide selected images.
|
|
- Deselect all?
|
- Reveal all hidden images?
- Yes - No |
||
|
Display Mode
|
- Done
|
Basic photo info
- Focus point Detailed photo info |
Allows you to select what shooting information is displayed with the picture during playback.
Highlights moved from Basic to Detailed in firmware v2.00. |
|
Copy Image(s)
|
- Slot 1 Select image(s)
|
- Select folder screen
- Deselect all - Select all images - Select protected images |
Allows you to copy images from the card in slot 1 to the card in slot 2.
|
|
- Slot 2 Select destination folder
|
- Select folder by number
- Select folder from list |
||
|
- Copy images?
|
- Copy images?
- Yes - No |
||
|
Image Review
|
- On
- Off |
|
Allows you to choose if you want to see your picture displayed right after it is shot.
|
|
After Delete
|
- Show next
- Show previous - Continue as before |
|
Lets you choose which remaining picture will be displayed after a picture is deleted.
|
|
Rotate Tall
|
- On
- Off |
|
Allows pictures that were shot in portrait orientation to be rotated correctly on the LCD monitor.
|
|
Slide Show
|
- Start
|
- OK
|
Allows you to create a slide show of existing pictures with your choice of interval between pictures. Hidden pictures will not be displayed.
|
|
- Frame interval
|
- 2 s
- 3 s - 5 s - 10 s |
||
|
- Audio playback
|
- On
- Off |
||
|
Print Set (DPOF)
|
- Select/set
|
- Select image screen
|
Allows you to select which pictures to print on a DPOF compatible printer.
|
|
- Deselect all?
|
- Remove print marking from all images?
- Yes - No |
||
Shooting Menu

(Click to view the complete Shooting Menu matrix (v1.00).)
| Shooting Menu Options | |||
|
Top-Level
Selection |
Second-Level
|
Third-Level
|
Notes
|
|
Shooting Menu Bank
|
- A
- B - C - D |
- Rename screen
|
This allows you to set up 4 different menu banks and lets you customize these options to your liking. These options stay set when you turn the camera off. The names can be changed if needed. |
|
- Rename
|
- A
- B - C - D |
||
|
Reset Shooting menu
|
- Yes |
|
Restores default settings to the shooting menu.
|
|
Active Folder
|
- New folder number
|
- 100-999
|
Choose the active folder name where your images will be stored.
|
|
- Select folder
|
- 101NC_D3
|
||
|
File Naming
|
- sRGB
- Adobe RGB |
- File naming screen
|
This is used to rename the file names used by sRGB or Adobe RGB.
|
|
Slot 2
|
- Overflow
- Backup - RAW Slot 1 - JPEG Slot 2 |
|
This is used to define how the Compact Flash slot 2 is to be used.
|
|
Image Quality
|
- NEF (RAW) + JPEG fine
- NEF (RAW) + JPEG normal - NEF (RAW) + JPEG basic - NEF (RAW) - TIFF (RGB) - JPEG fine - JPEG normal - JPEG basic |
|
Choose the type of file you want to capture.
|
|
Image Size
|
- Large
- Medium - Small |
|
Choose the images size you want to capture.
|
|
Image Area
|
- Auto DX crop
|
- On
- Off |
Choose the images size you want to capture. If you choose smaller than full frame format it will mask off the shooting area in the viewfinder.
|
|
- Choose image area
|
- FX format (36x24)
- DX format (24x16) - 5:4(30x24) |
||
|
JPEG Compression
|
- Size priority
- Optimal quality |
|
Compress images based on a fixed size or on the best quality.
|
|
NEF (RAW)recording
|
- Type
|
- Lossless compressed
- Compressed - Uncompressed |
Choose the type and bit depth of the Raw images you want to capture.
|
|
- NEF (RAW) bit depth
|
- 12-bit
- 14-bit |
||
|
White Balance
|
- Auto
- Incandescent - Fluorescent - Direct Sunlight - Flash - Cloudy - Shade - Choose color temp. - Preset manual |
- Adjustment screen (all modes except "Choose color temp" which allows you to choose color temp from 2500K to 10,000K)
|
Adjusts the white balance to match the conditions you are shooting in.
|
|
Set Picture Control
|
- Standard
- Neutral - Vivid - Monochrome |
- Quick adjust or Grid screen
- Sharpening - Contrast - Brightness - Saturation - Hue |
Set the picture control option for various intensities of color or to black and white.
Adjustment of these values can be done with either a grid type process or with the quick adjust values screen. Up to 99 custom picture controls can be saved to a memory card. |
|
Manage Picture Control
|
- Save/edit
|
- Standard
- Neutral - Vivid - Monochrome |
Adjustment of these values can be done with either a grid type process or with the quick adjust values screen.
|
|
- Rename
|
- C1 Unused
- C2 Unused - C3 Unused - C4 Unused - C5 Unused - C6 Unused - C7 Unused |
||
|
- Delete
|
- C1 Unused
- C2 Unused - C3 Unused - C4 Unused - C5 Unused - C6 Unused - C7 Unused |
||
|
- Load/save
|
- Copy to camera
- Delete from card - Copy to card - C1 Unused - C2 Unused - C3 Unused - C4 Unused - C5 Unused - C6 Unused - C7 Unused |
||
|
Color Space
|
- sRGB
- Adobe |
|
Color space determines the amount of color in your pictures.
|
|
Active D-Lighting
|
- High
- Normal - Low - Off |
|
This will help preserve the details in light and dark areas of the picture. Shadows and highlights.
|
|
Vignette Control
|
- High
- Normal - Low - Off |
Added in firmware v.200, this option helps reduce corner shading or "vignetting" in JPEGs. Also tags NEFs for similar processing in Capture NX2 software.
|
|
|
Long Exp. NR
|
- On
- Off |
|
Turns on the Noise Reduction for images taken with a shutter speed of greater than one second.
|
|
High ISO NR
|
- High
- Normal - Low - Off |
|
Selects the amount of Noise Reduction when using an ISO of greater than 2,000.
|
|
ISO Sensitivity Settings
|
- ISO sensitivity
|
- LO 1
- LO 0.7 - LO 0.3 - 200 - 250 - 320 - 400 - 500 - 640 - 800 - 1000 - 1250 - 1600 - 2000 - 2500 - 3200 - 4000 - 5000 - 6400 - HI 0.3 - HI 0.7 - HI 1 - HI 2 |
This adjusts many settings dealing with ISO sensitivity. See the manual for details. Note: These options are variable depending on the b1 Custom setting for ISO sensitivity step value.
1/320 to 1/4000 s added in firmware v2.00. |
|
- ISO Sensitivity auto control
|
- On
- Off |
||
|
- Maximum sensitivity
|
- 400
- 800 - 1600 - 3200 - 6400 - HI 1 - HI 2 |
||
|
- Minimum shutter speed
|
- 1/4000 s
- 1/3200 s - 1/2500 s - 1/2000 s - 1/1600 s - 1/1250 s - 1/1000 s - 1/800 s - 1/640 s - 1/500 s - 1/400 s - 1/320 s - 1/250 s - 1/200 s - 1/160 s - 1/125 s - 1/100 s - 1/80 s - 1/60 s - 1/50 s - 1/40 s - 1/30 s - 1/15 s - 1/8 s - 1/4 s - 1/2 s - 1 s |
||
|
Live View
|
- Live View Mode
|
- Hand-held
- Tripod |
Allows you to select which mode of Live view you want to use. You can also select the frame advance rate.
|
|
- Release Mode
|
- S Single frame
- CL Continuous low-speed - CH Continuous high-speed |
||
|
Multiple Exposure
|
- Done
|
- OK
|
Allows you to do from 2 to 10 multiple exposures.
|
|
- Number of shots
|
- 2 - 10 shots
|
||
|
- Auto gain
|
- On
- Off |
||
|
Interval Timer Shooting
|
- Choose start time
- Now |
|
Allows you to set the start time, the interval between shots and the number of shots to capture.
|
|
- Start time
|
- Start time
- Interval - Select intvls X no. of shots - On - Off |
||
Custom Settings Menu

(Click to view the complete Custom Settings matrix (v1.00).)
| Custom Menu Options | |||
|
Top-Level
Selection |
Second-Level
|
Third-Level |
Notes
|
|
Custom Setting Bank
|
- A
- B - C - D |
- Rename screen
|
Custom settings can be stored in four separate custom banks. You can switch between them at any time and rename them.
|
|
- Rename
|
- A
- B - C - D |
||
|
Reset Custom Settings
|
- Yes
- No |
|
Restores custom settings to their default values.
|
|
A- Autofocus
|
- a1 AF-C priority selection
|
- Release
- Release + focus - Focus |
These custom menu functions control all aspects of the Autofocus system. See manual for greater detail.
Focus point brightness option added in firmware v.200. |
|
- a2 AF-S priority selection
|
- Release
- Focus |
||
|
- a3 Dynamic AF area
|
- 9 points
- 21 points - 51 points - 51 points (3D tracking) |
||
|
- a4 Focus tracking w/lock-on
|
- Long
- Normal - Short - Off |
||
|
- a5 AF activation
|
- Shutter/AF-ON
- AF-ON only |
||
|
- a6 Focus point Illumination
|
- Manual focus mode
- On - Off - Continuous mode - On - Off - Focus point brightness - +2 Extra high - +1 High - 0 Normal - -1 Low |
||
|
- a7 Focus point wrap-around
|
- Wrap
- No wrap |
||
|
- a8 AF point selection
|
- AF51 51 points
- AF11 11 points |
||
|
- a9 AF-ON button
|
- AF-ON
- AE/AF lock - AE lock only - AE lock (Reset on release) - AE lock (hold) - AF lock only |
||
|
- a10 Vertical AF-ON button
|
- Same as AF-ON
- AF-ON - AE/AF lock - AE lock only - AE lock (Reset on release) - AE lock (hold) - AF lock only |
||
|
B- Metering/Exposure
|
- b1 ISO sensitivity step value
|
- 1/3 step
- 1/2 step - 1 step |
These custom menu functions control all aspects of the Metering/Exposure system. See manual for greater detail.
|
|
- b2 EV steps for exposure cntrl.
|
- 1/3 step
- 1/2 step - 1 step |
||
|
- b3 EV steps for exposure comp
|
- 1/3 step
- 1/2 step - 1 step |
||
|
- b4 Easy exposure compensation
|
- On(Auto reset)
- On - Off |
||
|
- b5 Center-weighted area
|
- 8 mm
- 12 mm - 15 mm - 20 mm - Average |
||
|
- b6 Fine tune optimal exposure
|
- Exposure compensation icon is not displayed when exposure is altered from the default value. Continue?
- Yes - No |
||
|
C- Timers/AE Lock
|
- c1 Shutter-release button AE-L
|
- On
- Off |
These custom menu functions control all aspects of the Self-timer and AE lock. See manual for greater detail.
|
|
- c2 Auto meter-off delay
|
- 4s
- 6s - 8s - 16s - 30s - 1 min. - 5 min. - 10 min. - 30 min. - No Limit |
||
|
- c3 Self-timer delay
|
- 2 s
- 5 s - 10 s - 20 s |
||
|
- c4 Monitor off delay
|
- 10 s
- 20 s - 1 min. - 5 min. - 10 min. |
||
|
D- Shooting/Display
|
- d1 Beep
|
- High
- Low - off |
These custom menu functions control all aspects of the Shooting/Display system. See manual for greater detail.
|
|
- d2 shooting speed
|
- Continuous high-speed
- 11 fps - 10 fps - 9 fps - Continuous low-speed - 9 fps - 8 fps. - 7 fps - 6 fps. - 5 fps - 4 fps. - 3 fps. - 2 fps - 1 fps |
||
|
- d3 Max. continuous release
|
- Select 1-130
|
||
|
- d4 File number sequence
|
- On
- Off - Reset |
||
|
- d5 Control panel/viewfinder
|
- Rear control panel
- ISO sensitivity - Exposures remaining - Viewfinder display - Frame count - Exposures remaining |
||
|
- d6 Shooting info display
|
- Auto
- Manual |
||
|
- d7 LCD illumination
|
- On
- Off |
||
|
- d8 Exposure delay mode
|
- On
- Off |
||
|
E- Bracketing/Flash
|
- e1 Flash sync speed
|
- 1/250 s (Auto FP)
- 1/250 s - 1/200 s - 1/160 s - 1/125 s - 1/100 s - 1/80 s - 1/60 s |
These custom menu functions control all aspects of the Bracketing/flash system. See manual for greater detail.
|
|
- e2 Flash shutter speed
|
- 1/60 s
- 1/30 s - 1/15 s - 1/8 s - 1/4 s - 1/2 s - 1 s - 2 s - 4 s - 8 s - 15 s - 30 |
||
|
- e3 Modeling flash
|
- On
- Off |
||
|
- e4 Auto bracketing set
|
- AE & flash
- AE only - Flash only - WB bracketing |
||
|
- e5 Auto bracketing (Mode M)
|
- Flash / speed
- Flash / speed / aperture - Flash / aperture - Flash only |
||
|
- e6 Bracketing order
|
- MTR > under > over
- Under > MTR > over |
||
|
F- Controls
|
- f1 Multi selector center button
|
- Shooting mode
- Select center focus point - Not used - Playback mode - Zoom on/off |
These custom menu functions control all aspects of the external Controls system. See manual for greater detail.
Firmware version 2.00 added new choose image area and shooting menu bank options.
Firmware version 2.00 added new choose image area and shooting menu bank options.
Firmware version 2.00 added new choose image area and shooting menu bank options.
|
|
- f2 Multi selector
|
- Reset Meter-off delay
- Do nothing |
||
|
- f3 Photo info/playback
|
- Info (left/right) / Playback (up/down)
- Info (up/down) / Playback (left/right) |
||
|
- f4 Assign FUNC. button
|
- FUNC. button press:
- Preview - FV lock - AE/AF lock - AE lock only - AE lock (Reset on release) - AE lock (Hold) - AF lock only - Flash off - Bracketing burst - Matrix metering - Center-weighted - Spot metering - Virtual horizon - None - FUNC. button + dials: - Choose image area (FX/DX/5:4) - 1 step spd/aperture - Choose non-CPU lens number - Focus point -selection - Shooting menu bank - None |
||
|
- f5 Assign preview button
|
- Preview button press:
- Preview - FV lock - AE/AF lock - AE lock only - AE lock (Reset on release) - AE lock (Hold) - AF lock only - Flash off - Bracketing burst - Matrix metering - Center-weighted - Spot metering - Virtual horizon - None - Preview + command dials: - Choose image area (FX/DX/5:4) - 1 step spd/aperture - Choose non-CPU lens number - Shooting menu bank - None |
||
|
- f6 Assign AE-L/AF-L button
|
- AE-L/AF-L button press:
- Preview - FV lock - AE/AF lock - AE lock only - AE lock (Reset on release) - AE lock (Hold) - AF lock only - AF-ON - Flash off - Bracketing burst - Matrix metering - Center-weighted - Spot metering - Virtual horizon - None - AE-L/AF-L + command dials: - Choose image area (FX/DX/5:4) - Choose non-CPU lens number - Shooting menu bank - None |
||
|
- f7 Customize command dials
|
- Reverse rotation
- Yes - No - Change main/sub - On - Off - Aperture setting - Sub-command dial - Aperture ring - Menus and playback - On - Off |
||
|
- f8 Release button to use dial
|
- Yes
- No |
||
|
- f9 No memory card?
|
- Lock Release Locked
- OK Enable Release |
||
|
- f10 Reverse indicators
|
- + 0 - display
- - 0 + display |
||
Setup Menu

(Click to view the complete Setup Menu matrix (v1.00).)
| Setup Menu Options | |||
|
Top-Level
Selection |
Second-Level
|
Third-Level
|
Notes
|
|
Format Memory Card
|
- Yes
- No |
|
Formats camera memory card.
|
|
LCD Brightness
|
- -3/+3 adjustment
|
|
Adjusts LCD brightness darker or lighter 3 arbitrary units each way.
|
|
Lock Mirror Up for Cleaning
|
- Start OK
|
|
This locks the mirror up to allow manual cleaning of the imaging sensor.
|
|
Video Mode
|
- NTSC
- PAL |
|
Selects the video output mode for display on a TV.
|
|
HDMI
|
- Auto
- 480P (progressive) - 576P (progressive) - 720P (progressive) - 1080I (interlaced) |
|
High Definition Multimedia Interface. Allows pictures to be played back on High Definition TVs and monitors with the appropriate cable (not supplied).
|
|
World Time
|
- Time zone
|
- Graphical time zone selector
|
Selects the time zone and date format that you want to use and sets the camera to use Daylight Savings time or not.
|
|
- Date and time
- Date format - Daylight saving time |
- YMD and HMS
- YMD, MDY, DMY - On - Off |
||
|
Language
|
- German
- English - Spanish - Finnish - French - Italian - Dutch - Polish - Portuguese - Russian - Swedish - Traditional Chinese - Simplified Chinese - Japanese - Korean |
|
Selects the language that the camera will use.
|
|
Image Comment
|
- Done
|
- OK
|
Allows comments to be added to a picture.
|
|
- Input comment
|
- Data entry screen
|
||
|
- Attach comment
|
- Set
|
||
|
Auto Image Rotation
|
- On
- Off |
|
Decides if the camera will automatically orient your picture properly for viewing during playback.
|
|
Voice Memo
|
- Off
|
- OK
|
Records a voice memo.
|
|
- 5s On(Auto and manual)
|
- 5 s
- 10 s - 20 s - 30 s - 45 s - 60 s |
||
|
- Manual only
|
- OK
|
||
|
Voice Memo overwrite
|
- Disable
- Enable |
|
Allows overwriting of a voice memo for the most recent photograph.
|
|
Voice Memo button
|
- Press and hold
- Press to start/stop |
|
Allows you to specify how the Voice memo button is activated.
|
|
Audio output
|
- Via speaker
|
- Speaker volume 1-5
|
Allows you to select how the audio output is to be played back.
|
|
- HDMI/audio-video output
|
|
||
|
- Off
|
|
||
|
USB
|
- Mass Storage
- MTP/PTP |
|
Selects a connection option to a computer or a Pictbridge printer.
|
|
Dust Off Ref Photo
|
- Start
|
- Take photo of bright featureless white object 10cm from lens. Focus will be set to infinity
|
Captures the reference data used to filter out dust electronically.
|
|
Battery Info
|
- Batt. meter %
- Pic. meter (nnn) - Calibration - Charging life |
|
Gives very detailed information about battery condition, age and shots fired on this battery.
|
|
Wireless Transmitter
|
- Mode
- Transfer settings - Device info - Device settings |
|
Select various settings for use with a wireless network.
|
|
Image Authentication
|
- On
- Off |
|
Allows you to turn image authentication on for photos about to be taken for detection by Nikon's image authentication software.
|
|
Copyright Information
|
- Done
- Artist - Copyright - Attach copyright information checkbox |
Allows you attach a copyright string to image files. Artist name can be up to 36 characters while Copyright can be 54 characters.
|
|
|
Save/Load Settings
|
- Save settings
- Load settings |
|
Allows you to Save specific settings to the memory card. These are described in the manual.
|
|
GPS
|
- Auto Meter off
|
- Enable
- Disable |
When a GPS unit is connected to the camera it can record latitude, longitude, altitude, time and heading information. See manual for specific GPS units the camera has been tested with.
|
|
- Position
|
|
||
|
Virtual horizon
|
- Horizon display
|
|
Displays a virtual horizon. This is based on data from the cameras orientation sensor.
|
|
Non-CPU Lens Data
|
- Done
|
|
Allows you specify data for lenses without CPU's to allow them to use some functions of CPU equipped lenses. Up to 9 lenses can be entered. See manual for full details.
|
|
- Lens Number
|
-1 thru 9
|
||
|
- Focal Length
|
-6 thru 4000
|
||
|
- Maximum aperture
|
-F1.2 thru F22
|
||
|
AF Fine Tune
|
- Af fine tune
|
- On
- Off |
Allows you to enter focus correction factors to fine tune focusing with lenses that you define via this menu. See manual for full details.
|
|
- Saved value
|
- + or - 20 units
|
||
|
- Default
|
- + or - 20 units
|
||
|
- List saved values
|
- Lens, Lens number
|
||
|
Firmware Version
|
- A
|
-Version
|
Displays which firmware version the camera is using.
|
|
- B
|
-Version
|
||
Retouch Menu

(Click to view the complete Retouch Menu matrix (v1.00).)
| Retouch Menu Options | |||
|
Top-Level
Selection |
Second-Level
|
Third-Level
|
Notes
|
|
D-Lighting
|
- Picture selection
|
- Normal
- High - Low |
Adjusts the D-lighting to brighten shadows. |
|
Red-Eye Correction
|
- Picture selection
|
|
Allows you to remove Red-eye from your pictures. It saves the new picture and retains the old one.
|
|
Trim
|
- Picture selection
|
- Trim screen
|
Allows you to crop a picture. It saves the new picture and retains the old one.
|
|
Monochrome
|
- Black-and-white
- Sepia - Cyanotype |
- Selection screen
|
Allows you to copy pictures to black and white, sepia or cyanotype.
|
|
Filter Effects
|
- Skylight
- Warming |
- Selection screen
|
Selects the time that an image is displayed on the LCD monitor after the picture is taken.
|
|
Color Balance
|
- Selection window
|
- Adjustment screen
|
Allows you to change the color balance via the adjustment window.
|
|
Image Overlay
|
- Selection window
|
- Image overlay screen
|
Allows you to take 2 Raw images and combine them into a third picture.
|
|
Side-By-Side Comparison
|
- Selection window
|
- Comparison screen
|
This option does not appear on the menu screen until you select an image that has already been retouched. Once it is selected you press the Menu button and this option will be there. It lets you compare your retouched image with your original image.
|
My Menu

(Click to view the My Menu matrix (v1.00).)
| My Menu Options | |||
|
Top-Level
Selection |
Second-Level
|
Third-Level
|
Notes
|
|
Delete
|
- Selected
|
- Selection screen
|
Allows you to delete either selected photos or all the photos on the memory card.
|
|
- All
|
- Slot 1
- Slot 2 |
||
|
Add Items
|
- Playback menu
|
- Delete
- Playback folder - Hide image - Display mode - Copy image(s) - Image review - After delete - Rotate tall - Slide show - Print set (DPOF) |
This let you add options to create a customized list of options.
|
|
- Shooting menu
|
- Shooting Menu Bank
- Reset Shooting Menu - Active Folder - File Naming - Slot 2 - Image Quality - Image Size - Image Area - JPEG Compression - NEF (RAW) recording - White Balance - Set Picture Control - Manage Picture Control - Color Space - Active D-Lighting - Long Exp. NR - High ISO NR - ISO Sensitivity settings - Live View - Multiple Exposure - Interval Timer Shooting |
||
|
- Custom setting menu
|
- Custom Setting Bank
- Reset Custom Settings - A Autofocus - B Metering/exposure - C Timers/AE lock - D Shooting/display - E Bracketing/flash - F Controls |
||
|
- Setup menu
|
- Format Memory Card
- LCD Brightness - Lock Mirror up for cleaning - Video mode - HDMI - World time - Language - Image comment - Auto image rotation - Voice memo - Voice memo overwrite - Voice memo button - Audio output - USB - Dust off ref photo - Battery info - Wireless transfer - Image authentication - Save/Load settings - Image comment - GPS - Virtual horizon - Non-CPU lens data - AF fine tune - Firmware version |
||
|
- Retouch menu
|
- D-Lighting
- Red-eye correction - Trim - Monochrome - Color balance - Image overlay - Side-by side comparison |
||
|
Remove Items
|
- Select Item
- Done - Delete |
Select the item(s) you wish to delete, then select Done to delete.
|
This let you remove options from your customized list of options.
|
|
Rank Items
|
- Menu of items
- Move - OK |
Select item and move it using Up or Down on the multi-selector.
|
This lets you change the order of options in your customized list of options.
|
|
Choose Tab
|
- My Menu
- Recent settings |
- OK
|
Added in v2.00 firmware, this option lets you use the D3 'My Menu' selection or the older 'Recent settings' selection, allowing the user to access the twenty most recent setting changes made.
|
Rawindex
Digital Cameras - Nikon D3 RAW Test Images
The tables below show selected representative images from our test shot series that were shot in RAW mode. See the Thumbnails index page and Gallery index page for links to all our Nikon D3 RAW files.
Depending on your browser, you can download the images by clicking on the links, or by right-clicking on the links and selecting "Save Target As...", or similar. Some browsers change the file extension to .TIFF. In that case, just rename to .NEF after downloading. You can see the full set of in-camera JPEG shots, including exposure information extracted from the EXIF file headers, on the Thumbnail index page.
NOTE: These are very large files (12+ megabytes each). They're here for you to use, but please be considerate of our bandwidth; don't just download everything willy-nilly. - Thanks!
Still Life
| Still Life ISO Series, RAW | |||
| ISO 100 | ISO 200 | ISO 400 | ISO 800 |
| ISO 1600 | ISO 3200 | ISO 6400 | ISO 12800 |
| ISO 25600 | |||
Multi-Target
| Multi Target Series, RAW | |||
| ISO 100 | ISO 200 | ISO 400 | ISO 800 |
| ISO 1600 | ISO 3200 | ISO 6400 | ISO 12800 |
| ISO 25600 | 2X RES | ||
Indoor Portrait, No Flash
| Indoor Portrait ISO Series, RAW | |||
| ISO 100 | ISO 200 | ISO 400 | ISO 800 |
| ISO 1600 | ISO 3200 | ISO 6400 | ISO 12800 |
| ISO 25600 | |||
Comparison
Nikon D3 Feature Comparison
The following table compares Nikon's current line-up of pro models. What we've done below is to present something of a hybrid comparison between these three models. A red cell means that a given camera performs below the other two, a green cell means that it performs better than the other two, and a yellow cell means it falls between the other two. In cases where two cameras share a superior capability, both their cells will be colored green. Sharp-eyed readers may find some areas where we haven't chosen to highlight a particular difference. Those cases are simply ones that we don't feel are significant in typical use of the camera.
| Nikon Pro SLR Camera Comparison | ||||
|
Manufacturer
|
Nikon
|
Nikon | Nikon | |
|
Model
|
D2Hs
|
D2Xs | D3 | |
| Imaging System |
Sensor Manufacturer
|
Nikon | Sony | Sony(?) |
|
Sensor Type
|
JFET LBCAST | CMOS | CMOS | |
|
Color Filter Array
|
RGB | RGB | RGB | |
|
Total Megapixels
|
4.26
|
12.84 | 12.87 | |
|
Effective Megapixels
|
4.1 | 12.4 | 12.1 | |
|
Pixel Size (µm)
|
9.4 x 9.4 | 5.49 x 5.49 | 8.45 x 8.45 | |
|
Effective Sensor Size (mm)
|
23.3 x 15.5
|
23.7 x 15.7 | 36.0 x 23.9 | |
|
Focal Length Multiplier (approx.)
|
1.5x
(Nikon DX) |
1.5x (Nikon DX) |
1.0x (Nikon FX) |
|
|
Image Processor
|
Not
stated
|
Not stated | EXPEED | |
| Viewfinder |
Type
|
Eye-level
pentaprism
|
Eye-level pentaprism | Eye-level pentaprism |
|
Coverage
|
~100%
|
~100% | ~100% | |
|
Magnification (-1 diopter with 50mm lens at infinity)
|
0.86x
|
0.86x | 0.70x (but full-frame) |
|
|
Eyepoint (mm)
|
19.9
|
19.9 | 18 | |
|
Dioptric Adjustment Range (diopters)
|
-3.0 to +1.0
|
-3.0 to +1.0 | -3.0 to +1.0 | |
|
Focusing Screen
|
BriteView Clear Matte Screen III Type-B; interchangeable with optional Type-E with grid
|
BriteView Clear Matte Screen III; supplied Type-B or optional Type-E with grid | Type B BriteView Clear Matte VI | |
|
Depth of Field Preview
|
Enabled
with depth-of-field preview button
|
Enabled with depth-of-field preview button | Enabled with depth-of-field preview button | |
|
Live View
(on LCD) |
No | No | Yes (2 Modes: Hand-held mode uses conventional AF sensor; Tripod mode uses contrast detect AF from image sensor) |
|
| Recording System |
Recording Media / Quantity / Slot Type
|
Type
I or II CF card / Microdrive
|
Type I or II CF card / Microdrive | Dual Type I or II CF card / Microdrive slots (UDMA supported) |
|
Compatible File System
|
FAT
16 / FAT 32
|
FAT 16 / FAT 32 |
FAT 16 / FAT 32
|
|
|
Recording Formats
|
RAW 12-bit (compressed or uncompressed NEF), TIFF, JPEG
|
RAW 12-bit (compressed or uncompressed NEF), TIFF, JPEG | RAW 12-bit or 14-bit (lossless compressed or compressed NEF), JPEG | |
|
Maximum Resolution
|
2464 x 1632
|
Full Image: HS Cropped Image: |
FX format (36 x 24): 4256 x 2832 5:4 format (30 x 24): DX format (24 x 16): |
|
|
Reduced Resolutions
|
1840 x 1224
|
Full Image: HS Cropped Image: |
FX format (36 x 24): 3184 x 2120; 2128 x 1416 5:4 format (30 x 24): DX format (24 x 16): |
|
|
RAW + JPEG Recording
|
Yes, Selectable JPEG resolution / compression
|
Yes, Selectable JPEG resolution / compression | Yes, Selectable JPEG resolution / compression | |
|
A/D Conversion
|
12-bit | 12-bit | 12- or 14-bit | |
|
Auto crop when DX lens mounted
|
n/a | n/a | Yes | |
| Color Space, Image Parameters & White Balance |
User-Selectable Color Space
|
Yes
sRGB (two variants) + Adobe RGB |
Yes sRGB (two variants) + Adobe RGB |
Yes sRGB + Adobe RGB |
|
Processing Parameters
(Contrast, Sharpness, Saturation, Hue) / # of Increments |
7 options for sharpening, 6 for contrast, 7 for hue, 5 for saturation. Second sRGB color space boosts saturation somewhat.
|
7 options for sharpening, 5 for contrast, 7 for hue, none for saturation. Second sRGB color space boosts saturation somewhat. | 9 options for sharpening, 7 for contrast, 7 for hue, 7 for saturation, 3 for brightness | |
|
Picture Control System
|
No | No | Yes | |
|
Active
D-Lighting |
No | No | Yes | |
|
Preset WB settings
|
6 (Direct sunlight, Cloudy, Shade, Incandescent, Fluorescent, Flash)
|
6 (Incandescent, Fluorescent, Direct Sunlight, Flash, Cloudy, Shade) | 6 (Incandescent, Fluorescent, Direct Sunlight, Flash, Cloudy, Shade) | |
|
Manual Color Temperature Setting Range
|
2,500 ~ 10,000K in 250K increments
|
2,500 ~ 10,000K in 250K increments | 2,500 ~ 10,000K in 250K increments | |
|
WB Adjustment Range
|
±3
steps in 1-step increments
10 mireds per step |
3 steps in 1-step increments, roughly 10 mireds per step
|
3 steps in 1-step increments, roughly 10 mireds per step
|
|
| Autofocus System |
Type
|
TTL phase detection by Nikon Multi-CAM2000 autofocus module
|
TTL phase detection by Nikon Multi-CAM2000 autofocus module | TTL phase detection by Nikon Multi-CAM3500FX autofocus module |
|
# of Focusing Points (Focusing Point Type)
|
11 points (9 cross-type, 2 vertical-type)
|
11 points (9 cross-type, 2 vertical-type; 9 points active in cropped mode) | 51 points (15 cross-type, 36 line type) | |
|
Superimposed Focus Point
Display
|
Yes | Yes | Yes | |
|
AF Working Range
|
EV
-1 ~ 19 (ISO 100)
|
EV -1 ~ 19 (ISO 100) | EV -1 ~ 19 (ISO 100) | |
|
AF Servo Modes
|
Single Servo AF-S,
Continuous Servo AF-C; Focus Tracking automatically activated by subject's status |
Single Servo AF-S,
Continuous Servo AF-C; Focus Tracking automatically activated by subject's status |
Single Servo AF-S, Continuous Servo AF-C; Focus Tracking automatically activated by subject's status |
|
|
AF Area Modes
|
1) Single Area AF,
2) Dynamic-area AF, 3) Closest Subject Priority Dynamic AF, 4) Group Dynamic AF |
1) Single Area AF
2) Dynamic-area AF 3) Group Dynamic AF 4) Dynamic-area AF with closest subject priority |
1) Single-point AF, 2) Dynamic-area AF [number of AF areas: 9, 21, 51, 51 (3D-tracking)], 3) Automatic-area AF |
|
|
AF-assist Beam
|
Emitted by an optional dedicated Speedlight
|
Emitted by an optional dedicated Speedlight | Emitted by an optional dedicated Speedlight | |
|
Fine-tune front/back focus adjustment
|
No | No | Yes (settings for up to 20 lenses) | |
| Exposure Control |
Shooting Modes
|
4
- Program, shutter-priority AE, aperture-priority AE, manual mode.
|
4 - Program, shutter-priority AE, aperture-priority AE, manual mode. | 4 - Program, shutter-priority AE, aperture-priority AE, manual mode. |
|
Metering Zones
|
1,005
|
1,005 | 1,005 | |
|
Metering Modes
|
1) 3D Color Matrix Metering II (type G and D lenses); matrix metering (other CPU lenses); color matrix metering II available with non-CPU lenses if user provides lens data; metering performed by 1,005-segment RGB sensor
2) Center-weighted: Weight of 75% given to 8mm dia. circle in center of frame 3) Spot: Meters 3mm dia. circle (about 2.0% of frame) centered on active focus area (on center focus area when non-CPU lens is used) |
1) 3D Color Matrix Metering II (type G and D lenses); color matrix metering II (other CPU lenses); matrix metering available with non-CPU lenses if user provides lens data; metering performed by 1,005-segment RGB sensor 2) Center-weighted: Weight of 75% given to 6, 8, 10, or 13mm dia. circle in center of frame 3) Spot: Meters 3mm dia. circle (about 2.0% of frame) centered on active focus area (on center focus area when non-CPU lens is used) |
1) 3D Color Matrix Metering
II (type G and D lenses); color matrix metering II (other CPU lenses); color
matrix metering available with non-CPU lenses if user provides lens data;
metering performed by 1,005-segment RGB sensor 2) Center-weighted: Weight of 75% given to 8, 15, or 20mm dia. circle in center of frame 3) Spot: Meters 4mm dia. circle (about 1.5% of frame) centered on active focus area (on center focus area when non-CPU lens is used) |
|
|
Metering System Working Range
|
1) EV 0 to 20 (3D Color Matrix or center-weighted metering)
2) EV 2 to 20 (spot metering) |
1) EV 0 to 20 (3D Color Matrix or center-weighted metering) 2) EV 2 to 20 (spot metering) |
1) EV 0 to 20 (3D Color
Matrix or center-weighted metering) 2) EV 2 to 20 (spot metering) |
|
|
Nikon Scene Recognition System
|
No | No | Yes | |
|
ISO Range / Extended
|
200 ~ 1,600 / up to 6,400 in Hi-2 mode
|
100 ~ 800 / up to 3,200 in Hi-2 mode | 200 ~ 6,400 / down to 100 in Lo-1 mode; up to 25,600 in Hi -2 mode | |
|
Exposure Compensation
|
+/-
5EV in 1/2 or 1/3EV increments
|
+/- 5EV in 1, 1/2 or 1/3EV increments | +/- 5EV in 1, 1/2 or 1/3EV increments | |
|
Automatic Exposure Bracketing
|
2 to 9 exposures in increments of 1/3, 1/2, 2/3 or 1EV
|
2 to 9 exposures in increments of 1/3, 1/2, 2/3 or 1EV | 2 to 9 exposures in increments of 1/3, 1/2, 2/3 or 1EV | |
| Shutter Speeds, Frame Rate, Shutter Lag |
Shutter Type
|
Electronically controlled vertical-travel focal-plane shutter
|
Electronically controlled vertical-travel focal-plane shutter
|
Electronically controlled vertical-travel focal-plane shutter |
|
Shutter Durability
|
Not specified
|
~150K cycles | ~300K cycles | |
|
Shutter Speed Range
|
1/8000 ~ 30 sec. in steps of 1/3, 1/2 or 1 EV, bulb
|
1/8000 ~ 30 sec. in steps of 1/3, 1/2 or 1 EV, bulb | 1/8000 ~ 30 sec. in steps of 1/3, 1/2 or 1 EV, bulb | |
|
Maximum Frames Per Second / Buffer depth
|
8 fps / 50 JPEG or 40 RAW
(manufacturer spec) |
5.3 fps / >20 JPEG or 16 RAW frames at full resolution; 8.0 fps / 34 JPEG or 29 RAW frames in High-Speed Cropped mode |
9 fps / 30 JPEG or 17 RAW frames at full resolution; up to 11 fps in 5.1MP DX Cropped mode
(measured) |
|
|
Full AF shutter lag (seconds)
|
Not specified | 0.045
(measured) |
0.085
(measured) |
|
|
Prefocused shutter lag (seconds)
|
0.037
(manufacturer spec) |
0.045
(measured) |
0.043
(measured) |
|
|
Startup Time (seconds)
|
Not specified | 0.2
(measured) |
0.3
(measured) |
|
| Flash |
i-TTL / Advanced Wireless Lighting
|
Yes / Yes
(with SB-800 Flash or SU-800 Wireless Commander) |
Yes / Yes (with SB-800 Flash or SU-800 Wireless Commander) |
Yes / Yes (with SB-800 Flash or SU-800 Wireless Commander) |
|
Built-in Flash / Guide Number at ISO 100.
|
No
|
No | No | |
|
Max flash x-sync speed. (sec.)
|
1/250
|
1/250
|
1/250
|
|
|
Flash Exposure Compensation
|
n/a
|
n/a | n/a | |
|
Slow-sync flash
|
1st or 2nd curtain
|
1st or 2nd curtain | 1st or 2nd curtain | |
|
PC Sync Terminal
|
Yes
|
Yes | Yes | |
| Playback System |
LCD Size / Pixel Count
|
2.5 in LCD / 232,000 pixels
|
2.5 in LCD / 235,000 pixels | 3.0 in LCD / 920,000 pixels |
|
Enlarged Playback / Scroll
|
1.1 - 15x for large images, 12x for medium / Yes
|
1.1 - 27x for large images, 20x for medium images, or 13x for small ones / Yes
|
Yes (details TBA) / Yes
|
|
|
LCD Monitor Brightness Adjustment Range
|
5
steps
|
5 steps
|
Yes (details TBA)
|
|
|
Automatic Rotation for Vertical Shots
|
Yes
|
Yes | Yes | |
|
Video Out
|
Analog NTSC/PAL | Analog NTSC/PAL | Analog NTSC/PAL, HDMI | |
| Other Features |
Computer Connection
|
Yes, USB 2.0 High -Speed, PTP-compliant
|
Yes, USB 2.0 High -Speed, PTP-compliant | Yes, USB 2.0 High -Speed, PTP-compliant |
|
Direct Printing (PictBridge-compliant printers)
|
Yes
|
Yes | Yes | |
|
Menu Languages
|
10 (Chinese, German, English, Spanish, French, Korean, Italian, Japanese, Dutch, Swedish)
|
10 (Chinese, German, English, Spanish, French, Korean, Italian, Japanese, Dutch, Swedish)
|
15 (Chinese [Simplified and Traditional], Dutch, English, Finnish, French, German, Italian, Japanese, Korean, Polish, Portuguese, Russian, Spanish, Swedish)
|
|
|
Camera Default Reset
|
Yes
|
Yes | Yes | |
|
Custom Functions (Quantity / Settings)
|
Yes (41)
|
Yes (41) | Yes (TBA) | |
|
Remote Control
|
Yes, 10-pin terminal
|
Yes, 10-pin terminal | Yes, 10-pin terminal | |
|
Info LCD Panel / Illumination
|
Yes (large top panel, smaller rear panel) / Yes (both panels)
|
Yes (large top panel, smaller rear panel) / Yes (both panels) |
Yes (large top panel, smaller rear panel) / Yes (both panels)
|
|
|
Ultrasonic dust-removal
|
No
|
No | No | |
|
Virtual Horizon digital level sensor
|
No | No | Yes | |
|
In-camera Lateral C.A. Correction
|
No
|
No
|
Yes | |
|
Self Diagnostic Shutter Monitor
|
No
|
No
|
Yes | |
| Body Structure |
Body Cover / Chassis
|
Magnesium Alloy, full environmental seals
|
Magnesium Alloy, full environmental seals | Magnesium Alloy, full environmental seals |
| Power System |
Battery
|
EN-EL4
|
EN-EL4a | EN-EL4a |
|
Rated Shooting Capacity at 20C/68F (shots)
|
100% AE: 2900
|
100% AE: 3800 | 100% AE: TBA | |
| Dimensions & Weight |
Dimensions (WxHxD, mm)
|
157.5 x 149.5 x 85.5
|
157.5 x 149.5 x 85.5 | 159.5 x 157 x 87.5 |
|
Weight (body only)
|
1070 g
|
1070 g | 1240 g | |
| Operational Environment |
Operating Temperature Range
|
0 ~ 40°C
|
0 ~ 40°C | 0 ~ 40°C |
|
Operating Humidity Range
|
85% max.
|
85% max. | 85% max. | |
| Lens Compatibility |
Lens Mount / Compatibility
|
1) AF Nikkor (including AF-S, DX, VR and D-/G-type): All functions possible 2) D-type Manual-Focus Nikkor: All functions except autofocus and some exposure modes available 3) AF Nikkor other than D-/G-type: All functions except 3D-Color Matrix Metering II and 3D Multi-Sensor Balanced Fill-Flash possible 4) AI-P Nikkor: All functions except 3D-Color Matrix Metering II, 3D Multi-Sensor Balanced Fill-Flash and AF possible 5) Non-CPU AI Nikkor: Can be used in exposure modes A and M; electronic rangefinder can be used if maximum aperture is f/5.6 or faster; Color Matrix Metering and aperture value display supported if user provides lens data. |
1) AF Nikkor (including AF-S, DX, VR and D-/G-type): All functions possible 2) D-type Manual-Focus Nikkor: All functions except autofocus and some exposure modes available 3) AF Nikkor other than D-/G-type: All functions except 3D-Color Matrix Metering II and 3D Multi-Sensor Balanced Fill-Flash possible 4) AI-P Nikkor: All functions except 3D-Color Matrix Metering II, 3D Multi-Sensor Balanced Fill-Flash and AF possible 5) Non-CPU AI Nikkor: Can be used in exposure modes A and M; electronic rangefinder can be used if maximum aperture is f/5.6 or faster; Color Matrix Metering and aperture value display supported if user provides lens data. |
1) Type G or D AF Nikkor: All functions supported 2) DX AF Nikkor: All functions supported except FX-format (36x24)/5:4 (30x24) image size 3) AF Nikkor other than type G or D (excluding lenses for F3AF): All functions supported except 3D Color Matrix Metering II 4) AI-P Nikkor: All functions supported except autofocus and 3D Color Matrix Metering II 5) Non-CPU AI Nikkor: Can be used in exposure modes A and M; electronic rangefinder can be used if maximum aperture is f/5.6 or faster; Color Matrix Metering and aperture value display supported if user provides lens data. Up to 9 non-CPU lenses can be registered. |
|
Auto switch to DX-format crop when DX lens mounted
|
n/a | n/a | Yes | |