Minolta Dimage 5The "little brother" to the Dimage 7 - same great features, but 3.3 megapixels and a (much) lower price...<<Optics :(Previous) | (Next): Shutter Lag & Cycle Time Tests>> Page 6:Exposure & FlashReview First Posted: 9/14/2001 |
Exposure
The Dimage 5 offers excellent exposure control, with very fine-grained adjustment of such image attributes as Sharpness, Contrast, and Color Saturation. Though we found the camera’s user interface a little confusing at first -- with its myriad buttons, dials, and switches -- we liked it quite a bit once we got the hang of it.
The Mode dial on top of the camera controls the basic operating modes: Record, Playback, Movie, Setup, or Data-Transfer. Within Record mode, you have several options: Program AE, Aperture Priority, Shutter Priority, Manual, and a handful of preset recording modes, which we will describe a little further on. These first four options are all accessed by turning the Function dial on the left side of the camera to the PASM position, holding down the button in the middle of that control, and rotating the Selector Wheel just to the right of the shutter button. It's definitely a two-handed process, but quick to execute once you are familiar with the system.
In Program AE mode, the camera determines the best possible exposure for the current shooting situation, setting the shutter speed and lens aperture automatically. Aperture Priority mode allows you to select the lens aperture setting, from f/2.8 to f/9.5 depending on zoom, while the camera selects the most appropriate corresponding shutter speed. In Shutter Priority mode, the user selects the shutter speed, from 1/2,000 to 4 seconds, while the camera chooses the best corresponding aperture. Switching to Manual mode gives you control over both shutter speed and aperture, with a Bulb setting available for longer exposures. Bulb exposure is determined by how long you hold down the shutter button, up to a maximum of 30 seconds. The Program Auto button, located on the top panel just above the Mode dial, is a handy feature, instantly returning the camera to all of its default settings and the Program AE exposure mode (especially helpful if you've set a number of functions and are looking for a quick way to get back to the default settings).
The Dimage 5’s default metering system is a 256-segment evaluative mode, which takes readings from throughout the image to determine exposure. However, Center-Weighted and Spot metering options are also available. Spot metering is useful for high-contrast subjects, as it bases the exposure reading on the very center of the image. Center-Weighted metering also bases the exposure on the center of the image, but the camera takes its readings from a very large area in the middle of the frame. You can also lock the exposure reading for a particular part of the image by pressing the AE / AF Lock button on the back panel. This locks the exposure reading until either the Shutter button is pressed or the AE / AF Lock button is pressed again. (Halfway pressing the Shutter button also locks exposure and focus.) The Dimage 5’s light sensitivity can be set to Auto, or ISO equivalents of 100, 200, 400, or 800. Exposure compensation is adjustable from -2 to +2 exposure values (EV) in one-third-step increments.
White Balance & Color Control
The Dimage 5 offers unusually flexible control over white balance, color rendition, and tonal range. Its White Balance system offers a total of five options, including Auto, Daylight, Tungsten, Fluorescent, Cloudy, and Custom, which is the manual setting. (In Custom mode, the white balance is determined by snapping a picture of a white card. The camera then adjusts its color balance to render the white card with a neutral hue.) We found the camera's white balance to be refreshingly sure-footed, providing accurate color rendition under a very wide range of lighting conditions. (We felt it did an excellent job with our very difficult indoor portrait shot, handling the household incandescent lighting just right. Its manual mode seems able to accommodate a very wide range of lighting conditions.)
We were also pleased to see extensive Contrast and Color Saturation controls in the Dimage 5. Both of these parameters are adjustable in seven steps across a fairly broad range of settings, using the Effects dial on the camera's left side in conjunction with the Selector Wheel next to the Shutter button (the same controls used for Exposure Compensation). To make adjustments, you rotate the Effects dial to the parameter you're interested in changing, press the button at its center, and then rotate the Selector Wheel to choose the desired setting. We found this to be a very accessible, easy to use interface for these controls.
We've seen contrast and saturation adjustments in other cameras we've tested, but the usual approach is to offer only three steps of adjustment (low, normal, and high) for each. While it's better than no adjustment at all, we've found that they generally provide either too much or too little variation to be useful. The Dimage 5's seven-step adjustment makes more subtle changes, but ultimately it has a profound difference in how these controls can be used. With three steps of adjustment, the tendency is to view these features as "tweaks" reserved for special shooting conditions. The seven-step range enables users to literally customize their cameras to reflect personal preferences. Want brighter color? No problem! Just boost the color saturation control a notch or two and you're there! The steps are small enough that they make subtle fine-tuning a very viable option, yet they cover enough range that you can use them to handle fairly extreme shooting conditions (such as pumping up the contrast on dreary, cloudy days). For instance, in the case of the Dimage 7, we found that we preferred to routinely shoot with the color saturation boosted by one or two steps. In the case of the Dimage 5, we felt that the color was pretty close to correct at the default setting, but might still boost it one notch since we tend to like fairly well-saturated color. Kudos to Minolta for this implementation!
In addition to these subtle color and tonal adjustments, the Dimage 5 also offers a Black-and-White mode for capturing monochromatic images. It's accessed via the Record mode settings menu, as is a Sharpness setting that adjusts the amount of in-camera sharpening.
Flash
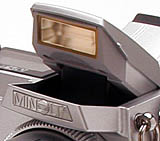
The Dimage 5 features a built-in, pop-up flash, which operates in either Fill-Flash, Red-Eye Reduction, or Rear Flash Sync modes. To release the flash from its compartment, pull on the two small tabs on either side of the casing and lift up the flash unit. The Flash mode is changed through the Record settings menu. In Fill-Flash mode, the flash fires with every exposure, regardless of lighting conditions. Red-Eye Reduction fires a series of small pre-flashes before firing the flash at full power with the exposure. This reduces the occurrence of red-eye effect. The Rear Flash Sync mode synchronizes the internal flash with an external flash, if connected. The flash is in the Off position when it's closed.
The Dimage 5 is unusual in that it offers two methods of flash metering. Its default mode is called ADI, which stands for Advanced Distance Integration. In this mode, it apparently bases its flash exposure on the lens aperture and feedback from the autofocus system. By determining how far away the target subject is, the camera knows how much flash power is required to illuminate it. As a fallback, a Pre-Flash TTL (through-the-lens) method uses a small metering flash before the main exposure to gauge how much light is reflected by the scene. Used in conjunction with the Spot Focus option mentioned earlier, the ADI flash metering should be much more accurate with small subjects against a different colored background than the pre-flash method.
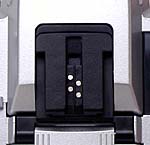 The Dimage 5 also provides a top-mounted hot shoe for attaching an external flash unit. The shoe design and contact arrangement are set up for Minolta's own dedicated flash units, but we imagine that compatible units are available from the major third-party flash manufacturers (Sunpak et. al.). Minolta's own Program Flash models 3600HS(D) and 5600HS(D) both work with the Dimage 5, and two macro flashes (Macro Twin Flash 2400 and Macro Ring Flash 1200) will work with an accessory macro flash controller.
Subject Program Modes
The Dimage 5 provides five preset exposure modes, including Portrait, Sports, Sunset, Night Portrait, and Text. These are accessed by pressing the Mode Select button next to the small status display panel on top of the camera, which displays an indicator arrow below each mode icon as it's selected. Portrait mode produces better-looking people shots by enhancing skin tones and decreasing the depth of field (to create a slightly blurred background). Sports mode provides faster shutter speeds to freeze action and maintains focus on quickly moving subjects. In Sunset mode, the camera employs slightly slower shutter speeds to let in more of the ambient light, and allows you to record the warm colors of the scene without compensating for them. In Night Portrait mode, the camera uses flash plus a slower shutter speed to allow more ambient light into the image, while the CxProcess feature helps ensure the recording of true black values and preserves the bright colors of artificial lighting. The final preset mode is Text mode, which optimizes the camera for capturing black text on a white background, keeping the contrast level high so the camera doesn't expose for neutral gray.
Continuous Mode
Accessed via the "Drive" setting on the left-side Function dial, the Dimage 5's Continuous mode captures images in rapid succession, at roughly 1.4 frames per second. This is somewhat faster than the roughly 1.1 frames/second that the Dimage 7 could manage, thanks again no doubt to the somewhat smaller sensor on the Dimage 5.
Reader Comments! --> Visit our discussion forum for the Minolta Dimage 5!

Follow Imaging Resource: