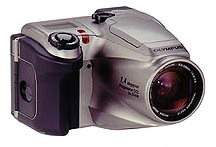
Olympus, D-620L Digital Cameras True "SLR" viewing, 1.4 million pixels, ultra-fast cycle time makes for genuine "Filmless Photography" experience! (Initial review date: 14 January, 1999) |
 |
|
True "SLR" through-the-lens
viewing |
|
|
1.4 million pixels, 1280x1024 image |
|
|
|
3x, f2.8 aspheric zoom lens, 36-110mm |
|
|
* |
Huge memory buffer for 0.8 second
cycle time for up to 5 images at full resolution! |
|
|
|
External flash sync connection. |
|
Olympus has been one of the more successful traditional, film-based camera
manufacturers making the transition to digital photography. They established
an early leadership role with their D-200 and D-300, and haven't let up since:
They were the first with under-$1,000 digital Single Lens Reflex (SLR) cameras,
in their D-500 and D-600, and have demonstrated exceptional customer support
by offering a retrofit service to adapt their D-600's to the newer 16 MB SmartMedia
standard. Now, they've updated their landmark D-600L to the D-620L, adding support
for external flash, and an internal buffer memory for incredible shot-to-shot
speed.![]()
D-620L Zoom "High Points" overview
Several readers have requested quick, up-front feature summaries of the cameras
we review, which we'll be doing from this point onward. Herewith are the key
characteristics of the Olympus D-620L, ranked in a completely arbitrary order
reflecting our own personal biases and dispositions ;-)
- Megapixel zoom digital camera delivering 1,410,000 pixels, 1280x1024 image
- 3x aspheric zoom lens in a true single lens reflex device
- Through-the-lens (TTL) viewfinder for easy capturing and viewing of images
- Large memory buffer provides VERY fast shot-to-shot cycle times for up to 5 images
- True "filmless photography" experience
- "Sequence Mode" feature provides 3.3 fps "Motor drive" for up to 5 full-resolution images
- Sync connection for external flash, in addition to built-in auto flash unit
- High-capacity (1450 mAh!) NiMH rechargeable batteries and charger included in box
- 8 MB, 3.3V SmartMedia removable memory card for in-camera storage and for transferring images to PCs
- Optional P-300/P-330 printers allows for quick and easy printing of images without computer
- Utility software included for quick and easy downloading and viewing of images on home PCs
- Optional "FlashPath" floppy-disk adapter for faster, easier image downloads
- Image manipulation and excellent panorama-stitching software included
"EZ Print" Link
Readers have requested free-formatted versions of our reviews (without the graphical
accouterments of our page design), to make printing easier. We've accommodated
this request with special copies of each review formatted to allow the text
flow to be dictated by the browser window. Click here
for a print-optimized page.![]()
Overview
In late 1997 Olympus revolutionized the "prosumer" digital camera
world with the D-500L and D-600L, the first digital SLR (single-lens reflex)
cameras selling for less than $5-10,000. Not only did these cameras provide
all the benefits of the single-lens approach (easy use with add-on filters and
reliable framing, even for macro shots), but they set new benchmarks for image
quality and color fidelity. Now, with the D-620L, Olympus builds upon the strengths
of the earlier models to deliver a camera with an enhanced feature set that
will fit the needs of a broad range of amateur digital photographers.![]()
In addition to its 3x zoom lens, three resolution levels up to 1280 x 1024 pixels,
and overall excellent image quality, the D-620L boasts several new features
that radically change the picture-taking experience. Primary among these is
a huge "buffer" memory that allows the camera to capture a group of
images virtually as fast as you can trip the shutter, even at maximum resolution.
The buffer memory holds up to 5 full-resolution images in temporary storage,
until the camera's processor can digest them and save the resulting files to
the memory card. This means that you don't need to wait after each shot for
the picture to be written to the memory card. The impact of this feature on
the picture-taking experience with the D-620L is hard to overstate: This is
the first digital camera we've used (January, 1999) that really feels like a
film camera!![]()
Another key feature is the provision of a flash sync output on the side of the
camera, allowing use with an external auto-flash unit. While still not offering
the total flexibility of a film-based SLR in this respect, the creative latitude
allowed by an off-camera flash unit is very nice.![]()
A third notable feature of the D-620L is the provision of a manual white-balance
control, with six separate settings, expressed as color temperature in degrees
Kelvin, ranging from 3000K to 6500K. (Sorry for the techie-talk: For those not
familiar with color-temperature measurements, this just means that you have
much finer control over manual "white balance" than is usually the
case.)![]()
The standard 8MB SmartMedia memory card coupled with an optional FlashPath floppy
disk adapter makes transferring images to your PC easier and much quicker than
standard serial port connections, and the optional P-300 or P-330 printers provide
a way to print images right from the camera, bypassing the computer connection
all together. ![]()
All the new features of the D-620L would be no bargain, if the basic image quality
weren't up to snuff. We're happy to say that it is though, with the camera producing
the sharp pictures and bright colors that were the hallmark of the earlier D-500/600L.![]()
Design
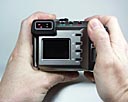 The
Olympus D-620L has a comfortable heft (just over 1 pound, minus batteries),
and well thought out design that's easy to master. It has the same basic "ZLR"
(Zoom Lens Reflex) form factor as the earlier Olympus SLR digicams, a form factor
we confess to being quite partial to: The camera fits the shooter's right hand
unusually well, with a fairly thick body and curved bulge on the right-hand
side to curl your fingers around. In normal shooting, the lens barrel provides
a natural grip for your left hand, creating a very stable camera platform.
The
Olympus D-620L has a comfortable heft (just over 1 pound, minus batteries),
and well thought out design that's easy to master. It has the same basic "ZLR"
(Zoom Lens Reflex) form factor as the earlier Olympus SLR digicams, a form factor
we confess to being quite partial to: The camera fits the shooter's right hand
unusually well, with a fairly thick body and curved bulge on the right-hand
side to curl your fingers around. In normal shooting, the lens barrel provides
a natural grip for your left hand, creating a very stable camera platform.![]()
Camera functions are controlled by a two-mode rotary switch on top (REC/PLAY
modes), a rotary toggle to control the zoom lens, a shutter button, 4 top-panel
buttons, and 4 back-panel ones. We like the fact that many common camera functions
can be accessed directly via the top-panel buttons, without resorting to the
menu system. When you do need to enter the menu system, it is fast to navigate,
with no menu more than one level "deep."![]()
The body is constructed of metallized plastic, but is quite rugged. (As we can
attest to from the painful experience of watching our own D-600L hit the floor
from a couple of feet up!) The location of the shutter button makes for comfortable
one-hand image capture, and the pop-up flash is readily accessible when needed.
The memory card compartment access and loading are both simple, and the batteries
are easy to load in the battery compartment in the right-hand side of the camera.
The LCD allows convenient review of images after you capture them. Significantly,
both batteries and memory card are readily accessed while the camera is attached
to a tripod.![]()
Viewfinder
The Viewfinder on the D-620L displays 95% of the actual image captured, a much
higher percentage than is common in digital point & shoots. Viewfinder image
clarity is excellent at both the wide angle and the telephoto settings. As mentioned
earlier, the D-620L is a "true SLR" device that offers through-the-lens
(TTL) viewing to make for an exceptionally easy picture taking experience, and
a complete lack of parallax between the viewfinder and camera lens. (Parallax
refers to the unavoidable difference in field of view between the viewfinder
and camera lens when the two are separate. At infinity, viewfinder parallax
is a non-issue, but the closer the subject, the greater the potential discrepancy.
Separate optical viewfinders are almost useless for macro or close-up shooting.)![]()
Like several other Olympus models, the D-620L sports a Dioptric Adjustment dial
to make viewing through the viewfinder easy for near- or far-sighted camera
users.![]()
Unlike most LCD-equipped digital cameras, the LCD display on the back of the
D-620L is not meant to be a viewfinder, but is used only for reviewing images.
(The SLR optics and excellent viewfinder accuracy largely eliminate the need
for an LCD viewfinder.) The D-620L's LCD has only 61K pixels, fewer than many
of its contemporaries, but nonetheless reasonably sharp. The LCD screen is also
reasonably resistant to wash-out in bright sun, and its brightness can be adjusted
over a fairly wide range. (One trivial but odd quirk: You can only adjust the
LCD brightness while the camera is in PLAY mode, but that setting remains in
effect for REC mode as well.) Normally, the D-620L displays each image briefly
on the LCD screen as it is being saved to the memory card, but a "Battery
Saving" menu option disables this feature to reduce power consumption.![]()
As is customary, the LCD screen on the D-620L doubles as an image-viewing tool
and a user-interface appliance. The menu display on the D-620L is particularly
bright and readable.![]()
Optics
The D-620L uses the same optics as the earlier D-600L, a multicoated, aspheric
3x autofocus zoom lens, with 35mm-equivalent focal lengths ranging from 36-110mm.
The lens is fairly fast, with apertures ranging from f2.8 to f5.6. Minimum "normal"
autofocus distance is 24 inches (0.6m), and an "official" macro focus
range of 11.8 inches to 2 feet (0.3-0.6 m) (more about this later). Zoom focal
length is controlled by a rotary toggle surrounding the shutter release, a very
convenient design. Zoom adjustment is quick and accurate, with no overshoot
after the zoom control is released.![]()
The D-620L's autofocus operates through the lens, using a "contrast
detection" system. This produces very accurate focus performance, and works
flawlessly with auxiliary lenses and filters. Its downside is that it requires
sufficient light for the camera electronics to be able to accurately measure
and maximize contrast differences on the CCD surface. Minimum illumination for
effective focus will depend somewhat on the subject's contrast (high-contrast
subjects will focus in lower light than low-contrast ones), so there's no hard-and-fast
limit that determines at what light level the autofocus will stop working. In
actual practice though, we found that the focus worked pretty well with typical
subjects, down to the minimum illumination level at which the camera was capable
of capturing an exposure (about EV 7). Below that, you'll need to use the "Quick
Focus" settings described below. (For example, if you're going to be shooting
in a situation in which you'll be relying on the flash for most of the illumination
on the scene.)![]()
The autofocus on the D-620L is relatively fast, requiring 0.5 seconds
or less to lock on most subjects. (Autofocus performance varies slightly depending
on the focal length setting of the lens: At the wide-angle end of the range,
average focus/shoot times are around 0.4 seconds. At the telephoto end, they
can range as high as 0.7-0.8 seconds, still a very good performance.) For those
times when you want a particularly rapid shutter-trigger response though, Olympus
provides three "Quick Focus" settings, accessible via three buttons
on the rear of the camera. Pressing and holding any of these three buttons prior
to tripping the shutter release racks the focus to one of three preset positions.
The preset Quick Focus distances are 1.3 feet (40cm), 8 feet (2.5m), and infinity.
(This last is an enhancement over the D-600L, which lacked the Quick Focus setting
of infinity.) Depth of field will determine how completely the Quick Focus settings
cover the range of possible shutter distances: At the larger lens opening and
telephoto focal lengths, Quick Focus provides three discrete ranges of subject
distances for sharp focus, with no overlap. At the wide angle end of the lens
range, and in brighter light (smaller f-stop), the range of sharp focus is almost
completely continuous. The quick focus settings reduce shutter delay to less
than 0.2 seconds, for capturing fast action, and also allow the camera to fire
in absolute darkness.![]()
For close-up photography, macro mode is selected by pressing one of the
top-panel control buttons, which supposedly shortens the camera's focusing range
to 11.8 inches to 2 feet (0.3-0.6 inches). Herein lies an interesting tale:
In actual fact, we found that our sample unit of the D-620L focused considerably
closer than the nearly 12 inches of the official spec! Our Macro test shot was
taken with the camera solidly autofocused at a lens to subject distance of only
9 inches. At closest approach, the camera captured an area 2.8 x 3.5 inches
(7.2 x 9.0 cm), considerably smaller than the 3.5 x 4.3 inches (9.0 x 10.9 cm)
claimed for it by Olympus. We're puzzled as to why Olympus didn't claim the
more aggressive figure for the '620. (It's possible that there's some unit to
unit variation. We considered the possibility that the bright lighting of our
Macro test shot might have caused the camera to shoot stopped-down, producing
greater depth-of-field, but the header data in the image file indicated an aperture
of f2.8.)![]()
Exposure
We found the exposure system on the D-620L to be quite accurate, and in fact
felt that it was slightly more so than that of the earlier D-600L. (At least,
its default exposure on the difficult outdoor portrait test shot seemed closer
to correct.) Serious photographers will love the inclusion of a spot-metering
option on the D-620L. (A feature carried forward from the earlier Olympus SLRs.)
While the '620 also provides a very broad exposure-compensation range of +/-
3 f-stops (albeit in fairly coarse 1-stop steps), the spot metering function
will produce better results in most situations, letting you determine exactly
what portion of the subject you want to expose for. Strongly backlit subjects
are handled naturally and easily with spot metering, by placing the small metering
circle in the 620's viewfinder on the shadowed area of the subject you want
to expose for. There are times though, where you'll still need to use the exposure-compensation
adjustment: In our outdoor portrait shot, even if we used spot metering, the
model's face was still too bright an object to produce a good overall exposure.
Likewise, most other portions of the subject were either too light or too dark
as well. As a consequence, we opted to use the exposure compensation to boost
the exposure a bit to lighten the overall scene, but found that the full f-stop
increment was a bit too much: A third of an f-stop would have been about right,
but that small an adjustment won't be worth worrying over for many people. If
you do need to sweat small adjustments like this though, you'll need to make
them post-exposure, in an image-editing program.![]()
The shutter speed of the D-620L ranges continuously from 1/4 to 1/10,000
of a second, with two fixed apertures available. At the wide angle end of the
lens' range, the two apertures correspond to f-values of f2.8 and f5.6, and
at the telephoto end, to f-values of f3.9 and f7.8. Combined with the CCD's
equivalent ISO speed of 100, these values should produce a usable illumination
range reaching from EV 10 to EV 24 or so. In practice, we found we could comfortably
use the camera in light as dim as EV 8 or 9.![]()
Like most current digicams, the D-620L provides an exposure/focus lock:
Pressing the shutter release button halfway triggers the autofocus and autoexposure
systems. If you continue to hold down the shutter button, you can re-frame the
shot, without losing the previously-determined focus and exposure. The 620's
spot metering option makes this feature particularly valuable.![]()
Also like most digicams, the D-620L includes a 12-seconds self-timer
function, which delays the shutter release by that amount, to allow the photographer
to get into the picture him/herself.![]()
White Balance
The D-620L has a quite capable automatic white balance capability, but takes
a different and interesting approach to manual white balance adjustment. Rather
than providing several fixed manual white-balance settings, corresponding to
"tungsten", "fluorescent", etc, it offers six different
color-temperature settings ranging from 3000K to 6500K. This provides finer,
more deterministic control over white balance in the image, but does presumably
assume that the light source is a "black-body radiator." (Color "temperature"
values refer to the color of light that would emit from a black object heated
to the corresponding physical temperature. Thus, a chunk of material heated
to 5,500 degrees on the Kelvin scale would glow (brightly!) and emit light having
a color temperature of 5500K.) We really liked the range and precision of adjustment
the color temperature settings gave us, and were surprised by how well these
settings coped with things like different types of fluorescent tubes. (Fluorescent
lighting spans a wide range of color balances, and the mix of wavelengths involved
are often difficult to adjust for. The overall color balance of most fluorescent
tubes is toward the green, rather than the blue or yellow. We expected this
to confound the 620's color balance adjustments, but in fact they performed
quite well.) The steps at the two ends of the color-temperature scale were a
bit larger than those in the middle, and we would have liked to have finer gradations
available there as well. Also, the lower end of the scale (3000K) doesn't go
quite far enough to completely neutralize the color cast of standard household
incandescent lighting (as used in our "indoor portrait" shot), which
typically has a color temperature of about 2700K. (For what its worth though,
we've found that the "incandescent" setting on most digital cameras
appears to be set to compensate for professional studio lighting, with a color
temperature of 3200K, rather than the more reddish cast of household lamps.)
The presence of filter threads on the 620's lens, and its through-the-lens-everything
(focus and exposure) does open the possibility of improving color-temperature
correction through the use of external color-correcting filters, such as the
80A, B, or C filters. The downside of this approach of course, is that these
filters will cut the light available for the exposure.![]()
Flash
Flash exposure is another area in which the D-620L represents a significant
advance over the earlier Olympus cameras: The D-620L permits use of an external
flash unit, albeit subject to some restrictions. This is a huge benefit for
anyone doing indoor photography, and really propels the D-620L into a new realm
of applications. More on this in a moment...![]()
The built-in flash has a stated working range of 11.8 inches to 11.8
feet (0.3 - 3.6m) in wide-angle mode, and 11.8 inches to 8.2 feet (0.3 - 2.5m)
in telephoto mode, although we found that it worked quite well down to the 9-inch
minimum-focus distance we discovered in our own experimentation. The "customizable"
flash settings include auto flash, red-eye reduction flash, fill-in flash, fill-in
and extension flash, extension flash only, and off.![]()
 The
external flash connection is via a standard PC-style sync connector on the left
side of the camera body, protected by a small black plastic cap. (This cap proved
to be a source of particular ire in our testing of the camera: It is hard to
remove, and has no independent attachment to the camera. Prying it off with
a fingernail is an invitation for it to suddenly pop loose and fly across the
room and lose itself. Once off, it's incredibly easy to misplace! We would have
much preferred the same sort of flexible rubber covering as is used to protect
the power, video, and printer connections, with the permanent attachment to
keep the cover from being lost.) The external flash unit plugs in here, and
can be used either alone, or in conjunction with the on-camera flash. This last
is quite an accomplishment, as it combines two independent light sources, yet
seems to work quite well. Although we didn't experiment with the external flash
option at any great length, shots we took with the on-board and external flash
units both active worked quite well. (We suspect that what was happening was
that the light sensor on the external flash unit metered the overall exposure,
including the light produced by the on-board flash. However it worked, the results
were quite pleasing, allowing a bounce light off the ceiling, combined with
a fairly subtle fill light from the on-board unit.)
The
external flash connection is via a standard PC-style sync connector on the left
side of the camera body, protected by a small black plastic cap. (This cap proved
to be a source of particular ire in our testing of the camera: It is hard to
remove, and has no independent attachment to the camera. Prying it off with
a fingernail is an invitation for it to suddenly pop loose and fly across the
room and lose itself. Once off, it's incredibly easy to misplace! We would have
much preferred the same sort of flexible rubber covering as is used to protect
the power, video, and printer connections, with the permanent attachment to
keep the cover from being lost.) The external flash unit plugs in here, and
can be used either alone, or in conjunction with the on-camera flash. This last
is quite an accomplishment, as it combines two independent light sources, yet
seems to work quite well. Although we didn't experiment with the external flash
option at any great length, shots we took with the on-board and external flash
units both active worked quite well. (We suspect that what was happening was
that the light sensor on the external flash unit metered the overall exposure,
including the light produced by the on-board flash. However it worked, the results
were quite pleasing, allowing a bounce light off the ceiling, combined with
a fairly subtle fill light from the on-board unit.)![]()
The one limitation of the D-620L's external flash support is that it
leaves it up to the photographer and flash unit to produce the light level the
camera is expecting: The camera always sets its aperture to f2.8 (ranging up
to f3.5 in telephoto mode), and expects the external flash unit to produce a
light level appropriate to that lens opening, and a film speed of ISO 100. Not
all auto flash units will exactly match this setting: In our case, the closest
our cheapie Sunpak auto-thyristor flash unit could come was a light level appropriate
for an aperture of f2.0 at ISO 100. Thus, the test shots we took were a bit
darker than would have been ideal.![]()
Special bonus tip: Adjusting your auto-strobe's light output!
A brief word here about how auto flash units work, and a possible workaround
to tailor your strobe's output to the exact level expected by the D-620L: Auto
strobes work by measuring the light reflected back from the subject, and terminating
the flash once a specific total exposure level has been reached. Most inexpensive
auto strobes provide two exposure settings: A higher one for use with smaller
apertures, and a lower one for use with larger apertures. The actual exposure
levels involved will vary from model to model, and the aperture required for
each power level will vary as a function of the film speed. Usually, the flash
unit has a control to select your film's ISO rating, and some sort of display
to indicate what lens aperture you should use with each power setting.![]()
Since the D-620L doesn't let you adjust the lens opening when working
with an external flash, what can you do if your strobe unit doesn't produce
exactly the right exposure level? There are two fairly simple things you can
do to make the necessary adjustments: If your strobe is producing a higher exposure
than needed (in other words, if its minimum setting corresponds to an f-stop
higher than 2.8), you can use a neutral-density filter on the front of the camera's
lens to reduce the amount of light actually hitting the CCD. (Filter threads
do come in handy!) On the other hand, if your strobe's auto setting calls for
an f-stop lower than f2.8, you need to trick the strobe into putting out a little
more light. This sounds tricky, but is actually quite easy: If you have an auto
strobe unit, you should be able to see a small opening somewhere on the front
of it that admits light to the exposure sensor. (If you're not sure you've found
the right opening, try this test: Manually trigger the flash while it is pointing
at a light surface fairly close to the flash head. Note the approximate level
of brightness it produces. Now, cover up the light sensor with your finger,
and manually trigger the strobe again. If you found the right opening for the
light sensor, the strobe should now fire at maximum power, because no light
is getting back into the sensor to tell it "enough's enough.") You
can easily increase the strobe's automatic power-output level in a controlled
fashion by taping a small sliver of neutral-density lighting gel over the sensor
opening. (You can get "gels" for balancing and color-correcting photo
lighting at any photo store catering to professional photographers.) Neutral-density
gels reduce the amount of light passing through them by a controlled amount,
typically 1/2, 1, 2, and 3 f-stops. If you need an intermediate value, such
as 1.5 f-stops, you can just combine a piece of 1/2f-stop and 1f-stop material.
By reducing the amount of light the strobe's sensor is seeing, you force it
to output proportionately more light before it thinks it's done. (Easier to
do than explain, but quite effective.)![]()
Shutter Lag and Cycle Times
When you press the shutter release on a camera, there's usually a delay before
the shutter actually fires. This time is to allow the autofocus and autoexposure
mechanisms time to do their work, and can amount to a fairly long delay in some
situations. Since this number is almost never reported on, and can significantly
affect the picture-taking experience, we now routinely measure it, using a little
Windows utility developed by Digital Eyes.![]()
We found that the D-620L is somewhat faster than most digital cameras
we've tested, requiring only 0.4-0.7 seconds to focus and fire, when autofocus
is engaged. If you've pre-focused, either by half-pressing the shutter button
in advance of the exposure itself, or by using one of the Quick Focus settings,
the lag time drops to only 0.15 seconds.![]()
FAST Shooting!
Shutter lag is only part of the story though: "Cycle time" is a key
parameter as well. With most digital cameras, after you've taken one picture,
you have to wait for the camera to process the data and store it on the memory
card before you can take the next one. We call this shot-to-shot delay "cycle
time," although you'll also see it referred to as "shot recovery time."
Cycle time is probably the single biggest factor distinguishing the shooting
experience with digital cameras from that with film-based units: You always
have to be aware of whether the camera is ready to take the next shot or not,
and sometimes have to be careful to "pick your shot," because you
won't get another chance for 5-20 seconds after taking it.![]()
The D-620L REALLY distinguishes itself in the area of cycle time!
It has a huge RAM "buffer" memory, where the camera can store images
temporarily, allowing you to snap another picture almost immediately. The buffer
memory can store up to 5 full-resolution images without waiting, bringing the
effective cycle time down to an astonishing 1.6 seconds with full autofocus,
and 0.8 seconds (!!) when using a Quick Focus setting. As we said at the outset,
the impact of this feature on the picture-taking experience with the D-620L
is hard to overstate: This is the first digital camera we've used (January,
1999) that really feels like a film camera! You'd think this would be a fairly
subtle thing, but it's not: The entire experience of using the camera is radically
different, and dramatically improved.![]()
If a shot every 0.8 seconds still isn't fast enough for you, how about
3.3 frames per second? Further taking advantage of its huge buffer memory, the
D-620L provides Sequence Mode, and "electronic motor drive" which
allows you to quickly shoot up to five images in VERY rapid succession. In this
mode, exposure and focus are both locked at the beginning of the sequence, allowing
the camera to acquire up to five images at 0.3 second intervals! To access this
feature, set the camera to REC mode, and press the Self-Timer/Sequence Mode
button until the Sequence icon appears on the top-panel LCD display. Then, fully
depress and hold the shutter release button. Up to five pictures can be captured
at 0.3 second intervals, as long as the shutter button is held down. ![]()
As images are captured, the image memory indicator blocks on the left
side of the Control Panel Display begin to fill in, showing how many images
are being held in the temporary buffer storage. As soon an image is stored in
the buffer, the camera begins writing data to the memory card, and memory blocks
disappear as images are written to the card and cleared from the buffer. In
practice, we found that the five images worth of buffer storage were enough
that we never had to wait for the camera in normal shooting, as we never really
needed to take more than 5 pictures without pausing.![]()
Image Storage and Interface
The D-620L uses 3.3 V ATA-compatible SmartMedia memory cards. (No 5V cards please!)
It comes equipped with an 8 MB removable memory card, but also accepts cards
in 2 MB, 4 MB, and 16 MB sizes. The memory card compartment is easily accessible
on the right-hand side of the camera. Open the compartment door, insert the
memory card into the slot, push it to the left, and you're all set to capture
images. Images are captured and stored in the JPEG format.![]()
When the camera is first placed in REC mode, the number of pictures remaining
on the memory card at the current image-quality setting appears on the Control
Panel on the top of the camera. The storage capacity of the SmartMedia card
is dependent on the resolution level at which you capture images. At the highest
SHQ setting, the 8 MB card can store about 8 images, at the HQ setting, 24 images,
and at the SQ setting, 99 images. Of course, as with all cameras, the number
of images stored on each card will vary, depending on the subjects being captured,
as well as the resolution level at which the camera is set. ![]()
Computer interface is either via the included serial cable, or the optional
FlashPath floppy-disk adapter. The serial cable is used in conjunction with
Olympus' Camedia program, providing basic image-download capabilities to the
host computer. Serial port interface speed can be set at up to 115Kbaud for
PCs and 230Kbaud for Macs. (The interface software runs on both platforms.)
Data transfer times are typical of serial-connected cameras, albeit a bit faster
than most: We clocked it at 33 seconds to transfer a 288K image file to a PC.![]()
Our evaluation unit of the D-620L shipped with version 4.0 of Camedia,
which has an improved user interface relative to earlier versions, but also
drops features we sometimes made use of. In particular, the new version appears
to no longer allow direct camera control for picture-taking: For some of our
critically-framed test shots (like the resolution chart), we liked the ability
to grab an image and immediately display it on the computer screen. On the other
hand, it's not too much more difficult to just take the shot manually, and then
transfer it later. (If you really need the direct control capability, earlier
versions of Camedia will still operate the D-620L in this fashion.) The new
Camedia application also includes a variety of image-manipulation functions,
even including tools to correct for barrel or pincushion distortion. Thus, you
can probably perform most of the cropping and tone/color adjustments on your
images without having to switch to another application.![]()
For those readers not familiar with it, the (optional) FlashPath floppy-disk
adapter is a significant convenience: With a list price of $99, and street prices
generally in the $80s, the FlashPath looks like a metallic floppy disk, with
a slot in the side. To use it, you must first load driver software onto your
computer. (On the PC anyway: On the Mac, the driver software runs as an application
program.) Then, you simply slip a SmartMedia card into the slot on the FlashPath's
side, and insert it into your computer's floppy disk drive. The device appears
to the computer as a floppy disk with the capacity of the SmartMedia card it's
carrying. (2, 4, 8, or even 16 megabytes, with 32 megabyte cards right around
the corner, due in early Spring 1999.) You can copy files to the host computer
by dragging and dropping them in Windows Explorer, with data transferring at
typical floppy speeds: Still no speed demon, but dramatically faster than the
serial connection. (On the Mac, the data transfer is a bit slower, and you can
only read, not write data on the cards.)![]()
As a minor aside, we liked the fact that the D-620L lets you change the
SmartMedia card (and the batteries!) while it is mounted on a tripod. A small
thing, to be sure, but some cameras use a bottom-mounted arrangement for memory
cards, meaning you have to unmount them from a tripod in order to pull the card.![]()
Included Software
The D-620L comes with an good complement of software. Direct camera control
and image downloading are provided by Olympus' own Camedia software package.
Although we now use the FlashPath adapter almost exclusively, we like the Camedia
application a lot: It is convenient and easy to use, and quite fast at downloading
images (at least, for a serial-port connection).![]()
In addition to the Camedia package, Olympus provides acquire plug-ins
for both Mac and Windows platforms.The Mac acquire module is a Photoshop plugin,
supported by many Mac image-editing applications. On the Windows side, a TWAIN
driver will provide near-universal access, given the wide range of applications
that support the TWAIN standard.![]()
Besides the acquisition software, Olympus also bundles Adobe's PhotoDeluxe,
for image editing and manipulation, and the incredible QuickStitch program from
Enroute Technology, for panoramic image assembly. PhotoDeluxe is a common enough
low-end imaging program that we won't devote additional space to it here. Suffice
to say it provides basic but adequate capabilities for manipulating images and
constructing simple projects with them.![]()
Earlier versions of the Camedia software included panorama stitching
capability directly within the application itself (for the D-220L and D320L).
For the D-620L, this feature is provided by the vastly superior and nothing-short-of-amazing
QuickStitch program from Enroute Technology. With versions included for both
Mac and Windows, QuickStitch goes quite a bit beyond any other "panorama"
software that we're aware of: It not only stitches conventional panoramas, but
can assemble images two-dimensionally to create huge, high-resolution images
from multiple smaller ones. (An array of up to 5x5 images can be assembled into
a single enormous one. Alternatively, you can easily make either horizontal
or vertically-oriented panoramas.) While it can't compensate for every goof
you might make in camera positioning, QuickStitch is little short of magical:
The software has a remarkable ability to compensate for barrel or pincushion
distortion between images, successfully stitching together photos that would
be hopeless with lesser programs.![]()
Overall, the software bundle provided with the D-620L provides a complete
suite of capabilities for capturing and manipulating your photos. Even better,
all packages provided are fully functional on both Mac and PC.![]()
Direct Printing
The D-620L has the added capability of printing images to the optional Olympus
P-300 or P-330 Photo Printer. These printers connect easily through a parallel
cable attached to the printer on one end, and the printer output port on the
camera itself at the other. Simply connect the cable, plug in the printer, turn
on the camera and printer, and the images are ready to be printed. Just press
the Print button on the rear control panel while in PLAY mode, and you can print
individual pictures, index prints containing several prints, multiple prints,
or all prints, You can even mirror a picture prior to printing it. You can also
make sticker prints for the kids, using pre-cut sticker sheet media.![]()
The new P-330 photo printer goes quite a bit beyond simple camera-to-printer
output though: Besides this basic function, it can also print images directly
from SmartMedia cards, from a computer, from any video source (TV, VCR, etc.),
display images from a SmartMedia card on a TV, and even act as a SmartMedia
card reader, transferring data from the cards to the PC via a fast parallel-port
connection! Think of it as a "universal image output/transfer engine!"![]()
Power
The D-620L is powered by a set of four AA nickel metal hydride (NiMH) batteries
which are included with the package, along with a charger so you can start using
the camera as soon as you take it out of the box. (Big kudos to Olympus for
recognizing that the camera really needs the rechargeable NiMH cells for any
sort of reasonable battery life.) You can also use NiCd or alkaline batteries,
but we strongly advise sticking with the NiMHs due to their superior power capacity.
Battery status is indicated by a small icon on the right-hand side of the top-panel
LCD display in both REC and PLAY modes. As noted earlier, the battery compartment
opens to the side of the camera, allowing batteries to be changed without removing
the device from a tripod. Finally, Olympus offers an optional AC adapter to
power the D-620L from a common AC wall outlet. The AC adapter plugs into the
power connector under the connector cover on the left-hand side of the camera,
letting you snap pictures all day long.![]()
Control Overview
The D-620L's user interface is quite straightforward, aided by the fact that
many common functions are directly available via external buttons, rather than
requiring the user to navigate the menu system. The menu system is also quite
simple, presenting the same display in both REC and PLAY modes. (The only difference
in the REC or PLAY menu systems is that (oddly), the display brightness can
only be adjusted when in PLAY mode.) Our only overall complaint about the user
interface stems from our recurring rant that exposure-compensation controls
should be available without entering the menu system: On the D-620L, it takes
three button-presses to access the EV adjustment screen.![]()
As is our custom, rather than providing a detailed discussion of each
camera function, we'll just review the various control operations in outline
form, with brief explanations where needed. (In previous reviews, we've split
the control functions up according to the camera mode they operate in. This
time, we've just described the functions of each button all in one place, thinking
that this makes the overall presentation a bit more concise and easier to understand.
-- Please let us know if you have a strong preference for one format over the
other!)![]()
Top-of-Camera Controls
Shutter Release Button and Zoom Lever
- Move between wide-angle and telephoto using the zoom control lever
- Push shutter button halfway to adjust the focus and lock the exposure
- Push shutter button all the way to release the shutter and capture the
image

Record/Play Switch
- Powers-up the camera with the push of a button, and selects between two
operating modes with a turn of the lever. Functions include:
- PUSH ON/OFF - to turn the camera on and off
- PLAY - to view images in playback mode, and to lock, erase, or print an image
- REC - to capture images
- Built-in Flash and Flash Pop-up Lever
- Use the flash whenever the orange lamp in the Viewfinder blinks (slow shutter speed warning)
- Press the flash pop-up lever on the top, left- hand side of the camera to raise the flash head
- Wait before taking a picture until the orange lamp glows steadily, indicating that the flash circuitry is fully charged.
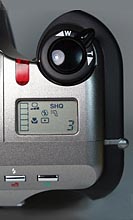 Control
Panel
Control
Panel
Camera status information is displayed on a small black/white LCD indicator
panel on the top of the camera, showing icons that correspond to the current
operation of the camera. (The shot at right also shows the shutter release and
zoom lens control toggle):
- Image Memory Blocks: Displays from 0 to 5 blocks which denote the number of images currently stored in the temporary buffer memory. The D-620L allows you to capture up to 5 images in rapid succession and then stores them to internal memory as it writes them to the SmartMedia Card
- MWB (Manual White Balance) Icon: Appears whenever the white balance is manually set rather than automatically determined. (We have to say that this is one of the more obscure icons we've ever seen to date!)
- Flash Mode Icon: Displays the flash mode currently selected.
- Exposure Compensation Mode Icon: Appears whenever exposure compensation is selected from the menu.
- Image Quality Indicator: Appears when the camera is operating in REC mode, showing SHQ, HQ, or SQ, depending on current recording mode.
- Card Error Icon: Indicates a problem with the memory card and displays a corresponding error code
- Battery Check Icon: Displays when first entering REC or PLAY mode to inform you of the battery status. (We don't understand the rationale, but this icon disappears after you've been in REC or PLAY mode for a while.)
- Number of Remaining Pictures/Frame Number/Error Code Display
- In REC mode, displays the number of remaining "open" slots on the memory card
- In PLAY mode, displays the current frame number
- If an error condition exists, displays an error code which can be referenced in the camera's user guide
- Extension Flash Icon: Displays when the camera is set to use an external flash unit.
- Self-Timer Icon: Displays when the camera is in self-timer mode. Provides a 12 second delay after the shutter button is depressed, before the picture is taken.
- Spot Metering Mode Icon: Appears when you choose spot metering to correct for a excessive backlight or other unusual lighting conditions.
- Sequential Shooting Icon: Appears when the camera is set to quickly capture a series of images and storing them to a buffer prior to writing to the memory card
- Macro Mode Icon: Appears when the camera is set to capture small subjects at close range
Top Control Panel Buttons
The four top-panel control buttons have different functions depending on whether
the camera is in REC or PLAY mode.
![]()
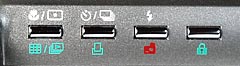
- Macro-Mode/Spot-Metering Mode Button (REC mode) or Index -Display Mode/Slide-Show
Mode Button (PLAY mode):
- In REC mode: allows you to choose between Macro mode to capture a subject as small as 3.5 inches x 4.3 inches at a close distance, or Spot Metering Mode to obtain just the right exposure for your image regardless of the backlight situation.
- In PLAY mode: allows you to view either single images in a slide show fashion, full-frame, or an index of all captured images
- Self-Timer Button /Sequence-Mode Button (REC mode) or the Print Button
(PLAY mode):
- In REC mode: allows you to choose between the Self-Timer mode which lets the picture taker become part of the image by providing a 12 second delay before releasing the shutter, or Sequence Mode, which allows you to shoot up to five frames in sequence at 3.3 frames per second
- In PLAY mode: allows you to print images with the optional P-300/330 Printers. You can print single prints, multiple prints, or index prints.
- Flash-Mode Button (in REC mode) or Erase Button (in PLAY mode)
- In REC mode: allows you to choose between six different
flash mode settings:
- Auto-Flash Mode: Automatically fires the flash in low-light and backlight conditions
- Red-Eye Reducing Flash Mode: Significantly reduces the red-eye effect
- Fill-In Flash Mode: Fires regardless of the available light
- Fill-In Flash PLUS Extension Flash Mode: With an extension flash connected, fired both the main and the extension flash
- Off Mode: With flash in down position, flash does not fire
- Extension Flash Mode: With flash in down position, fires only the extension flash
- In PLAY mode: allows you to delete individual images from the camera's memory card
- In REC mode: allows you to choose between six different
flash mode settings:
- Protect Button (in PLAY mode): Allows you to lock an image to prevent
accidental deletion
Back- Panel Controls
- Viewfinder indicators and markings
- Displays an orange light when flash is in use (flashes when the flash is charging, or when light levels are so low that flash use is advisable).
- Displays a green light during focus operations (blinking for focus operating, steady when focus is locked).
- Central Auto focus mark shows region examined by autofocus circuitry, as well as area measured when in spot-metering mode.
- Diopter Adjustment Dial (on the left-hand side of the camera) adjusts
viewfinder optics to accommodate near- or far-sighted users.
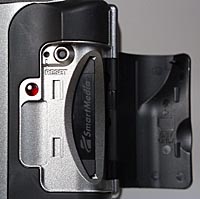 SmartMedia
Memory Card Compartment
SmartMedia
Memory Card Compartment
- Reset Button (inside door compartment): Resets camera values and proper
operation of camera when a problem is encountered. (Although very seldom
used, this can be a key control to know about if your camera ever "locks
up." This happened once to us as the result of what appeared to be
a memory card problem - pressing the recessed Reset button got us back
up and running after only a few heart palpitations!)
 Rear
Control Panel Buttons
Rear
Control Panel Buttons
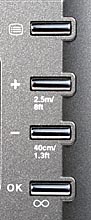
Four rear-panel control buttons operate the LCD menu system, and are also the
means by which you select Quick Focus settings:
- Menu Button: Displays all the available menu options and camera settings
- Menu Navigational Buttons (+/-/OK): Allow you to scroll through the available menu options and make selections
- Quick Focus Buttons: Allow you to select a pre-adjusted focal length while
pressing the shutter release button halfway:
- 1.3 feet
- 8 feet
- Infinity
Multi-function LCD monitor
- Displays captured images for viewing in PLAY mode. Also displays the camera's built in menu system (in PLAY or REC mode), the date of capture, and the frame number. You can set the brightness of the LCD display by pressing the menu button, and choosing the brightness option. When the menu-system "Battery Saver" option is disabled, each image captured will be displayed briefly on the LCD screen as it is being saved to the memory card.
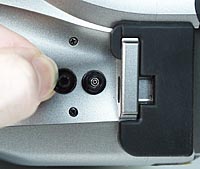
Controls/Interfaces, Left-Hand Side of Camera
- Flash Synchronization Socket: Receptacle into which the cord from the extension flash is plugged. Allows you to use an extension flash if you want to capture a subject that is beyond the range of the built-in flash (> 11.8 feet), or to achieve better lighting control overall.
- Diopter Adjustment Dial: Allows you to set the auto focus for clear viewing through the viewfinder
- AC Adapter Connector (hidden under rubber protective flap): Allows supplementary power from a standard AC wall connection
- Printer Output Connector (hidden under rubber protective flap): Allows for connection of a parallel printer cable to the optional P-300/330 printers
- RS-232C Computer Connector (hidden under rubber protective flap): Provides for direct connection between the camera and your PC for downloading and storage of images
LCD Menu Options
Menu Structure
With the camera set in either REC or PLAY mode, pressing the Menu Button brings
up a menu system on the LCD screen, offering the following options to control
camera operation:
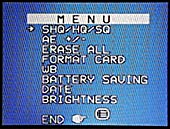 SHQ/HQ/SQ:
Allows you to choose the JPEG compression level and subsequent resolution
at which images will be captured:
SHQ/HQ/SQ:
Allows you to choose the JPEG compression level and subsequent resolution
at which images will be captured:
- SQ: Standard Quality (maximum compression/small image size), stores 99 images on an 8 MB card. With normal compression, and a 640x512 image size, these images are ideal posting to the web, or for sharing via e-mail.
- HQ: High Quality, stores 24 images on an 8 MB card, at 1280x1024 image size
- SHQ: Super High Quality (minimal compression), stores 8 images on an 8 MB card, at 1280x1024 image size. With very low compression factors, this setting is ideal for downloading and printing high-quality photo images
- AE +/- Exposure Compensation: Allows you to compensate for exposure when subjects are either too dark or too light in stepwise increments from 0 + 3 EV units.
- Erase All: Erases all images stored on the camera's memory card
- Format Card: erase all existing data, including images, from the camera's memory card
- WB (White Balance): Provides a way to adjust the color the camera
considers to be "neutral" (without coloration). Allows you to choose
between automatic white balance (the default) and the following manual white
balance values, specified in degrees Kelvin:
- 3000K
- 3700K
- 4000K
- 4500K
- 5500K
- 6500K
- Battery Saving: provides two settings:
- Off: After you capture an image, it appears on the LCD for 5 seconds
- On: The image does not appear after you capture it.
- Date: Provides a way to set date and time variables tagged to each captured image
- Brightness: (Available only in PLAY mode, but affects the display in both PLAY and REC): Allows you to set the brightness of the LCD backlight. Boost the brightness in strong ambient lighting, to improve visibility. Decrease it in darker surroundings to save battery power.
Test Results
In keeping with our standard policy, the comments here are rather
condensed, summarizing our key findings: For a full commentary on each of the
test images, see the D-620L's "pictures" page.![]()
As with all Imaging Resource camera tests, we encourage you to let your
own eyes be the judge of how well the devices performed: Explore the images
on the pictures page, to see how well the D-620L performed, and how its images
compare to other cameras you may be considering buying.![]()
Overall, we found the D-620's picture quality very impressive. Images
were consistently well-exposed, with bright, clean colors and excellent detail.
Olympus' D-600L, the predecessor to the D-620L was characterized by sharp images,
bright colors, and relatively high contrast, making for very "snappy"
prints. The updated model retains all these characteristics, but has a bit better
handle on image contrast, and seems to be a bit less likely to lose highlight
detail. Color accuracy and saturation were exceptionally good across the entire
color spectrum, with no evident deficiencies in any hue.![]()
Detail and resolution were very good, with a visual resolution of approximately
600-650 line pairs/picture height in both vertical and horizontal directions,
clearly at the top of the field. Performance in the outdoor far-field shot was
exceptionally good as well. While the D-620L does apparently apply some in-camera
sharpening, the amount seems to be just enough, increasing apparent resolution,
without coarsening fine details.![]()
The optical viewfinder on the D-620L is significantly more accurate than
the optical viewfinders of other cameras we've tested, showing fully 95% of
the final image capture area. The viewfinder image is also well-centered at
all focal lengths, from wide angle to telephoto.![]()
The D-620L did quite well in macro mode, the telephoto zoom providing
a comfortable 9 inch (22 cm) working distance, while capturing a small 2.8 x
3.5 inch (7.2 x 9.0 cm) minimum capture area. (Interestingly, we measured better
macro performance than Olympus claims for the unit.) The flash works well up
to the closest focusing distance, successfully throttling-back its output, and
providing surprisingly even illumination up close.![]()
Conclusion
Olympus had a tough act to follow, in attempting to better their earlier D-600L
SLR digicam. We're happy to say that they succeeded in doing just this, with
the D-620L. While they've made slight but perceptible improvements in image
quality, the biggest strides come in the "feel" of the camera in live
shooting situations, and in the provision of an external flash sync connector.
We mentioned it at several points during the review, but it deserves special
notice again: The extremely fast shot-to-shot cycle times of the D-620L radically
alter the entire digital photography experience. The change is qualitative,
not quantitative: Its increased responsiveness makes the camera so much more
transparent to the creative process that it's easy to forget you're using a
digital camera, rather than a film one.![]()
Reader Sample Images!
Do you have a D-620L camera? If you'll post an album of your samples
on one of the photo-sharing services and email us at [email protected],
we'll list the album here for others to see
For More Info:
View the data sheet for the D-620L![]()
View the test images from the D-620L![]()

Follow Imaging Resource: