Minolta Dimage 7Minolta unleashes the first 5-megapixel camera, with a tack-sharp 7x zoom lens, and amazingly sensitive electronic viewfinder!<<Shutter Lag & Cycle Time Tests :(Previous) | (Next): Camera Modes & Menus>> Page 8:Operation & User InterfaceReview First Posted: 5/23/2001 |
Operation & User Interface
The Dimage 7's user interface is much more sophisticated than most digital cameras on the market, as it provides significant external control over commonly used settings. As a result, the Dimage 7 should be more intuitive for film-based photographers who are accustomed to the "tactile" interface of the traditional 35mm SLR. The difference is immediately apparent with the mechanically-coupled zoom lens control, which provides much more stability than the motorized rocker switch zooms used by most other digital cameras. The rubber collar grip surrounding the lens barrel is clearly marked with corresponding focal lengths, so you know immediately the zoom setting at which you're operating -- a feature we've missed in standard digicams. Manual focus is more of a "fly by the wire" adjustment, in which a notched focus ring at the base of the lens is used to control the internal motor that actually makes the focus adjustment. In our opinion, the zoom control is much more important, however, given that the majority of users will spend more time in Auto Focus rather than Manual Focus mode.
Aside from Flash adjustments, you can control almost all of the essential camera functions without having to resort to the on-screen LCD menu system. Most of the camera adjustments are made by rotating a dial, pressing a button, and turning a selector wheel. This may sound like a lot of steps, but in practice we've always found external mechanical controls like these are much faster to navigate than LCD menu selections. In addition to the Mode Dial / Main Power Switch on top of the camera, the major interface elements include a set of function dials on the left side of the camera, a selector wheel just to the right of the Shutter button, and the top-panel LED data readout (or, you can refer to the LCD or electronic viewfinder displays.) Initially, we found it a little awkward to have to view the left side of the camera to select specific parameters, but after a few short hours of using the camera, we found ourselves simply counting the clicks on the dials to select the options we wanted. Bottom line, while they're rather unusual in the digicam world, the Dimage 7's controls lend themselves to quick, sure operation when you're in a concentrated (mental) shooting mode.
The sections below will walk you through all of the dials and buttons on the Dimage 7, explaining what each is used for:
Control Enumeration

Shutter Button
Located on the top right-hand side of the camera, this button sets exposure (in automatic exposure modes) and focus (in autofocus mode) when half-pressed, and trips the shutter when fully pressed.

Selector Wheel
This ribbed wheel sits just behind and to the right of the shutter button, conveniently under your index finger. All of the most commonly used camera settings are adjusted by using this wheel in conjunction with one of the function dials on the left side of the camera. It also controls aperture and shutter speed in exposure modes where those parameters are placed under the photographer's direct control. (Aperture or Shutter Priority, or full Manual mode.)
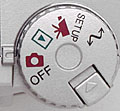
Mode Dial / Main Switch
In the right rear corner of the top panel, this knob turns the camera on or off and selects the main operating modes of the camera. Options include: Record, Playback, Movie, Setup, and Computer Connect modes.
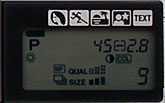
Data / Status Panel
Not a control per se, this data readout panel displays icons and numbers indicating the status of a wide range of camera control settings.

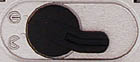
Pro Auto Button
We called this one the "Help, I'm Lost" button. Pressing it resets most camera options to their default settings, and returns the camera to programmed autoexposure mode. (A handy way to get back to square one, after making multiple settings adjustments.)

Subject Program Button
Just to the right of the status panel, this button cycles the camera through its five "Subject Programs," including Portrait, Sports, Sunset, Night Portrait, and Text Modes. (We described the operation of these modes earlier, in the Exposure section of this review.)

AF / AEL Button
On the back of the camera, just below the Mode Dial is the AF / AEL button. Pressing this locks the focus and exposure settings (much as half-pressing the shutter button does). It can be configured to suit your shooting style via an LCD menu option. Focus and exposure lock can be set together or as separate functions, and it can also be used to toggle the lock on or off. (This would permit locking exposure without requiring you to keep the button held down while you focused, zoomed, etc.)
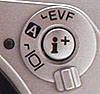
Display Mode Switch
Also on the back of the camera, just to the right of the EVF eyepiece is the Display Mode switch. This controls the operation of the rear-panel LCD and the EVF displays. Turned fully clockwise, it disables the EVF and enables the LCD screen. Turned fully counterclockwise, it enables the EVF and turns off the LCD. In its middle position, the camera will switch automatically between the EVF and LCD, depending on whether your eye is pressed to the eyepiece. (Pretty slick.)
Information Button
Located in the middle of the Display Mode switch, this button controls the amount of information displayed on the EVF and LCD screens while in Record and Playback modes, and it activates the Index display in Playback mode.
Menu Button
While the Dimage 7 does make considerable use of external controls, it also has an extensive LCD menu system, with three screens of menus in both Record and Playback modes. Pressing the Menu button calls up the menu system, or turns it off when you're done.
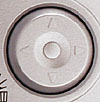
Five-Way Controller
This rocker control is used to step through selections within the LCD menu system and to interact with various status messages or requests for confirmation that appear on the LCD screen. You navigate the menus by pressing one of the four arrows around the control's periphery, and confirm selections by pressing the center of the control. In Playback mode, pressing the up arrow calls up the histogram display. In record mode, pressing and holding the center of the control switches the camera between Wide and Spot autofocus modes. Once in Spot AF, rocking the control moves the Spot crosshair around the frame, converting it to Flex Focus Point mode..

QV/Delete Button
Below the Five-Way Controller, the QuickView button lets you quickly switch from Record to Playback mode to view just-captured images. When viewing an image, pressing this button prompts the camera to ask if you want to delete it.

Magnify Button
Below and to the right of the Five-Way Controller, this button can be configured (via an LCD menu option) to either toggle the 2x digital zoom, or to magnify the center of the image by 4x for manual focusing.
Battery Compartment Latch
Directly below the LCD screen, this latch opens the battery compartment cover. We found it slightly challenging to actuate this latch while simultaneously pressing on the compartment cover to hold it closed, but it's far from the worst battery compartment design we've seen.
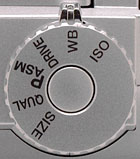
Function Dial
Located on the left side of the camera, just below and between the flash head and electronic viewfinder, this dial is the primary interface for controlling the most frequently used camera settings. Options include Image Size, Image Quality, Exposure Mode, Drive (single shot, continuous, or self-timer), White Balance, and ISO. You change a setting by rotating the dial to the appropriate position, and then pressing the central button while rotating the ridged Selection Wheel. When you press the center button, the corresponding camera option is displayed in isolation on either the LCD or EVF (whichever is in use), so you can see its current value as you rotate the Selection Wheel.

Digital Effects Controller
Below and forward of the Function Dial is the Digital Effects Controller. Its operation is very similar to that of the Function Dial, in that changes are made by rotating the dial, pressing the central button, and scrolling the Selection Wheel. Options include Contrast, Exposure Compensation, and Color Saturation.

AF / MF Button
Just to the rear of the Digital Effects Controller, this button switches the camera between automatic and manual focus operation.

Manual Focus Ring
Surrounding the base of the lens barrel, this ridged ring controls focus when the camera is in Manual focus mode. It isn't directly (mechanically) connected to the optics, but rather commands an internal motor to move the lens elements.

Macro Focus Switch
Located on the left side of the lens barrel, this control engages the macro focusing option. (Note that there's an interlock that prevents it from being engaged unless the lens is zoomed all the way to its telephoto position.)

Follow Imaging Resource: