DC265 Controls and User Interface
Digita OS and extensive use of LCD menus make it easy to navigate
through multiple options
(Full review posted 16 April, 1999)
|
Too much info! - Split review format: There ended up being SO much to write about the DC265, that we've split-off our user-interface coverage, as well as coverage of the Digita F/X application we tested with the camera. See the "EZ Print" page if you want to print a single hardcopy containing all the material. Follow the links below, or in the main body of the text to see other portions of the review: |
||
|
|
Main Review for the DC265. |
|
Operation and User Interface
The DC265's user interface is so "deep" that we felt it justified
a completely separate review section to cover it. The first paragraphs below
repeat some of the material from the main review, for the sake of completeness.
Click here to skip over these portions, if you've
already read them in the main review.![]()
The user interface and operation of the DC265 is easily one of its most
distinguishing characteristics, and probably the feature most likely to spark
debate as well. As the one of a still limited number of cameras incorporating
the "Digita" camera operating system and scripting language (two others
being its little brother the DC220, and its predecessor the DC260), the DC265
offers new capabilities for modifying the camera's behavior to suit specific
applications and worfklows. Kodak has always maintained an excellent interface
for third-party developers, but the release of the Digita operating system extends
this further than has ever been the case before.![]()
As wonderful as the computer-like capabilities of the DC260 were, we
complained a fair bit about the computer-like need for the camera to "boot
up" prior to use. In the case of the DC260, this process required fully
15 seconds or more, removing some of the spontaneity that digital photography
offers. In the DC265, a faster processor and firmware changes have reduced this
start-up time to on the order of 10 seconds. Likewise, shutdown time has been
cut to a maximum of 5 seconds, whereas the DC260 could take as long as 40 seconds
if it needed to process images in the buffer memory. (The DC265 still has to
process any data in the buffer memory before it turns the power off, but it
retracts its lens and goes into "shutdown mode" within 5 seconds of
pressing the power button.)![]()
While we're once talking about the power button, it's worthwhile pointing
out another minor but useful change Kodak's made on the DC265: A frequent annoyance
on the DC260 was the tendency for users to hit the power button by mistake when
intending to take a picture (it's located on top of the camera, just behind
the shutter button). This initiated a shutdown, and required waiting through
the lengthy re-boot before you could finally take the shot. On the DC265, a
delay has been inserted between pressing the power button to shut down and actually
powering-off the camera: You now have to hold down the power button for about
two seconds before it will shut down the camera. In our experience, this has
now all but eliminated the problem of accidental shutdowns.![]()
The handling of "buffer memory" and "background"
processing of images is an area of huge improvement in the DC265 over the DC260.
As digital camera resolution has increased, the time required to process the
images and save them to the camera's memory has increased as well. Although
faster processors have helped somewhat, until recently, digital cameras lagged
far behind film-based units in their responsiveness and shot-to-shot cycling.
We discussed the DC265's excellent shot-to-shot cycle time performance earlier,
but some further discussion of buffer memory and camera operation is warranted
here, as this is an area where the DC265 really shines.![]()
The DC260's buffer memory was sufficient to allow you to capture two
maximum-resolution images in rapid succession, but would then require you to
wait for a fairly long time (20-30 seconds) after that, before you could take
the next shot. The ability to grab two pictures fairly quickly was great, but
the long delay before the third could be taken was frequently an annoyance.
Also, while the camera was processing images, you couldn't change settings,
or otherwise get ready for the next shot. With the DC265 though, all this is
changed. First, a *MUCH* larger buffer memory lets you capture up to 6 full-resolution
images before having to pause, and the camera requires only about 15 seconds
to free-up enough memory to allow capture of picture number 7. In practice the
6 full-resolution images were enough that we almost never found ourselves waiting
for the camera between shots. Even better, essentially all camera controls remain
"live" while the DC265 is processing images in the background. This
makes it easy to change flash or white balance settings, image resolution, exposure
compensation, etc, without having to wait for the camera to get done with its
processing. This may seem like a relatively minor issue, but the difference
in the "feel" of the camera is enormous. Not having to plan your shots
around the camera's ability to process them greatly frees the creative process:
If we had to pick one characteristic of the DC265 that we liked most over the
DC260, the improved "burst" performance would have to be it!![]()
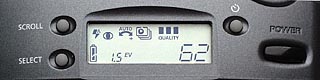
![]() The feedback the DC265 gives you on
its memory and image-processing status is very useful as well: Two indicators
relating to memory performance and availability appear in the LCD viewfinder
display. In the image at right, the upper row of blocks correspond to available
space in the CompactFlash memory card: Red-filled blocks indicate used space,
while white-filled ones show available storage. The horizontal, thermometer-style
display under the row of red and white blocks shows buffer memory status: The
gray portion of the bar shows buffer memory currently in use, holding images
waiting to be processed, while the white portion shows available buffer memory.
Although our usage of the camera rarely exercised the buffer memory to its fullest
extent, we can envision sports or other applications in which the photographer
may want to wait before beginning a sequence of images until sufficient buffer
memory had become available.
The feedback the DC265 gives you on
its memory and image-processing status is very useful as well: Two indicators
relating to memory performance and availability appear in the LCD viewfinder
display. In the image at right, the upper row of blocks correspond to available
space in the CompactFlash memory card: Red-filled blocks indicate used space,
while white-filled ones show available storage. The horizontal, thermometer-style
display under the row of red and white blocks shows buffer memory status: The
gray portion of the bar shows buffer memory currently in use, holding images
waiting to be processed, while the white portion shows available buffer memory.
Although our usage of the camera rarely exercised the buffer memory to its fullest
extent, we can envision sports or other applications in which the photographer
may want to wait before beginning a sequence of images until sufficient buffer
memory had become available.![]()
As was doubtless evident in our earlier comments, the DC265 is an unusually
flexible device with many options (external flash, time exposure, time-lapse
photography, multiple focus modes, etc). It should come as no surprise then,
that the user interface needs a lot of screens and menu options to manage all
this functionality. Kodak has created a very clear series of screens and menus
to control the camera, but the result is still a "deep" interface
that can take a little while to navigate. Fortunately, the most-frequently accessed
controls can be reached through the top-panel LCD and pushbuttons, which provide
a much shorter route to the desired functions. (Top-panel controls available
in capture mode include flash functions, +/- EV compensation, still/burst/time-lapse
enabling, compression level selection, and self-timer enabling.)![]()

Camera setup is effected through a combination of a back-panel mode-select
rotary switch, a 4-way rocker button located inside the mode-select ring, "display"
and "menu" buttons to the left of the LCD panel, and three unlabeled
"soft buttons" arranged along the bottom of the LCD. Extensive use
is made of the LCD panel for displaying menus and option choices, which are
then selected through a combination of the various buttons and controls.![]()
Overall operation of the DC265 is divided into four modes, of which only
3 actually affect camera operation. The four modes, selected by a back-panel
rotary switch, are Capture, Review, Connect, and Info. These are fairly self-explanatory,
except perhaps "Info" mode. Presently, selecting "Info"
displays a screen on the LCD panel showing the camera's firmware version, and
directing you to a web location
for the "latest info", or to the FlashPoint
site for information on the Digita language and operating environment.![]()
With the preceding as background, we'll now step through the various
operating controls and modes of the DC265, beginning with the top-panel controls:![]()
![]() Self-Timer Mode
Self-Timer Mode
The Self-Timer mode has its own button on the top of the camera. You can use
the self-timer in conjunction with any of the camera settings you've enabled,
like many other camera models. Depressing the Self-Timer button provides a 10
second delay between when you press the Shutter button and the when the shutter
fires.![]()
Scroll and Select Buttons
Also located on top the camera are the Scroll and Select buttons, shown below.
These buttons provide you with a way to quickly change the flash mode, exposure
compensation, picture type (still, burst, or time-lapse), and quality settings
to meet your needs without entering the LCD menu system. Simply press the scroll
button until the setting you want is flashing on the Status display. Then, press
the select button to move through the available options. Pressing the Scroll
button a second time confirms what you selected, or if you don't press a button
for 5 seconds, the current selection is automatically confirmed.
 Zoom Toggle
The Zoom Toggle switch is located on the back of the camera, in the top-right
corner. Move the switch to the right to zoom in (3x) on your subject, to the
left for a wide-angle shot. Turning on the LCD and moving the toggle switch
to the right enables the camera's (2x) digital zoom capabilities.![]()
Mode Dial & Four-Way Controller
The DC265 Zoom Camera can operate in one of four different modes. You use the
Mode Dial button on the rear of the camera to select the mode in which you want
to operate:
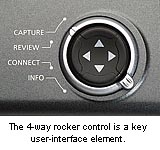 Capture - To capture your
images, and set camera options using the LCD menus.
Capture - To capture your
images, and set camera options using the LCD menus.
- Review - To review the images you've captured, and edit and organize
the images.
- Connect - To connect the camera to a computer for downloading your
images.
- Info - To view information specific to the camera.
The Four-Way Controller button is on the rear of the camera in the center of
the Mode Dial. The Controller contains up/down and left/right arrow buttons
that you use to scroll through the camera menu options on the LCD, and to scroll
through pictures.![]()
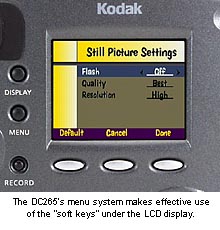 Softkeys
Located just under the LCD, these buttons are used to confirm selections displayed
just above the button on the LCD screen. You use these buttons, in conjunction
with the Four-Way Controller, in Capture and Review Modes when choosing camera
settings and reviewing images.![]()
Display and Menu Buttons
Display-Activates the LCD for viewing of images and menu options.
Menu-Displays the available menu options when in Capture or Review Mode.![]()
Record Button
After choosing an image in Review Mode, or QuickView mode after capture, press
this button to record up to 45 seconds of audio data for the current image.![]()
Capture Mode Menu Options
With the Mode Dial on the rear of the camera set to Capture, pressing the Menu
Button provides a variety of different options for capturing your images:![]()
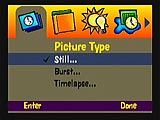 Picture Type Menu: Lets you
select the type of picture that you want to capture, and specify the picture's
characteristics:
Picture Type Menu: Lets you
select the type of picture that you want to capture, and specify the picture's
characteristics:
- Still: Use this setting when capturing images normally. When choosing
the Still picture setting, you can change the following characteristics through
the on-screen menu options:
- Flash: Choose from Auto, Fill, Red-Eye, or Off settings. This setting
may be overridden/changed via the top-panel buttons and readout.
- Quality: Choose from Good, Better, and Best compression settings
for your images. Best compresses the image the smallest amount for highest
quality results. This setting can be overridden/changed via the top-panel
buttons and readout.Resolution: Choose from Standard (768x512), Medium (1152x768),
or High (1536x1024) resolution.
- Burst: Use this setting to capture a series of images in rapid succession,
while holding down the shutter button. You can shoot up to 6 pictures at high
and medium resolutions, and 24 pictures at standard resolution. The Burst
menu screen lets you change change the following characteristics:
- Quality: Choose from Good, Better, and Best compression settings
for your images. Best compresses the image the smallest amount for highest-quality
results. This setting may be overridden/changed via the top-panel buttons
and readout.
- Resolution: Choose from Standard (768x512), Medium (1152x768),
or High (1536x1024) resolution.
- Burst Rate: Select from .1 to 3 frames per second. The camera
continues to fire as long as you hold down the Shutter button.
- Quality: Choose from Good, Better, and Best compression settings
for your images. Best compresses the image the smallest amount for highest-quality
results. This setting may be overridden/changed via the top-panel buttons
and readout.
- Timelapse: Use this setting to capture images at fixed intervals,
over an extended period of time. When choosing the Timelapse setting, you
can change the following characteristics:
- Flash: Choose from Auto, Fill, Red-Eye, or Off setting. This
setting may be overridden/changed via the top-panel buttons and readout.
- Quality: Choose from Good, Better, and Best compression settings
for your images. Best compresses the image the smallest amount for highest-quality
results. This setting may be overridden/changed via the top-panel buttons
and readout.
- Resolution: Choose from Standard (768x512), Medium (1152x768),
or High (1536x1024) resolution.
- Interval: Sets the interval between shots. You can set an interval
from 1 minute to 24 hours, in a total of 16 increments. (1, 2, 3, 4, 5,
10, 20, 30, 50 minutes, and 1, 2, 3, 4, 8, 12, and 24 hours) The camera
fires at the interval set after you press the Shutter button. For long
intervals between shots, the camera powers down to conserve batteries,
but turns back on when the next time interval is met.
- Number of Pictures: Sets the number of pictures to capture at
the preset intervals chosen. (Any number from 2 to 1000(!) can be selected.)
- Flash: Choose from Auto, Fill, Red-Eye, or Off setting. This
setting may be overridden/changed via the top-panel buttons and readout.
Note that you can also use the Scroll and Select buttons on top of the camera
to choose a Picture type, and modify the Flash and Quality settings. When choosing
a picture type in this manner, other parameters for that picture type (resolution,
burst rate or time-lapse interval, etc.) will be as previously-selected in the
LCD menu system.![]()
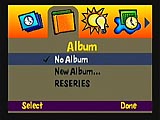 Album Menu: Allows you to organize
and store images to in-camera albums on the memory card. There are three options
from which you can choose:
Album Menu: Allows you to organize
and store images to in-camera albums on the memory card. There are three options
from which you can choose:
- No Album: Images are captured and stored to the camera's general
storage on the memory card.
- New Album: Allows you to create a new album and specify a name for
the album. When you create and select an album, all images you capture are
stored to that album until you change the setting.
- Existing Album(s): Choose an existing album to work with, or "dissolve"
it. NOTE that "dissolving" an album doesn't delete the images in
it, but merely dumps them back in to the default directory on the memory card.
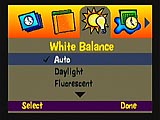 White Balance Menu: Select one of five
white balance settings depending on the current lighting conditions:
White Balance Menu: Select one of five
white balance settings depending on the current lighting conditions:
- Auto: Automatically adjusts the white balance setting based on the
scene being shot. (This is the default setting.)
- Daylight: Adjusts the white balance for natural, neutral daylight
lighting.
- Fluorescent: Adjusts the white balance for images captured under
fluorescent lighting to remove the greenish tint that sometimes occurs.
- Tungsten: Adjusts the white balance for images captured under tungsten
lighting to remove the reddish-orange tint that sometimes occurs.
- Off: Applies no white-balance adjustment.
(SSHOT)
 Watermark Menu: Allows you to "watermark"
images by placing a text or logos on the images that you capture. You can position
the watermark anywhere on the picture by specifying offsets, and you can choose
from a variety of text and background colors, including transparency settings.
There are four Watermark options from which you can choose:
Watermark Menu: Allows you to "watermark"
images by placing a text or logos on the images that you capture. You can position
the watermark anywhere on the picture by specifying offsets, and you can choose
from a variety of text and background colors, including transparency settings.
There are four Watermark options from which you can choose:
- None: Use this option when you don't want a watermark.
- Date and Time: Use the current date and time as the watermark, and
set the offset and text characteristics of the watermark.
- Text: Use pre-defined text as the watermark, enter the text to use,
and define the characteristics of the text and where it appears on your image.
- Logo: Use a pre-defined logo as the watermark, choose the logo to
use, and define the characteristics of the logo and where it appears on your
image. The logo files are specially formatted .lgo files that must be uploaded
from a host computer to the camera's PC Card. Kodak provides a software utility
for creating the .lgo files. If the .lgo file is larger than 512K, it will
not appear as an option on the LCD menu.
- (Sub-menu options:)
- Left Offset - distance from left-hand edge of the picture the watermark will be placed.
- Top Offset - distance from the top edge of the picture the watermark will be placed.
- Transparency - on/off - For Date/Time and Text options, allows a transparent watermark to be "embossed" on the image.
- Text Color - Also for Date/Time and Text options only, allows you to choose from several preset text colors.
- Background Color - Also for Date/Time and Text options only,
allows you to select from several preset background colors, for the area
immediately surrounding the imprinted text.
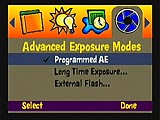 Advanced Exposure Modes Menu: Allows
you to choose one of three exposure modes:
Advanced Exposure Modes Menu: Allows
you to choose one of three exposure modes:
- Programmed AE: Automatically chooses the appropriate shutter speed
and aperture settings for your shots. This is the default, used for shooting
most pictures. Maximum automatic exposure time is 1/2 second.
- Long Time Exposure: Lets you choose the exposure time ranging from
0.5 to 16 seconds in 0.5 second intervals.
- External Flash: Allows you to disable the camera's flash and use
the external flash sync to provide the flash. You can set the lens aperture
manually in one stop increments from f/3 to f/16. (Actually, the first step
is a bit less than a full stop, in that it goes from f/3 to f/4.0.)
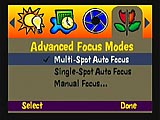 Advanced Focus Modes Menu: Lets you choose
the way focus is determined when capturing images:
Advanced Focus Modes Menu: Lets you choose
the way focus is determined when capturing images:
- Multi-Spot Auto Focus: Determines the focus setting by examining
three areas in the field of view.
- Single-Spot Auto Focus: Determines the focus position by examining
only the center of the field of view.
- Manual Focus: Lets you set the focus distance manually, in 9 steps
from 1.5 feet (50cm) to infinity.
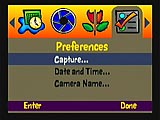 Preferences Menu: Lets you set preferences
with regard to image capture, date and time, and camera name:
Preferences Menu: Lets you set preferences
with regard to image capture, date and time, and camera name:
- Capture: Capture preferences include the following:
- File Type: Choose from JPEG or FlashPix formats.
- Quickview: Displays the image you just captured in the LCD for
several seconds after capture. You can choose the length of time to display
the image ranging from .5 seconds to 30 seconds.
- Auto Rotate: When enabled, rotates the picture automatically
based on an internal sensor that determines the orientation of the camera
at the time of exposure. Thus, "Portrait" (vertical) images
will display as such on your computer screen directly, without requiring
the image to be rotated manually in an image-manipulation program.
- File Type: Choose from JPEG or FlashPix formats.
- System Sounds: Turns system sounds on and off. These are the sounds
that the camera makes when the buttons on the camera are pressed, or errors
occur.
- Sleep Timeout: Sets the number of minutes of camera inactivity (with
the LCD on) before going into power-save mode. You can set the timeout anywhere
from 1 to 5 minutes in 1/2 minute intervals.
- Date and Time: Set the camera's date and time (in 12 or 24 hour format).
Camera name: Lets you enter a name for your camera which appears in the header of each picture file.
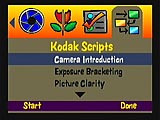 Kodak Scripts Menu: Lets you run scripts
that are stored on the camera's memory card to further customize your picture-taking
experience. The scripts loaded on the Picture Card shipped with the DC265 appear
on the Kodak Scripts set-up screen. The DC265 comes with several scripts preloaded,
as well as others that are included on the CD ROM that comes with the camera.
Any scripts on the CD ROM must be uploaded to the camera's memory card from
a host computer by using utility software that Kodak provides for this purpose,
or by copying them onto the card directly using a CF card reader/writer. Examples
of some scripts include an Exposure Bracket script that prompts you to capture
three versions of the same subject at different exposure levels to get the best
shot, and adding a Super quality setting (in addition the Good, Better, Best
settings) to your camera. Note that the Kodak Scripts menu is created
by scripts on the memory card shipped with the camera. It won't appear otherwise
(eg, on other cards not carrying the scripts on them.) Note, too, that script-created
entries can appear on ANY menu in the LCD menu system.
Kodak Scripts Menu: Lets you run scripts
that are stored on the camera's memory card to further customize your picture-taking
experience. The scripts loaded on the Picture Card shipped with the DC265 appear
on the Kodak Scripts set-up screen. The DC265 comes with several scripts preloaded,
as well as others that are included on the CD ROM that comes with the camera.
Any scripts on the CD ROM must be uploaded to the camera's memory card from
a host computer by using utility software that Kodak provides for this purpose,
or by copying them onto the card directly using a CF card reader/writer. Examples
of some scripts include an Exposure Bracket script that prompts you to capture
three versions of the same subject at different exposure levels to get the best
shot, and adding a Super quality setting (in addition the Good, Better, Best
settings) to your camera. Note that the Kodak Scripts menu is created
by scripts on the memory card shipped with the camera. It won't appear otherwise
(eg, on other cards not carrying the scripts on them.) Note, too, that script-created
entries can appear on ANY menu in the LCD menu system.
Review Mode
 Use Review mode to view your images after
you capture them. When you change from Capture to Review Mode, the LCD automatically
activates and displays your images. Initially, the last image captured appears
full screen on the LCD. The image may contain date and time information and
other image markings depending on whether or not the "Overlay" feature
is turned on (in the LCD menus available in Review Mode). We liked the "Overlay"
option (shown in the screen shot at right), and also liked the fact that it
can be turned off, to allow you to see the full image unobstructed. When enabled,
the overlay bars display the image number, date, time, type of shot (this last
via an icon), and provide options relevant to the image being viewed. Options
include:
Use Review mode to view your images after
you capture them. When you change from Capture to Review Mode, the LCD automatically
activates and displays your images. Initially, the last image captured appears
full screen on the LCD. The image may contain date and time information and
other image markings depending on whether or not the "Overlay" feature
is turned on (in the LCD menus available in Review Mode). We liked the "Overlay"
option (shown in the screen shot at right), and also liked the fact that it
can be turned off, to allow you to see the full image unobstructed. When enabled,
the overlay bars display the image number, date, time, type of shot (this last
via an icon), and provide options relevant to the image being viewed. Options
include:
- Delete: Delete the current image. (Takes you to a second screen for
confirmation.)
- Magnify: Lets you magnify and zoom in on a particular portion of
a picture for closer examination. You can use the up/down and left/right scroll
buttons to view different parts of the picture at the magnified level.
- Play: Lets you play sound, and review burst and time lapse sequences.
The Play button only appears when viewing full-screen with Overlay turned
on. If the image has sound associated with it, the camera will play the sound.
If the image is part of a burst or timelapse sequence, the camera displays
the images one after another on the LCD for your review.
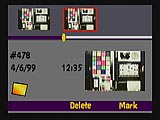
As noted above, in review mode, the LCD display normally shows one image at a time. Pressing the Display button once though, puts the camera into what we've called "Index" mode, in which you can very rapidly scan through images stored on the memory card. In this mode, you'll see a "film strip" area at the top of the LCD, containing tiny thumbnail versions of images you've captured (assuming there's more than one picture currently stored on the memory card). The left/right arrows on the rocker control let you scroll quickly through the images, and a slightly larger copy of the currently-selected image appears in the lower portion of the window, along with information showing the date and time of capture, image number, and type of image that it is (still, burst, time-lapse). Pressing the Display button again shows you this image full-size. When in index mode, you'll have two or three options available, relating to the currently-selected image:
- Open/Close: Lets you open and close albums that contain more than
a single image.
- Expand/Collapse: The equivalent of Open/Close for Timelapse or Burst
sequences. These images are stored as folders on the PC Card, and initially,
only the first image in the sequence is displayed. To expand the folder, scroll
to select the first image and press the Expand button. All the images in the
Burst or Timelapse sequence will appear in thumbnail form across the top of
the LCD panel, connected by dots or bars, to show that they are grouped together.
To close the folder after viewing the images, press Collapse.
- Mark: Lets you mark one or more images for a specific action. For
example, you can mark images to be deleted, moved into an album area, or copied
from one camera to another. You can select all the images on the memory card
by holding down the Mark button for at least 2 seconds.
- Delete: Deletes all marked images on the memory card.
 Review Mode Menu Options:
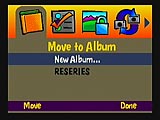
Move to Album Menu: Allows you to move previously-marked images into a predefined album area on the PC Card, or allows you to create a new album for storage purposes. Use the up/down arrows on the Four-Way Controller to choose the album option that you want.
Review Preferences Menu:
- Overlay: Turns the Overlay feature on and off.
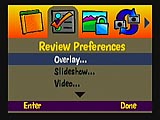 Slideshow: Lets you choose the time
interval for viewing your images in a slideshow on your television. You first
need to connect the camera to your TV with the video cable supplied. You can
set the time interval to between 1 and 99 seconds. In addition you can turn
sound on and off, and choose whether or not you want to images to run in a
continuous loop.
Slideshow: Lets you choose the time
interval for viewing your images in a slideshow on your television. You first
need to connect the camera to your TV with the video cable supplied. You can
set the time interval to between 1 and 99 seconds. In addition you can turn
sound on and off, and choose whether or not you want to images to run in a
continuous loop.
- Video: Supports NTSC for US and Canadian usage, and PAL for European
usage.
- Playback: Lets you set the time intervals for playing back images
captured in Burst or Timelapse sequences, as well as images stored in albums.
You can set the time interval to between 1 and 10 seconds.
- Format: Lets you format picture cards for use with the DC265 if they
have a different format or have become corrupted in some way. Remember that
formatting removes all information on the card including any logo files or
scripts you may have stored.
- Picture Protection: Allows you to protect previously-marked images
from being accidentally erased from the picture card. When you protect an
image, the Protect icon appears over the image on the LCD, and it can't be
erased unless it is either un-protected, or the memory card is formatted.
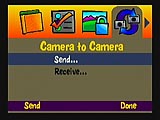 Camera to Camera Menu: Allows you
to copy previously marked pictures to another camera in Send mode, or to received
images from another camera in Receive mode.
Camera to Camera Menu: Allows you
to copy previously marked pictures to another camera in Send mode, or to received
images from another camera in Receive mode.
Kodak Scripts Menu:![]() As mentioned
in the Capture section, Kodak Scripts are scripts that are stored on the camera's
memory card to further customize your picture-taking or picture-reviewing experience.
In Review mode, the following script is available for selection:
As mentioned
in the Capture section, Kodak Scripts are scripts that are stored on the camera's
memory card to further customize your picture-taking or picture-reviewing experience.
In Review mode, the following script is available for selection:
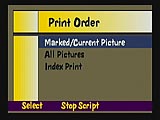 Print Order: Lets you select previously
marked images or all images on the PC Card for printing. Also lets you choose
how many copies of the image to print. This information is stored to the picture
card along with the image in a special file format. This format can be read
by some inkjet printers or by Kodak Picture Maker kiosks. When you insert
the picture card into a reader on the Picture Maker, for example, the kiosk
will fulfill your order, printing the quantity of each image that you've specified
using the Print Order script. You can set different print quantities for different
images by selecting each set of photos for which you want the same number
of prints, and then setting the quantity in the Print Order script. Then,
go back to select the next group of photos, which will be printed in a different
quantity. (Unfortunately, once an image is marked and a quantity set, it looks
like you're committed: We couldn't find any way to remove a print order for
a file, as there's no "quantity zero" or "delete order"
option available.)
Print Order: Lets you select previously
marked images or all images on the PC Card for printing. Also lets you choose
how many copies of the image to print. This information is stored to the picture
card along with the image in a special file format. This format can be read
by some inkjet printers or by Kodak Picture Maker kiosks. When you insert
the picture card into a reader on the Picture Maker, for example, the kiosk
will fulfill your order, printing the quantity of each image that you've specified
using the Print Order script. You can set different print quantities for different
images by selecting each set of photos for which you want the same number
of prints, and then setting the quantity in the Print Order script. Then,
go back to select the next group of photos, which will be printed in a different
quantity. (Unfortunately, once an image is marked and a quantity set, it looks
like you're committed: We couldn't find any way to remove a print order for
a file, as there's no "quantity zero" or "delete order"
option available.)
Connect Mode
When you want to connect the camera to a PC for downloading of images, you first
need to place the camera in Connect mode. Connect mode enables the data port
on the side of the camera for image transfer. As mentioned below, the DC265's
data port is dual-mode, providing either a standard RS-232 serial connection,
or the faster USB connection, depending on the cable used. (No configuration
setting is required on the camera to select between the two types of ports:
Just plug the cable in and go.![]()
Info Mode
Info Mode displays information about the DC265 Camera including the software
version number, the location on the Kodak web site where youcan get more information
about the camera, and website for FlashPoint Technology, where you can find
additional information on the Digita programming language used for creating
scripts to further customize your camera and your picture-taking experience.![]()
Capture Mode Menu Options
With the Mode Dial on the rear of the camera set to Capture, pressing the Menu
Button provides a variety of different options for capturing your images:![]()
Picture Type Menu: Lets you
select the type of picture that you want to capture, and specify the picture's
characteristics:
- Still: Use this setting when capturing images normally. When choosing
the Still picture setting, you can change the following characteristics through
the on-screen menu options:
- Flash: Choose from Auto, Fill, Red-Eye, or Off settings. This setting
may be overridden/changed via the top-panel buttons and readout.
- Quality: Choose from Good, Better, and Best compression settings
for your images. Best compresses the image the smallest amount for highest
quality results. This setting can be overridden/changed via the top-panel
buttons and readout.Resolution: Choose from Standard (768x512), Medium (1152x768),
or High (1536x1024) resolution.
- Burst: Use this setting to capture a series of images in rapid succession,
while holding down the shutter button. You can shoot up to 6 pictures at high
and medium resolutions, and 24 pictures at standard resolution. The Burst
menu screen lets you change change the following characteristics:
- Quality: Choose from Good, Better, and Best compression settings
for your images. Best compresses the image the smallest amount for highest-quality
results. This setting may be overridden/changed via the top-panel buttons
and readout.
- Resolution: Choose from Standard (768x512), Medium (1152x768),
or High (1536x1024) resolution.
- Burst Rate: Select from .1 to 3 frames per second. The camera
continues to fire as long as you hold down the Shutter button.
- Quality: Choose from Good, Better, and Best compression settings
for your images. Best compresses the image the smallest amount for highest-quality
results. This setting may be overridden/changed via the top-panel buttons
and readout.
- Timelapse: Use this setting to capture images at fixed intervals,
over an extended period of time. When choosing the Timelapse setting, you
can change the following characteristics:
- Flash: Choose from Auto, Fill, Red-Eye, or Off setting. This
setting may be overridden/changed via the top-panel buttons and readout.
- Quality: Choose from Good, Better, and Best compression settings
for your images. Best compresses the image the smallest amount for highest-quality
results. This setting may be overridden/changed via the top-panel buttons
and readout.
- Resolution: Choose from Standard (768x512), Medium (1152x768),
or High (1536x1024) resolution.
- Interval: Sets the interval between shots. You can set an interval
from 1 minute to 24 hours, in a total of 16 increments. (1, 2, 3, 4, 5,
10, 20, 30, 50 minutes, and 1, 2, 3, 4, 8, 12, and 24 hours) The camera
fires at the interval set after you press the Shutter button. For long
intervals between shots, the camera powers down to conserve batteries,
but turns back on when the next time interval is met.
- Number of Pictures: Sets the number of pictures to capture at
the preset intervals chosen. (Any number from 2 to 1000(!) can be selected.)
- Flash: Choose from Auto, Fill, Red-Eye, or Off setting. This
setting may be overridden/changed via the top-panel buttons and readout.
Note that you can also use the Scroll and Select buttons on top of the camera
to choose a Picture type, and modify the Flash and Quality settings. When choosing
a picture type in this manner, other parameters for that picture type (resolution,
burst rate or time-lapse interval, etc.) will be as previously-selected in the
LCD menu system.![]()
Album Menu: Allows you to organize
and store images to in-camera albums on the memory card. There are three options
from which you can choose:
- No Album: Images are captured and stored to the camera's general
storage on the memory card.
- New Album: Allows you to create a new album and specify a name for
the album. When you create and select an album, all images you capture are
stored to that album until you change the setting.
- Existing Album(s): Choose an existing album to work with, or "dissolve"
it. NOTE that "dissolving" an album doesn't delete the images in
it, but merely dumps them back in to the default directory on the memory card.
White Balance Menu: Select one of five
white balance settings depending on the current lighting conditions:
- Auto: Automatically adjusts the white balance setting based on the
scene being shot. (This is the default setting.)
- Daylight: Adjusts the white balance for natural, neutral daylight
lighting.
- Fluorescent: Adjusts the white balance for images captured under
fluorescent lighting to remove the greenish tint that sometimes occurs.
- Tungsten: Adjusts the white balance for images captured under tungsten
lighting to remove the reddish-orange tint that sometimes occurs.
- Off: Applies no white-balance adjustment.
(SSHOT)
Watermark Menu: Allows you to "watermark"
images by placing a text or logos on the images that you capture. You can position
the watermark anywhere on the picture by specifying offsets, and you can choose
from a variety of text and background colors, including transparency settings.
There are four Watermark options from which you can choose:
- None: Use this option when you don't want a watermark.
- Date and Time: Use the current date and time as the watermark, and
set the offset and text characteristics of the watermark.
- Text: Use pre-defined text as the watermark, enter the text to use,
and define the characteristics of the text and where it appears on your image.
- Logo: Use a pre-defined logo as the watermark, choose the logo to
use, and define the characteristics of the logo and where it appears on your
image. The logo files are specially formatted .lgo files that must be uploaded
from a host computer to the camera's PC Card. Kodak provides a software utility
for creating the .lgo files. If the .lgo file is larger than 512K, it will
not appear as an option on the LCD menu.
- (Sub-menu options:)
- Left Offset - distance from left-hand edge of the picture the watermark will be placed.
- Top Offset - distance from the top edge of the picture the watermark will be placed.
- Transparency - on/off - For Date/Time and Text options, allows a transparent watermark to be "embossed" on the image.
- Text Color - Also for Date/Time and Text options only, allows you to choose from several preset text colors.
- Background Color - Also for Date/Time and Text options only,
allows you to select from several preset background colors, for the area
immediately surrounding the imprinted text.
Advanced Exposure Modes Menu: Allows
you to choose one of three exposure modes:
- Programmed AE: Automatically chooses the appropriate shutter speed
and aperture settings for your shots. This is the default, used for shooting
most pictures. Maximum automatic exposure time is 1/2 second.
- Long Time Exposure: Lets you choose the exposure time ranging from
0.5 to 16 seconds in 0.5 second intervals.
- External Flash: Allows you to disable the camera's flash and use
the external flash sync to provide the flash. You can set the lens aperture
manually in one stop increments from f/3 to f/16. (Actually, the first step
is a bit less than a full stop, in that it goes from f/3 to f/4.0.)
Advanced Focus Modes Menu: Lets you choose
the way focus is determined when capturing images:
- Multi-Spot Auto Focus: Determines the focus setting by examining
three areas in the field of view.
- Single-Spot Auto Focus: Determines the focus position by examining
only the center of the field of view.
- Manual Focus: Lets you set the focus distance manually, in 9 steps
from 1.5 feet (50cm) to infinity.
Preferences Menu: Lets you set preferences
with regard to image capture, date and time, and camera name:
- Capture: Capture preferences include the following:
- File Type: Choose from JPEG or FlashPix formats.
- Quickview: Displays the image you just captured in the LCD for
several seconds after capture. You can choose the length of time to display
the image ranging from .5 seconds to 30 seconds.
- Auto Rotate: When enabled, rotates the picture automatically
based on an internal sensor that determines the orientation of the camera
at the time of exposure. Thus, "Portrait" (vertical) images
will display as such on your computer screen directly, without requiring
the image to be rotated manually in an image-manipulation program.
- File Type: Choose from JPEG or FlashPix formats.
- System Sounds: Turns system sounds on and off. These are the sounds
that the camera makes when the buttons on the camera are pressed, or errors
occur.
- Sleep Timeout: Sets the number of minutes of camera inactivity (with
the LCD on) before going into power-save mode. You can set the timeout anywhere
from 1 to 5 minutes in 1/2 minute intervals.
- Date and Time: Set the camera's date and time (in 12 or 24 hour format).
Camera name: Lets you enter a name for your camera which appears in the header of each picture file.
Kodak Scripts Menu: Lets you run scripts
that are stored on the camera's memory card to further customize your picture-taking
experience. The scripts loaded on the Picture Card shipped with the DC265 appear
on the Kodak Scripts set-up screen. The DC265 comes with several scripts preloaded,
as well as others that are included on the CD ROM that comes with the camera.
Any scripts on the CD ROM must be uploaded to the camera's memory card from
a host computer by using utility software that Kodak provides for this purpose,
or by copying them onto the card directly using a CF card reader/writer. Examples
of some scripts include an Exposure Bracket script that prompts you to capture
three versions of the same subject at different exposure levels to get the best
shot, and adding a Super quality setting (in addition the Good, Better, Best
settings) to your camera. Note that the Kodak Scripts menu is created
by scripts on the memory card shipped with the camera. It won't appear otherwise
(eg, on other cards not carrying the scripts on them.) Note, too, that script-created
entries can appear on ANY menu in the LCD menu system.
Review Mode
Use Review mode to view your images after
you capture them. When you change from Capture to Review Mode, the LCD automatically
activates and displays your images. Initially, the last image captured appears
full screen on the LCD. The image may contain date and time information and
other image markings depending on whether or not the "Overlay" feature
is turned on (in the LCD menus available in Review Mode). We liked the "Overlay"
option (shown in the screen shot at right), and also liked the fact that it
can be turned off, to allow you to see the full image unobstructed. When enabled,
the overlay bars display the image number, date, time, type of shot (this last
via an icon), and provide options relevant to the image being viewed. Options
include:
- Delete: Delete the current image. (Takes you to a second screen for
confirmation.)
- Magnify: Lets you magnify and zoom in on a particular portion of
a picture for closer examination. You can use the up/down and left/right scroll
buttons to view different parts of the picture at the magnified level.
- Play: Lets you play sound, and review burst and time lapse sequences.
The Play button only appears when viewing full-screen with Overlay turned
on. If the image has sound associated with it, the camera will play the sound.
If the image is part of a burst or timelapse sequence, the camera displays
the images one after another on the LCD for your review.
As noted above, in review mode, the LCD display normally shows one image at a time. Pressing the Display button once though, puts the camera into what we've called "Index" mode, in which you can very rapidly scan through images stored on the memory card. In this mode, you'll see a "film strip" area at the top of the LCD, containing tiny thumbnail versions of images you've captured (assuming there's more than one picture currently stored on the memory card). The left/right arrows on the rocker control let you scroll quickly through the images, and a slightly larger copy of the currently-selected image appears in the lower portion of the window, along with information showing the date and time of capture, image number, and type of image that it is (still, burst, time-lapse). Pressing the Display button again shows you this image full-size. When in index mode, you'll have two or three options available, relating to the currently-selected image:
- Open/Close: Lets you open and close albums that contain more than
a single image.
- Expand/Collapse: The equivalent of Open/Close for Timelapse or Burst
sequences. These images are stored as folders on the PC Card, and initially,
only the first image in the sequence is displayed. To expand the folder, scroll
to select the first image and press the Expand button. All the images in the
Burst or Timelapse sequence will appear in thumbnail form across the top of
the LCD panel, connected by dots or bars, to show that they are grouped together.
To close the folder after viewing the images, press Collapse.
- Mark: Lets you mark one or more images for a specific action. For
example, you can mark images to be deleted, moved into an album area, or copied
from one camera to another. You can select all the images on the memory card
by holding down the Mark button for at least 2 seconds.
- Delete: Deletes all marked images on the memory card.
Review Mode Menu Options:
Move to Album Menu: Allows you to move previously-marked images into a predefined album area on the PC Card, or allows you to create a new album for storage purposes. Use the up/down arrows on the Four-Way Controller to choose the album option that you want.
Review Preferences Menu:
- Overlay: Turns the Overlay feature on and off.
- Slideshow: Lets you choose the time
interval for viewing your images in a slideshow on your television. You first
need to connect the camera to your TV with the video cable supplied. You can
set the time interval to between 1 and 99 seconds. In addition you can turn
sound on and off, and choose whether or not you want to images to run in a
continuous loop.
- Video: Supports NTSC for US and Canadian usage, and PAL for European
usage.
- Playback: Lets you set the time intervals for playing back images
captured in Burst or Timelapse sequences, as well as images stored in albums.
You can set the time interval to between 1 and 10 seconds.
- Format: Lets you format picture cards for use with the DC265 if they
have a different format or have become corrupted in some way. Remember that
formatting removes all information on the card including any logo files or
scripts you may have stored.
- Picture Protection: Allows you to protect previously-marked images
from being accidentally erased from the picture card. When you protect an
image, the Protect icon appears over the image on the LCD, and it can't be
erased unless it is either un-protected, or the memory card is formatted.
Camera to Camera Menu: Allows you
to copy previously marked pictures to another camera in Send mode, or to received
images from another camera in Receive mode.
Kodak Scripts Menu:![]() As mentioned
in the Capture section, Kodak Scripts are scripts that are stored on the camera's
memory card to further customize your picture-taking or picture-reviewing experience.
In Review mode, the following script is available for selection:
As mentioned
in the Capture section, Kodak Scripts are scripts that are stored on the camera's
memory card to further customize your picture-taking or picture-reviewing experience.
In Review mode, the following script is available for selection:
- Print Order: Lets you select previously
marked images or all images on the PC Card for printing. Also lets you choose
how many copies of the image to print. This information is stored to the picture
card along with the image in a special file format. This format can be read
by some inkjet printers or by Kodak Picture Maker kiosks. When you insert
the picture card into a reader on the Picture Maker, for example, the kiosk
will fulfill your order, printing the quantity of each image that you've specified
using the Print Order script. You can set different print quantities for different
images by selecting each set of photos for which you want the same number
of prints, and then setting the quantity in the Print Order script. Then,
go back to select the next group of photos, which will be printed in a different
quantity. (Unfortunately, once an image is marked and a quantity set, it looks
like you're committed: We couldn't find any way to remove a print order for
a file, as there's no "quantity zero" or "delete order"
option available.)
Connect Mode
When you want to connect the camera to a PC for downloading of images, you first
need to place the camera in Connect mode. Connect mode enables the data port
on the side of the camera for image transfer. As mentioned below, the DC265's
data port is dual-mode, providing either a standard RS-232 serial connection,
or the faster USB connection, depending on the cable used. (No configuration
setting is required on the camera to select between the two types of ports:
Just plug the cable in and go.![]()
Info Mode
Info Mode displays information about the DC265 Camera including the software
version number, the location on the Kodak web site where youcan get more information
about the camera, and website for FlashPoint Technology, where you can find
additional information on the Digita programming language used for creating
scripts to further customize your camera and your picture-taking experience.![]()

Follow Imaging Resource: