Kodak DC4800 ZoomKodak's first true 3 megapixel consumer camera has excellent color and *amazing* low-light capability!<<Shutter Lag & Cycle Time Tests :(Previous) | (Next): Camera Modes & Menus>> Page 8:Operation & User InterfaceReview First Posted: 7/31/2000 |
Operation and User Interface
The DC4800's user interface is alternately both time saving and time consuming. We greatly appreciate the ability to set the aperture and the exposure compensation by simply turning a dial. It's also nice to have these settings physically marked on the camera. Kodak thoughtfully placed the setting values of the mode dial on the side of the dial in addition to the top, making it more convenient to read from different shooting angles. That said, we still find the camera's LCD menu system a little tedious for setting some options. For example, to manually set the shutter speed, you have to navigate through the menu and then scroll through a selection of speeds. The benefit of this is being able to see all the available shutter speeds at once, though. Other than the time it takes to scroll through the menu, we did find the menu system very user friendly. Memorable icons quickly clue you in to the various exposure options, and the rocker toggle button simplifies the navigation process. We also noticed that all of the controls are placed so that you could operate the camera one-handed, presuming you have small to medium sized hands (larger hands may find it a little hard to grip all the controls).
One minor complaint we had with the DC4800's user interface design might have more to do with our familiarity with other digicam designs than any inherent defect in the DC4800: From working with a large number of other digicams that use the "rocker toggle" type of control used on the 4800 for navigating menu choices, we're accustomed to using the up/down directions to navigate to a given choice, and then selecting it using either the right arrow, or by pressing down on the center of the toggle control. On the DC4800, the up/down arrows do in fact navigate between menu choices, but you actually make the choices by pressing the yellow display/OK button. We found it unnatural to take our finger off the rocker toggle just to tell the camera "OK." This may just be a personal bias, but we much prefer keeping all the menu navigation functions on the rocker control itself.
Let's take a look at each of the DC4800's controls.

Shutter Button: Located on the top right of the camera, just over the hand grip, this button sets focus and exposure with a half press, and fires the shutter with a full press.

Exposure Compensation Adjustment Lever: Located just behind the shutter button, this notched dial sets the camera's exposure compensation from -2 to +2 in 1/2 EV increments.
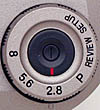
Mode Dial: Also on the top right of the camera, this dial controls the camera's operating mode:
- Setup: Displays the Setup menu immediately when entering the mode, which allows you to alter camera settings such as the Power Save feature and the date and time setting.

- Review: Puts the camera into Playback mode, where you can scroll through captured images as well as write protect, delete, or set up DPOF printing options.
- Program AE: Accesses the camera's Program AE exposure mode, which puts the camera in charge of shutter speed and aperture settings. You control the exposure compensation, flash, white balance, ISO, etc.
- f/2.8: Places the camera into Aperture Priority or Manual exposure mode, depending on the setting of the shutter speed menu option, and sets the lens aperture at f/2.8. You control all remaining exposure options.
- f/5.6: Similar to the f/2.8 setting, the lens aperture is set to f/5.6 and you control all other exposure options.
- f/8.0: Sets the lens aperture to f/8.0 and gives you control over all other exposure options.

Power Button: Situated directly in the center of the mode dial, this button turns the camera on and off, and signals the activation or deactivation of the telescoping lens.
![]()
Flash Button: Directly beneath the status display panel, this button controls the flash mode:
- Automatic: Lets the camera decide whether or not to fire the flash, depending on existing light levels.
- Fill: Sets the flash to automatically fire with each exposure.
- Redeye Reduction: Fires the flash with each exposure, but adds a small pre-flash before the full flash to reduce the Redeye Effect.
- Off: Prevents the flash from firing at all, regardless of existing light levels.
![]()
Macro / Landscape Button: Located to the left of the Flash button, this button cycles through the Macro mode for close-up photography, and the Landscape mode, which fixes the focus at infinity for far away subjects.
![]()
Self-Timer / Burst Button: To the left of the Macro / Landscape button, this button cycles through normal exposure, 10 second Self-Timer, and the Burst photography modes.
![]()
Pop-Up Flash Switch: Located on the left side of the pop-up flash, this sliding switch releases the pop-up flash from its compartment.

Dioptric Adjustment Dial: Positioned on the left side of the optical viewfinder, this small dial adjusts the optical viewfinder to accommodate eyeglass wearers.
![]()
Zoom Lever: Situated on the top right side of the back panel, this lever controls the 3x optical zoom. When the digital telephoto mode is activated through the setup menu, it also controls the 2x digital telephoto.

Menu Button: Also on the back panel of the camera, just to the right of the LCD monitor, this button activates the LCD menu system in all capture modes and in Playback mode. Pressing it a second time dismisses the menu.

Display (OK) Button: Located to the right of the Menu button, this button activates and deactivates the LCD display. It also serves as the "OK" button for confirming menu selections.
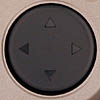
Rocker Toggle Control: This large button is positioned to the right of the LCD monitor and features arrows in all four cardinal directions. When in any record mode, pressing the right or left arrow displays the last image captured on the LCD monitor. You can then press the left arrow to delete the image, or the right arrow to magnify the image to 4x. Once magnified, the four arrows allow you to scroll around in the enlarged image. (This is one of the nicest "quick review" implementations we've seen to date.) In any of the menu screens, these arrow buttons navigate through menu options. In Playback mode, the right and left arrow buttons allow you to review captured images, one by one. Once an image is magnified (through the Playback menu) the four arrow buttons let you move around within the image.

CompactFlash Eject Switch: Situated on the bottom of the camera, adjacent to the battery compartment, this sliding button releases the CompactFlash card from its slot (once the plastic protective door has been opened).
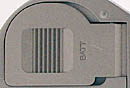
Sliding Battery Compartment Door: Also located on the bottom of the camera, this sliding door serves as both the battery compartment door and lock.

Follow Imaging Resource: