Kodak DC5000Familiar 2 megapixel electronics in a super-rugged case make a *true* take-anywhere camera!<<Operation & User Interface :(Previous) | (Next): Image Storage & Interface>> Page 9:Camera Modes & MenusReview First Posted: 09/10/2000 |
Capture Mode
With the Mode Dial on the rear of the camera set to Capture, pressing the Menu Button provides the following options for capturing your images:
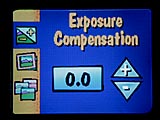 Exposure Compensation: Adjust the exposure set by the camera's automatic metering from +2 EV to -2 EV, in .5 EV steps.
 Border: Allows you to add borders or logos to your pictures. Using the Kodak DC5000 Border Transfer utility, you can save borders onto your picture card. Then, you can use the DC5000's Border feature to add the borders to your image prior to capture. When in Border mode, the LCD automatically turns on and displays the chosen border so that you can see if the border matches well with your subject. Note that formatting the picture card erases all the borders you've loaded: If you reformat, you'll need to reload.
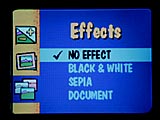 Effects: Lets you capture images in Black & White, Sepia (for an antique look), or Document (adds contrast when capturing images containing text) mode. When in Effects mode, the LCD automatically turns on and displays the image with the chosen effect. Use the LCD display to see if the image works well with the effect. If so, capture it. If not, choose another effect and see how it looks.
 Picture Quality: Select one of three settings: Good, Better, and Best. Of course, as you move from Good to Best, more space is needed on the picture card to store the image. The Good setting is more than adequate to capture images for online sharing. In high resolution mode (see below), the picture quality settings correspond to the following file sizes:
- Best: 625K, or about 10:1 compression.
- Better: 420K, or about 15:1 compression.
- Good: 230K, or about 30:1 compression.
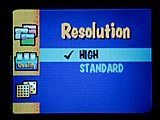 Resolution: Choose from one of two settings: High or Standard.
- High: Use this setting for images that you hope to print. The resolution of the image at this setting is 1760 x 1168 pixels.
- Standard: Use this setting when capturing images for online sharing. The resolution of the image at this setting is 896 x 592 pixels.
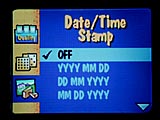 Date/Time Stamp: Lets you record the date and time that the image is captured on the image itself.
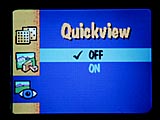 QuickView: Displays the image you just captured in the LCD for several seconds after capture. This handy feature lets you review the image and decide if you want to keep it and save it to the picture card. A Delete icon (trash can) appears on the image when viewing it. If you don't like the image, press the left scroll button to delete it. If you like it, do nothing and it will be stored automatically.
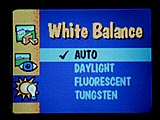 White Balance: Select from one of four white balance settings based on the environment in which you are capturing images:
- Auto: Automatically adjusts the white balance setting to the scene content.
- Daylight: Adjusts the white balance for natural, neutral daylight lighting.
- Fluorescent: Adjusts the white balance for images captured under fluorescent lighting to remove the greenish tint that sometimes occurs.
- Tungsten: Adjusts the white balance for images captured under tungsten lighting to remove the reddish-orange tint that sometimes occurs.
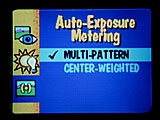 Metering: Use this option to obtain the best exposure for your images, based on the lighting and subject type. Two metering modes are available:
- Multi-Pattern: Examines the entire image area to determine the best exposure. This setting will generally be the best choice for everyday pictures.
- Center-Weighted: Bases its exposure decision primarily on the central portion of the frame, while de-emphasizing the background. The Center-Weighted mode will be most useful for shooting portraits shots, or for dealing with backlit subjects.

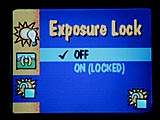 Exposure Lock: After this option is selected, the camera exposure and white-balance settings will be "locked" as soon as the first shot is taken. These settings will remain in effect until the "lock" is released by revisiting this menu option. Use this feature to insure consistent exposure for multiple shots to be used in panoramas, or other applications requiring consistent exposure.
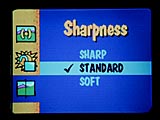 Sharpness: Provides three options for sharpening or softening a picture:
- Sharp: Highlights the edges contained within your images so that they stand out more.
- Standard: Captures the image and stores it as is with no changes to sharpness.
- Soft: Blurs fine details so that they become "softer" and edges of objects blend into the image.
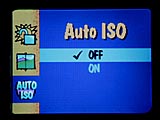 Auto ISO: Enables the camera to automatically increase its light sensitivity (at some cost in image noise) to increase shutter speed in low-light conditions:
- Off: (Default) Camera ISO is fixed at an equivalent value of 70.
- On: Effective ISO increases at low light levels, apparently to as much as ~140, although the absolute low-light limit is not changed.
Review Mode
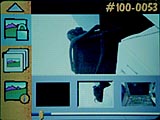
Use Review mode to examine already-captured images. When you change from Capture to Review Mode, the LCD automatically activates and displays your images. Use the left/right scroll buttons to scroll through and view all the images currently stored on the picture card.
Pressing the menu button changes what is displayed on the LCD. At the bottom of the LCD you'll see smaller versions of the images that you have captured (if there's more than 1, of course). You can use the left/right scroll buttons to quickly scroll through the images that you have captured to find a particular image. Once you find it, that image appears larger in the LCD. To the left of the LCD, a series of icons appears. Each of these icons represents an operation that you can perform on the selected image. Whenever one of these operations is selected, Delete, for example, the Trash Can icon appears over the image in the LCD.
 Magnify: Lets you magnify and zoom in on a particular portion of a picture for closer examination. The image expands to twice the normal LCD display size. You can use the up/down and left/right scroll buttons to view different parts of the picture at the magnified level. (We liked the smooth scrolling the direction buttons provide in this mode: Many digicams jump between quadrants of the enlarged image, rather than scrolling smoothly.)
- Delete: Lets you delete the current image or all the images stored to the picture card.
- Print Order: Lets you select the current picture or all pictures for printing. Also lets you choose how many copies of the image to print. This information is stored to the picture card along with the image in a special file format. This format can be read by newer card readers or by Kodak Picture Maker kiosks. When you insert the picture card into a reader on the Picture Maker, for example, the Picture Maker will fulfill your order, printing as many copies of the image(s) as you have requested.
 Protect: Prevents an image from being accidentally erased from the picture card. When you protect an image, the Protect icon appears over the image on the LCD.
- Slideshow: Lets you choose the time interval for viewing your images in a slideshow on the LCD or on your television. For television display, you first need to connect the camera to your TV with the video cable supplied. You can set the time interval between successive images from 1 to 99 seconds.
- Information: Displays the Picture Info screen that includes information about the image being viewed. The information includes capture date and time, flash setting, and aperture and shutter speed used to capture the image.
Connect Mode
When you want to connect the camera to a PC for downloading of images, you first need to place the camera in Connect mode. Connect mode enables the different ports on the side of the camera for image transfer. The ports include a standard RS-232 connection for Windows-based computers, and a Universal Serial Bus (USB) connection for Windows '98 based computers, as well as USB-equiped Apple Macintosh computers.
Camera Setup Mode
Camera Setup Mode provides several options you can use to customize the camera for your own picture-taking needs:
 Set Date and Time: Lets you set the month, date, and year.
- Beep: Lets you choose from one of three setting: Off, Selected On (only beeps when the shutter button is depressed), and All On (beeps when any button on the camera is pressed).
Video Out: Supports NTSC for US and Canadian usage, and PAL for European usage. - Power Save: When turned on, shortens the amount of time that the camera stays on when not in use.
- Flash Default: Lets you choose a flash setting to be in effect every time you turn on the camera. If you consistently capture images in a way that requires only one of the available flash options, you can change the default to the option you need. The available options are Auto (normal default), Fill, Redeye, and Off.
- White Balance Default: Lets you choose a white balance setting to be in effect every time you turn on the camera. If you capture images in a way that consistently requires one of the manual white balance options, you can change the default to the option you need. The available options are Auto (normal default), Daylight, Tungsten, and Fluorescent.
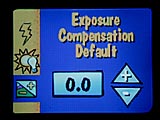 Exposure Compensation Default: Lets you set a default value for exposure compensation. If you capture images in a way that requires a specific exposure value, you can change the default value to the exposure you need. Ambient settings range from +2 EV to -2 EV, in .5 EV steps.
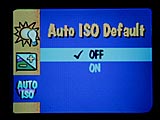 Auto ISO Default: Sets Auto-ISO option that will be selected when the camera is powered-up. Enables the camera to automatically increase its light sensitivity (at some cost in image noise) to increase shutter speed in low-light conditions:
- Off: (Default) Camera ISO is fixed at an equivalent value of 70.
- On: Effective ISO increases at low light levels, apparently to as much as ~140, although the absolute low-light limit is not changed.
- Border Default: If you have borders loaded on your picture card, you can select a default border to use every time you choose the border option.
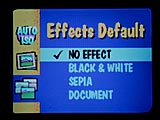 Effects Default: Lets you choose a special effect for your pictures whenever you turn on your camera and begin capturing images. The available options are No Effect (normal default), Black & White, Sepia, and Document.
 Language Default: Choose from one of seven languages: English (normal default for US cameras), Japanese, French, German, Portuguese, Spanish, or Italian.
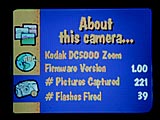 About the Camera: Provides you with information about your camera including the number of pictures captured and the number of flashes fired.
 Format: Lets you format picture cards for use with the DC5000 if they have a different format or have become corrupted in some way. Remember that formatting removes all information on the card including any borders or graphics you may have stored.

Follow Imaging Resource: