Olympus Camedia E-100 Rapid ShotOlympus unleashes a 1.5 megapixel speed demon: By FAR the fastest digicam we've tested to date!<<Shutter Lag & Cycle Time Tests :(Previous) | (Next): Camera Modes & Menus>> Page 8:Operation & User InterfaceReview First Posted: 1/18/2001 |
Operation and User Interface
The E-100RS offers so many features and controls that its user interface appears somewhat daunting at first. We admit to having to refer to the manual quite a bit to get to know the camera. However, once you understand the basic operation, changing settings is a snap. The camera's electronic SLR design means that it relies quite heavily on the LCD menu system. However, many of the basic controls, such as exposure compensation, flash, aperture, and shutter speed can be adjusted by using the camera's various control buttons without resorting to the menu system. We especially appreciated the Drive button, which controls many of the camera's capture modes, including single frame capture, sequential shooting, self-timer, and auto bracketing. Metering, macro mode, autoexposure lock, optical zoom, and the LCD information display is also controlled externally.
The LCD menu system is nearly identical to that of other Olympus digicams, and it's very straightforward (though somewhat lengthy). The menus are navigated by the Arrow buttons, and the OK button confirms any menu selections. Our only complaint with the LCD menu is that it encompasses several pages, making it necessary to scroll through several lists of options to find the one you're looking for. We also noticed that some settings are slightly hidden. Image sharpness and image quality are part of the separate Mode Setup menu, which controls basic camera functions like sleep time, sounds, file naming, and screen brightness. However, the E-100RS Instruction Manual is very easy to follow, with detailed diagrams and illustrations of all menus and control buttons, as well as helpful hints.
Control Enumeration
Shutter Button: Located on the top right of the camera, just over the hand grip, the shutter button sets focus and exposure when pressed halfway. When precapture mode is enabled, half-pressing the shutter button starts the continuous cycling of images through the camera's buffer memory. When fully depressed, the shutter button releases the shutter.
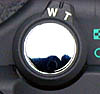
Zoom Lever: Encircling the Shutter button, the Zoom lever slides back and forth between the Wide Angle (W) and Telephoto (T) positions, to control the amount of optical zoom. When the 2.7x digital zoom (Super Tele) is enabled, sliding the control toward the Telephoto setting controls the amount of digital zoom. In Playback mode, the Zoom lever controls the Index Display mode and playback Enlargement function. Sliding the lever toward wide-angle (W) brings up the Index Display, while sliding it toward telephoto (T) engages the Enlargement zoom.

Mode Dial: Behind the Shutter button is the Mode dial, which controls the camera's operating modes. The dial is notched all the way around for easy turning. Available settings are:
- Movie: Sets the camera to record moving images with or without sound.

- Scene Program (S-Prg): A still image recording mode, with four "Scene" options available for shooting specific subjects or scenes:
- Portrait: Uses a large aperture setting to decrease the depth of field, so that the subject is in focus and the background is blurred.
- Sports: Uses fast shutter speeds to freeze action.
- Landscape: Sets the lens aperture to a smaller opening to increase the depth of field, so the foreground and background remain in sharp focus.
- Night: Uses a slow shutter speed to allow more ambient light into night and twilight scenes.
- Manual: Allows the user to control both the shutter speed and lens aperture settings, along with all other exposure variables (except for Exposure Compensation). Available shutter speeds range from 1/10,000 to 16 seconds, and apertures from f/2.8 to f/8.0.
- Shutter Priority: The user sets the desired shutter speed, while the camera selects the best corresponding lens aperture setting. Available shutter speeds range from 1/10,000 to five seconds. All other exposure variables are available.
- Aperture Priority: The user controls the lens aperture setting (from f/2.8 to f/8.0), while the camera selects the best corresponding shutter speed. All other exposure variables are available.
- Program: The camera maintains control over both shutter speed and aperture, while the user controls all other exposure variables.
- Playback: Allows the user to review captured images and movies, as well as to set up images for printing on a DPOF compatible device. Images can be erased, protected, or played back in a slide show format. Images can also be copied between memory cards.
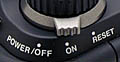
Power Switch: Located under the Mode dial, the power switch turns the camera on and off. A Reset setting reactivates the camera once it has gone to "sleep."
![]()
Macro Button: To the left of the small status display on the camera's top panel, this button switches the lens from Normal to Macro mode, changing the focal range to 0.3 to 2.0 feet (9.1 to 60.9cm) at wide-angle, and 3.3 to 6.5 feet (1.0 to 1.9 meters) at maximum telephoto.
![]()
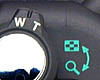
Metering Button: Directly below the Macro button, this button controls the camera's metering mode:
- Standard (Digital ESP): Divides the image into several areas, taking readings from the center of the image and the surrounding areas. Readings are then averaged to determine the appropriate exposure.
- Center-Weighted: Bases the exposure on a large area in the center of the image.
- Spot: Judges the exposure based on a reading at the very center of the image, inside the AF target mark.
![]()
Drive Button: Just below the Metering button, this button controls the camera's capture modes:
- Single Frame/Normal: Captures a single image each time the shutter button is fully pressed.
- Sequential Shooting: Takes a series of images at preset frame rates (15, 7.5, 5.0, or 3.0 frames per second) for as long as the shutter button is held down. White balance, exposure, and focus are locked in the first shot.
- AF Sequential Shooting: Captures a series of images for as long as the shutter button is held down, with the focus, exposure, and white balance determined individually for each shot.
- Self-Timer/Remote Control: Sets up the camera to work as a self-timer, which is activated with the Shutter button or the Infrared Remote. Using the Shutter button triggers a 10-second countdown before the shutter is released. Pressing the shutter button on the Infrared Remote triggers a three-second countdown. (Pressing the Drive button while the Self-timer is engaged cancels the countdown.)
- Auto Bracket: Records a series of images at different exposure compensation or white balance levels (or both).
![]()
Pop-Up Flash Release Switch: This sliding switch is located on the side of the pop-up flash compartment, and releases the flash.

Diopter Adjustment Dial: Located on the side of the optical viewfinder eyepiece, this dial adjusts the focus of the viewfinder to accommodate eyeglass wearers.

Flash/Erase Button: On the camera's back panel, to the right of the viewfinder, this button controls the internal Flash mode (and that of the FL-40, if connected). Options include Auto-Flash, Red-Eye Reduction, and Fill-In Flash (which fires the flash with every exposure). In Playback mode, this button erases the currently displayed image, with an option to cancel.
![]()
Info Button: Below Flash/Erase, the Info button controls the amount of information displayed on the LCD monitor in either Record or Playback mode. Pressing the Info button cycles between no display, partial display, and full information display (reporting all the exposure settings in Record mode, and all the exposure settings plus the file names in Playback mode).
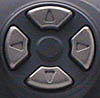
Arrow Pad: To the right of the Flash and Info buttons, the Arrow Pad has four small arrow buttons, each pointing in a separate direction: Up, Down, Right, and Left. In Aperture and Shutter Priority exposure modes, the Up and Down buttons control either the aperture or shutter speed. In Manual mode, the Up and Down buttons control shutter speed, while the Left and Right buttons control the lens aperture setting. In Program, Aperture Priority, Shutter Priority, Scene Program, and Movie modes, the Left and Right Arrow buttons control exposure compensation, from -2 to +2 exposure equivalents (EV) in one-third-step increments. All four arrow keys are used to navigate through menu options and settings adjustments. In Playback mode, the Left and Right buttons scroll through captured images.
![]()
AE Lock /Print Button: Directly to the right of the Arrow Pad, the AEL button locks the exposure reading in any Record mode. In Playback mode, pressing this button calls up the DPOF Print Order screen, which allows you to set the currently displayed image or all images for printing in Digital Print Order Format. The second Print Order screen allows you to set the number of prints for each image, whether or not to print the date and time, and cropping instructions.

MF/OK/Protect Button: Below the Arrow Pad, this button confirms all menu settings and selections. In any Record mode, pressing this button pulls up a small Focus menu, allowing you to choose between Autofocus (AF) and Manual Focus (MF). In Playback mode, pressing this button write-protects the currently displayed image, preventing it from being accidentally erased (except through card formatting). Write-protection appears as a key symbol on the viewfinder screen. Pressing the button a second time cancels the Protect function.

Display Button: Located on the right of the LCD monitor and outlined by a raised plastic rim, this button alternates the image display between the Electronic ViewFinder (EVF) and the LCD monitor.
![]()
Menu Button: Just below the Display button, the Menu button engages the menu selection display in any camera mode.

CompactFlash Release Button: Inside the memory card compartment, beside the CompactFlash slot, this button releases the CompactFlash card so it can be removed.

Battery Compartment Switch: In the center of the battery compartment door, on the bottom panel of the camera, this button locks and unlocks the compartment door.

Follow Imaging Resource: