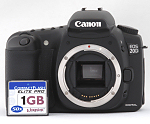
Canon EOS 20DBy: Shawn Barnett and Dave EtchellsSlightly smaller and lighter upgrade brings greater speed and ease of use along with higher res and lower image noise. <<Executive Overview :(Previous) | (Next): Viewfinder>> Page 4:DesignReview First Posted: 08/19/2004, Update: 11/19/2004 |
Design
 With
a control layout and body design similar to the earlier EOS-10D, Canon's latest
in the "Compact" EOS line of digital cameras, the EOS 20D, will be
familiar to photographers already accustomed to other EOS cameras, film or digital.
At 1.71 pounds (27.38 ounces; 776.3 grams) with battery and card, the weight
has gone down quite a bit from the EOS 10D's 2.05 pounds (932.6 grams) with
battery and card. With the
18-55mm lens included in the bundle added, it's 2.14 pounds (34.86 ounces;
974.2 grams). The 20D is well-balanced, and certainly a
lot lighter than the "industrial strength" Canon EOS-1Ds and 1D Mark
II. The EOS 20D is just slightly smaller than its predecessor in all
directions, being about five millimeters less in width, two millimeters less
in height, and just over three millimeters less in depth than the EOS 10D. Body
dimensions of the 20D are 5.7 x 4.2 x 2.8 inches (144 x 105.5 x 71.5 millimeters).
With
a control layout and body design similar to the earlier EOS-10D, Canon's latest
in the "Compact" EOS line of digital cameras, the EOS 20D, will be
familiar to photographers already accustomed to other EOS cameras, film or digital.
At 1.71 pounds (27.38 ounces; 776.3 grams) with battery and card, the weight
has gone down quite a bit from the EOS 10D's 2.05 pounds (932.6 grams) with
battery and card. With the
18-55mm lens included in the bundle added, it's 2.14 pounds (34.86 ounces;
974.2 grams). The 20D is well-balanced, and certainly a
lot lighter than the "industrial strength" Canon EOS-1Ds and 1D Mark
II. The EOS 20D is just slightly smaller than its predecessor in all
directions, being about five millimeters less in width, two millimeters less
in height, and just over three millimeters less in depth than the EOS 10D. Body
dimensions of the 20D are 5.7 x 4.2 x 2.8 inches (144 x 105.5 x 71.5 millimeters).

The front of the camera features a Canon EF/EF-S lens mount, indicated by the presence of both red dot (standard EF) and white square (EF-S) alignment marks for the two different styles of lens. There's also the lens release button, a depth of field preview button (on the lower left of the lens mount as viewed from the rear), a flash head pop-up button (on the upper left of the lens mount) and the redeye reduction lamp/self timer lamp (the frosted window at upper left in the view above). Nestled in the inside bottom of the handgrip, but just about visible in this picture, is the hole through which the DC coupler cord hole emerges, when using the dummy battery of the AC adapter.
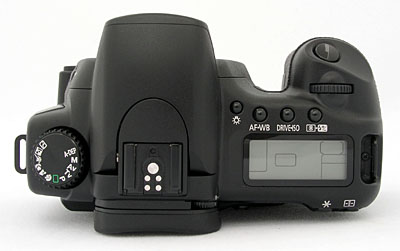
The top of the camera features the Shutter button, Mode dial and a small status display panel that reports most of the camera's settings. An LCD Illuminator button next to the redesigned status display panel backlights the display with an orange glow for better viewing in dark shooting conditions. Also on top are the Main dial and several control buttons (AF Mode / White Balance, Drive Mode / ISO Speed, and Metering Mode / Flash Exposure Compensation). The top of the camera also contains a hot shoe for mounting an external flash unit. The hot shoe has the usual trigger terminal in the center, as well as four other contacts for interfacing to Canon EX Speedlight flash units, and a hole for a locking pin to prevent rotation of the speedlight. Fixed neck strap eyelets are located on both sides of the top panel as well.
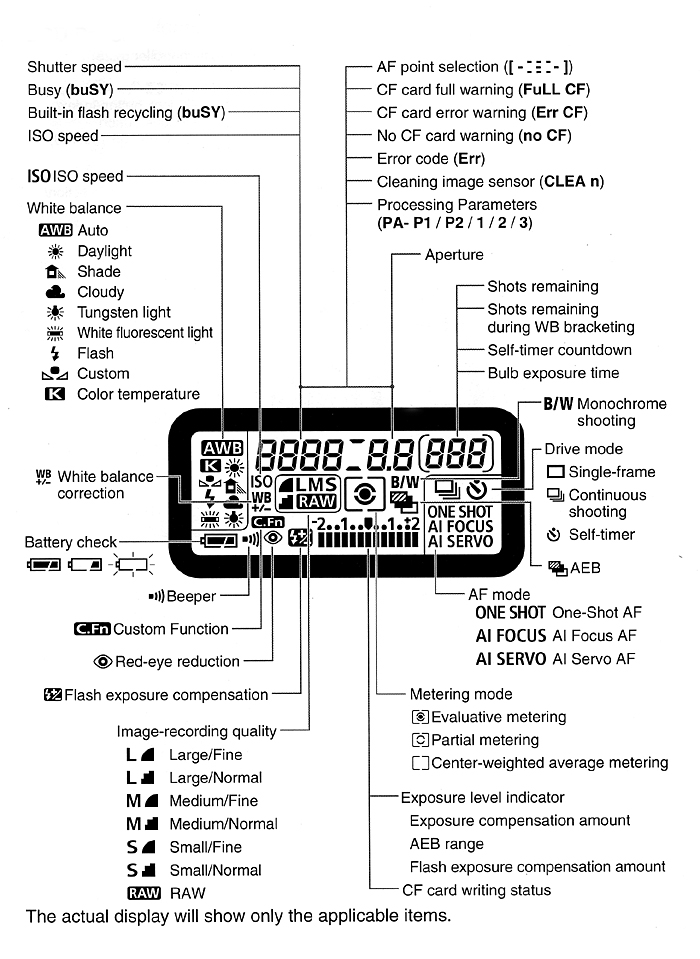
The top-panel data readout conveys a wealth of information about the current status of the camera and its settings, and has been redesigned somewhat since the EOS-10D. Two new indications have been added (white balance compensation, and black & white color mode), and a number of items have been rearranged to more logical positions, or to help fit the new icons on the display. Here's an illustration showing all possible segments and icons and their interpretation:
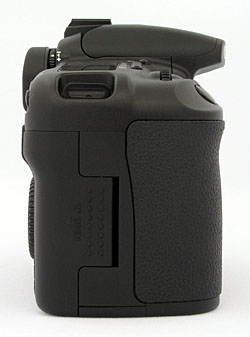
On the right side of the camera, toward the rear of the handgrip, is a large door which slides back and out to reveal the CompactFlash slot (which supports Type-I and Type-II cards, including the Hitachi MicroDrive). Inside the compartment, underneath the CompactFlash slot is a small gray eject button for removing the card. Gone is the small access hole from the 10D that showed the access lamp inside the CompactFlash door; this lamp is now on the back of the camera.
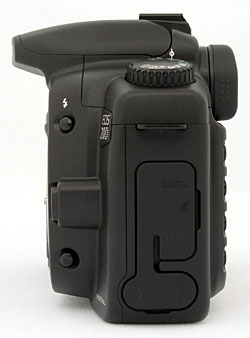
The opposite side of the camera features a hinged rubber flap covering the digital (USB) and Video Out sockets. Below this are two more sockets, likewise protected by a rubber flap. Forward of these sockets is a standard PC flash sync terminal, while the rear socket is for an N3 remote control. This picture also shows the Depth of Field Preview button (bottom) and Flash Pop-up button (top) on the side of the lens mount a little more clearly.
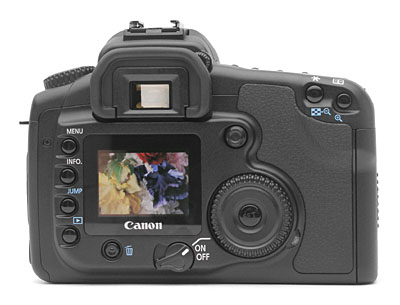
The rear panel of the EOS 20D is home to the bulk of the camera's controls, as well as the large, bright LCD screen. It is also the one part of the camera's body with the most visible changes since the EOS-10D. Beneath the LCD monitor's lower right corner is the main power on/off switch, with an additional setting that turns on the Quick Control dial. Lining the left side of the LCD monitor are four buttons: Menu, Info, Jump, and Playback. Underneath the LCD screen is the Delete button, and to the right of the screen is the Quick Control dial, in the center of which is the Set button. The Set button in the center of the Quick Control Dial acts as a menu selection button. At the lower right of the Quick Control Dial is the Access lamp, which indicates when the memory card is being written to. It has been moved from its location inside the battery chamber in the EOS-10D. Gone is the EOS-10D's Quick Control Dial switch that was used to disable the Quick Control Dial to prevent accidental use, being now integrated into the power switch. Also gone are the Direction and Assist buttons, whose functions when combined have been replaced by the Multi-Controller, an 8-way "joystick"-style controller located at the top right corner of the LCD display that also functions as a button when pressed directly inward. On the top right corner of the optical viewfinder is the diopter adjustment knob, recessed slightly to prevent accidental changes, and featuring a ridged surface to give grip. Finally, the top right corner of the rear panel features the AE/FE Lock / Index / Reduce and AF Point / Enlarge buttons.
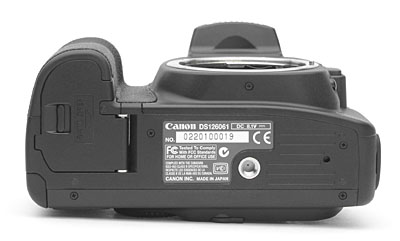
The very flat bottom of the camera reveals the metal tripod mount, as well as the cover for the BP-511 Lithium Ion and CR2016 button battery chamber. Unlike the EOS-10D, the 20D places both batteries (the latter of which is used for keeping the date / time) in the same chamber, the button battery being held in a little tray that slots in next to the main Lithium Ion battery. No coin is needed to open the battery compartment for the button battery, although that wasn't a task that needed to be performed very often anyway. The main battery compartment cover is removable, necessary when installing the optional vertical battery grip (BG-ED2) on the camera (interesting note: the BG-E1 for the Digital Rebel almost fits the 20D, except that it's keyed differently around the camera's battery opening; there's no telling whether the pinout is the same up inside, however, so trying a hack-fit is not recommended). A small latch lever at the outside edge of the battery chamber cover unlocks it so that it may be opened. The battery compartment cover is far enough from the tripod socket that you should be able to swap batteries without removing the camera from your tripod mount. The large surface area of the camera's bottom provides a stable mounting surface for use with a tripod, even with fairly large lenses attached.
Reader Comments! --> Visit our discussion forum for the Canon EOS 20D!

Follow Imaging Resource: