Olympus EVOLT E-300By: Shawn Barnett and Dave Etchells8.0 megapixels, ZUIKO DIGITAL lens mount, digital SLR design, and loads of features! <<Optics :(Previous) | (Next): Shutter Lag & Cycle Time Tests>> Page 7:Exposure & FlashReview First Posted: 11/08/2004, Updated: 03/12/2005 |
Exposure
| Free Photo Lessons | |
|
In Program mode, the camera is in charge of the aperture and shutter speed, while you control the remaining exposure options such as ISO, metering, and white balance. Program mode also provides access to the exposure compensation adjustment, which lets you adjust the camera's automatically determined exposure setting by plus or minus five exposure equivalent (EV) units, in steps of 0.3, 0.5, or 1.0 EV. (You can specify the level of adjustment through the Setup menu.) Aperture Priority lets you set the aperture (the available range depends on the lens attached), leaving the camera to automatically determine the appropriate shutter speed. In Shutter Priority, you can select shutter speeds from 1/4,000 to 30 seconds, with the camera selecting the corresponding aperture setting. The Manual exposure option lets you control both aperture and shutter speed yourself, and the shutter speed range also includes a Bulb setting for variable length exposures as long as 30 seconds. In common with other Olympus cameras, a handy feature of the Manual mode is that, as you scroll through the various exposure settings, the camera indicates whether it thinks your chosen setting will produce a correct exposure. It does this by flashing the exposure differential (the difference between your settings and what the camera metering system thinks is correct) in green on the viewfinder display, up to a limit of +/- 5EV. Another useful feature is that in any of the main exposure modes (Program, Aperture Priority, Shutter Priority, and Manual), you can press the OK button for a depth of field preview display in the optical viewfinder. This feature has to be manually enabled in the Setup Menu.
The 14 scene modes include Landscape, Landscape Portrait, Night Scene, Night Portrait, Fireworks, Sunset, Portrait, High Key, Macro, Documents, Museum, Sport, Beach & Snow, and Candle modes, which optimize the camera for specific shooting situations. The five most commonly used scene settings also have places on the Mode dial, and include Portrait, Landscape, Macro, Sports, and Night Scene. (A sixth Scene setting provides access to all 14 modes.) In Portrait mode, the Olympus EVOLT uses a larger lens aperture, reducing depth of field to throw distracting background elements out of focus. Landscape mode keeps foreground and background in focus, adjusting the camera's color handling to emphasize blue and green hues in the image (producing more intense foliage and sky colors). The Macro setting is for shooting as close as 11.8 to 20.0 inches (30 to 50 centimeters) to a small subject. Sports mode biases the exposure system toward faster shutter speeds, to help freeze fast-moving subjects. Night Scene employs slower shutter speeds, allowing more ambient light into the image. Limited menu options are available in the scene modes, as their purpose is to simplify camera setup for novices. (A multitude of menu choices would only add complication to what are intended to be easy-to-use camera settings.)
The Olympus E-300 lets you adjust its light sensitivity, with options of 100, 200, or 400 ISO equivalents, or to an Auto mode in which the camera selects an ISO appropriate to the subject's brightness. You can also enable "boosted" ISOs through the Record menu, allowing 800 and 1,600 equivalents. The higher ISO settings are helpful when you want faster shutter speeds under normal lighting, to help freeze fast action. Of course, as with all digicams, the higher ISO settings produce photos with more image noise, in much the same way that higher-ISO films show more film grain. To combat this problem, the E-300 offers a Noise Reduction option through the Record menu, which reduces the amount of image noise from long exposures, particularly at the higher ISO settings. (As mentioned above, this First Look review contains no comment on the EVOLT's noise performance, pending tests of a production-level camera.)
Three metering systems are available on the E-300: Center-Weighted, Spot, and Digital ESP. All three are accessed through the Metering button on the camera's back panel. Under the default Digital ESP setting, the camera takes an exposure reading from the center of the image as well as the surrounding area and chooses the best exposure based on brightness and contrast across the entire scene. Spot metering simply reads the exposure from the very center of the image, so you can pinpoint the specific area of the photograph you want properly exposed. (Spot metering is very handy when you have a subject that's backlit, or that has a very different brightness, either lighter or darker, than the background.) Center-Weighted metering also reads from the center of the frame, but from a larger area.
An AE Lock button locks the current exposure settings whenever pressed, so you can independently lock exposure and focus. (AE Lock is useful when you want to base your exposure on an off-center subject. Point the camera at the subject, lock the exposure, then recompose your shot however you like. Your subject will be correctly exposed, regardless of what might be in the center of the frame when you finally snap the shutter.) Through the Setup menu, you can designate whether the camera automatically chooses the metering mode for AE Lock, or you can set it to Digital ESP, Spot, or Center-Weighted.
While the Olympus E-300 EVOLT's metering was generally quite accurate, we for a while were tearing our (figurative) hair with its ESP metering mode. The problems we encountered were with fairly severe underexposure in our standard "Far Field" shot of the house with the bright white paint on its bay window, and in some portrait shots Shawn did of his daughter, who was wearing a white shirt at the time. Our initial suspicion was that the camera was simply over-reacting to strong highlights, whenever they occupied more than a small percentage of the frame. We later discovered that other shots with strong highlights elsewhere in the frame didn't trigger the underexposure problem. The bottom line is that it seems that Olympus' "ESP" evaluative metering mode pays a lot of attention to the center of the frame, at least when there's a really strong highlight there. We found that this over-reaction to central highlights made it hard to guess how the camera would respond to any shot of that sort. When shooting his daughter in "green" mode with the camera, Shawn found that the exposure varied pretty radically as he simply zoomed in on her, as the white shirt became more prominent in the frame. Overall, this probably shouldn't be considered a fatal flaw in the camera (using the exposure lock button to set the exposure with the highlight slightly to one side of center is pretty easy to do), but it's definitely something to be aware of any time you're shooting a scene with a bright highlight somewhere near the center of the frame.
In situations where exposure compensation is necessary, simply press the Exposure Compensation button and turn the Command dial (in all exposure modes except Manual) and the EV value will display on the LCD monitor. You can increase or decrease the exposure in either 0.3, 0.5, or 1.0-step increments (selected via a menu option), up to a maximum of +/- 5 EV. Or, you can use the Auto Exposure Bracketing (AEB) function to automatically bracket an exposure in three-step increments of either 0.3, 0.7, or 1.0 EV units each. The auto bracketing will center its efforts around whatever exposure you've chosen as the starting point, including any exposure compensation adjustments you've made. AEB is handy for those times when you want to make sure you get just the right exposure for a critical subject.
White balance options include Auto, Tungsten, Incandescent, White Fluorescent, Neutral White Fluorescent, Daylight Fluorescent, Outdoors, Cloudy, Shade, and Custom, to accommodate a variety of lighting situations. Pressing the White Balance button and turning the Command dial adjusts the setting, and the Kelvin temperature is displayed in the LCD monitor. The E-300 offers a Custom setting, and you can save as many as four custom settings for several specific light sources. You can also adjust the white balance, adding either more red or more blue. This ability to "tweak" the white balance is very helpful when dealing with difficult light sources. The E-300 also features a white balance bracketing setting, accessed through the Drive menu. If activated, the camera will take three successive images, the first biased toward red, the second at the neutral setting, and the third biased toward blue. You can set the images to vary by two, four, or six arbitrary adjustment steps.
The Olympus E-300 also offers a Self-Timer for self-portraits or those occasions when you don't want to risk camera shake on a long exposure by pressing the Shutter button to trip the shutter. You can choose between a two- or 12-second countdown. The two-second countdown is useful for times when you're taking a long exposure with the camera on a tripod, and you want to minimize any camera shake from pressing the Shutter button. The Drive setting also accesses the Remote Control modes, for use with the optional IR remote.
There are also options on the Record menu to set the in-camera image sharpening, contrast, and saturation, in arbitrary units from Lo to Hi. In addition, the Olympus E-300 has a Gradation setting to control the brightness of the entire image. You can choose between the Normal, Low, and High Key settings. A color space option under the Record menu lets you choose between sRGB (for Windows machines) and Adobe RGB (for Adobe Photoshop) color options. Finally, the Monochrome menu option offers Black and White and Sepia shooting modes.
Sequential Shooting Mode
The E-300 offers a Sequential mode that mimics the motor drive on a film
camera, recording as many as 12 images at about three frames per second when
you hold down the Shutter button. As is usually the case,
the number of frames you can capture quickly is limited by the camera's buffer
memory capacity and the frame rate is determined by the file size.
Hands On
In our shooting with it, we felt that the Olympus E-300's exposure system was a little too concerned about preserving highlight detail. When confronted with any significant area of strong highlight in the scene, it dialed down the exposure to preserve detail in the highlight areas. This is a fairly common characteristic of the exposure systems of professional SLRs, as it means that the camera will do its best to avoid losing any detail anywhere in the frame. Pros are accustomed to tweaking every photo manually, post-exposure, so dark images with well-preserved highlight detail are bread and butter to them. For amateurs though, many of the E-300's images of subjects with strong highlights will look very dark when shot with the camera's default exposure settings, and the degree to which the camera reacts to even relatively small areas of highlight made it hard for us to predict just how the camera was going to respond in any given situation. We're quite accustomed to looking at a high-key scene (e.g., beach, snow, an expanse of concrete in the sun, etc) and knowing that we'll need to dial in +0.7-1.0 EV of exposure compensation to brighten up the scene. With the EVOLT though, we found ourselves having to use significant exposure compensation at times when we really weren't expecting to. The EVOLT's strong reaction to highlights is not technically in error: As noted, pros would almost certainly prefer this sort of exposure response. For amateur (and even advance amateur) shooters though, we suspect that this exposure behavior will be an annoyance. While there was never a situation in which we couldn't compensate for the exposure system's behavior, we found that we had a hard time predicting how the camera would respond in advance of the shot itself.
Flash
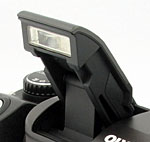 The E-300 offers a built-in, sliding, pop-up flash, with six operating modes: Auto, Red-Eye Reduction, Slow Sync (First Curtain), Slow-Sync (Second Curtain), Slow-Sync with Red-Eye Reduction, Fill-in Flash, Fill-in with Red-Eye Reduction, and Flash Off modes. Auto mode lets the camera decide when to fire the flash, while the Fill-in mode fires the flash with every shot. (Fill-in is useful for throwing light on backlit subjects, keeping their faces from being obscured in deep shadow.) The Red-Eye Reduction modes fire a brief burst of low-power flash pulses before firing the flash at full power, making the pupils of your subject's eyes contract, reducing the occurrence of the Red-Eye Effect. The Slow Sync modes allow more ambient light into the background, producing more natural lighting behind a flash-illuminated subject. The First Curtain mode fires the flash at the beginning of the exposure, while Second Curtain mode fires the flash at the end of the exposure. A button on the rear panel pops the flash up from its compartment, while the Flash button on the back panel controls the flash operating mode (different modes are available depending on the exposure mode). You can also adjust the overall flash intensity from +/-2 EV through the Record menu, in 0.3, 0.5, or 1.0 step increments. The flash option menu also offers a range of Manual flash exposures, setting the flash output to Full, 1/4, 1/16, or 1/64 of its maximum power. This mode is handy for working with studio strobe systems with slave triggers. In manual flash mode, the flash emits only a single burst, so it will trigger conventional slave circuits properly.
The E-300 also features an external flash hot-shoe, for attaching more powerful external flash units. The Olympus FL-50, FL-36, and FL-20 flash units, as well as several other manufacturer flash units. Because the built-in flash is offset from the hot shoe, both can be made to fire at once. A scenario can be imagined with the big external flash bouncing off the ceiling while the small built-in flash fills in the shadows.
As noted earlier, the EVOLT's flash head doubles as a very power autofocus-assist illuminator. The one drawback (shared with several other cameras that take this approach) is that AF-assist lighting is only available if you're going to be taking flash exposures. If you want to snap an available-light photo, you're on your own.
Reader Comments! --> Visit our discussion forum for the Olympus EVOLT E-300!

Follow Imaging Resource: