Canon EOS-1DCanon leaps into the professional SLR arena, with the fastest digital SLR on the planet!<<Viewfinder :(Previous) | (Next): Exposure & Flash>> Page 5:OpticsReview First Posted: 12/08/2001 |
Optics
Sensor
One of the first notable characteristics of the EOS-1D's optical system is its
unusually large sensor. The chip on the 1D measures 28.7 x 19.1mm. Oddly, Canon
states the multiplier ratio for this sensor to be 1.3x -- relative to the full
35mm frame (24 x 36mm) -- but a little math reveals that it's actually only
1.255x. Thus, a 16-35mm wide-angle lens works about like a 20-44mm lens on a
35mm camera. This ability to shoot wider with common lenses will be welcomed
by many photojournalists, a market at which the 1D is clearly aimed.
The EOS-1D's CCD has a total of 4.48 million pixels, arranged in a 2,664 x
1,681-pixel array. Of these, only 2,496 x 1,662, or 4.15 million are "effective"
pixels, the rest are lost to dark current calibration and edge effects. After
processing, the resulting images measure 2,464 x 1,648 pixels at full size,
or 1,232 x 824 at half-size. (Interestingly though, the RAW images include the
full 2,496 x 1,662 pixels of the CCD array.)
Many people have commented on Canon's decision to go with a CCD sensor in the
EOS-1D, particularly after the stunning success of the CMOS technology used
in the D30. This decision was apparently driven by Canon's design goal of eight
frames per second (fps) continuous shooting. A large-area CMOS sensor simply
couldn't read out the image data quickly enough to keep up with such a high
frame rate. Canon claims that the noise reduction technology and larger pixels
of the 1D's CCD sensor will result in images with even lower noise than those
from the D30, a fact supported by direct measurements on my Davebox test target.
When I compared images captured by the 1D and D30 using the same ISO setting
(200 in this example), I found that image noise from the 1D was noticeably lower.
(A standard deviation of 1.17 for the large gray midtone swatch on the 1D's
MacBeth chart versus 1.24 for the same swatch shot with the D30.) This is quite
impressive, given the exceptional smoothness of the D30. The numbers were borne
out by examining the individual color channels of images from the 1D, where
I found remarkably little noise in the blue and red channels. (I have to say
though, that there's a possibility that some psychovisual effect is coming into
play here. Despite the numbers and visual evidence of the individual color channels,
when I look at 1D and D30 images side-by-side on-screen, I pick the D30's image
as the one every time. Go figure…)
Lenses
The EOS-1D features a Canon EF lens mount, which accommodates the full range
of Canon EF lenses. I normally cite the aperture and focal length of a digicam's
lens in this part of my reviews, but because the EOS-1D accepts a wide range
of lenses, these characteristics will vary depending on the lens in use. Our
initial evaluation model was accompanied by Canon's 28-70mm L-series lens with
a maximum f/2.8 aperture setting. This is a pretty sharp lens, albeit not quite
as sharp as the 100mm macro lens I used for a portion of my testing of the D30.
(Update - I've now gotten a sample of the Canon 100mm macro lens, and have added
shots with it to the 1D's sample pictures page.)
Antialiasing Filter
Essentially all of today's digital cameras use "antialiasing" filters
in front of the CCD array to reduce color aliasing in images containing high
spatial frequencies (high-contrast, closely spaced lines). These filters work
by slightly blurring the image -- technically, by knocking off the high spatial
frequencies, while hopefully leaving the lower frequencies undisturbed. The
problem of course, arises in trying to balance the need for antialiasing with
the desire to maintain good image sharpness. Too strong a filter produces soft-looking
images, while too weak a filter results in color "twinkles" and "jaggies"
appearing in the fine details. Some high-end cameras leave the choice up to
the user, with a removable antialiasing filter that allows the user to choose
whether or not to use it, based on specific shooting conditions.
Canon claims to have taken a different approach with the 1D, deliberately choosing
an antialiasing filter with a higher cutoff frequency, and relying on fancy
image processing to eliminate or reduce any aliasing that might creep in as
a result. How well does it work? It's a little tough to say, as differences
in sharpness and detail can be so subtle between cameras. Compared to other
4-megapixel cameras I've tested, I can say that it does seem to deliver about
as much detail as any of them, and also displays an absolute lack of color artifacts
and aliasing in my resolution target shots. Overall, it looks like Canon's antialiasing
solution is quite effective.
 Autofocus
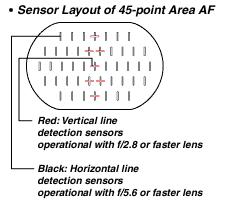
The EOS-1D employs a very fast autofocus system, with a myriad of focusing options.
At the heart of Canon's advanced AF is an unusually large AF frame. (The region
over which the AF system can take readings to determine focus.) As in the EOS-1v,
no fewer than 45 autofocus points cover a large portion of the overall field
of view. As shown in the diagram at right, seven of these are "cross"
sensors, sensitive to both horizontal and vertical detail, while the remaining
38 respond to texture in the horizontal axis only. The EOS-1D can select the
specific AF point automatically (based on the closest subject with reliable
autofocus characteristics), or the user can select a specific AF point manually.
The AI Servo AF system can also track moving subjects anywhere in the AF frame,
if they're initially locked-in via the central AF area.
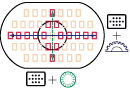 In the Manual/45-point
mode, you can select any one of the 45 AF points manually, and the camera will
use that point exclusively in its focus determinations. Selection is made by
using both the front and back Main and Quick Control dials.
In the Manual/45-point
mode, you can select any one of the 45 AF points manually, and the camera will
use that point exclusively in its focus determinations. Selection is made by
using both the front and back Main and Quick Control dials.
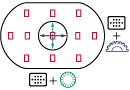 No two ways about
it, 45 focus points are probably a lot more than you need for manual selection,
and choosing just one of them could be more time-consuming than you'd like,
particularly in a fast-paced shooting situation. Custom Function menu item 13-2
simplifies the AF choice, reducing the number of available AF points to 11,
and arranging them in a cross pattern. Selection is again made using both the
front and back Main and Quick Control dials.
No two ways about
it, 45 focus points are probably a lot more than you need for manual selection,
and choosing just one of them could be more time-consuming than you'd like,
particularly in a fast-paced shooting situation. Custom Function menu item 13-2
simplifies the AF choice, reducing the number of available AF points to 11,
and arranging them in a cross pattern. Selection is again made using both the
front and back Main and Quick Control dials.
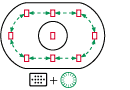 When speed is really
the issue, Custom Function menu option 13-3 further reduces the available AF
points to nine, all located around the periphery of the AF frame area. The advantage
of this is that only the Quick Control dial is needed to select an AF point,
rotating the selection point around the edge of the AF area as it is rotated.
This allows for a much faster selection, and is particularly useful for situations
where the photographer is dealing with an off-center subject..
When speed is really
the issue, Custom Function menu option 13-3 further reduces the available AF
points to nine, all located around the periphery of the AF frame area. The advantage
of this is that only the Quick Control dial is needed to select an AF point,
rotating the selection point around the edge of the AF area as it is rotated.
This allows for a much faster selection, and is particularly useful for situations
where the photographer is dealing with an off-center subject..
The "Assist" button on the top of the camera's rear panel offers another
important speed-related feature: You can "memorize" any individual
focusing point (whether at the center of the AF area, or more likely an off-center
one pertinent to your particular subject), and then quickly return to it by
pressing the Assist button.
 Sometimes, you
may want to use more than one focusing point (for example, if your subject is
fast-moving, low-contrast, or if you're working in low-light conditions). For
these situations, Canon has provided the Focus Point Expansion option, available
as Custom Function menu items 17-1 and 17-2. In these modes, you can still manually
select a single focus point, but the camera then looks at up to six surrounding
points to determine focus. Only the selected point lights up in the viewfinder,
but as many as six other points are used to determine focus.
Sometimes, you
may want to use more than one focusing point (for example, if your subject is
fast-moving, low-contrast, or if you're working in low-light conditions). For
these situations, Canon has provided the Focus Point Expansion option, available
as Custom Function menu items 17-1 and 17-2. In these modes, you can still manually
select a single focus point, but the camera then looks at up to six surrounding
points to determine focus. Only the selected point lights up in the viewfinder,
but as many as six other points are used to determine focus.
In addition to being able to select the AF area, you can also set the camera
to One-Shot AF or AI Servo AF. One-Shot AF is intended for stationary subjects,
and locks in focus on one area. In Al Servo AF mode, the camera tracks moving
subjects, keeping the subject in sharp focus no matter where it appears in the
frame. (As fast as 186 mph or 300 km/h, until the car is as close as 66ft/20m,
when using the 300mm f/2.8L IS lens, according to Canon.)
Canon's current USM lenses allow direct manual focusing at any time, regardless
of the operation of the AF system. (The mechanically-coupled manual focusing
overrides any AF setting.) A few early USM lenses had "electronic manual
focus", and the 1D supports manual "tweaking" of the focus setting
with those lenses, if you hold down the shutter button after the initial autofocus
is achieved.
A Depth of Field Preview button on the camera's front panel allows you to check
the depth of field and focus for the current aperture setting. The preview is
displayed in the viewfinder, and is helpful for determining how much of the
scene will be in focus.
Overall, the Canon EOS-1D's AF technology is very impressive. (Based on my opinion of the EOS-1v's much-vaunted implementation of the same technology.) It's both flexible and very fast, well-suited to the demands of professional sports shooters and photojournalists.
Sensor Cleaning!Everyone understands that lenses sometimes get dust on them and need to be cleaned, and there are a lot of lens-cleaning cloths, solutions and other accessories on the market that work well. BUT, what do you do when your sensor gets dusty? Dust specks on the sensor tend to show up when shooting at very small apertures, appearing as dark blobs on your images. They're distracting at best, a terrible nuisance at worst, if you end up having to retouch every image to rid of them.
Most of us are naturally leery about the idea of poking around inside the delicate innards of our d-SLRs to wrestle with recalcitrant dust specks. Gently blowing the sensor surface (actually, the surface of the anti-aliasing filter) with compressed air gets rid of some dust, but there's invariably a lot that just stays stuck, no matter what. So what do you do?
If you've got dust specks on your sensor (and sooner or later you will), you're going to need to clean it. There are a lot of products out there intended to address this need, but a distressing number of them work poorly (if at all), and many are grossly overpriced. Advertising hype is rampant, with bogus pseudo-scientific jargon and absurd product claims run rampant. And prices - Did I mention prices? How about $100 for a simple synthetic-bristle brush?
So how do you know what product to use?
We don't pretend to have used everything currently on the market, but can tell you about one solution that worked very well for us. The "Copper Hill" cleaning method is straightforward and safe, and in our routine usage here at Imaging Resource, highly effective. Better yet, the products sold by Copper Hill Imaging are very reasonably priced. Best of all, Nicholas R (proprietor of Copper Hill) has put together an amazingly detailed tutorial on sensor cleaning, free for all.
Sensor cleaning is one of the last things people think about when buying a d-SLR, but it's vital to capturing the best possible images. Take our advice and order a cleaning kit from Copper Hill right along with your d-SLR, so you'll have it close at hand when you need it: You'll be glad you did!
(Other than a few backlinks on their site, we receive no promotional consideration from Copper Hill. We just think their sensor cleaning products are among the best on the market, and like their way of doing business. - We think you will too. Check them out.)
Reader Comments! --> Visit our discussion forum for the Canon EOS-1D!

Follow Imaging Resource: