Olympus EVOLT E-500By: Shawn Barnett and Dave Etchells8.0 megapixels, ZUIKO DIGITAL lens mount, digital SLR design, and loads of features! <<Operation & User Interface :(Previous) | (Next): Image Storage & Interface>> Page 11:Camera Modes & MenusReview First Posted: 09/25/2005, Updated: 12/05/2005 |
Camera Modes and Menus
![]()
Manual Exposure Mode (M): Noted on the camera's Mode dial with an "M," Manual mode provides complete user control over the exposure, with an extended shutter speed range that includes a Bulb setting for variable length exposures up to eight minutes.
![]()
Shutter Priority Mode (S): Indicated by an "S" on the Mode dial, this mode lets the user control the shutter speed from 1/4,000 to 60 seconds, while the camera selects the best aperture setting.
![]()
Aperture Priority Mode (A): An "A" notes this mode on the Mode dial. Here, the user controls the lens aperture setting while the camera selects the best corresponding shutter speed. Aperture ranges will vary with the lens in use.
![]()
Program Mode (P): A "P" marks this mode on the Mode dial. In Program mode, the camera controls both aperture and shutter speed settings, while the user can adjust all other exposure variables.
![]()
Auto Mode: The word Auto in blue lettering notes this mode on the Mode dial, which puts all of the exposure variables under automatic control.
![]()
Portrait Mode: Indicated by an icon of a woman's head, this mode optimizes the camera for capturing portraits. A larger aperture is used, so that the subject will appear sharply focused in front of a slightly soft background.
![]()
Landscape Mode: Indicated by a mountain icon on the Mode dial. This mode is for capturing wide views of scenery, with both the foreground and background in focus, and enhances any blue or green colors in the image, for more vibrant trees, water, and skies.
![]()
Macro Mode: The traditional macro flower symbol indicates this mode on the Mode dial, which is intended for shooting close-ups of small subjects. Of course on an SLR, the closest shooting distance is determined by the abilities of the currently mounted lens, but this mode constricts the aperture for greater depth of field and sets flash power for Macro distances.
![]()
Sports Mode: An icon of a person running marks this mode, which biases the camera's exposure system toward faster shutter speeds to freeze action and moving subjects.
![]()
Night Scene Mode: This mode is best for capturing night portraits or night scenery, such as cityscapes. A slower shutter speed lets you shoot under darker conditions. A moon and star icon marks this mode on the Mode dial.
![]()
Scene Mode: Indicated by the word "SCENE" on the Mode dial, this mode accesses all 15 of the preset Scene modes. The following Scene menu automatically displays when the mode is accessed.
 Portrait Mode: This mode optimizes the camera for capturing portraits. A larger aperture is used, so that the subject will appear sharply focused in front of a slightly soft background.
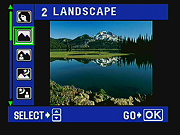 Landscape: This mode is for capturing wide views of scenery, with both the foreground and background in focus, and enhances any blue or green colors in the image, for more vibrant trees, water, and skies.
 Landscape + Portrait: Similar to the above mode, this mode is for capturing portraits in front of scenery. Both the foreground and background are in sharp focus, and the camera emphasizes blues and greens.
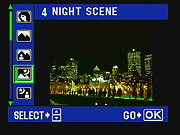 Night Scene Mode: This mode is best for capturing night portraits or night scenery, such as cityscapes. A slower shutter speed lets you shoot under darker conditions.
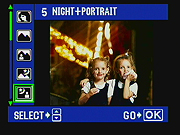 Night + Portrait: As with Night Scene mode, this mode uses a slower shutter speed to allow more ambient light into the image. However, the flash is now available in Slow-Sync mode with Red-Eye Reduction so that the subject is accurately exposed.
 Children: This mode sets the AF to Continuous mode, to make photographing busy children easier.
 Sport Mode: This mode biases the camera's exposure system toward faster shutter speeds to freeze action and moving subjects.
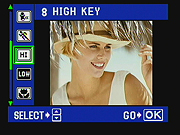 High-Key: This mode is best for capturing bright subjects. Overall image brightness is enhanced.
 Low-Key: Optimized for dark scenes, this mode accurately reproduces dark subjects, without overdoing the shadows.
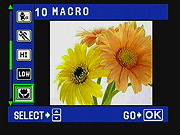 Macro Mode: This mode is intended for shooting close-ups, the minimum shooting distance determined by the lens in use.
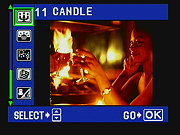 Candle: This mode uses a slow shutter speed and emphasizes a warm color balance for bright images in candlelight.
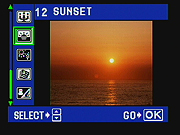 Sunset: This mode also uses a slow shutter speed for capturing vivid sunsets and sun rises. Reds and yellows are emphasized in the final image.
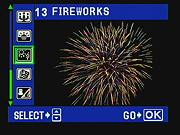 Fireworks: This mode uses a slow shutter speed to accurately capture the color and full pattern of firework displays.
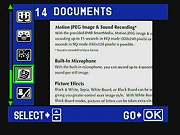 Documents: Best for shooting black and white documents, this mode increases contrast for better viewing.
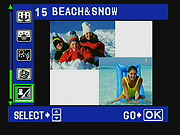 Beach and Snow: This mode is best for bright subjects such as beach and snow scenes. The camera attempts to preserve detail in the bright highlights.
Playback Mode: Accessed by pressing the Playback button on the rear panel, this mode lets you view previously captured images using the Arrow Pad to scroll through frames stored in memory. The Command dial switches the image display to Index mode when moved in the wide angle direction, and when moved in the telephoto direction, enlarges a single image. While zoomed in on an image, the Arrow buttons move the enlarged view around the full image area, allowing you to inspect all parts of it.
Still Picture Shooting Menu: In any camera mode, pressing the Menu button brings up following four-tab menu screen. Note that not all Camera menu options will be available in all modes.
- Camera 1
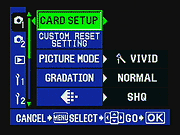 Card Setup: Erases all images on the CompactFlash or xD-Picture card or formats the card.
- Custom Reset Setting: The E500 lets you set up two sets of custom settings that the camera will remember if switched off. Here, you can reset the custom settings to their defaults, or set up the two banks of settings.
- Picture Mode: Offers Vivid, Natural, and Muted color settings, as well as Monotone and Sepia shooting options. Within each option, you can adjust separate controls for contrast, sharpness, and saturation. In Monotone and Sepia modes, you can choose the color of the filter used to convert the color image to a monochrome one, as well as set the color tone of the resulting image. (Really quite a surprising level of configurability.)
- Gradation: Controls the overall brightness of the image. Choices are Normal, Low, or High Key.
- Quality: Controls the resolution and quality settings. Options are SHQ (3,264 x 2,448 pixels), TIFF (3,264 x 2,448 pixels), RAW (3,264 x 2,448 pixels), RAW + SQ, RAW + HQ, RAW + SHQ, HQ (3,264 x 2,448 pixels) and SQ. (The resolution and compression values for SQ and the compression settings for HQ are set under the Setup 1 portion of the menu.)
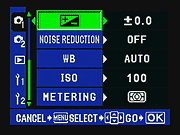 Exposure Compensation: Increases or decreases the exposure from -5 to +5 exposure equivalents (EV) in either 0.3, 0.5, or 1.0 step increments. (The step size is set in the Setup portion of the menu.)
- Noise Reduction: Turns Noise Reduction on or off.
- White Balance: Sets the white balance to Auto, Daylight (5,300K), Cloudy (6,000K), Shade (7,500K), Tungsten (3,000K), White Fluorescent (4,000K), Neutral White Fluorescent (4,500K), Daylight Fluorescent (6,600K), one of four saved "Custom" settings (to which you can assign your own Kelvin temperatures, ranging from 2000 K to 10,000K), or One-Push (Custom) modes. In all of the above modes, you can also control the balance of red/blue or green/magenta, from +/- 7 in arbitrary units.
- ISO: Adjusts the ISO sensitivity to Auto, or from 100 to 400. If ISO Boost is enabled, 800 and 1,600 equivalent settings are also available. (An ISO step size option in the Setup menu affects the number of ISO settings as well.)
- Metering: Selects between Digital ESP, Spot, Center-Weighted, Spot with Highlight Control, and Spot with Shadow Control metering modes.
- Camera 2
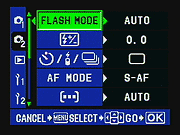 Flash Mode: Sets the built-in flash to Auto, Auto Red-Eye Reduction, Fill-In, Off, Slow-Sync Red-Eye Reduction, Slow-Sync 1, or Slow-Sync 2. There's also a range of manual flash exposure levels, in which the flash will fire at 1/64, 1/16, 1/4, or full power. This mode is handy when working with studio strobe systems with slave triggers, because in it, the flash emits only a single burst, so it will trigger conventional slave circuits properly. (Note that some flash modes will not be available, depending on the exposure mode selected.)
- Flash +/-: Adjusts the intensity of the internal flash, from -2 to +2 EV in one-third-step increments.
- Drive: Sets the camera's Drive mode to Single-Frame, Sequential Shooting, Self-Timer 12S, Self-Timer 2S, Remote Control 0S, or Remote Control 2S modes.
- AF Mode: Controls the autofocus system's operating mode. Options are Single AF, Continuous AF, Manual Focus, Single AF with Manual Focus, or Continuous AF with Manual Focus.
- AF Area Selection: Sets the AF area to one of three AF points, or to Auto, in which the camera selects the point at which the subject is closest to the camera.
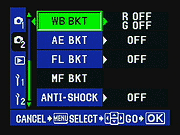 WB Bracket: Activates the white balance bracketing mode, with two, four, or six-step variable increments. Red/Blue and Green/Magenta balance can be independently controlled. (Again, an unusual level of configurability.)
- AE Bracket: Enables Auto Exposure Bracketing mode, which shoots three frames at +/-0.3, +/-0.7, or +/-1.0 step variables.
- Flash Bracket: Similar to AE Bracket, this mode brackets the flash exposure in three frames, at +/-0.3, +/-0.7, or +/-1.0 step variables.
- MF Bracket: Enables the manual focus bracketing option, which captures five or seven frames, at either one or two step variables.
- Anti-shock: Enables the Anti-shock option, which reduces camera vibration from the mirror raising. You can set the delay from the time that the mirror is raised until the shutter is released from one to 30 seconds.
- Playback:
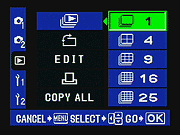 Slide Show Play: Activates an automated slide show of images stored on the memory card, in single image format, or four, nine, 16, or 25 image index display.
 - Rotate: If enabled, automatically rotates images captured vertically on the camera's display. (Doesn't affect the data in the image files though, they'll still appear as landscape-format images when downloaded and viewed on a computer.)
- Edit: Accesses the image editing menu, where you can apply Black and White, Sepia, Red-eye Fix, or Saturation effects to a captured image, or resize it to smaller pixel dimensions. Also allows you to edit RAW files in-camera.
- DPOF: Marks individual or all images for printing on a DPOF device. You can also designate whether or not the date and time are overlaid on the image.
- Copy All: Lets you copy all the images from one card to another when you have both CF and xD cards in the camera. (This screen not shown.)
- Setup 1:
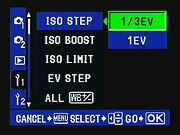 ISO Step: Sets the EV step size to 1/3 or 1 EV step size.
- ISO Boost: Turns ISO Boost on or off. If on, the ISO options in the Camera 1 ISO submenu will include 800 and 1,600 equivalents. There's also an On + NF option for automatic noise reduction at higher ISOs.
- ISO Limit: If enabled, this setting limits the maximum ISO to 100, 200, 400, or 800, to reduce the risk of overexposure in bright conditions.
- EV Step: Sets the EV step size to 1/3, 1/2, or 1 EV step size.
- All WB: Applies the same compensation to all white balance settings at once. As with the individual adjustments, you can control the amount of red, green, blue, and magenta in the image. Also lets you reset all White Balance settings to their defaults.
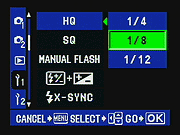 HQ: Sets the HQ JPEG compression level to 1/4, 1/8, or 1/12.
- SQ: Sets the SQ resolution to 3,200 x 2,400; 2,560 x 1,920; 1,600 x 1,200; 1,280 x 960; 1,024 x 768; or 640 x 480 pixels. JPEG compression levels can be set for each size option to 1/2.7, 1/4, 1/8, or 1/12.
- Manual Flash: Enables the "Manual" flash exposure option.
- Exposure + Flash +/-: If enabled, this option lets you adjust the flash intensity by pressing the EV +/- and Flash with together.
- Flash X-sync: Adjusts the speed synchronization for the built-in flash, from 1/60 to 1/180 in 1/3 step increments.
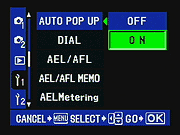 Auto Pop-up: If enabled, this option automatically pops up the built-in flash in low-lit or backlit conditions, in any of the automatic modes.
- Dial: Sets the function of the Control dial for Program and Manual modes.
- AEL/AFL: Sets the function of the AE/AF Lock button in Single, Continuous, and Manual focus modes. In each mode, you can set the button to lock focus and/or exposure in a certain order or independently, and also designate the function of the Shutter button in this regard.
- AEL / AFL Memo: If activated, this option lets you turn the AE lock off by pressing the AE/AF Lock button after locking exposure and focus.
- AE Lock Metering: Sets the type of metering for the AE Lock function to Auto, ESP, Center-Weighted, Spot, Spot HI, or Spot SH.
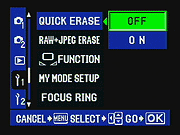 Quick Erase: If enabled, this function lets you immediately erase the captured image by pressing the Erase button.
- RAW+JPEG Erase: Determines type of file that's erased through the Erase option, either JPEG, RAW, or JPEG+RAW files.
- One-Touch WB Function: Sets the One-Touch WB button function to One-Touch selection, Test Picture, My Mode, or Preview. The Test Picture option displays the captured image without recording to the card. My Mode applies the My Mode settings before capturing an image, and Preview lets you preview the image while holding down the button.
- My Mode Setup: Sets the options for My Mode, which lets you register up to two sets of camera settings, which can be instantly recalled while shooting.
- Focus Ring: Lets you determine the direction for the focus ring.
 AF Illuminator: Turns the AF illuminator feature on or off. (Note that the E-500 uses the flash head as its AF illuminator, so you'll only get AF-assist illumination when the flash head is popped up; however, the flash does not necessarily need to be enabled.)
- Reset Lens: Resets the focus of the lens to infinity when the power is switched off.
- Release Priority S: Controls whether the shutter can be released before focus and exposure are set in Single AF mode.
- Release Priority C: As above, controls whether the shutter can be released before focus and exposure are set in Continuous AF mode.
- Setup 2:
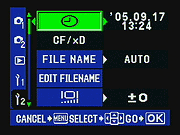 Date/Time: Sets the camera's date and time.
- CF/xD: Specifies what type of memory card is in use, either CompactFlash or xD-Picture Card.
- File Name: Resets file numbers with each new memory card or formatting operation, or continues in sequential order.
- Edit Filename: Edits file names to make identification easier. You can opt for Adobe RGB or SRGB in the filename, with options for numbering.
- LCD Brightness: Adjusts the brightness of the LCD monitor.
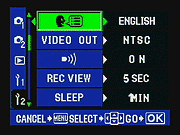 Language: Sets the menu language to English, French, German, or Spanish.
- Video Out: Sets the camera's video-out signal to NTSC or PAL timing.
- Beep: Turns the camera's beep sounds on or off.
- Record View: Turns the post-capture image review off, or sets the duration from one to 20 seconds.
- Sleep: Designates the amount of time before the camera puts itself to sleep. Choices are 1, 3, 5, or 10 minutes, or Off.
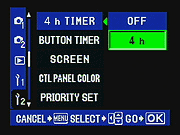 4 h Timer: Sets the power off time to four hours, or turns this function off.
- Button Timer: Sets the duration of time that a function menu appears on the LCD screen after the button has been pressed. Options are Hold, or 3 or 5 seconds.
- Screen: Determines whether the startup screen displays when the camera is turned on.
- Control Panel Color: Sets the color scheme for the Control Panel to one of two options.
- Priority Set: Customizes the cursor position (to Yes or No) for options such as Erase.
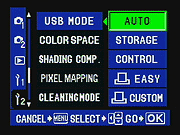 USB Mode: Sets the USB mode to Auto, Storage, Control, Print Easy, or Print Custom. Auto means that you'll need to select PC or Print in the USB connection menu when the camera is connected to a computer or printer. Storage mode allows the transfer of data from the camera to the computer. The Control setting allows you to remotely control the camera from the computer, using the included Olympus software, while the Print options are for direct printing to PictBridge or DPOF devices.
- Color Space: Selects either sRGB or Adobe RGB as the camera's working color space.
- Shading Compensation: If enabled, brightens any darkened corners of the frame automatically, to counteract any slight distortion from the lens.
- Pixel Mapping: Checks the CCD for bad pixels, "maps" them out (using data from adjacent pixels), so they won't appear in images.
- Cleaning Mode: Raises up the mirror so that the CCD can be cleaned. (This allows direct access to the CCD's cover glass, in like fashion to other digital SLRs. - The E-500's SSWF automatic sensor cleaning occurs every time the camera is powered up, and should keep the sensor free of dust under most circumstances. This mode is for those (hopefully few) times when there's grundge on the protective glass that requires physical intervention to remove.)
- Firmware: Reports the camera's firmware version.

Follow Imaging Resource: