Fuji FinePix 1300Fuji updates their entry-level 1.3 megapixel model, adding USB for fast file downloads<<Design :(Previous) | (Next): Optics>> Page 4:ViewfinderReview First Posted: 11/28/2000 |
 Viewfinder
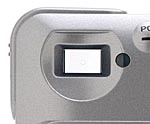
The FinePix 1300 features both an eye-level optical viewfinder and a 1.6-inch color LCD monitor. The optical viewfinder is positioned right over the camera lens, in the upper left corner of the camera. Fujifilm estimates that the viewfinder provides 80 percent frame coverage. In our testing, we found the optical viewfinder to be much less accurate, as our standard measurement lines were completely cut off in the resulting image. This means that the optical viewfinder shows a much larger area than what is recorded in the final image.
A very faint etched circle in the center of the viewfinder aids in composition, but is not designed to take spot meter readings, as the camera averages its light meter readings from 64 zones over the entire viewfinder area. The FinePix 1300 does have an automatic exposure (AE) lock function, which allows you to take a close-up meter reading of your subject, depress the shutter button half way to lock it in, and recompose the image without changing the exposure. However, since the lens is fixed focus, there are no automatic focus lock or spot focus functions to consider.
An LED lamp to the right of the viewfinder glows green, orange, or red, depending on the camera's status. A steady green light indicates that the camera is ready to shoot; if it flashes green, the AE function is in operation or camera shake is a potential problem. A solid orange LED means the image is being recorded to the memory card, while a flashing orange light means that the camera flash is recharging. Finally, if the LED is flashing red, it indicates a SmartMedia warning—the details of which will be reported on the LCD screen (if activated).
As with the MX-1200, the FinePix 1300's optical viewfinder has a few notable problems. Its poorly defined (and slightly fuzzy) edges make it hard to determine exactly where the edges of the frame will be aligned. For eyeglass wearers, this problem is compounded by a rather low "eye point" and no dioptric correction adjustment. (In fairness, you wouldn't expect to find dioptric correction on such an inexpensive camera, but a higher eye point would have been nice.) In our testing, we took a "best guess" of how we thought the average user would compose a scene, and ended up with a fairly inaccurate result, thus emphasizing the importance of crisp, well-defined edges in the viewfinder's field of view.
We found the 1.6-inch, 55,000-pixel D-TFT, color LCD monitor to be much more accurate than the optical viewfinder, showing approximately 96.6 percent of the final image area, which is very close to the optimum 100 percent accuracy. The LCD is not automatically activated when the camera is turned on in Auto mode. You must depress the Display button to bring up the image and information display (which includes the current record mode, frame number, image resolution, macro icon [if activated], and flash setting); a second press of the Display button turns off the information display, leaving only the image; and a third press turns off the display altogether.
In Manual mode, the information display comes into view automatically when you turn on the camera. The on-screen icons reveal the same information as they do in Auto mode, as well as additional details such as the date (which flashes on the bottom of the monitor for only a second), exposure compensation, and white balance setting. Pressing the Display button one time brings up the image along with the information display; pressing it a second time eliminates the information display, and shows only the image; and pressing it a third time returns you to the information-only display. In Macro mode, the LCD image display cannot be turned off, as it is necessary to compose the image.
In Playback mode, the LCD monitor provides reasonably sharp images, and features up to 4X zoom playback, so you can more closely inspect captured images. The Up and Down Arrow buttons on the rocker toggle enable you to zoom in or out of the photo you're viewing. Once you reach the desired zoom level, you can press the Display button to change the operation of the toggle, allowing you to move around within the enlarged photo. Pressing the Display button once again cancels this mode and returns the toggle control to its normal Playback operation.
The LCD monitor also provides an index display for viewing up to nine images at a time. This function is activated by pressing the Display button twice quickly. Once in the index display, the arrows of the rocker toggle move the "cursor" highlight to the desired frame. Pressing the Display button then enlarges the selected image to full-screen size.

Follow Imaging Resource: