Fuji FinePix 1300Fuji updates their entry-level 1.3 megapixel model, adding USB for fast file downloads<<Operation & User Interface :(Previous) | (Next): Image Storage & Interface>> Page 9:Camera Modes & MenusReview First Posted: 11/28/2000 |
Camera Modes and Menus
Set-up Mode: Indicated on the Mode Dial by the word "Set," this mode provides access to a menu of basic camera settings:
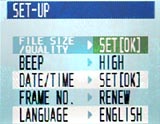 File Size/Quality: Select one of two image file sizes: 1,280 x 960 or 640 x 480 pixels. The 1,280 x 960 file size offers three Quality settings: Fine, Normal, and Basic (Normal is the default); the 640 x 480 size only offers the Normal quality setting.
- Beep: Selects the buzzer tone as: High, Low, or Off (factory default is High).
- Date/Time: Allows you to set the date and time using the Arrow buttons.
- Frame Number: Selects either Continue or Renew frame numbering (Renew is the default). The Continue option maintains incremental file numbers, even after the memory card is erased or a new card is inserted (very handy to avoid overwriting previous images when you copy them to your hard drive). Renew starts the numbering system over again when you switch memory cards.
- Language: Changes the camera's menu language to English or French.
Photography (Record) Mode: Indicated on the Mode Dial by the traditional red camera symbol, this mode allows you to capture images in either Auto or Manual exposure modes. (See Below)
Auto Mode: In this mode, the camera controls all exposure settings, including shutter speed, f/stop, and white balance. You control the Flash mode, Macro/Normal lens setting, Digital Telephoto, Self-Timer, and Continuous Shooting functions. Depressing the Menu/OK button in Auto mode brings up the following menu options:
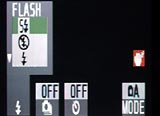 Flash: Choose between Auto Flash, Red-Eye Reduction, Forced Flash, Suppressed Flash, and Slow Synchro modes.
- Continuous Shooting: Turns the Continuous Shooting mode on or off. When activated, the Continuous Shooting mode allows you to capture up to nine consecutive shots, at approximately two frames per second, while holding down the shutter button.
- Self-Timer: Activates the Self-Timer shooting mode, which initiates a 10-second countdown when the shutter button is depressed, releasing the shutter after the countdown is complete.
- Mode: Sets the capture mode to Auto or Manual.
Manual Mode: In this mode, the photographer is given control over two additional exposure settings: White Balance and Exposure Compensation (EV). It is also possible to access the Macro and Digital Telephoto functions in this mode, but not the Self-Timer or Continuous Shooting functions. Depressing the Menu/OK button in Manual mode brings up the following menu options:
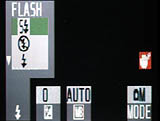 Flash: Choose between Auto Flash, Red-Eye Reduction, Forced Flash, Suppressed Flash, and Slow Synchro modes.
- Exposure Compensation (EV): Allows you to adjust the brightness level for optimum exposure. The camera offers nine exposure compensation (EV) levels, from –0.9 to +1.5, in one-third-step increments. This setting is ineffective when using Auto Flash or Red-Eye Reduction modes, and when using Forced Flash in a dark scene. (Note: One full EV unit corresponds to one f/stop increase or decrease in exposure.)
- White Balance: Enables you to select the CCD's White Balance based on light conditions. Options include: Auto, Sunny, Cloudy, Daylight Fluorescent, Warm White Fluorescent, Cool White Fluorescent, and Incandescent lighting. The Auto adjustment mode may not always be accurate when shooting close-up images or under special lighting conditions. This setting is also ineffective when used with Flash.
- Mode: Sets the capture mode to Auto or Manual.
Playback Mode: Indicated by the standard green arrow symbol on the Mode Dial, Playback mode enables you to view recorded images frame-by-frame or in multi-frame index format. With Playback Digital Zoom, you can enlarge an image with the Up Arrow key, press the Display button, and scroll through the enlarged image with all four arrow keys to examine specific details. Press the Menu/OK button to return the image to normal size.
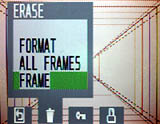
The Playback mode menu also allows you to Erase and Protect images, or to set them up for printing on a Digital Print Option Format (DPOF) device. Depressing the Menu/OK button in Playback mode brings up the following menu options:
 Back: Allows you to exit out of the menu.
- Erase: Deletes the currently displayed image or all images from the memory card. You can also format the memory card, which erases all images, including the protected ones.
- Protect: Protects the currently displayed image or all images from accidental deletion (except from card formatting). You can also remove protection from one or all frames.
- DPOF (Digital Print Order Format): Gives you the ability to select DPOF settings for each image frame for subsequent output on a DPOF-capable printer. The following options are provided:
- Date On/Off: Turns on or off the date stamp printing function.
- Frame Set/Reset: Selects how many prints of a particular frame to print, or resets prints.
- Set All: Specifies printing of one print for each image.
- Reset All: Cancels all DPOF settings for each frame.
- Date On/Off: Turns on or off the date stamp printing function.
Note: You cannot delete files with DPOF settings. To delete these images, the DPOF settings must first be removed.

Follow Imaging Resource: