Quick Review
Fuji FinePix F410 Digital Camera
 |
Camera QuickLook | |
|
Review Date |
|
|
|
User Level |
|
|
|
Product Uses |
|
|
|
Digicam Design |
|
|
|
Picture Quality |
Good, 3.1-megapixel SuperCCD, interpolates to 6.0-megapixels | |
|
Print Sizes |
To 8x10 inches, possibly larger | |
|
Availability |
|
|
|
Suggested Retail Price
(At Introduction) |
|
|
|
||||||||||
Introduction
Over the last several years, Fuji's design team has developed a strong line
of compact, stylish digicams that continue to impress in terms of color performance
and image quality. With designs focusing on portability and convenience, Fuji
digicams generally feature smooth contours that fit well into typical pockets.
At the same time, Fuji continues to offer a nice collection of features, while
keeping user interfaces comfortable for the novice. Perhaps their greatest
strength lies in the excellent color that's become a hallmark of Fuji's camera
lineup. (Many professionals shooting portrait and wedding photography have
gravitated toward Fuji's pro SLR cameras for their beautiful rendering of
skin tones.)
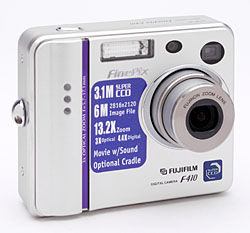
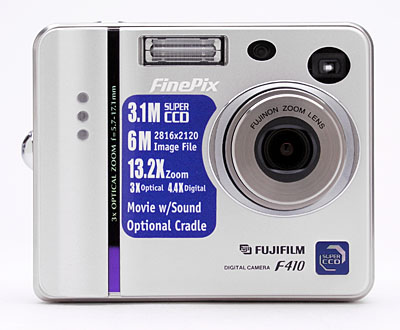
The latest model in this line is the Fuji FinePix F410, featuring the most recent generation of Fuji's SuperCCD "HR" technology. A 3.1-megapixel SuperCCD (producing 6.0-megapixel finished file sizes) and a 3x optical zoom lens offer nice image quality, with a handful of exposure options that offer reasonable flexibility without getting too complicated. Read on for all the details!
Slim and ultra-compact, the Fuji FinePix F410 is a stylish digicam that's ready to travel. Overall design is nearly identical to the preceding FinePix F401, but the F410 is equipped with a larger, 3.1-megapixel SuperCCD (which interpolates for a maximum 6.0-megapixel resolution). Small enough for shirt pockets and evening bags, the F410 easily fits into one hand. Thanks to its retractable lens, the camera's low-profile front panel lets you quickly slip it into a pocket and go. However, a shoulder strap comes with the camera, so you can slip it around your neck and have it ready at a moment's notice. The matte-finish, all-silver camera body is sleek and modern, with cobalt blue lights on the front panel. Camera controls are minimal, and logically placed, fitting in smoothly with the camera's low-profile design.
Equipped with a 5.7-17.1mm lens (equivalent to a 38-114mm lens on a 35mm camera), the F410 offers a true, 3x optical zoom. The camera offers apertures of either f/2.8 or f/7, selected automatically depending on ambient lighting conditions and the current ISO setting you've selected. The F410's autofocus uses a contrast-detection system, with a range of two feet (60 centimeters) to infinity in normal mode. A Macro setting changes the range to 0.3 to 2.6 feet (10 to 80 centimeters). In addition to the 3x optical zoom, the F410 also features as much as 4.4x digital zoom, effectively increasing the camera's zoom potential to 13.2x. (The amount of digital zoom available depends on the image resolution selected, with the higher digital zoom levels only available when smaller final image sizes are selected.) I always remind readers that digital zoom decreases the overall image quality because it simply enlarges the center pixels of the CCD image, and shouldn't be relied on for sharp details and high image quality. That said, Fuji's approach is intelligent in that they avoid interpolation in their digital zoom, accepting limits on the amount of magnification in order to preserve the original pixel quality. The F410 has both a real-image optical viewfinder and a 1.5-inch polysilicon, TFT, color LCD monitor for composing shots. An information display on the LCD monitor includes basic camera information, such as the shooting mode and image quality setting, as well as the current image capacity of the memory card and the flash mode. When you half-press the shutter, the LCD display reports the current aperture and shutter speed settings, giving you an idea of what the exposure will be. (While you can't directly set the exposure parameters yourself, I personally find it very useful to know what shutter time the camera is using, as an aid to knowing how careful I need to be to avoid camera movement when shooting in dim lighting.) A set of focus/exposure brackets in the center of the display helps line up shots. You can also enable a grid display for lining up tricky compositions. The grid divides the image area into thirds, horizontally and vertically, making it easier to accurately frame your subject and align vertical or horizontal elements.
Exposure is automatically controlled on the F410, although a "Manual" mode offers a few extended exposure options. A Mode switch on the camera's back panel puts it into Movie, Playback, or Record modes. Through the LCD menu, however, you have a choice between Auto and Manual mode settings in still capture mode, which basically dictates the number of menu options available. Auto mode offers limited user options, including resolution, quality, flash mode, zoom, and the camera's drive settings (Continuous Shooting, Self-Timer). Manual expands these to include Exposure Compensation and White Balance adjustments. The F410's shutter speeds range from 1/2,000 to 1/4 second, the lower end of which limits the camera's low-light shooting capabilities somewhat. (Many competing cameras have maximum exposure times of one or two seconds.) The F410 utilizes a 64-zone metering system, which divides the image area into sections and evaluates brightness and contrast across the entire scene to determine the best overall exposure. You can adjust the overall exposure from -2.1 to +1.5 exposure equivalents (EV) in one-third-step increments, through the LCD menu in Manual mode. ISO sensitivity options range from 200 to 800, adjustable in both Auto and Manual modes. White balance options include Auto, Daylight, Cloudy, Daylight Fluorescent, Warm White Fluorescent, Cool White Fluorescent, and Incandescent. A new Color option offers Black and White and Chrome (high saturation and contrast) color photography options, in addition to Standard color. A built-in flash operates in either Auto, Red-Eye Reduction, Forced, Suppressed, or Slow Synchro modes. The Flash button cycles through each mode, and an icon appears on the LCD display indicating the selection.
The F410's Movie mode records as long as 480 seconds of moving images (with sound) per clip, at the 160 x 120-pixel resolution. (It can record as long as 120 seconds at the 320 x 240-pixel setting.) Note that the actual amount of recording time may be limited by available memory card space, if the card is nearly full. A Voice Memo option in Playback mode records short sound clips to accompany previously-captured images. For self-portraits or timed shots, the F410's Self-Timer counts down for 10 seconds after the Shutter button is fully pressed, before it fires the shutter. Finally, the F410 also features two Continuous Shooting modes: Top 4-Frame and Final 4-Frame. Top 4-Frame mode shoots up to four frames at intervals as fast as 0.3-seconds. All four images appear on the LCD monitor while being recorded. Final 4-Frame mode captures as many as 25 consecutive images at approximately the same frame rate, but records only the last four frames. (This mode is handy for catching just the right moment. Press the Shutter button well before the key moment arrives, then release it just after it's passed. Chances are one of the last four frames captured will be perfectly timed. - A very useful feature!)
The F410 stores images on xD-Picture Cards, and ships with a 16MB card in the box. I highly recommend picking up a larger card though, given the F410's 2,816 x 2,120-pixel maximum image size. For power, the camera uses a rechargeable lithium-ion battery pack or an AC adapter, both of which are included with the camera. The AC adapter acts as an in-camera battery charger as well. Since the F410 doesn't have any AA-type battery capacity (making spares more difficult to come by), I strongly advise purchasing an additional battery pack, and keeping it freshly charged and close at hand on extended excursions. The F410 will automatically shut itself down after a short period of inactivity, which can be adjusted through the Setup menu to either two or five minutes. (You can also disable the power save function, in which case the F410 will remain powered-up until the battery pack runs down.) The F410 connects to a host computer via a USB jack, and comes with the appropriate cable, as well as drivers and Fuji FinePix Viewer software on CD (compatible with both Windows and Macintosh operating systems). The F410 is also DPOF (Digital Print Order Format) compatible, with a handful of print settings available in Playback mode.
Basic Features
- 3.1-megapixel Super CCD, interpolates to 6.0-megapixels and maximum 2,816 x 2,120-pixel resolution.
- 1.5-inch color LCD monitor.
- Real-image optical viewfinder.
- Glass, 3x 38-114mm lens, with apertures from f/2.8 to f/7.
- Up to 4.4x digital zoom.
- Automatic exposure control.
- Shutter speed range from 1/2,000 to 1/4 second.
- 64-zone Multi metering mode.
- ISO values from 200 to 800.
- Built-in flash with five operating modes.
- Adjustable white balance with seven modes.
- xD-Picture Card image storage.
- Power supplied by rechargeable lithium-ion battery pack or AC adapter, both included.
Special Features
- Movie (with sound) recording mode.
- Voice Memo mode for short sound clips.
- 10-second Self-Timer.
- Macro focus mode.
- DPOF (Digital Print Order Format) compatibility.
- USB cable for connection to a computer.
- Software CD with interface software and USB drivers.
Recommendation
Tiny, compact, and uncomplicated, the FinePix F410 is a good choice for anyone wanting an easy-to-use camera for general usage. Fully automatic exposure control makes for true point-and-shoot operation most of the time, although the camera does offer at least a few options for users who want to dabble with extended control. The ability to choose white balance settings, ISO sensitivity, and adjust the overall exposure makes the camera more flexible for unusual shooting conditions. The 3.1-megapixel Super CCD captures more detail than conventional 3 megapixel CCDs, good for prints to 8x10 inches and even a bit larger. With a user-friendly interface, small size, good overall performance, and better-than-average color the F410 is a great option for anyone just starting out in digital photography and looking for a compact, portable camera.
Small dimensions and light weight make Fuji's FinePix F410 digital camera an attractive option for anyone needing a travel-worthy digicam. Measuring a mere 3.3 x 2.7 x 1.1 inches (85.0 x 69.4 x 27.5 millimeters), the F410 easily fits into most shirt pockets and even small purses. The telescoping lens retracts flush with the camera front, keeping a smooth profile that won't catch on pockets. The included neck strap is great for keeping the camera securely around your neck, but I'd recommend a small camera bag for better protection when traveling. The F410 is light on the scales, at just 6.8 ounces (193 grams), including the battery and memory card.
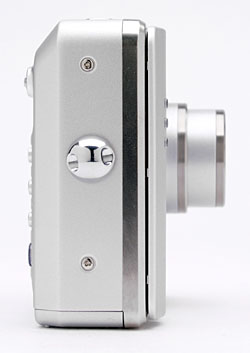
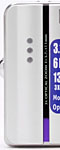
With the lens retracted, the F410's front panel is nearly smooth, with just a small protrusion around the outside ring of the lens barrel and a slight bump on the left side (as viewed from the front) for the combined finger grip / power switch. A protective lens cover automatically slides open when the camera is powered on, letting the lens telescope outward, thereby eliminating the need for a lens cap. The entire handgrip bulge on the left side (as viewed from the front) serves as a power switch, sliding open to power the camera on. The three blue LED lamps illuminate briefly when the camera is turned on, the center LED lamp also acting as the Self-Timer LED, blinking to count down the self-timer interval. The sculpted power switch also serves as a finger grip when holding the camera in shooting position. Also on the front panel are the flash, optical viewfinder window, and flash exposure sensor.
The right side of the F410 (as viewed from the rear) features only the wrist strap attachment eyelet.
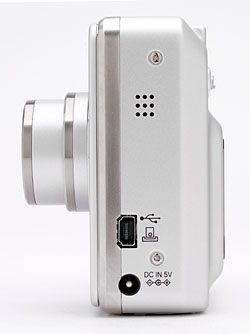
On the left side of the F410 is the camera's speaker, as well as the USB and DC-In jacks.

The Shutter button and tiny microphone grille are the only features on the F410's flat top panel.
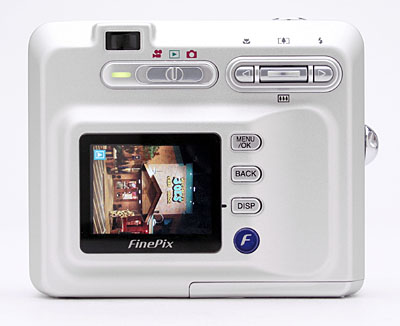
The few available controls all reside on the back panel, along with the optical viewfinder eyepiece and LCD monitor. A Mode switch just below the optical viewfinder controls the camera's operating mode, and a series of buttons in the top right corner adjust focus, flash mode, and macro mode. Arranged down the right-hand side of the LCD monitor are the Menu / OK, Back, Display, and Photo Mode buttons.
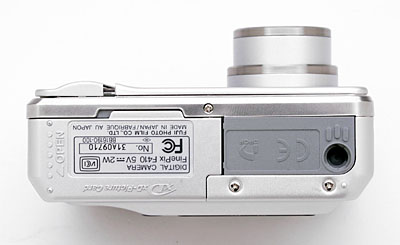
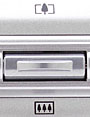
The F410 has a fairly smooth bottom panel, holding the combined battery/memory card slot, as well as the plastic, threaded tripod mount. The small amount of space on the bottom panel keeps the battery and memory card compartment too close to the tripod mount for quick changes of either while the camera is mounted on a tripod. I doubt this will be much of an issue for the vast majority of users though, as the F410 is clearly intended for on the go shooting, as opposed to studio work.
The F410 operates under automatic exposure control at all times, and a straightforward LCD menu system offers a handful of exposure options to choose from. The F410 has few external controls, the primary adjustments being flash, Macro mode, zoom, and the main camera mode options. That said, the LCD menu system itself is simple to navigate, with a selection of menu options displayed along the bottom edge of the screen. The arrow keys navigate the choices, and the Menu/OK button confirms settings. One change from the previous F401 model is the Photo Mode button, which provides access to Resolution, ISO, and Color settings. Although an instruction manual accompanies the camera, I doubt you'll need it for much of anything other than reference, as the camera is simple enough to operate that you should be able to start shooting with it right away.
Record-Mode Display
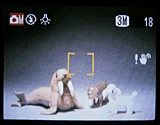 In
record mode, the LCD monitor displays the subject with a small amount of
overlaid information, indicating flash, white balance, ISO setting, the
current size/quality setting, and number of images that can be stored on
the remaining memory card space at the current size/quality. Pressing the
Display button beneath the LCD once turns on a grid of horizontal and vertical
lines to help align your subjects, pressing it again turns the LCD off entirely,
and pressing it a third time restores the default display. When you half-press
the shutter button, the central brackets shrink to indicate that the focusing
system is active, and the shutter speed and aperture the camera will use
is displayed at the bottom of the LCD screen. If a slow shutter speed is
indicated, a "shaking hand" icon will appear on the right-hand
side of the display, warning you not to jiggle the camera when you snap
the shot. The screenshot above right shows the normal record-mode display,
the display that appears when the shutter button is half-pressed, and the
screen with the alignment grid superimposed.
In
record mode, the LCD monitor displays the subject with a small amount of
overlaid information, indicating flash, white balance, ISO setting, the
current size/quality setting, and number of images that can be stored on
the remaining memory card space at the current size/quality. Pressing the
Display button beneath the LCD once turns on a grid of horizontal and vertical
lines to help align your subjects, pressing it again turns the LCD off entirely,
and pressing it a third time restores the default display. When you half-press
the shutter button, the central brackets shrink to indicate that the focusing
system is active, and the shutter speed and aperture the camera will use
is displayed at the bottom of the LCD screen. If a slow shutter speed is
indicated, a "shaking hand" icon will appear on the right-hand
side of the display, warning you not to jiggle the camera when you snap
the shot. The screenshot above right shows the normal record-mode display,
the display that appears when the shutter button is half-pressed, and the
screen with the alignment grid superimposed.
Playback-Mode Display
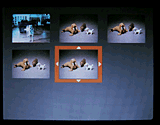 In
playback mode, pressing the default image display shows the most recently
captured image, with an information overlay momentarily showing the date
of capture, and the file and folder number in which the image is stored
on the memory card. After a couple of seconds, the information overlay disappears,
and only a small "playback" arrow simple is shown in the upper
right. Pressing the Display button once removes any overlay, and pressing
it a third time shows a set of nine thumbnails. With an image displayed
full-screen, pressing the zoom control in the "T" direction zooms
in on the image in small steps, up to a maximum magnification of 17.6x.
(Maximum playback magnification is a function of the recorded image size.
0.3M (640x480 pixel) images can only be enlarged 4x, while 6M (2816x2120
pixel) may be enlarged the full 17.6x.) At any magnification level, pressing
the "DISP" button switches you to scrolling operation, in which
the left/right buttons and the T/W control let you scroll around the magnified
image. Pressing the center of the DISP button again returns you to zoom
operation. The screenshot above right shows the index display and the normal
playback screen, without the momentary information overlay.
In
playback mode, pressing the default image display shows the most recently
captured image, with an information overlay momentarily showing the date
of capture, and the file and folder number in which the image is stored
on the memory card. After a couple of seconds, the information overlay disappears,
and only a small "playback" arrow simple is shown in the upper
right. Pressing the Display button once removes any overlay, and pressing
it a third time shows a set of nine thumbnails. With an image displayed
full-screen, pressing the zoom control in the "T" direction zooms
in on the image in small steps, up to a maximum magnification of 17.6x.
(Maximum playback magnification is a function of the recorded image size.
0.3M (640x480 pixel) images can only be enlarged 4x, while 6M (2816x2120
pixel) may be enlarged the full 17.6x.) At any magnification level, pressing
the "DISP" button switches you to scrolling operation, in which
the left/right buttons and the T/W control let you scroll around the magnified
image. Pressing the center of the DISP button again returns you to zoom
operation. The screenshot above right shows the index display and the normal
playback screen, without the momentary information overlay.
External Controls

Shutter Button: A silver button on the top panel, the Shutter button
sets focus and exposure when halfway pressed, and fires the shutter when
fully pressed.
Power Switch: Occupying the entire right side of the front panel (as
viewed from the rear), this gently-sculpted sliding switch turns the camera
on or off. It also serves as a finger grip.

Mode Switch: Beneath the optical viewfinder on the back panel,
this sliding switch controls the camera's operating mode, placing it into
Movie, Playback, or Record modes.

Macro / Left Arrow Button: Directly to the right of the Mode switch
on the camera's back panel, this button alternates between the normal AF
(autofocus) and Macro modes. In any settings menu, this button serves as
the left arrow key. In Playback mode, this button scrolls backward through
captured images.
Zoom Rocker Button: To the right of the Macro button, this
rocker button has a raised tab for your thumb to bear against. Rocking the
button up and down controls the optical and digital zoom in Record mode.
In any settings menu, this button toggles up and down to adjust settings.
In Playback mode, this button controls Playback zoom, which enlarges the
view of the captured image as much as 17.6x (depending on the image's resolution
-- Lower-resolution images can't be enlarged as much as higher-resolution
ones).

Flash / Right Arrow Button: Located to the right of the Zoom
rocker button, this button cycles through the available flash modes when
in still-picture recording mode. The options include:
- Auto: Lets the camera decide when to fire the flash, based on the existing lighting conditions and whether or not the subject is backlit.
- Red-Eye Reduction: The camera decides when to fire the flash, but now pops a small pre-flash before firing the flash at full power, to eliminate the Red-Eye effect in the subject's pupils.
- Forced: Fires the flash with every exposure, regardless of lighting conditions.
- Suppressed: Completely disables the flash.
- Slow Synchro: Combines the flash with a slower exposure, to allow more ambient light into the shot.
In any settings menu, this button serves as the right arrow key. In Playback mode, this button scrolls forward through captured images.
![]()
Menu / OK Button: Just off the top right corner of the LCD monitor,
this button displays the settings menu in any mode. While making menu selections,
pressing this button confirms the selection and returns the LCD to its normal
display.
![]()
Back Button: Directly below the Menu / OK button, this button backs
out of menu options without saving changes.
![]()
Display Button: Just below the Back button, this button controls the
LCD image and information display. In Record mode, pressing this button
cycles through the following displays: image with information, image with
grid lines, and no display at all. In Playback mode, this button displays
the image only, the image with text, or activates the nine-image index display.

 Photo
Mode Button: Adjacent to the lower right corner of the LCD monitor,
this button accesses the FinePix Photo Mode menu, with the following options
in Record mode:
Photo
Mode Button: Adjacent to the lower right corner of the LCD monitor,
this button accesses the FinePix Photo Mode menu, with the following options
in Record mode:
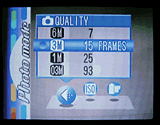
-
Quality: Sets the image size and quality, and also reports the number of images available at each setting. Options are 6M (2,816 x 2,120 pixels, interpolated), 3M (2,048 x 1,536 pixels), 1M (1,280 x 960 pixels), and 0.3M (640 x 480 pixels). Movie mode options include 320 x 240 pixels and 160 x 120 pixels.
- ISO: Changes the camera's sensitivity setting. Choices are 200, 400, or 800. (The 800 ISO setting forces the image resolution to 1,280 x 960 pixels.)
- Color: Adjusts the camera's color mode. Choose between Standard Color, Chrome (high contrast and saturation), and Black and White.
In Playback mode, the following options are available:
- DPOF: Specifies whether an image with be printed with or without the date, as well as the number of prints. A scrolling option lets you choose which image to assign print settings to.
- DPOF Reset: Resets all DPOF settings.
Camera Modes and Menus
 Record
Mode: Designated by a small, red camera symbol above the Mode switch,
this mode sets up the camera for capturing still images. Pressing the Menu/OK
button in this mode calls up the menu options shown here. (These menus are
normally superimposed over the top of the "live" viewfinder display.
I've shown them here over a black background, to make them easier to read.)
Record
Mode: Designated by a small, red camera symbol above the Mode switch,
this mode sets up the camera for capturing still images. Pressing the Menu/OK
button in this mode calls up the menu options shown here. (These menus are
normally superimposed over the top of the "live" viewfinder display.
I've shown them here over a black background, to make them easier to read.)
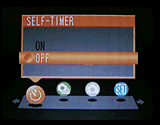
- Self-Timer: Turns the 10-second Self-Timer mode on or off.
- Continuous Shooting: Enables Top 4-Frame or Final 4-Frame continuous shooting modes.
- Shooting Mode: Puts the camera into Auto or Manual shooting modes.
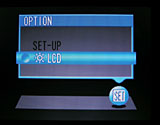
- Set: Activates the LCD Brightness adjustment, or displays the Option menu shown below
- White Balance: Offers Auto, Daylight, Cloudy, Daylight Fluorescent, Warm White Fluorescent, Cool White Fluorescent, and Incandescent white balance settings.
- Exposure Compensation: Increases or decreases the overall exposure
from -2.1 to +1.5 EV in one-third-step increments.
- Set Sub-Menu: The Set option on the Record menu calls up a 3-screen
menu of options for various camera functions, as seen at right. The options
include:
- Image Display: Turns on the post-capture review screen, which lets you view an image immediately after capture.
- Power Save: Turns off the automatic power save option, or sets the delay to two or five seconds.
- Format: Formats the xD-Picture Card, which erases all files, even protected ones.
- Beep: Controls the volume of the camera's beep sounds, or turns them off.
- Shutter: Sets the volume of the shutter sound, or turns it off.
- Date / Time: Sets the camera's internal clock and calendar.
- LCD: If set to "On," the LCD monitor automatically comes on when the Mode switch is put into the Record position. If "Off," the LCD monitor must be manually switched on.
- Frame Number: Determines whether the camera numbers frames continuously from card to card, or resets numbering with each new card.
- USB Mode: Specifies DSC or PC Cam USB modes. DSC is the Mass Storage Device mode, letting you transfer images from the camera to a computer. PC Cam mode turns the camera into a videoconferencing tool, for use with PCs only.
- Language: Changes the camera's menu language to English, French, German, Japanese, Spanish, or Chinese.
- Reset: Returns all camera settings to their defaults.
 Playback
Mode: This mode lets you review captured images and movies on the memory
card, as well as erase them, write-protect them, or set them up for printing
on a DPOF device. Menu options in this mode include:
Playback
Mode: This mode lets you review captured images and movies on the memory
card, as well as erase them, write-protect them, or set them up for printing
on a DPOF device. Menu options in this mode include:
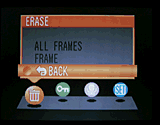
- Erase: Lets you erase a single frame or all frames.
- Protect: Write-protects the currently-displayed image or all images, preventing accidental erasure (except via card formatting). This option can also remove protection.
- Voice Memo: Records a short sound clip to accompany a captured image. Records for 30 seconds or less.
- Set: Lets you adjust the LCD brightness, playback volume, or
accesses the Setup menu described above.
 Movie
Mode: A small, red movie camera icon denotes this mode above the Mode
switch. Here, the camera captures moving images with sound, with actual
recording times depending on the available memory card space. The following
menu options are available in this mode:
Movie
Mode: A small, red movie camera icon denotes this mode above the Mode
switch. Here, the camera captures moving images with sound, with actual
recording times depending on the available memory card space. The following
menu options are available in this mode:
- LCD: Sets the brightness of the backlight on the F410's LCD screen.
- Set: Displays the same Setup menu as in Record mode.
In the Box
Included in the box are the following items:
- Fuji FinePix F410 digital camera.
- Shoulder strap.
- AC adapter.
- Lithium-ion battery pack.
- 16MB xD-Picture Card.
- USB cable.
- Software CD.
- Instruction manuals and registration kit.
- Large capacity xD-Picture Card. (At least 64MB.)
- Additional lithium-ion battery pack.
- Soft case for travel.
Recommended Software: Rescue your images!
Just as important as an extra memory card is a tool to rescue your images
when one of your cards fails at some point in the future. I get a lot of
email from readers who've lost photos due to a corrupted memory card. Memory
card corruption can happen with any card type and any camera manufacturer,
nobody's immune. A surprising number of "lost" images can be recovered
with an inexpensive, easy to use piece of software though. Given the amount
of email I've gotten on the topic, I now include this paragraph in all my
digicam reviews. The program you need is called PhotoRescue, by DataRescue
SA. Read our review of it if you'd like, but download the program now,
so you'll have it. It doesn't cost a penny until you need it, and even then
it's only $29, with a money back guarantee. So download PhotoRescue for
Windows or PhotoRescue for
Mac while you're thinking of it. (While you're at it, download the
PDF manual and quickstart
guide as well.) Stash the file in a safe place and it'll be there when you
need it. Trust me, needing this is not a matter of if, but when...
PhotoRescue is about the best and easiest tool for recovering digital
photos I've seen. (Disclosure: IR gets a small commission from sales
of the product, but I'd highly recommend the program even if we didn't.)
OK, now back to our regularly scheduled review...
Test Images
See the
full set of my sample pictures and detailed
analysis here. The thumbnails below show a subset of my test
images. Click on a thumbnail to see the full-size photo.
 |
 |
 |
| |
|
|
|
|
|
|
| |
|
|
|
|
|
|
| |
|
|


"Gallery" Photos
For those readers interested in a set of less "standardized" photos
from the F410, here are some thumbnails of more random shots snapped with
it. Click on one any of the thumbnails below for a larger view. Click on
the larger view again to see the original image from the camera. (Photos
in this gallery were shot by Gibbs Frazeur or Stephanie Boozer. Thanks Gibbs
and Stephanie!)
NOTE: that these are big files, so be aware that (a) they'll take a while to download, and (b) they'll chew up a pretty good chunk of bandwidth on us. (Read the "support this site" blurb at the top the carrier pages, and think about it while you're waiting for the images to download.
NOTE TOO: Some browsers have difficult with very wide images, and distort them a lot when they display them. (I don't know about others, but IE 5.0 on the Mac definitely does this. If the full-sized images appear to be stretched horizontally, you may need to just download them to your hard drive and view them in an imaging application, or possibly try another browser.)
1,525.1 KB Shutter: 1/ 450 Aperture: F7 Exposure EV: 14.4 ISO Speed: 200 |

1,534.2 KB Shutter: 1/ 320 Aperture: F7 Exposure EV: 13.9 ISO Speed: 200 |

1,464.5 KB Shutter: 1/ 420 Aperture: F7 Exposure EV: 14.3 ISO Speed: 200 |

1,472.4 KB Shutter: 1/ 680 Aperture: F7 Exposure EV: 15 ISO Speed: 200 |
1,393.4 KB Shutter: 1/ 600 Aperture: F2.8 Exposure EV: 12.1 ISO Speed: 200 |

1,451.2 KB Shutter: 1/ 950 Aperture: F7 Exposure EV: 15.5 ISO Speed: 200 |

1,492.3 KB Shutter: 1/ 500 Aperture: F7 Exposure EV: 14.5 ISO Speed: 200 |

1,457.2 KB Shutter: 1/ 600 Aperture: F7 Exposure EV: 14.8 ISO Speed: 200 |

1,409.7 KB Shutter: 1/ 1200 Aperture: F7 Exposure EV: 15.8 ISO Speed: 200 |

1,489.7 KB Shutter: 1/ 550 Aperture: F7 Exposure EV: 14.7 ISO Speed: 200 |

1,396.6 KB Shutter: 1/ 210 Aperture: F7 Exposure EV: 13.3 ISO Speed: 200 |

1,491.8 KB Shutter: 1/ 420 Aperture: F7 Exposure EV: 14.3 ISO Speed: 200 |

1,571.0 KB Shutter: 1/ 350 Aperture: F7 Exposure EV: 14 ISO Speed: 200 |
Click here for detailed specifications for the F410.
Cycle times, shutter lag, battery life, etc. can be found here.
- Fuji FinePix F410 user reviews on PriceGrabber.com
- Fuji FinePix F410 user reviews on PC PhotoREVIEW
Test Results
Overall, I found images from the F410 to be quite pleasing, with very good
color under most conditions, and what I'd deem as acceptable color in all
cases. See the F410's sample pictures page for
the full results of my testing, but meanwhile, here's a summary
of my findings:
- Color: Overall, the F410 produced very good color,
with accurate hue and generally correct saturation. (I say "generally
correct" because I felt it tended to get strong primary colors a
little "hot" or oversaturated. - From my experience though,
most consumers are happiest with this sort of color, preferring it to
the more drab look of scientifically accurate color rendition.) The Auto
and Daylight white balances often produced similar results, and both had
a tendency to be slightly warm, although not to an objectionable degree.
The camera did have some trouble with the incandescent lighting of my
Indoor Portrait test. The pink cast there would probably be acceptable
to most users, but I'd really like to see a lot more neutral color balance
in such situations myself. Skin tones were very good in the Outdoor Portrait,
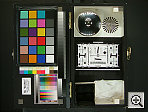
as were the blue flowers of the bouquet. The large color blocks of the
"Davebox" test were nearly accurate, though warm, with slightly
low saturation. That said, the additive primaries (red, blue, and green)
were a little hot. Overall though, I found the F410's color to be very
pleasing, and I expect that most consumers would agree.
- Exposure: The F410's exposure system performed well
in most instances, though the camera required a significant amount of
positive exposure compensation to handle the harsh lighting of the Outdoor
portrait. Midtones in the resulting shot were pretty good, but shadow
detail was quite limited, and highlights also suffered some. On my "Davebox"
test, the F410 distinguished the subtle pastel tones on the Q60 target
well, and showed good detail in both highlights and shadows. My biggest
complaint against the F410's image quality though, is that it's shots
tend to be a bit noisy, particularly when compared with best-of-breed
three megapixel models. This noise is evident in the large color blocks
of the MacBeth(tm) target on the left side of the Davebox. This could
give some purchasers pause, as I've found people react very differently
to image noise - Some people can't tolerate the slightest hint of it,
while others could care less. - Definitely check out my sample images
to see if you find the noise levels of the F410 objectionable.
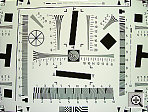
- Resolution/Sharpness: The F410 performed moderately
well on the "laboratory" resolution test chart at its interpolated
6.0-megapixel resolution. It started showing artifacts in the test patterns
at resolutions as low as 800 lines per picture height vertically, and
around 650 lines horizontally. (Artifacts became very pronounced in the
horizontal direction, especially around 800 lines.) I found "strong
detail" out to at least 1,300 lines horizontally, and around 1,200
lines in the vertical direction. "Extinction" of the target
patterns didn't occur until about 1,500 lines.
- Closeups: The F410 performed reasonably well in the
macro category, and captured a minimum area of 2.86 x 2.12 inches (73
x 54 millimeters). Resolution was moderately high, with good detail in
the dollar bill. The coins and brooch were very soft due to the shallow
depth of field that comes with such close shooting distances. Color balance
was just slightly warm, but not too bad overall. Glare from the surface
of the brooch tricked the F410's flash into throttling down a little too
much for the macro area, but that's generally good news, in that it means
the flash can indeed be used up close. (On a negative note though, flash
illumination is rather uneven when shooting at the minimum focusing distance).
- Night Shots: The F410's fully automatic exposure control
and maximum exposure time of 1/4 second hampered its low-light shooting
abilities quite a bit. In my testing, the F410 produced clear, bright,
usable images only down to the one foot-candle (11 lux) light level at
the 800 ISO setting. At ISO 400, images were bright as low as two foot-candles
(22 lux), and at 200 ISO, images were bright only to four foot-candles
(44 lux). Since average city street lighting at night equates to about
one foot-candle, the F410's 800 ISO setting is just sensitive enough for
city night scenes. Color was pretty good, but image noise was quite high.
(A side note: I happened to have an F410 along on a recent trip, and found
that it actually did pretty well with city night scenes. It couldn't pull
detail out of the darkest shadows, but well-lit street scenes came out
quite nicely.)
- Viewfinder Accuracy: The F410's optical viewfinder
was tighter than average, showing only 80 percent frame of the final frame
at wide-angle, and about 79 percent at telephoto. The LCD monitor proved
much more accurate, showing 98 percent frame accuracy at wide angle, and
about 99 percent at telephoto. Given that I like LCD monitors to be as
close to 100 percent accuracy as possible, the F410's LCD monitor performed
well in that respect, but I'd really like to see a more accurate optical
viewfinder.
- Optical Distortion: Optical distortion on the F410
was higher than average at the wide-angle end, where I measured an approximate
1.05 percent barrel distortion. The telephoto end fared much better, as
I measured only a half-pixel of pincushion distortion. (The average among
cameras I've tested seems to be about 0.8% barrel distortion at wide-angle
(still too much IMHO), and between 0.1 and 0.3% at pincushion at telephoto.
The F410 thus did a bit worse at wide-angle, and a bit better at telephoto.)
Chromatic aberration was low, showing only a few pixels of fairly weak
coloration on either side of the res target lines, although it was a bit
more pronounced in the lower right-hand corner. (This distortion is visible
as a very slight colored fringe around the objects at the edges of the
field of view on the resolution target.)
- Battery Life: The F410 showed surprisingly good battery life for a compact digicam. While I still strongly recommend purchasing a second battery along with the camera, its projected runtime of almost 2.5 hours in its worst-case operating mode (capture mode with the LCD turned on) is excellent, and its runtime of over 7.5 hours with the LCD off is exceptional.
| Free Photo Lessons | |
|

I got to spend more time with the F410 than I usually
do with digicams I test, as I brought it along on an extended business trip
while I was reviewing it. Somewhat to my own surprise, I found that it has
become one of my favorite compact digicams. I found this surprising because
I generally tend to prefer cameras with more exposure control and user options
than the F410 offers. - I'm also a little sensitive to image noise (of which
the F410 has its share), although perhaps less so than other "enthusiast"
users. Still, what won me over was how easy it was to get great-looking
shots with the F410. Its color was excellent, its white balance system worked
very well under most light sources (although it struggles a good bit with
incandescent lighting), and it likewise produced accurate exposures with
all but the most pathological lighting conditions. In short, it's a great
take-anywhere, no-brainer point & shoot camera, with enough capability
to bring back good-looking images from a wide variety of situations. If
you're shopping for a nice all-around camera that's very portable as well,
you should give the F410 a good look. - After living with one for a week
or so, I'm convinced that it has what it takes to make a lot of prospective
owners very happy.

Follow Imaging Resource: